Updates (July 2025 to September 2025)
September 2025 — Updated the page to add information about runner labels. For more information, see Understanding Runner labels and Installing a Runner section, From the Platform tab.
Runners are nothing but Traceable CLI installed on your server as a service. Runners are used to process the scans. Each runner can process one scan at a time.
You can download and install a runner using either of the following methods:
Through the Traceable platform
As a service using the
install.shscriptUsing Helm chart
On AWS ECS using CloudFormation or Terraform
Traceable also allows you to set up custom certificates for runners according to your requirements. For more information, see Set up custom certificates for runners.
The following table compares Traceable CLI and runner on various parameters, along with their use case and recommendations:
Parameters | Traceable CLI | Traceable Runner |
|---|---|---|
Integration | It is designed to integrate with CI systems, allowing jobs to be triggered and run on a CI runner. It is a quick way to run scans from local or remote hosts. | It is designed to integrate with job schedulers and CI/CD systems, allowing the CI pipeline to trigger the scan and delegate the actual running to the Traceable runner. |
Execution | It executes synchronously, running tests immediately as they are invoked. | It executes asynchronously, consuming the job queue. |
Configuration | It is usually a part of the script setup. | It requires a runner pool, which is typically set up using Helm charts or similar deployment tools. |
Use Case | It is ideal for pre-commit hooks, pre-deploy checks, and other stages in the development pipeline where immediate feedback is required. | It is ideal for scheduling regular security scans, batch jobs, or handling multiple requests asynchronously. |
Recommendation | It is recommended for use in small to medium-sized projects that require immediate results on simple security tests. | It is recommended for use in either of the following scenarios:
|
Before you begin
Make a note of the following before proceeding with setting up Runner:
A runner needs at least 2 CPUs and 4 GB of memory. This number may increase with an increase in the number of tests. Contact Traceable support for exact sizing by sending an email to support@traceable.ai.
Ensure that the machine where you are installing the Runner can communicate with the APIs and Traceable Platform.
DAST does not need an app to be instrumented, but an environment still needs to be created for DAST scan to create a default service and list APIs under it.
Runners are not scoped by the environment. They are available for all environments.
Ensure you are assigned the Security admin or Account Owner role, or the corresponding permissions to start a runner. For more information about different roles, see Teams and roles - RBAC.
Installing a Runner
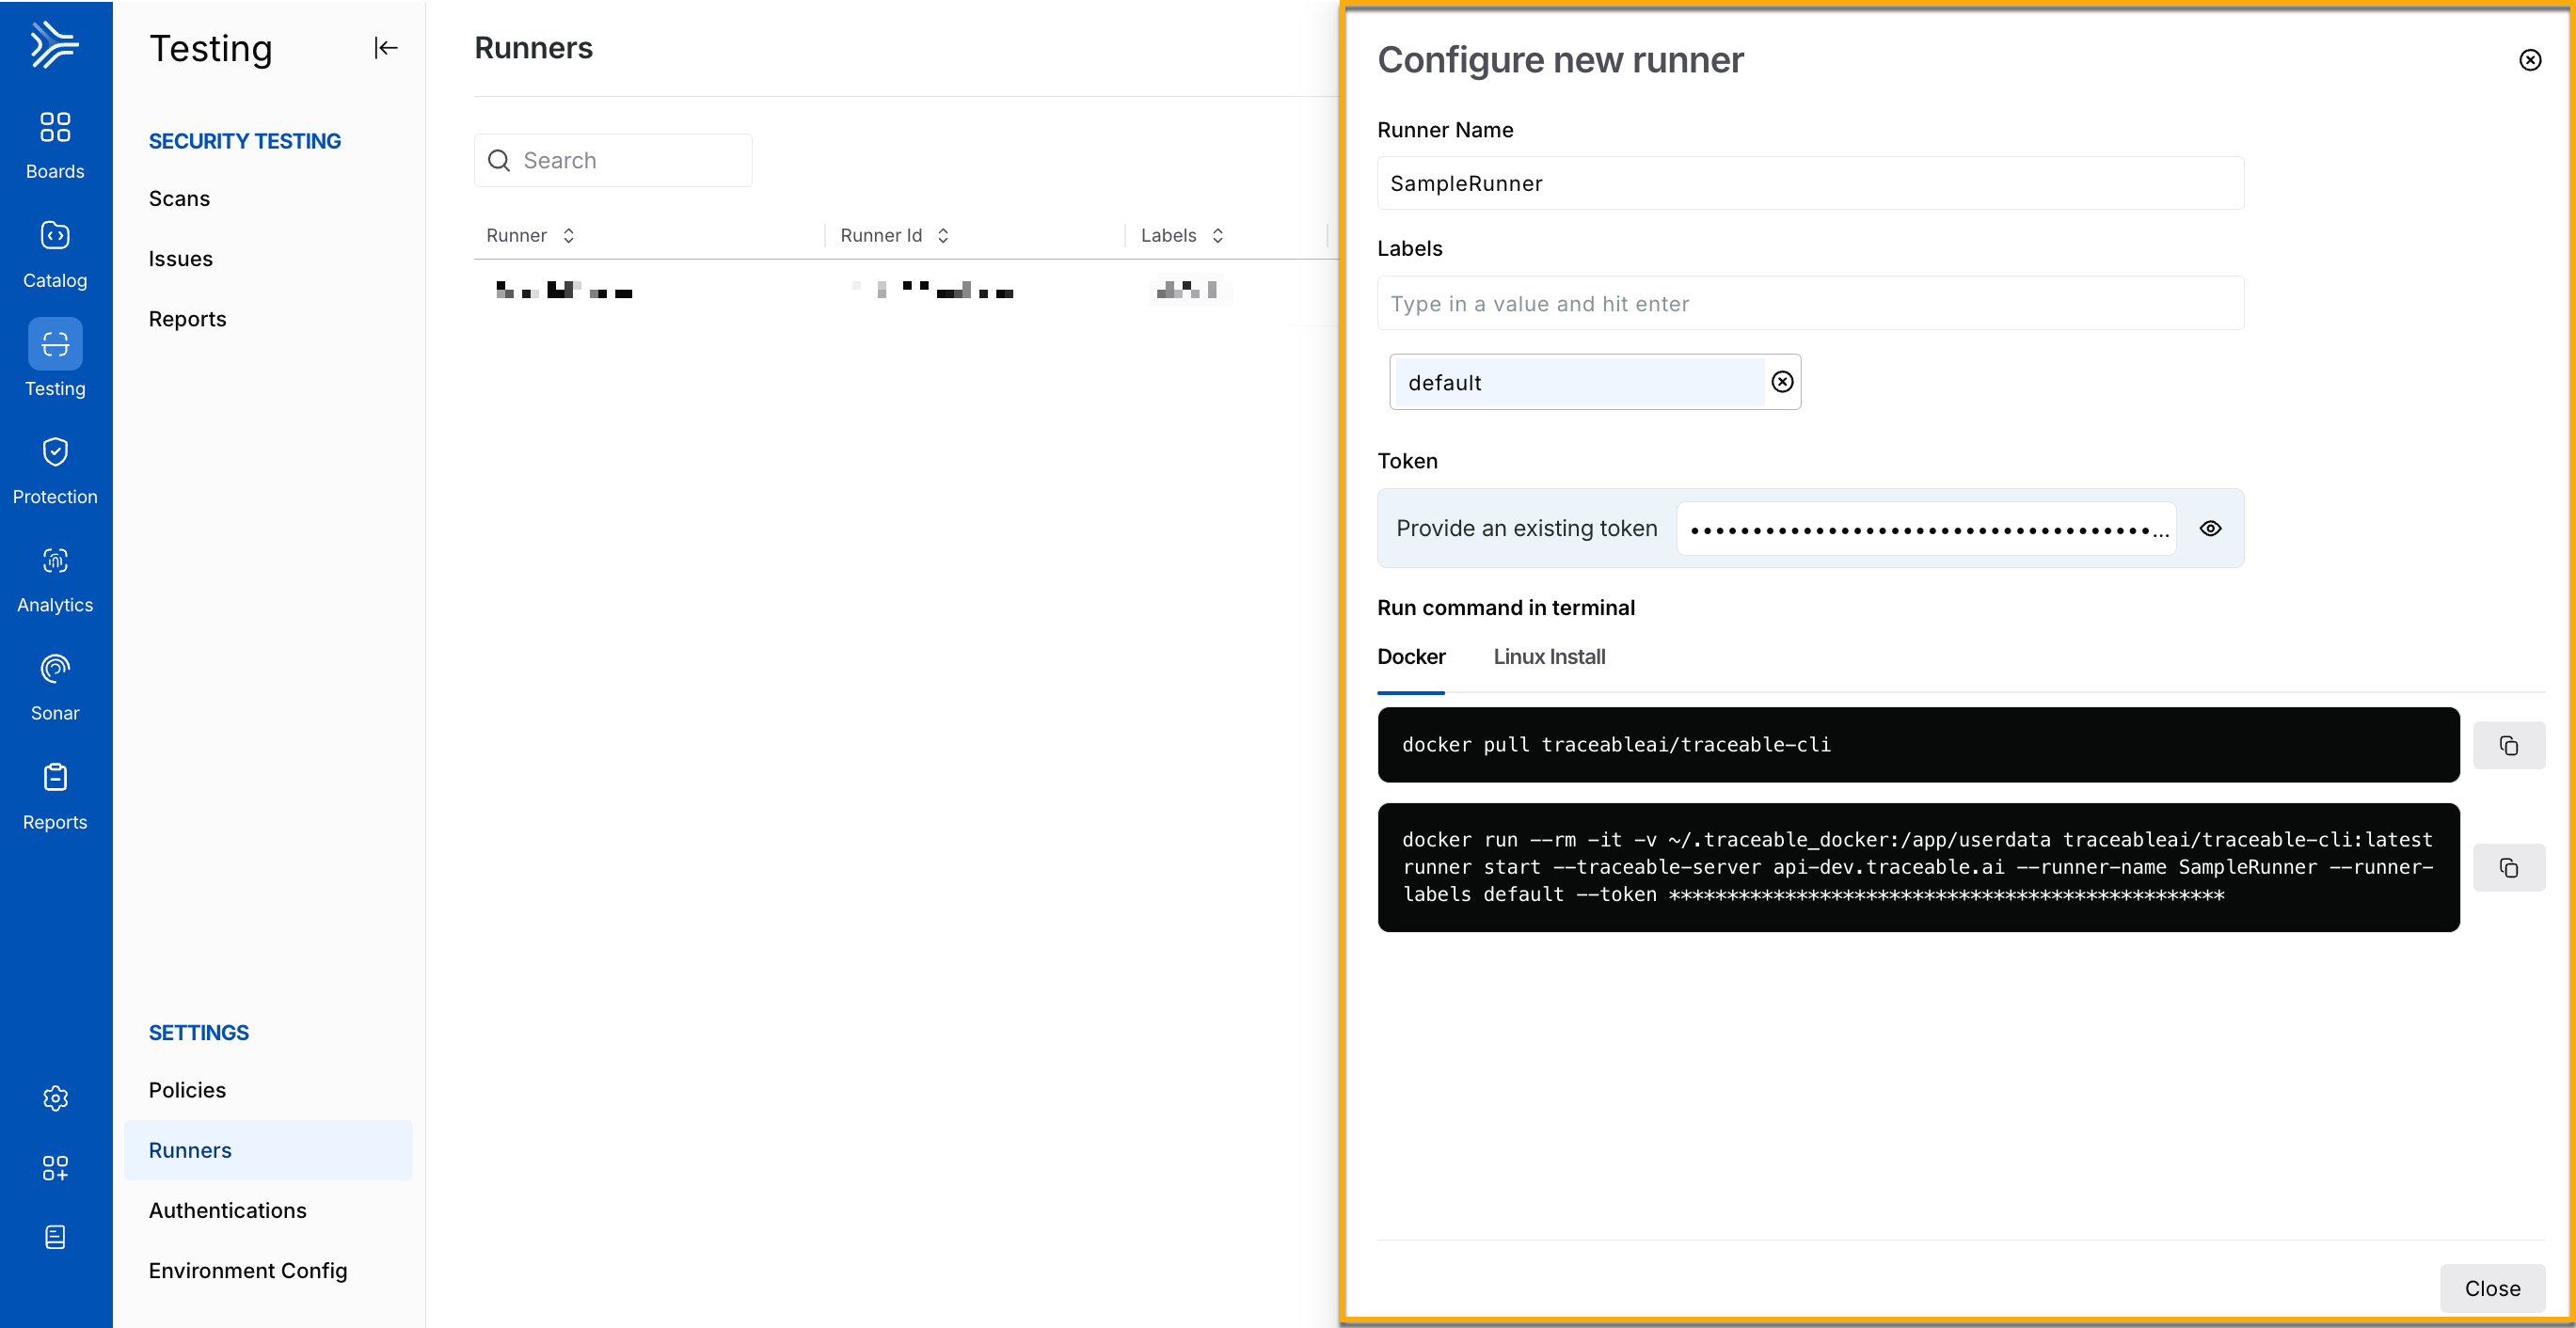
To start configuring a runner on the Traceable platform, navigate to Testing → Settings → Runners, and click + Configure Runner. In the Configure new runner window, complete the following steps:

Configuring Runners
Specify the Runner Name, for example, SampleRunner.
Specify the Label(s) you wish to use to identify the runner, for example, default. You can use these labels to assign runners to scans during scan creation. For more information, see Understanding runner labels.
Click Generate New Token or specify an existing platform token for setting up the runner.
Traceable displays the commands you must execute in your terminal to set up the runner on your server. You can do this using either Docker or Linux. Upon successful execution, Traceable displays the runner on the Runners page.
By default, the binary command runs in the background. The Docker command displayed on the platform interactively runs in the foreground. If you wish to run the Docker command in the background, use the following command. Replace the runner's name with the name of your runner:
docker run --rm -d -v ~/.traceable_docker:/app/userdata traceableai/traceable-cli:latest runner start --traceable-server api.traceable.ai --runner-name newrunner --token **** The following is an explanation of the Docker command:
docker runis the command to run a Docker container.--rmremoves the container automatically after it exits.-druns the container in detached mode.-v ~/.traceable_docker:/app/userdatamounts the local directory~/.traceable_dockerto the/app/userdatadirectory inside the container. This allows the container to access and modify files in the local directory.traceableai/traceable-cli:latestspecifies the image to use for the container.runner startruns thestartcommand of the Traceable Runner program within the container.--traceable-server api.traceable.aispecifies the URL of the Traceable Server to connect to.--runner-name newrunnersets the name of the runner to “newrunner”.--token ****sets the authorization token required to connect to the Traceable Server.
You can configure the runner as a systemd service. To do so, see the following sections:
Step 1 - Pre-installation
Before configuring Runner as a service, complete the following steps:
Generate a new API token in the Traceable platform. To do this:
Navigate to Testing → Suites and select any suite.
In the page’s top right corner, click Start Scan.
In the Start New Scan window, under Generate Token, click Generate New Token.
You can also use an existing API token.
This is required while installing Runner as a service.
Navigate to the terminal on your machine and enter the following command to download the installation script:
curl -O https://downloads.traceable.ai/cli/release/latest/install.shNote
The
install.shscript is supported on a Linux machine.
Step 2 - Installation
Enter the following command to install Runner as a service:
bash install.sh --service --token <traceable-api-token> --server <traceable-server>
See the table below for the available options you can use in the above command:
Option | Description | Default Value |
|---|---|---|
| The installation prefix |
|
| The CLI version to install |
|
| A custom name for the runner |
|
| The path to the Traceable distribution zip file | Downloaded from Traceable’s download site |
| Does not provide a prompt on confirmation | - |
| Install the runner as a | - |
| Install the runer as a user. Run as the |
|
| Install the runner as a group. Run as the |
|
| The Traceable server to connect to. |
|
| The Traceable user token for authentication. | - |
| The path to the Traceable home folder. |
|
| The path to the file that should store the runner logs. By default, Traceable outputs to | - |
| The path to the directory that stores all the logs. By default, Traceable uses the | - |
| The level of logs you want for the runner. This can contain the following values:
| - |
| The maximum number of files that Traceable should retain in the logs folder. When the files reach the limit, the oldest ones are replaced with new ones. | - |
| The maximum number of days for which Traceable should retain the log files. | - |
| The maximum size of a log file (in bytes). | - |
| The directory to use during installation and runtime. | System Temp Directory |
| Show this table for reference in your terminal. | - |
Step 3 - Post-Installation
Post-installation of the runner, you must complete the following steps to start the runner:
Enter the following command to restart the service:
sudo systemctl daemon-reloadEnter the following command to start the service:
sudo systemctl start traceable-runnerEnter the following command to check the status of the service:
sudo systemctl status traceable-runnerThe output of the above command should look like this:
● traceable-runner.service - Traceable CLI
     Loaded: loaded (/etc/systemd/system/traceable-runner.service; disabled; vendor preset: enabled)
     Active: active (running) since Mon 2025-01-06 07:07:19 UTC; 9s ago
   Main PID: 283083 (traceable)
      Tasks: 15 (limit: 1069)
     Memory: 405.3M
        CPU: 1.850s
     CGroup: /system.slice/traceable-runner.service
             ├─283083 /home/ubuntu/.local/traceable/bin/traceable runner start --runner-name traceable-runner
             ├─283085 /tmp/staticx-EJFPfK/traceable_shared runner start --runner-name traceable-runner
             └─283086 /tmp/staticx-EJFPfK/traceable_shared runner start --runner-name traceable-runner
Jan 06 07:07:19 loyal-tick systemd[1]: Started Traceable CLI.
Jan 06 07:07:21 loyal-tick traceable[283086]: Traceable CLI 1.10.19 (linux)
Jan 06 07:07:21 loyal-tick traceable[283086]: [2025-01-06 07:07:21,625]:INFO: Refreshing config
Jan 06 07:07:21 loyal-tick traceable[283086]: [2025-01-06 07:07:21,626]:INFO: Connecting to `api.traceable.ai` with token `YTU2**********...`
Jan 06 07:07:23 loyal-tick traceable[283086]: [2025-01-06 07:07:23,999]:INFO: Setting log level to: INFO
Jan 06 07:07:24 loyal-tick traceable[283086]: [2025-01-06 07:07:24,000]:INFO: Acquired lock on /home/ubuntu/.traceable/runner.pid
Jan 06 07:07:24 loyal-tick traceable[283086]: [2025-01-06 07:07:24,001]:INFO: Finding hook files in /home/ubuntu/.traceable/hooks
Jan 06 07:07:24 loyal-tick traceable[283086]: [2025-01-06 07:07:24,015]:INFO: Started runner name: loyal-tick-runner (id: e1f123b7-3815-5e94-b8bd-8eb1234c7814). Listening for scan jobs...
In the above output, the dot (●) shows the status of a runner. The table below describes the dot colors and their corresponding status descriptions:
Color
Status Description
Green
The runner is being activated or is currently active.
Red
The runner has failed.
White
The runner is currently inactive.
Enter the following command to enable the service to start on system boot:
sudo systemctl enable traceable-runner
You can run more than one runner on the same machine for both option 1 and option 2. For more information on how to run more than one runner on a single machine, contact Traceable support at support@traceable.ai.
Complete the following steps to install the runner using the Helm chart:
Enter the following command to add the repo:
helm repo add traceableai https://helm.traceable.aiEnter the following command to update the repo:
helm repo update
Create values.yml file
Create a values.yml file based on the sample provided below. Make sure to add the correct values for traceableToken and traceableServer in the file.
replicaCount: 1
resources:
  limits:
    cpu: 2.0
    memory: 4Gi
  requests:
    cpu: 2.0
    memory: 4Gi
astRunnerArgs:
  name: traceable-runner-helm   # Name of the runner
  traceableServer: api.traceable.ai   # Traceable Server
  traceableToken: ""   # Replace this with actual token value
  maxRetries: 1   # Number of Request Retries
  idleTimeout: 10   # Idle Timeout before aborting a scan
  requestDelay: 0   # Request delay delay between requests
  threads: 20   # Number of threads to run on
  logfile: stdout   # Log file name
  loglevel: INFO   # Set log level
externalTraceableTokenSecret:
  name: "" # Name of the secret
  key: "" # Key of the secret
Note
Make sure that the
externalTraceableTokenSecret.keythat you provide is valid.If you specify the token as plain text under
astRunnerArgs.traceableTokenand as secret underexternalTraceableTokenSecret.key, Traceable ignores the plain text and uses the secret key.
Enter the following command:
helm install <release_name> traceableai/traceable-runner -f values.yamlYou can configure runners on AWS ECS (Elastic Container Service) using CloudFormation. Download the template file by contacting Traceable support, and install the runner in your AWS console. For the steps to do this, see Installation using CloudFormation.
You can configure runners on AWS ECS (Elastic Container Service) using Terraform. Download the Terraform file by contacting Traceable support, and install the runner in your shell. For the steps to do this, see Installation using Terraform.
Understanding Runner labels
Runner labels are categories that enable you to define and control which runners are eligible to execute scans or tasks. You can assign one or more labels to a runner to describe its purpose or any other detail. For example, labels such as production, sandbox, or us-east can indicate the runner’s deployment region or context.
Runner selection based on labels
You can define one or more labels while configuring runners. For more information, see Installing a Runner.
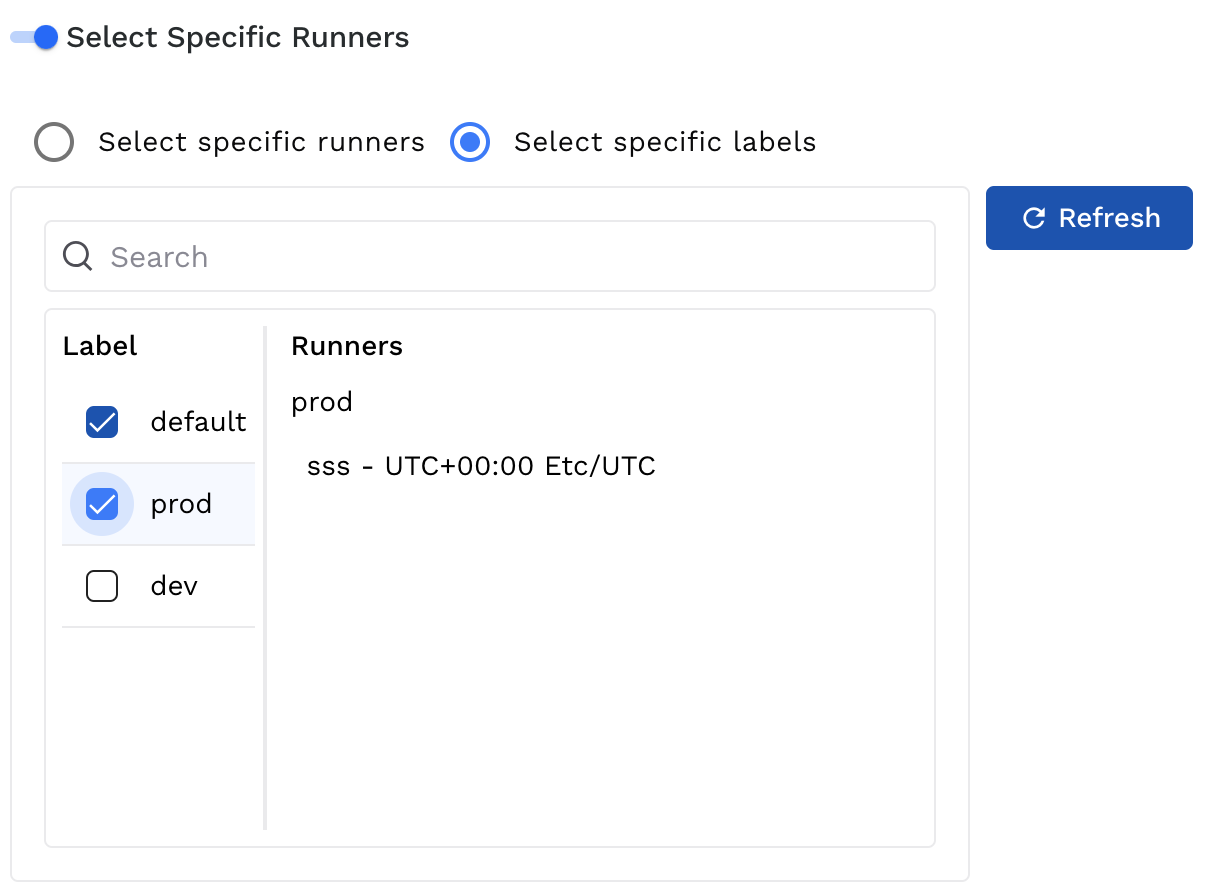
Further, you can select one or more runner labels while creating a scan. For more information, see Creating a Scan.

Runner Label Selection during Scan Creation
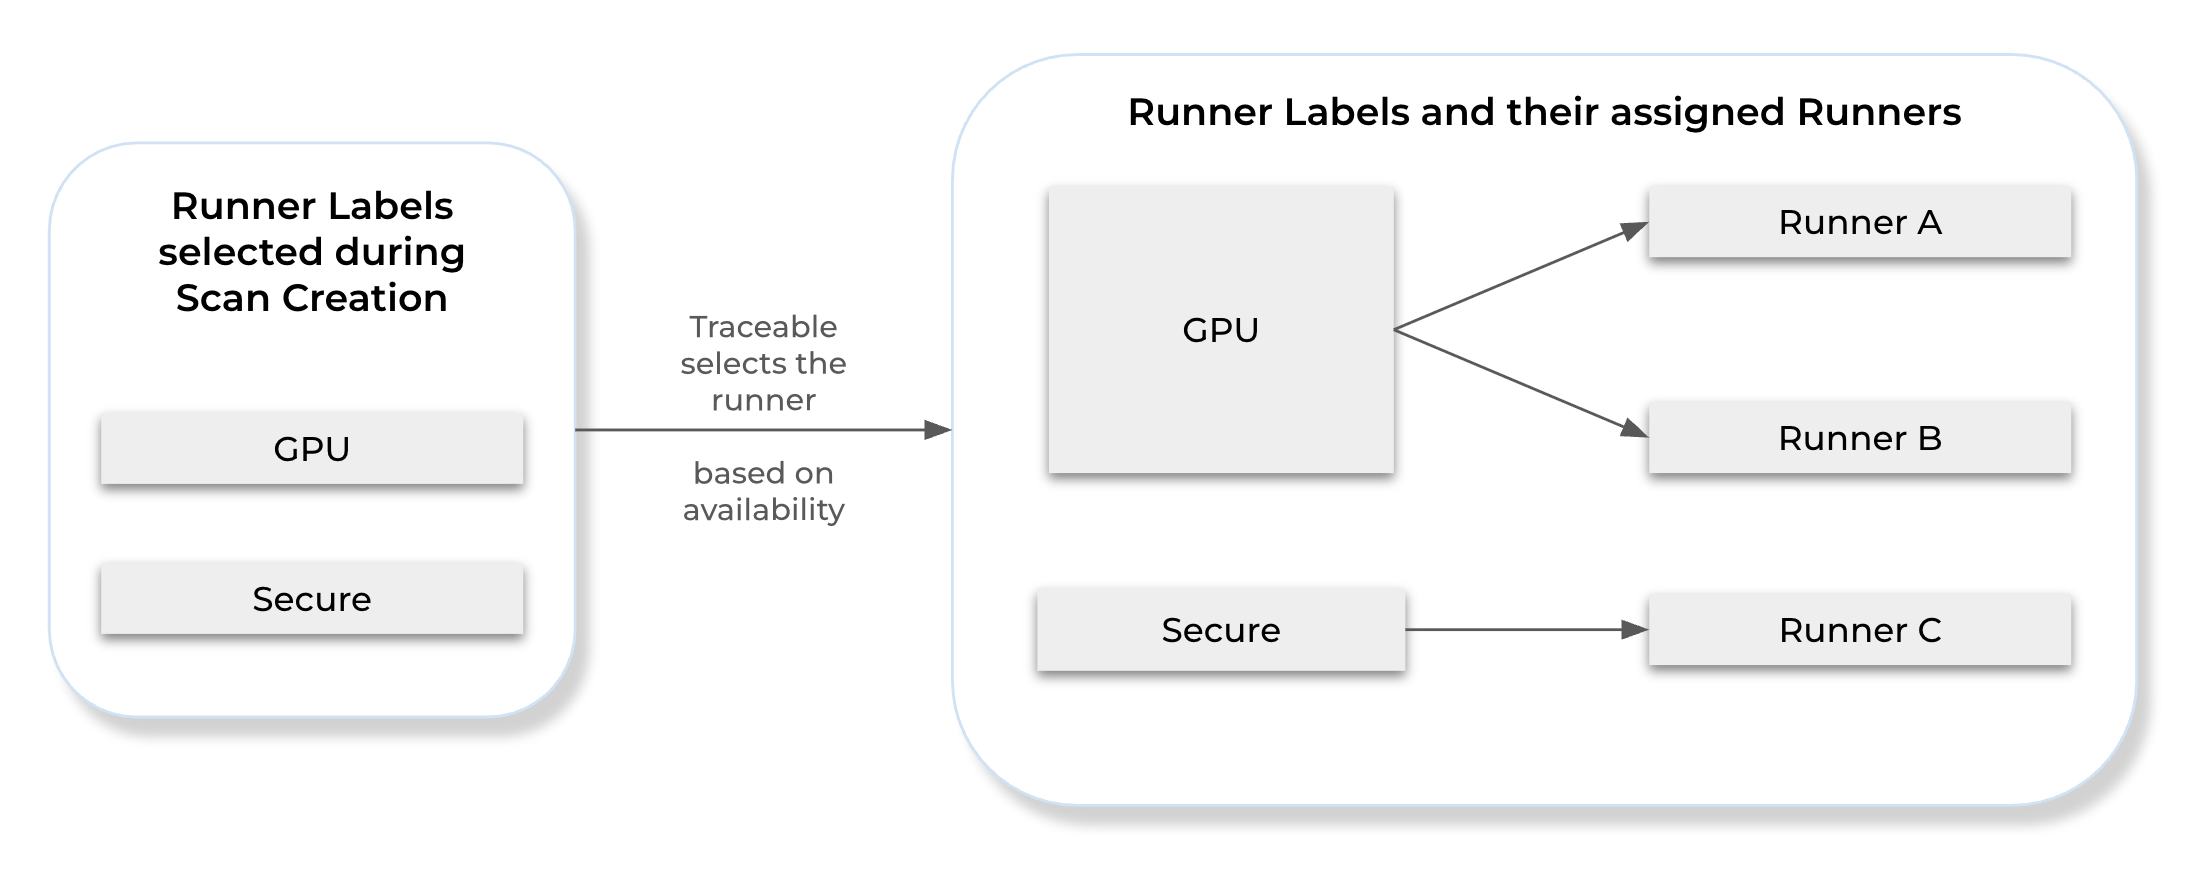
Traceable selects runners based on label matching, where any runner sharing at least one label with the ones selected during scan creation is eligible. If multiple runners match, Traceable may choose either of them to execute the scan.
The following illustration highlights runner selection based on the label assigned to it.

Runner Selection
Runner View
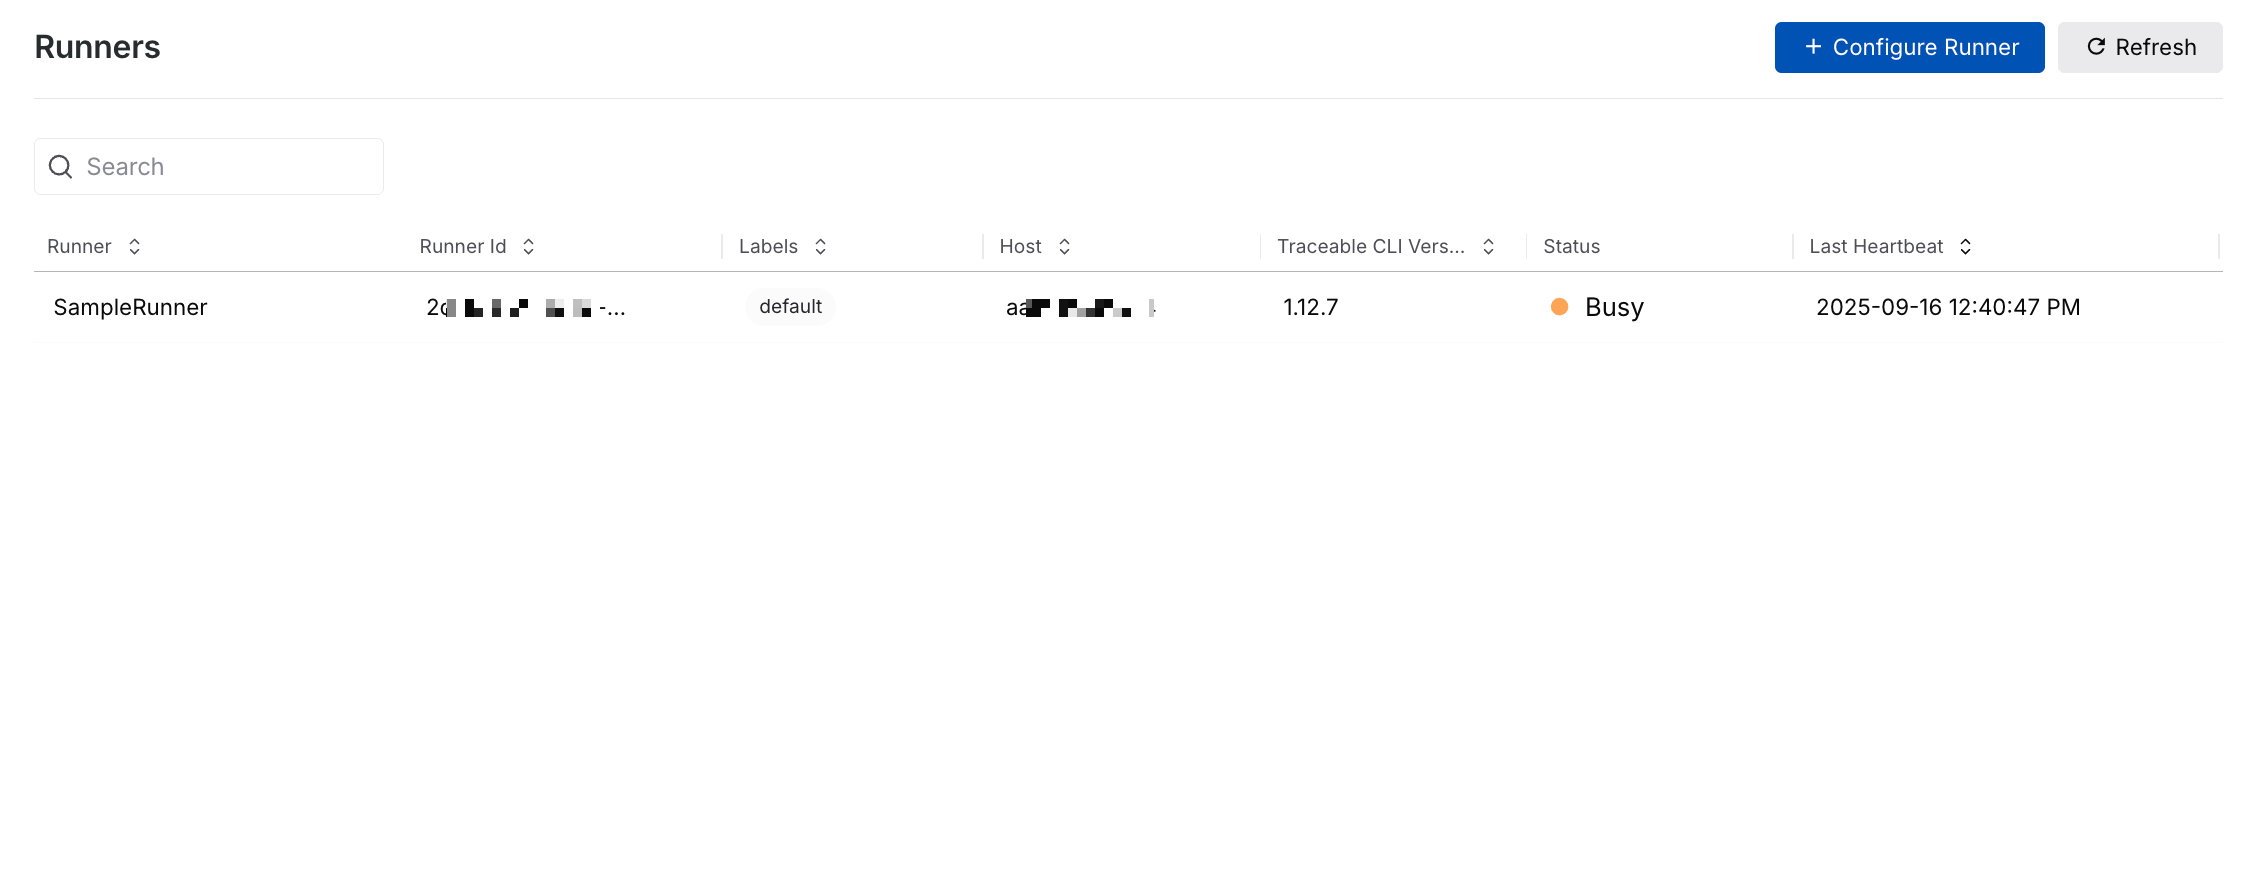
Traceable shows all configured runners on the Runners page. This includes runners configured across environments. The page also shows the following columns:

Runner View
Runner — The name you used while configuring the runner. For example, SampleRunner in the above screenshot.
Note
Each runner in Traceable processes one scan at a time.
Runner ID — A unique identifier for the runner instance.
Labels — The label(s) assigned to the runner. For more information, see Understanding runner labels.
Host — The host (server or URL) that the runner is targeting.
Traceable CLI Version — The CLI version associated with the runner.
Status — The current status of the runner. For example, Idle or Busy.
Last Heartbeat — The time at which the runner was last active. For example, 2024-11-12 01:32:34 PM.
You can also hover over a column and the corresponding row value and click the Copy (![]() ) icon to copy the value for use in the Traceable CLI.
) icon to copy the value for use in the Traceable CLI.
Uninstalling a Runner
You can uninstall a runner from your terminal; however, the steps to do this depend on the option you choose while installing it:
Option 1 - As a systemd service
systemd serviceComplete the following steps:
Enter the following command to stop the service if it is currently running:
sudo systemctl stop traceable-runner.serviceEnter the following command to check the status of the service:
sudo systemctl status traceable-runner.serviceThe above command and recent log entries show whether the service is active, inactive, or has failed.
Enter the following command to disable the service:
sudo systemctl disable traceable-runner.serviceThe above command prevents the service from starting automatically at boot time.
Enter the following command to remove the service unit file from your custom location:
sudo rm /etc/systemd/system/traceable-runner.serviceThe above command removes the file from the
/etc/systemd/systemdirectory. This directory usually contains thesystemdservice files created or customized by the system administrator.Enter the following command to remove the service unit file from the standard location:
sudo rm /user/lib/systemd/system/traceable-runner.serviceThe above command removes the file from the
/user/lib/systemd/system/directory. This directory usually containssystemdservice files provided by installation packages.Enter the following command to reload the
systemdmanager configuration:sudo systemctl daemon-reloadThe above command reloads the manager configuration. You must run this command to ensure that
systemdis aware of the above steps.
Option 2 - Not as a service
Complete the following steps:
Enter the following command to stop the runner:
traceable runner stop <runner_name>Ensure that the Traceable runner process is currently not running:
ps -ef | grep traceableEnter the following command to remove the Traceable CLI installation:
delete $HOME/.local/traceable directory
Enter the following command to uninstall the runner:
helm uninstall <deployment_name>Complete the following steps:
Open your web browser and log in to the AWS management console.
In the console, navigate to the Amazon Elastic Container Service.
Click the cluster where you installed the runner.
Delete the runner service.