Updates (January 2026 to March 2026)
January 2026 — Updated the page to add information about configuring API dependencies and sample values while creating a DAST scan. For more information, see Provide Scan Source Details.
A Scan in Traceable defines what to test, how to test it, and which configurations to use. By creating a scan, you can efficiently manage and organize your security testing workflows, ensuring consistent coverage and easier maintenance across various environments and APIs.
You can create a scan directly from the Traceable platform. Creating a scan requires just a few simple steps:
Provide scan details — Specify the scan name and select an environment.
Select the traffic type and assets — Select how Traceable should generate or capture traffic, and the APIs you wish to test.
Set up a policy or attack set — Define the attacks Traceable should simulate on the above APIs.
Configure optional settings — Set up runners, timeouts, and integrations.
To help you create efficient and optimized scans, Traceable provides recommendations for creation that you can use according to your specific requirements. For more information, see Scan Creation Recommendations.
Once you create a scan, Traceable also allows you to pause and resume scans from the CLI. For more information, see Pause and Resume Scan.
Before you begin
Make a note of the following before creating a scan:
Make sure that you have a clear understanding of the available traffic types. For more information, see Traffic Types.
Make sure that a Runner is installed and is active for scan execution. For the steps to install one, see Runners.
Step 1 — Provide Scan Details
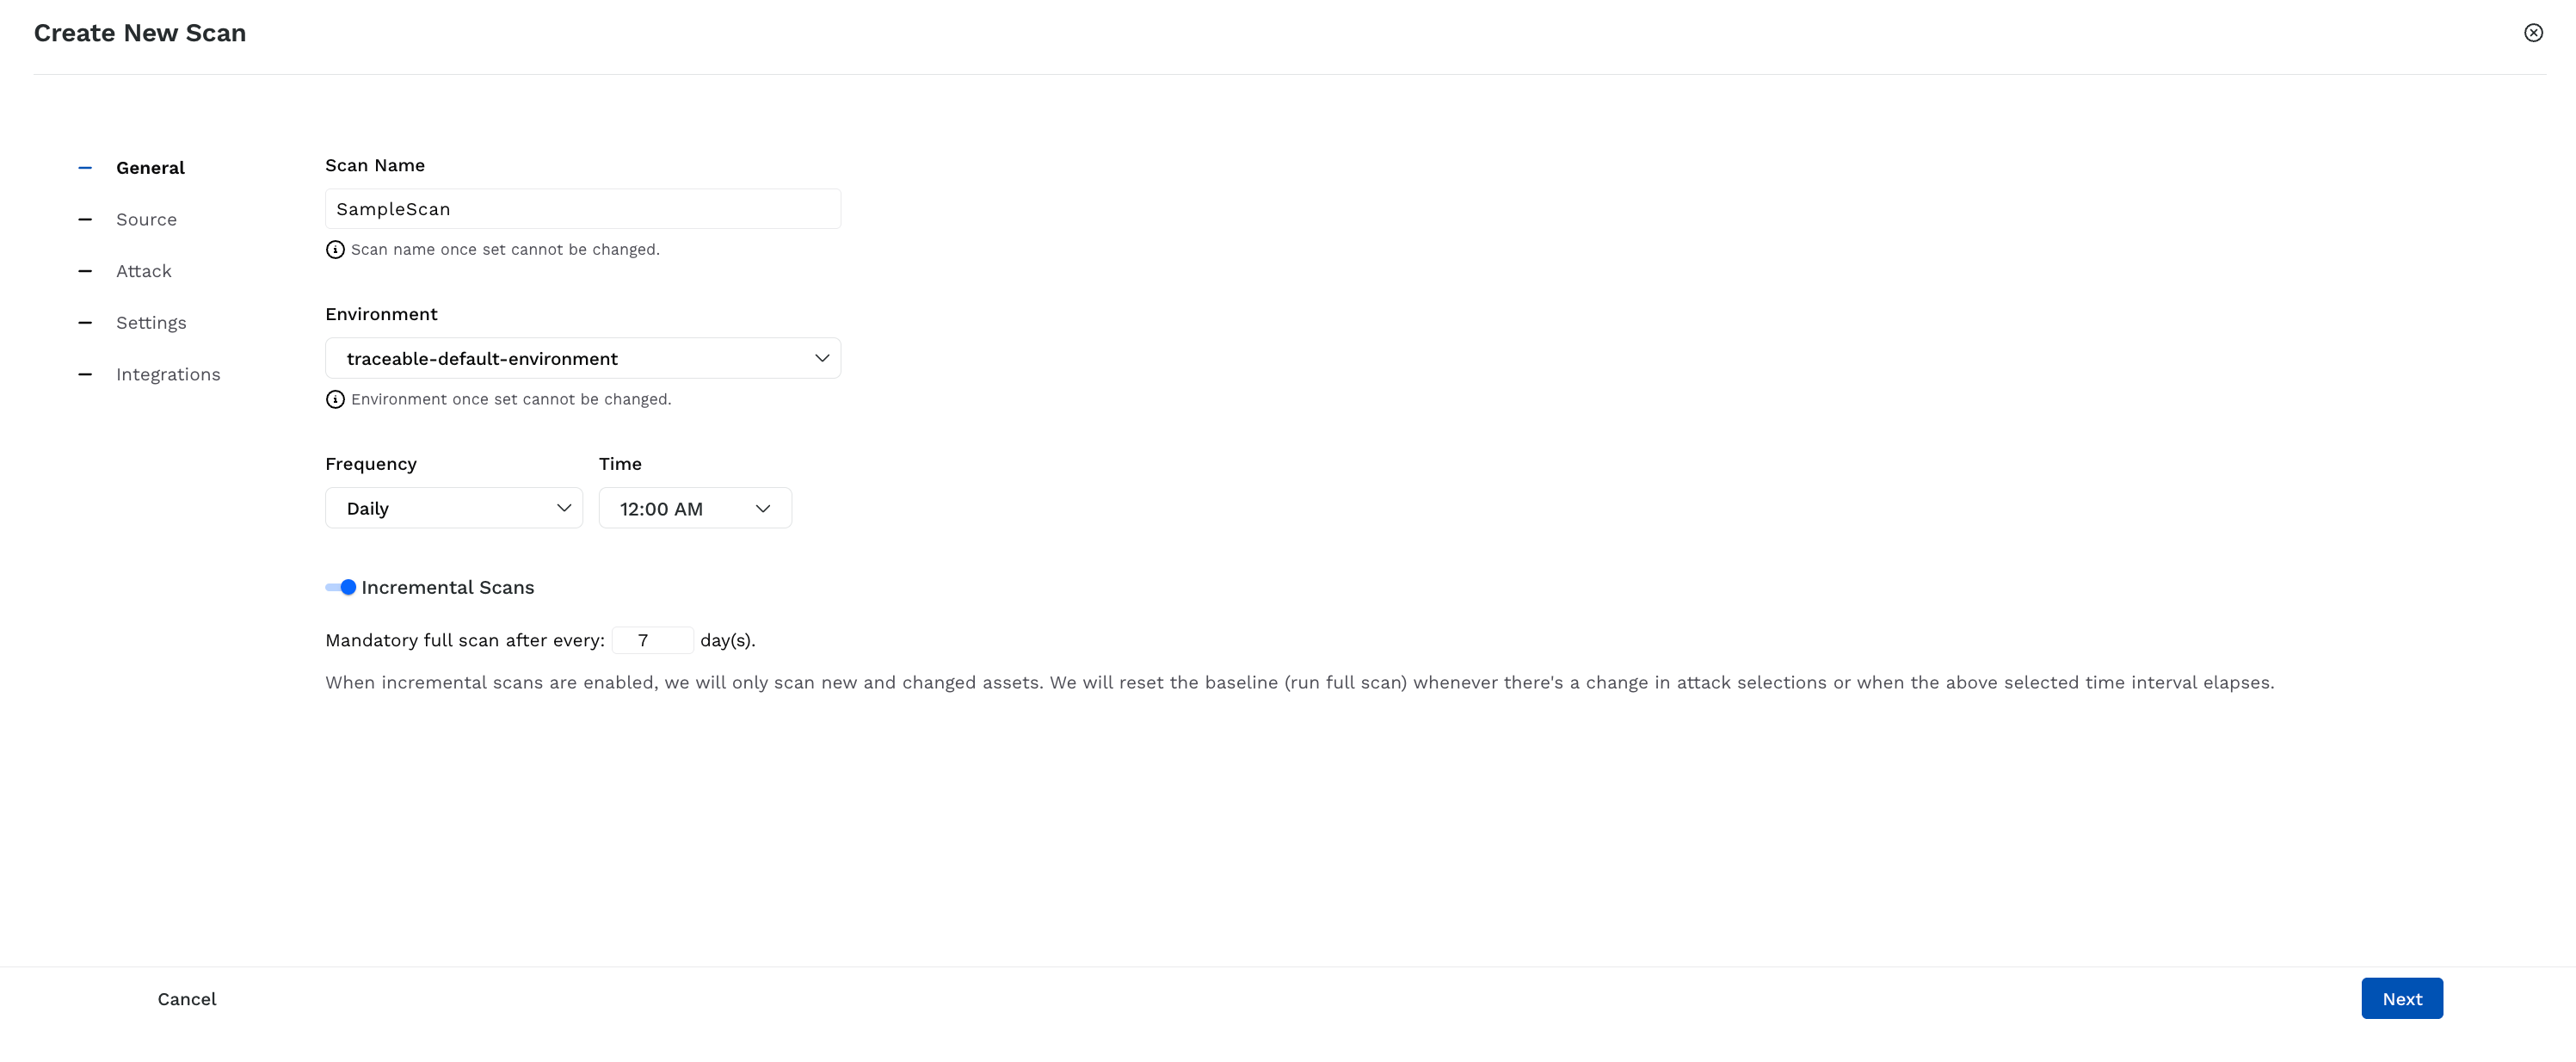
Creating a scan starts with you laying a foundation for the scan by providing basic details and defining where (environment) and when (frequency) should Traceable execute the scan.
In this step, you should provide the following details:
Provide Scan Details
Scan Name — Specify a name for the scan. Traceable uses this name to show the scan on the Scans page.
Note
The scan name should contain alphanumeric characters, underscores, and hyphens only.
Environment — Select the environment for which you wish to run the scan. Traceable creates the scan only for the selected environment.
Frequency — Select the schedule or frequency of the scan.
One Time — Upon selecting this option, Traceable executes the scan only once post-creation. However, you can start an ad-hoc scan from the Scans page according to your requirements.
Daily — Select the time at which Traceable should run the scan. Upon selection, Traceable executes the scan once daily according to the time you select.
Weekly — Select the day(s) of the week and time at which Traceable should run the scan. Upon selection, Traceable executes the scan on the selected day(s) and at the specified time.
Monthly — Select the day(s) of the month and time at which Traceable should run the scan. Upon selection, Traceable executes the scan on the selected day(s) and at the specified time.
For Daily, Weekly, and Monthly scans, you can also select the toggle and enable Incremental Scans. You can also specify or select the number of days after which Traceable should execute a full scan.
Incremental Scans
As part of incremental scans, Traceable only scans the endpoints not scanned in the previous run. These may be the ones that were:
Skipped for some reason
Added to the scan post-creation
Discovered in the environment post-execution of the previous run.
How is it useful?
Incremental scans are helpful as they:
Avoids rescanning unchanged APIs, saving time and resources.
Provide quick visibility into the issues detected due to the recent changes.
Focus on new and updated APIs that may introduce new issues.
Caveats
You may change the policy or attack set against which Traceable evaluated the endpoints between successive scan runs. In such cases, Traceable executes a full scan.
An endpoint's signature and other properties may change after it has been scanned. For example, an endpoint that was initially unencrypted may now be encrypted. These changes affect how Traceable evaluates the endpoint. Therefore, Traceable re-scans such endpoints automatically to ensure that the results remain accurate, even if the endpoint was previously scanned.
In some scenarios, the endpoint properties may not change, but they might still contain issues for other reasons. Traceable recommends setting up a short full scan window to identify such issues. This helps ensure that all endpoints are regularly scanned.
Step 2 — Provide Scan Source Details
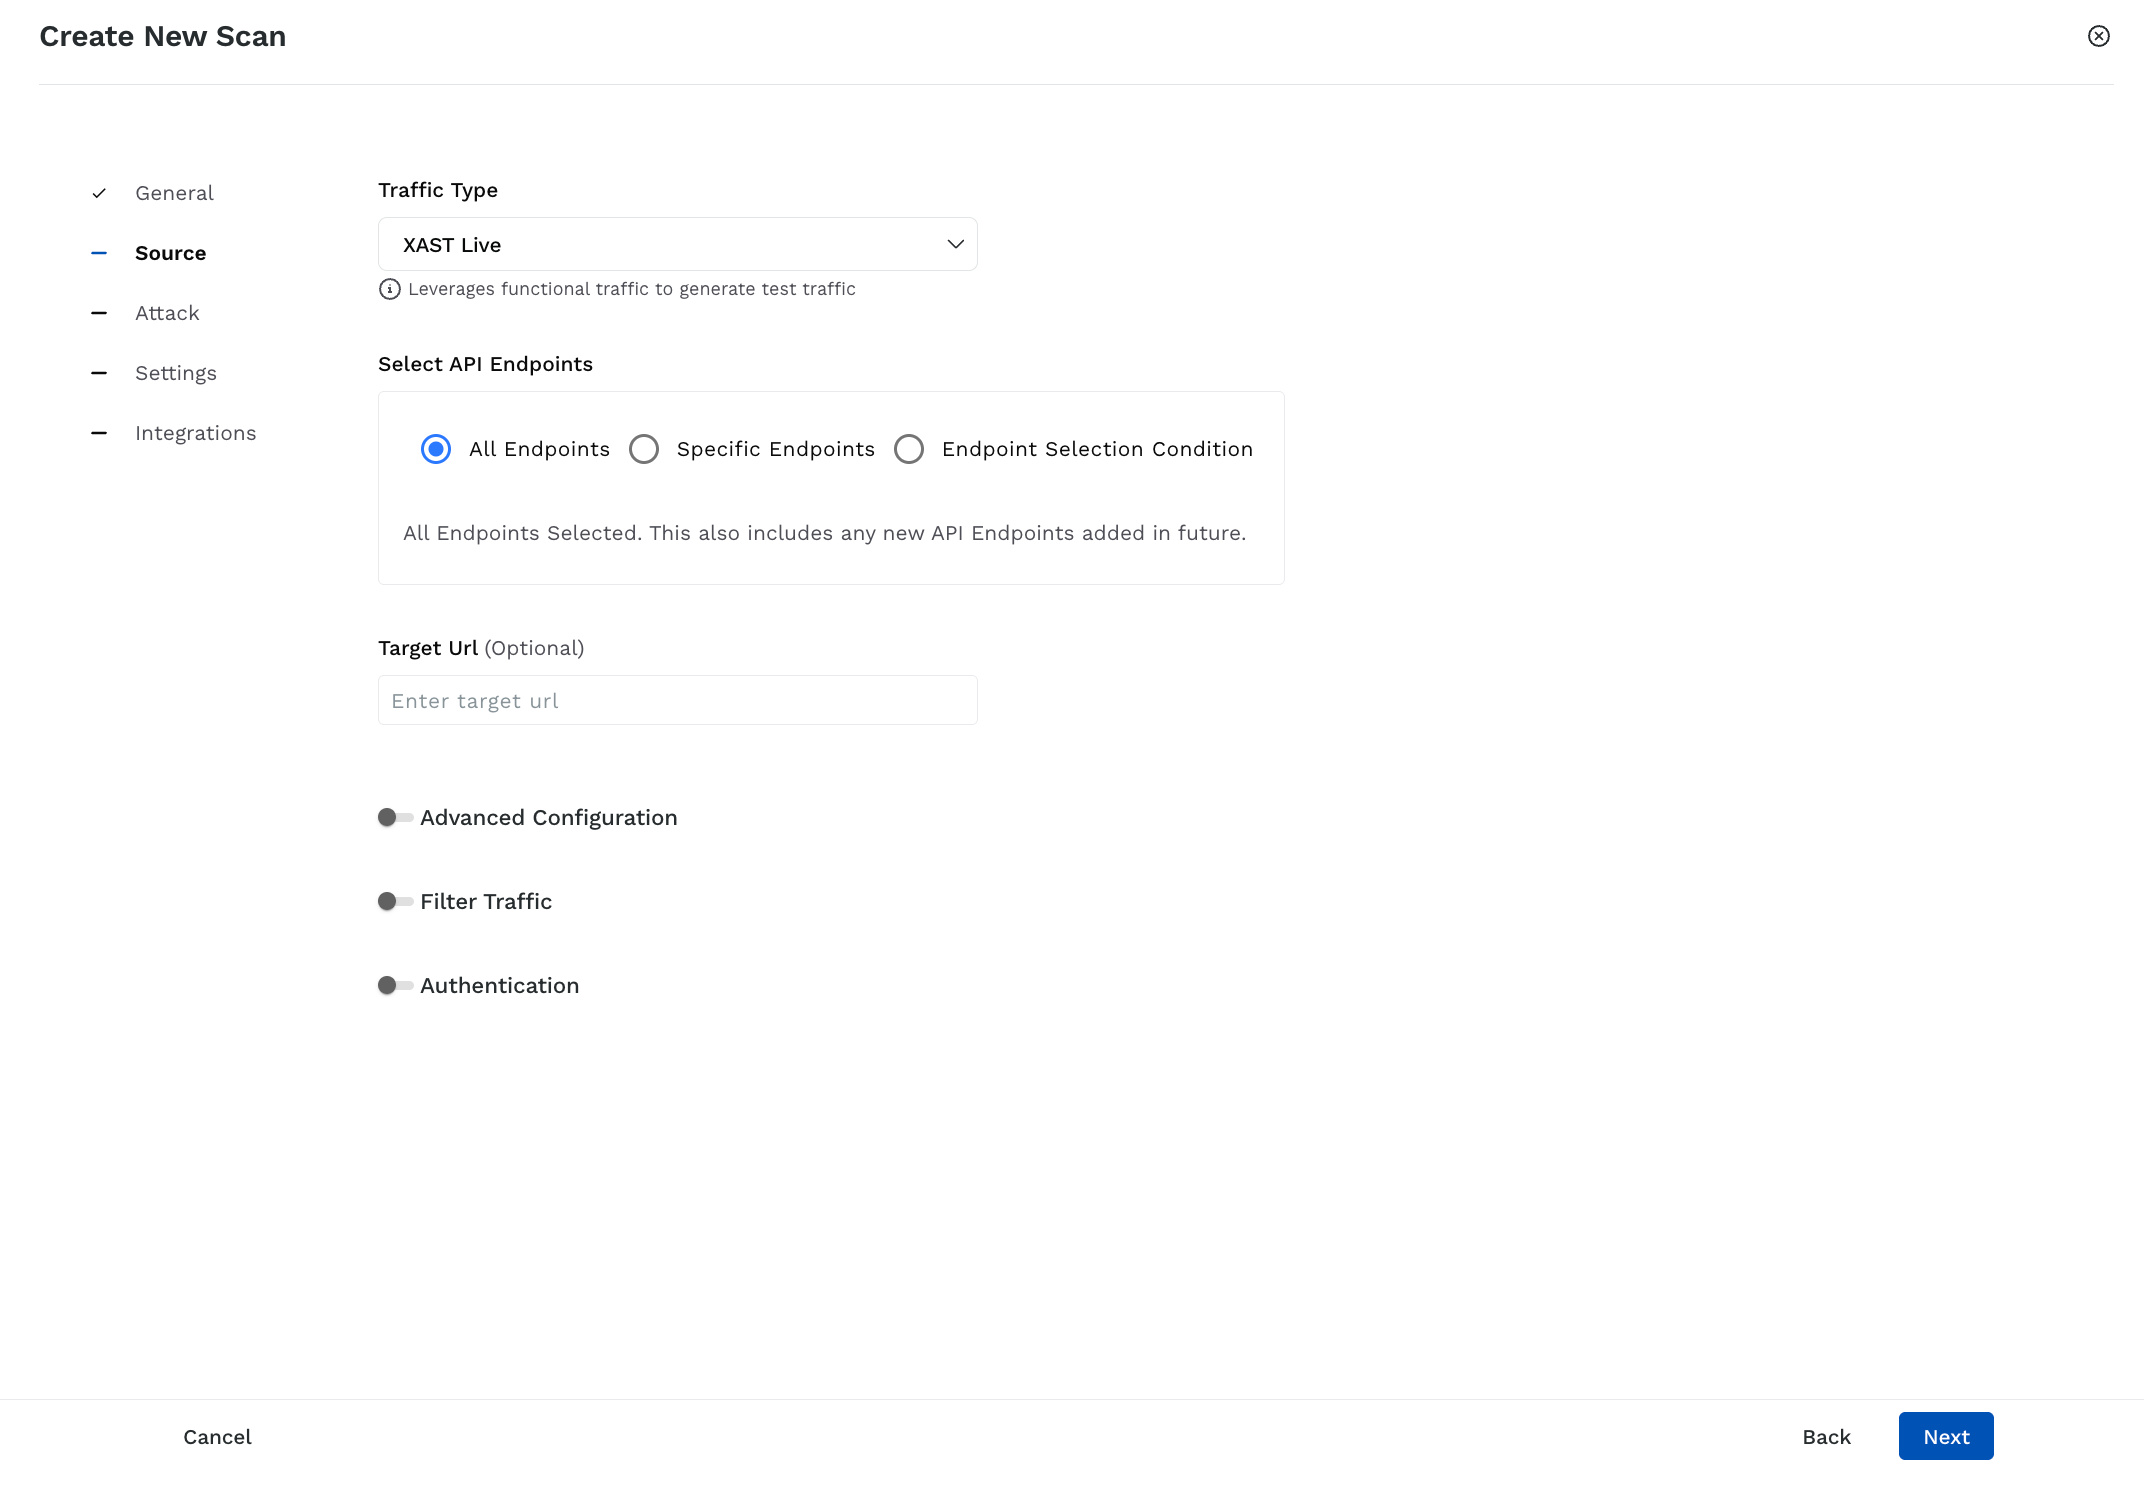
After defining where and when you want to scan, you must define how (traffic type) and what (assets) Traceable should test. In this step, you should select the Traffic Type from the following:
Scan Source Details
XAST Live — Runs the scan on live traffic.
XAST Replay — Runs the scan on stored APIs. This is possible in environments with replay enabled. For information on enabling this for your environment, see Environment Config.
DAST — Runs the scan based on the API specifications you upload. Traceable supports the following documentation types:
OpenAPI Spec
Postman Collection
GraphQL Schema
Note
DAST does not require you to instrument an app, howeverm you must choose an environment for the DAST scan to create the default service and list the APIs under it. By default, the service name is traceable-oas-processor.
DAST Web — Crawls through the domain you specify, discovers the underlying APIs, and scans them for issues.
Note
DAST Web is currently available for early access only. To enable it for your account, you can contact your Traceable Account Manager.
Based on the traffic type you select, click the tab below and specify the configurations for Traceable to execute security tests.
Scan Source Details for XAST Live and Replay
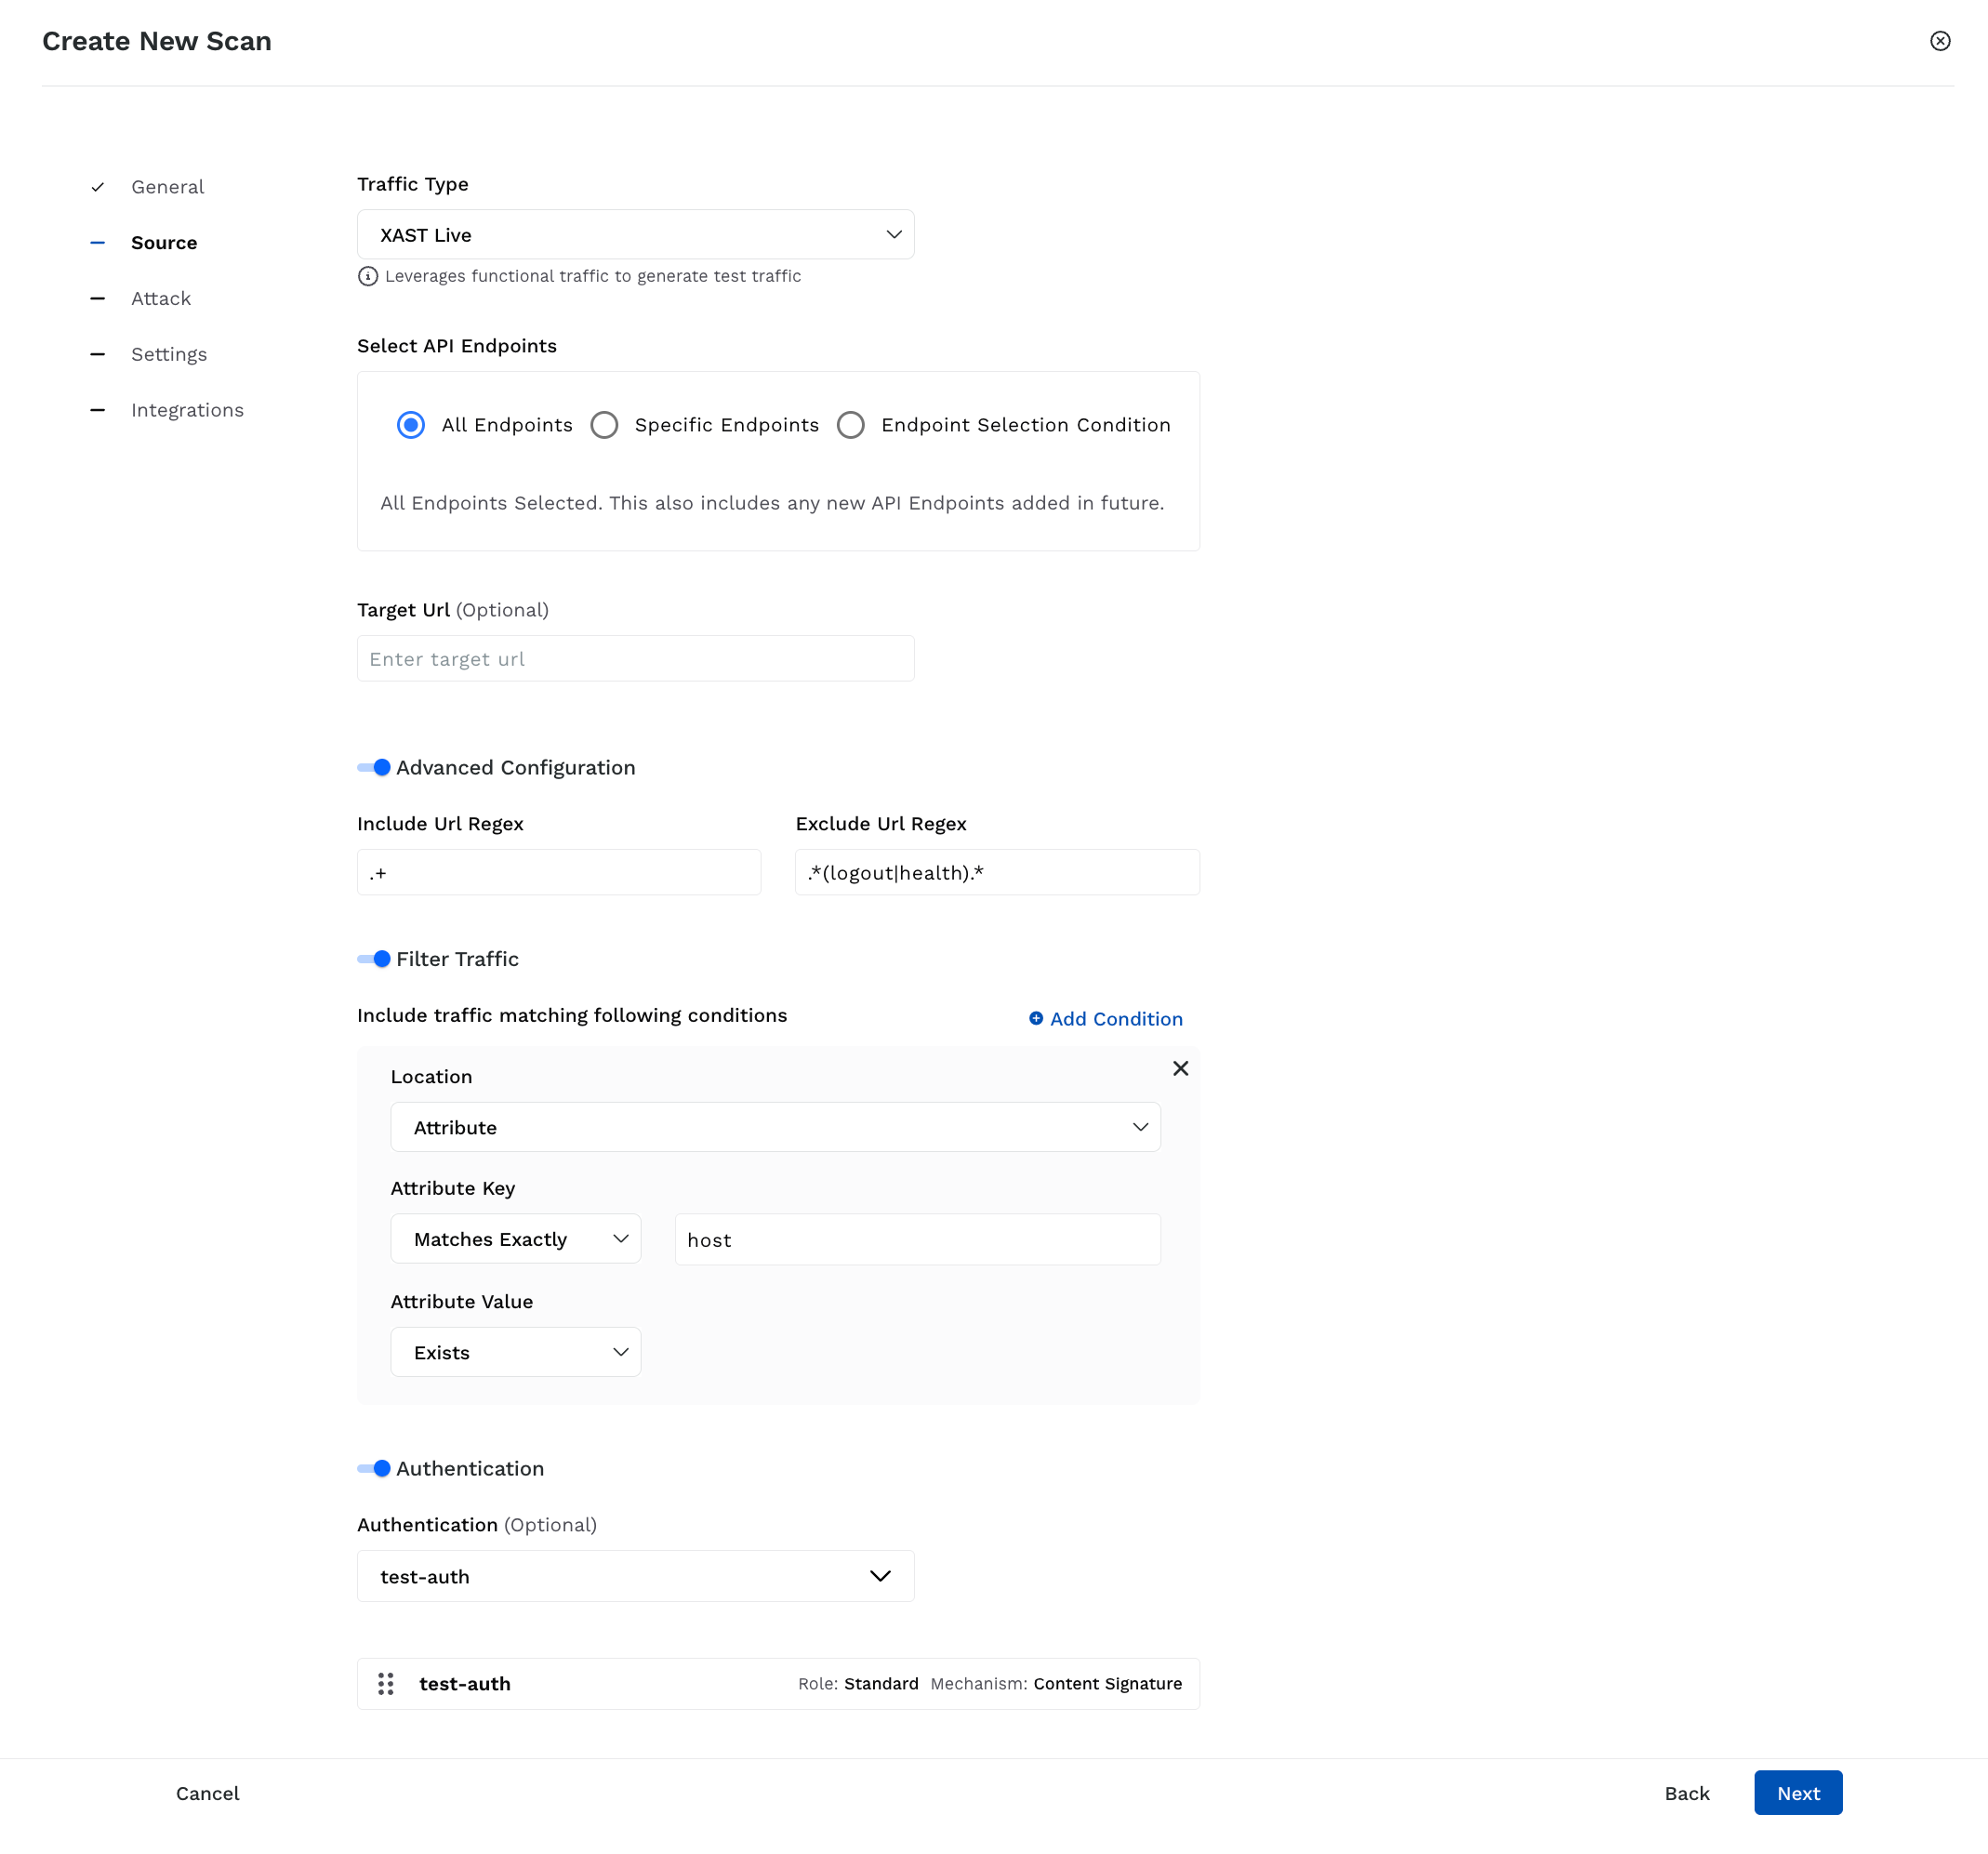
Select API Endpoints — Select the endpoints you want Traceable to execute the security tests on. You can select from the following options according to your requirements:
All Endpoints — Executes the tests on all endpoints within the environment, including any endpoints discovered in the environment post-scan creation.
Specific Endpoints — Executes the tests on specific endpoints within the environment.
Endpoint Selection Condition — Executes tests on specific endpoints that Traceable identifies based on the conditions you specify. You can add one or more conditions and select the corresponding Attributes, Operators, and Values according to your requirements. Traceable performs an AND operation between these conditions. Once you have specified the conditions, click View Endpoints to see the APIs Traceable selects for executing scans.
(Optional) Target URL — Specify the domain on which you wish to execute the test, for example, mydomain.com.
(Optional) Advanced Configuration —
Include URL Regex — Specify a regular expression to include specific API endpoints in the scan, for example,
.+includes all URLs.Exclude URL Regex — Specify a regular expression to exclude specific API endpoints in the scan, for example,
.*(logout|health).*includes all health checks and logout paths.
(Optional) Filter Traffic — Allow granular filtering of traffic to include endpoints that match specific conditions:
Location — Specify where Traceable should look for the attribute, for example, the Request Header.
Attribute Key — Define how Traceable should match the key and specify the name of the key to match.
Attribute Value — Define the value corresponding to the attribute key, for example, Matches Regex.
(Optional) Authentication — Select one or more predefined authentication hooks Traceable should use during scanning. This ensures that Traceable can access secured endpoints during the scan.
Scan Source Details for DAST
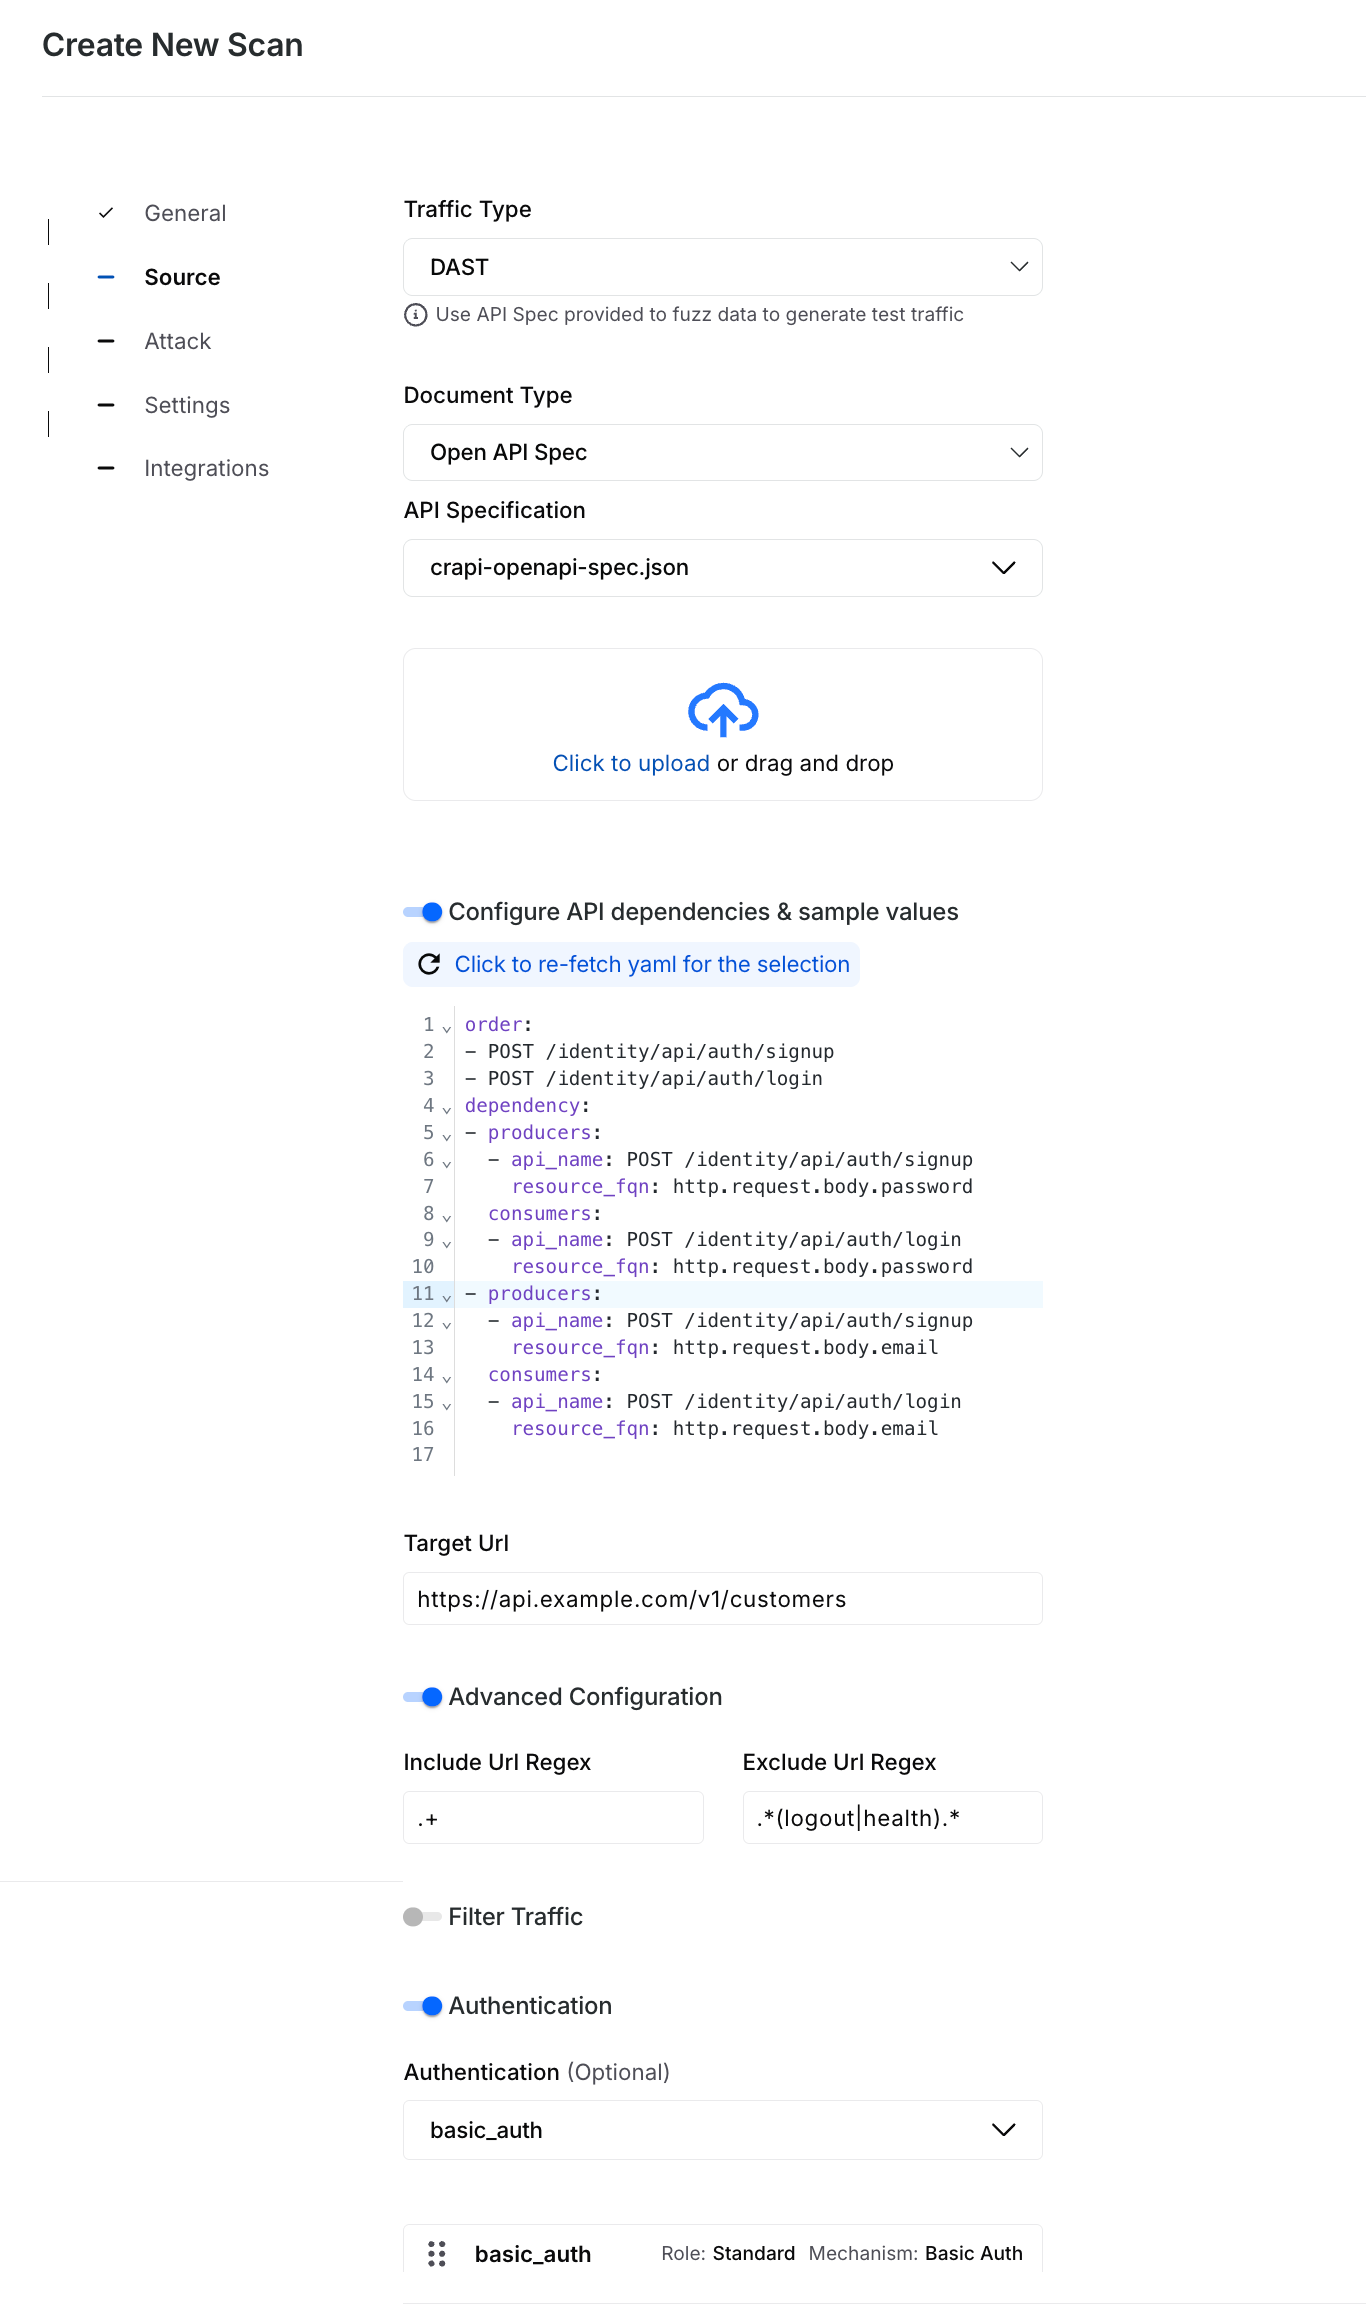
Document Type — Select the specification type you wish to upload or add:
Open API Spec —
API Specification — Select one or more specs from the list of pre-uploaded ones or upload new specs according to your requirements.
(Optional) Configure API dependencies & sample values — Define the application’s dependency graph. When an API requires one or more prerequisite APIs to run first, the dependency ensures that those calls are executed in order during the DAST scan. For example,
GET /orders/{order_id}depends onPOST /service/orderbecause an order must be created before it can be retrieved. For more information, see Understanding API Dependencies.
Postman Collection —
Collection — Select one or more collections from the list of pre-uploaded ones or upload new collections according to your requirements.
(Optional) Environment Doc — Select a Postman environment document from the list of pre-uploaded ones or upload a new document according to your requirements. Traceable uses this document to resolve variable references present in the collection(s) that you selected above.
GraphQL Schema —
Introspection Enabled — Select this option to enable Traceable to dynamically extract the schema from the Target URL you specify below. This enables you to run security tests on the discovered schema without uploading a specification.
API Specification — Select one or more schemas from the list of pre-uploaded ones or upload a new specification according to your requirements.
(Optional) Target URL (for Open API Spec and GraphQL Schema only)— Specify the domain on which you wish to execute the test, for example, mydomain.com.
(Optional) Advanced Configuration —
Include URL Regex — Specify a regular expression to include specific API endpoints in the scan, for example,
.+includes all URLs.Exclude URL Regex — Specify a regular expression to exclude specific API endpoints in the scan, for example,
.*(logout|health).*includes all health checks and logout paths.
(Optional) Authentication — Select one or more predefined authentication hooks Traceable should use during scanning. This ensures that Traceable can access secured endpoints during the scan.
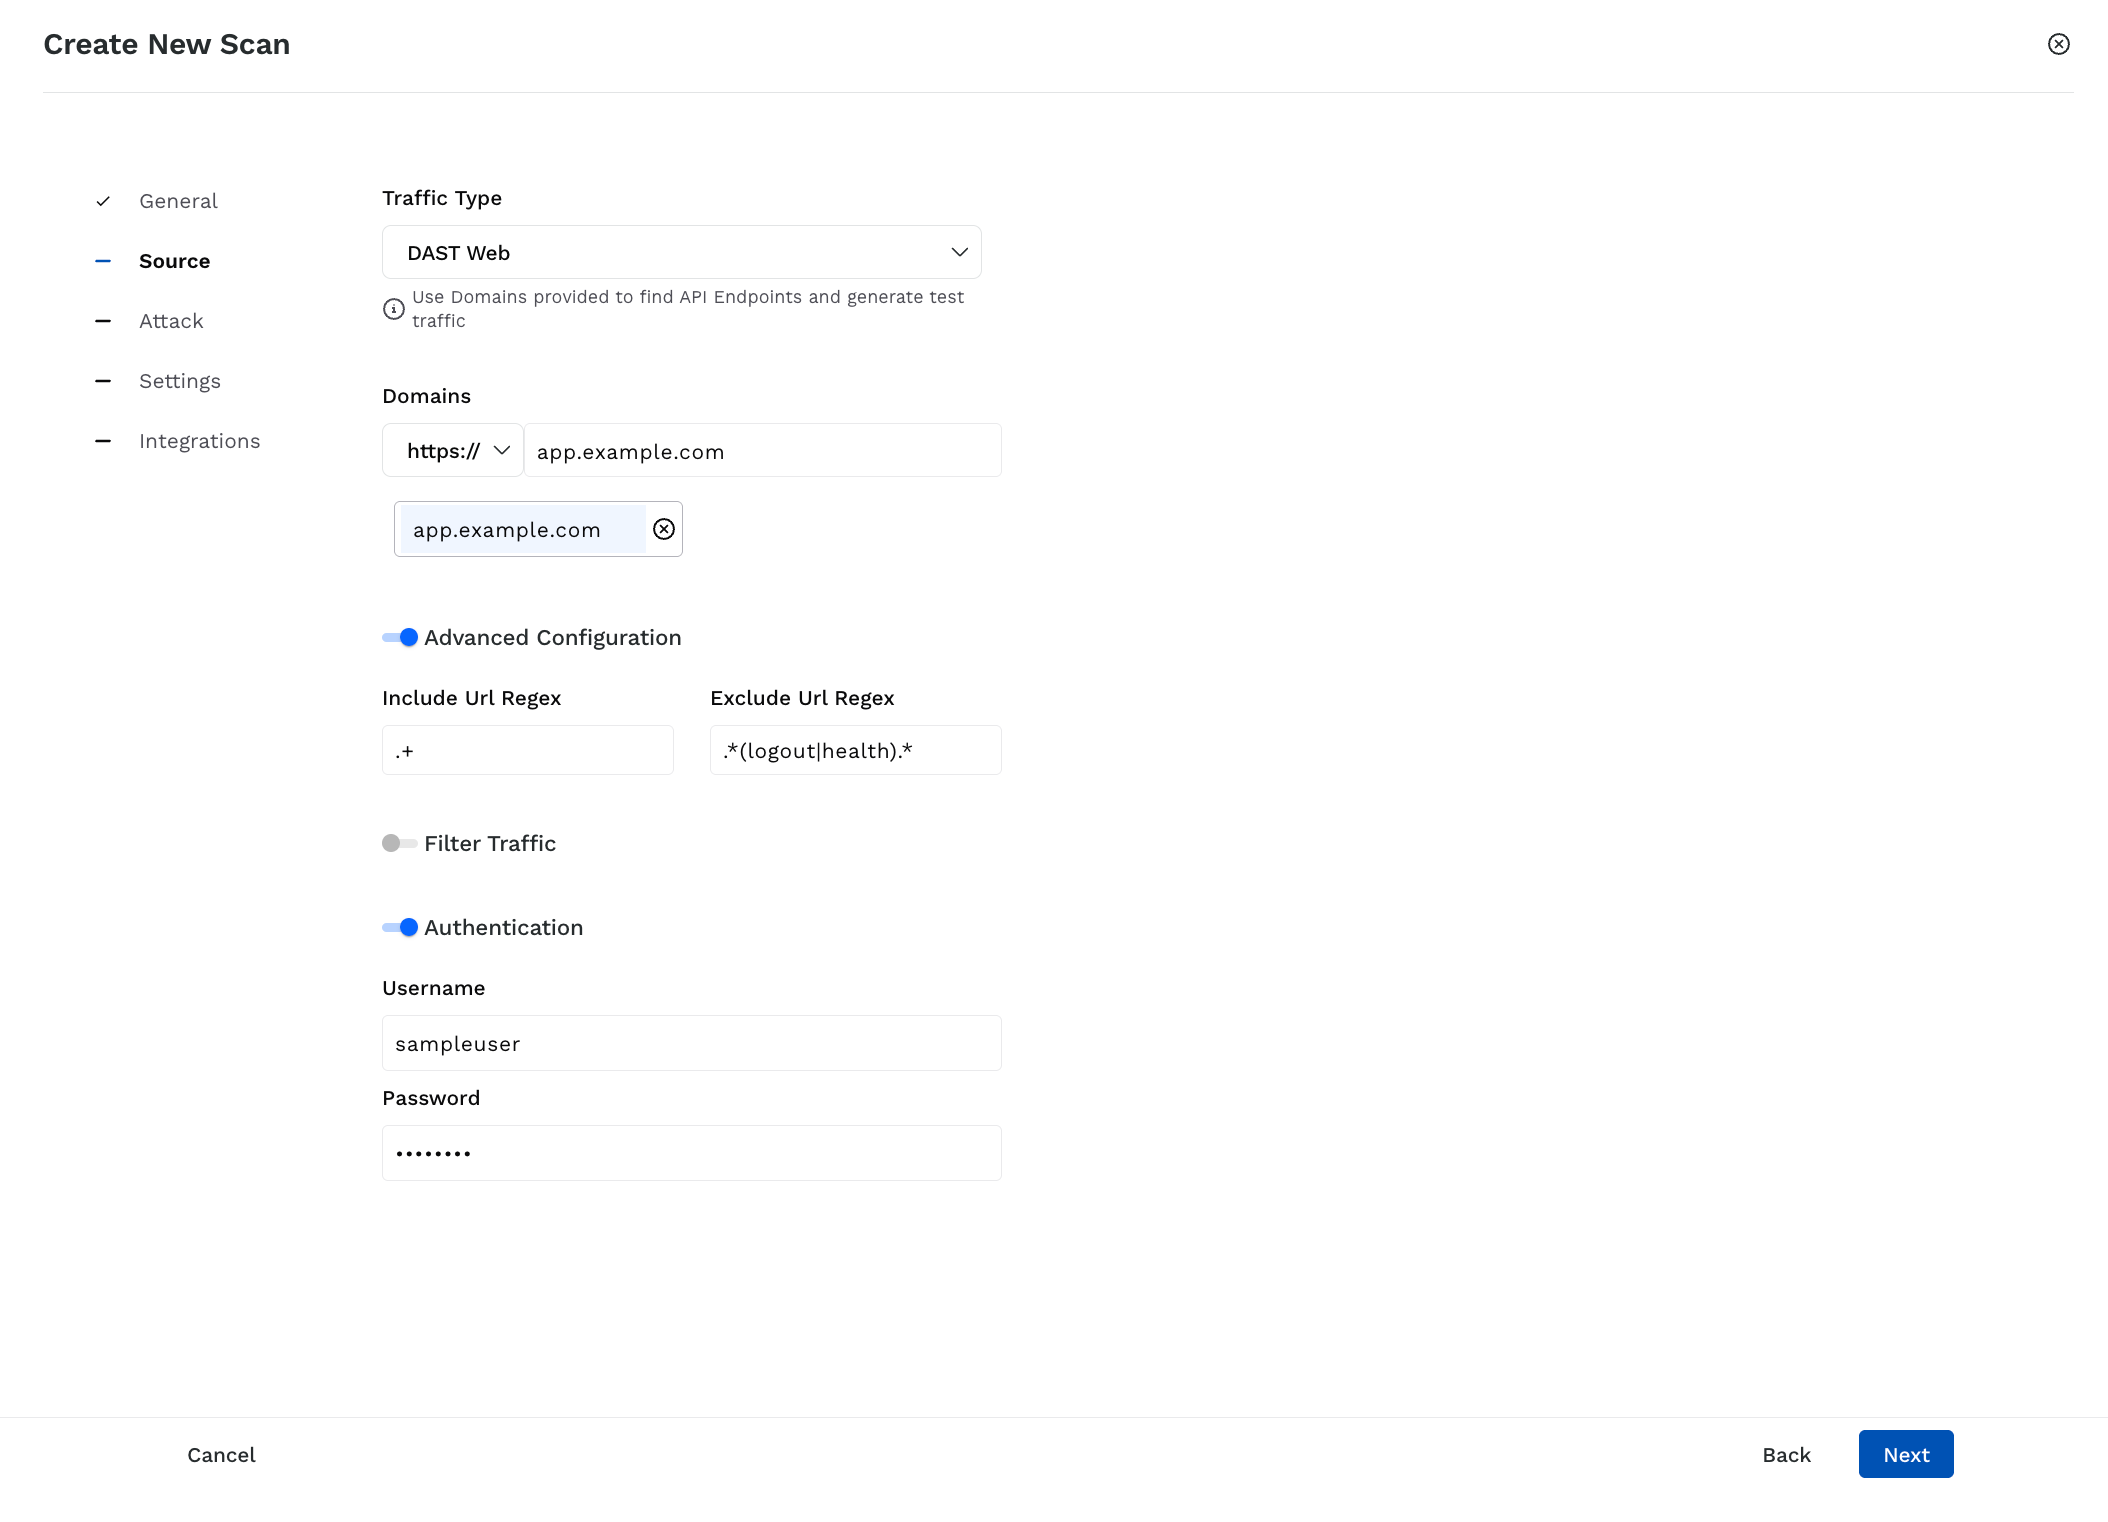
Scan Source Details for DAST Web
Domains — Select the protocol and specify the domain you want Traceable to crawl and discover APIs. You can add one or more domains by specifying a domain and clicking Enter/Return.
(Optional) Advanced Configuration —
Include URL Regex — Specify a regular expression to include specific API endpoints in the scan, for example,
.+includes all URLs.Exclude URL Regex — Specify a regular expression to exclude specific API endpoints in the scan, for example,
.*(logout|health).*includes all health checks and logout paths.
Authentication —
Username — Specify the username Traceable should use to log in to the domain(s) you specified above.
Password — Specify the password corresponding to the above username.
Once you have specified the above details, click Next.
Step 3 — Select or Create Attacks
As part of step 3, you must either select an existing policy or create a new one. Based on the policy, Traceable executes attacks on the selected endpoints to detect issues.
Traceable provides you with the following options related to a policy:
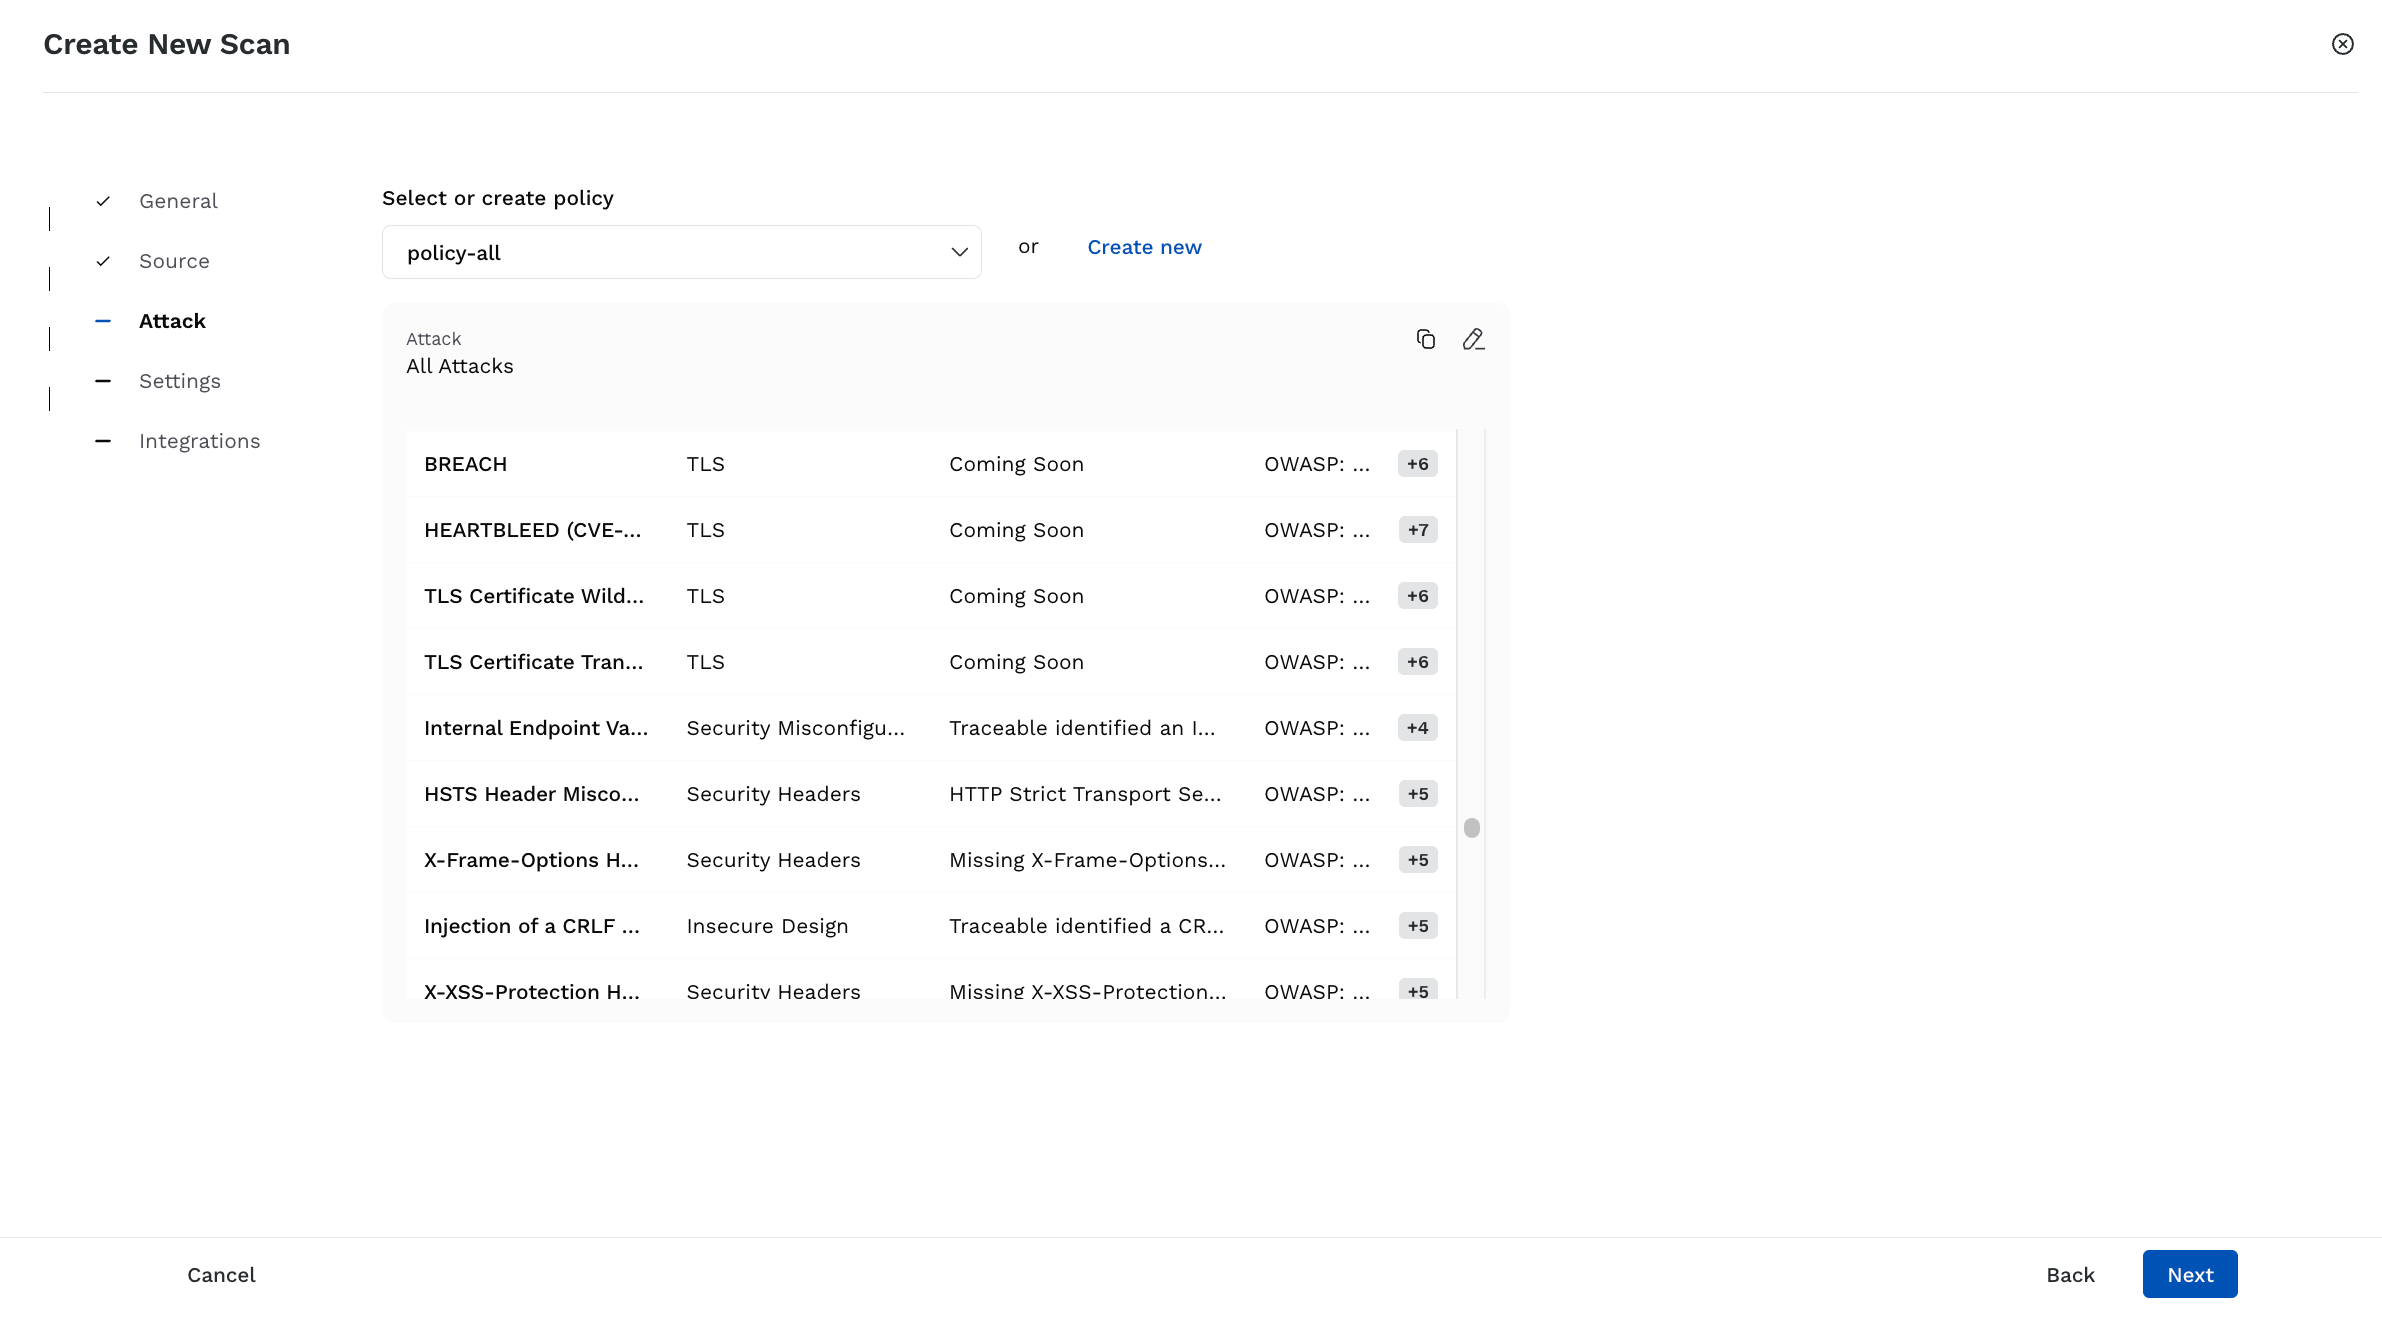
Select or Create Attacks
Select an existing policy — Select a policy from the drop-down list. Traceable shows the attacks configured as part of the policy. In the attack list, you can also perform the following actions according to your requirements:
Create a new policy using the same attack selection — Click the Copy icon to create a policy that inherits the attack selections from the selected policy. In the pop-up window, specify the policy details and customize the attack types according to your requirements. This helps when you wish to tweak attack selections by adding or removing specific attacks without altering the original policy. For more information, see Policies.
Edit the selected policy — Click the Edit icon to customize the attack types or policy names according to your requirements.
Create a new policy — Click Create New to create a new policy according to your requirements. For more information, see Policies.
Once you create the policy, Traceable automatically selects it to attack the endpoints.
Note
Traceable also provides AI Scan Policies that you can use to detect AI-related issues, such as LLM System Prompt Leakage and AI SQL Injection. For more information, see AI Security Testing.
Once you have selected or created a policy, click Next.
Step 4 — Specify Additional Settings
As part of Step 4, you can define the scan evaluation criteria, runners, and advanced settings:
.png)
Additional Scan Settings
Scan Evaluation Criteria — Define the conditions based on which Traceable should evaluate the scan:
Matches All/Any — Define whether Traceable should execute an AND or an OR operation between the conditions.
API Endpoints (default)/Services — The scope of assets (all or new) within which the criteria should apply.
Vulnerability — The scope of vulnerabilities (any or new) corresponding to the above-selected assets. Based on your selection, Traceable looks for vulnerabilities in the above-selected assets.
Severity — The severity associated with the vulnerability, based on which Traceable should evaluate the criteria.
Operator — The operator for comparing the above-selected criteria and threshold.
Threshold — The number of vulnerabilities Traceable should look for, as part of the scan.
Vulnerability Age — The number of days (1-60) for which the vulnerability should be open, for the criteria to be successfully evaluated.
You can click + Condition to add one or more conditions according to your requirements.
Select Specific Runners — Enable this toggle to select the runners Traceable should use for scan evaluation. You can select specific runners or a runner label from which Traceable should select a runner for scanning. If you do not enable this toggle, Traceable automatically selects a runner for you. For more information, see Runners.
Advanced Settings — Customize the scan performance and timeouts according to your requirements:
Idle Timeout — Define how long Traceable should wait if no activity occurs.
Scan Timeout — Maximum duration for Traceable to complete the scan.
Delay Between Requests — Milliseconds that Traceable should wait between sending individual requests.
Test Execution Threads — The number of concurrent threads that Traceable should use for executing the scan.
Once you have specified the settings, click Next.
Step 5 — Integration
As part of step 5, you can integrate Snyk with the scan according to your requirements. For information on setting up the integration, see Snyk Integration.
Once you have enabled the integration according to your requirements, click Create. For information on how Traceable handles scans after creation, see FAQs.
Starting an Adhoc Scan
While Traceable executes the scan according to the schedule you set when creating the scan, you can start an ad-hoc scan immediately, as needed. To do so, complete the following steps:
Navigate to the Scans dashboard.
Search for and click the scan you wish to run.
In the top right corner of the Scan Details page, click the Start Scan (
 ) icon.
In the Start New Scan window, select how you wish to run the scan. You can choose to run the scan using:
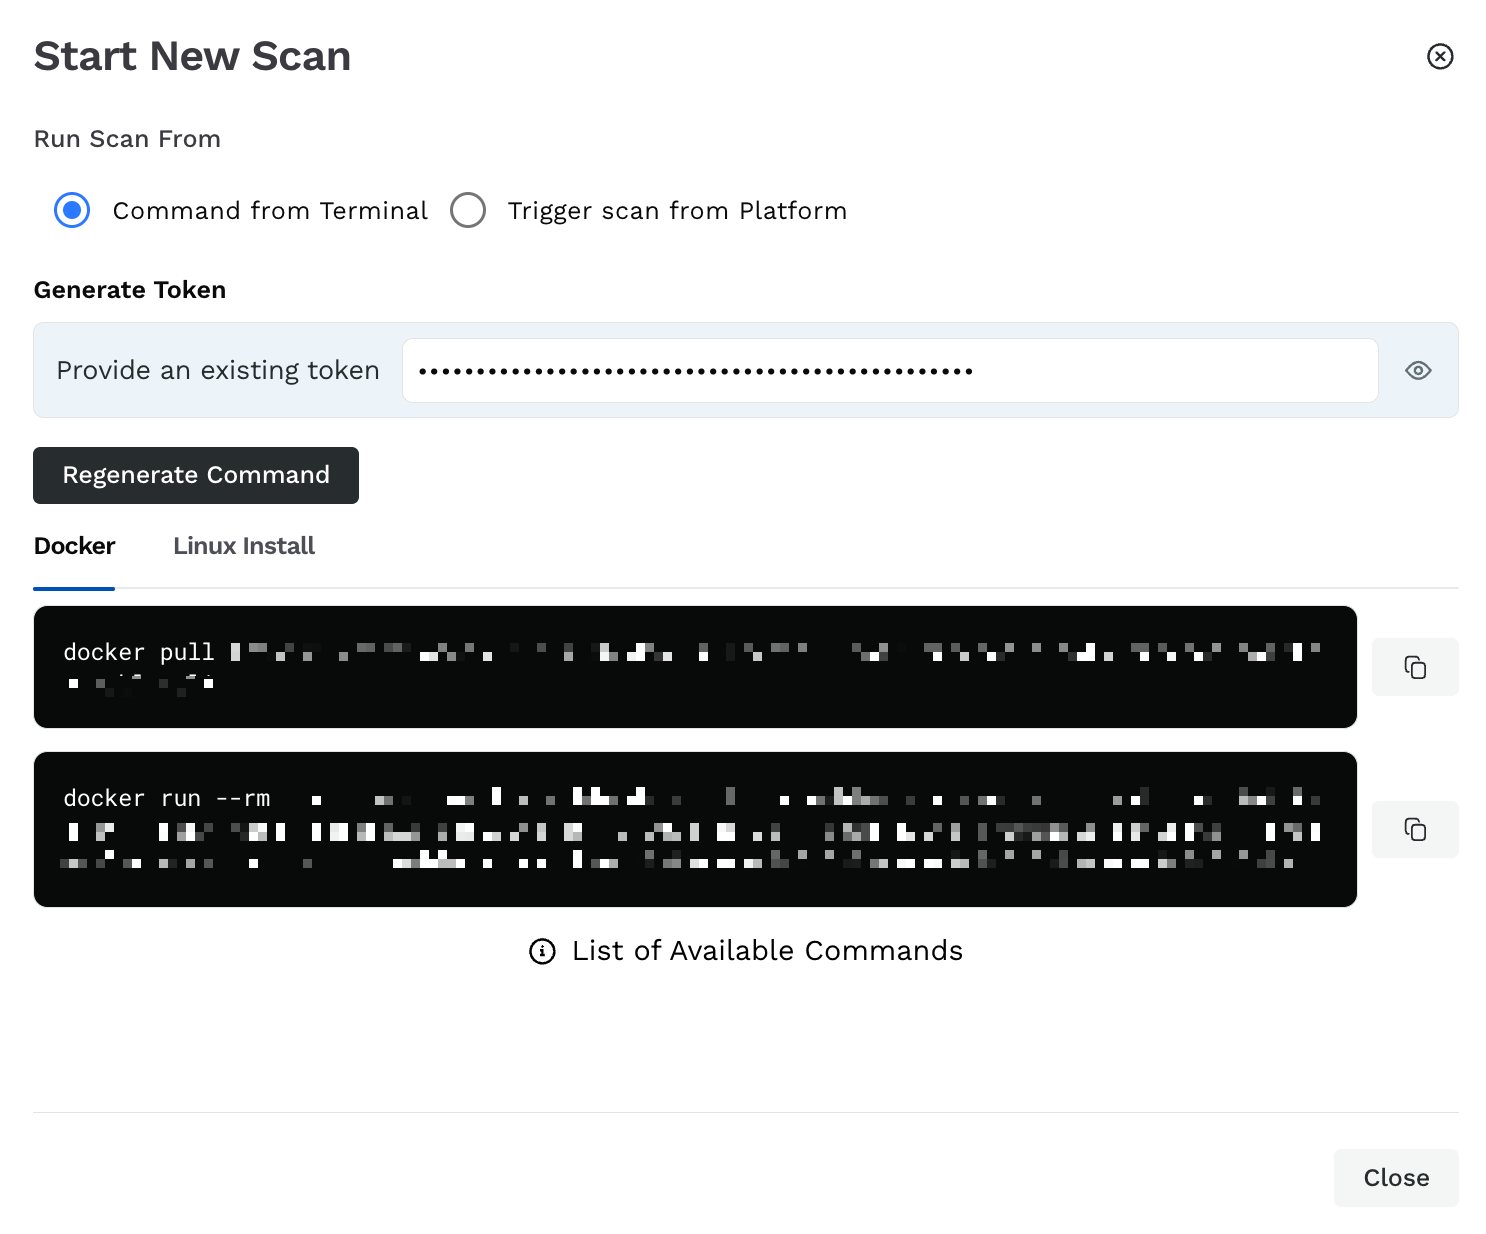
Start Scan
Command from Terminal — You can run the scans using your system terminal. To do this, complete the following steps:
Click Generate New Token or use an existing platform token.
Click Generate Command.
Execute the displayed commands in either Docker or Linux Install.
The Platform — You can run the scan on the Traceable platform. For this, complete the following steps:
Specify the Scan Name.
Select how Traceable should run the scan:
Allow Traceable to automatically select a runner.
Select a runner according to your requirements.
Select a runner label according to your requirements.
For more information, see Runners.
This scan is executed on an ad hoc basis and is listed in the Scan Runs tab. For more information, see Scan Details.
Pause and Resume Scan
Traceable allows you to pause and resume scans using the CLI. Follow the steps in the tabs below to pause and resume the scan as needed.
When you pause a scan, Traceable stops test generation for the scan. You can always resume the scan according to your requirements.
To pause a scan, complete the following steps in your CLI:
Press
Ctrl+CorCommand+Cto get a list of scan termination options.Type
Pand clickEnterorReturn.
Traceable pauses the scan indefinitely until you resume it.
Traceable can resume a scan if it is in either of the following states:
Paused
Aborted
To resume a scan, you must run the following command:
Note
The
<scan-id>field in the below command is optional. If you skip this field, Traceable automatically selects the ID from the last scan.
traceable ast scan resume --id <scan-id>Caveats
Resuming a scan does not generate new test scans or plugins; it only re-runs the plugins that were partially executed or not executed in the previous run.
As Traceable may re-run some tests from plugins that were partially executed, you may see an increase in the test count.
Note
Pause and Resume scan is available for CLI version 1.10.20 and above. To check the current CLI version, you can use the
traceable versioncommand.