Updates (April 2026 to June 2026)
May 2026 —
Updated the page to include the
configandhookconfiguration options when installing a runner using a Helm chart. For more information, see Runner installation methods and steps, Helm Chart (Kubernetes) tab.
Traceable runners are designed to operate across various infrastructure and deployment setups. A well-prepared system is essential to ensure stable operation, consistent scan execution, and predictable performance as environments grow and evolve.
What will you learn in this topic?
By the end of this topic, you will understand:
The prerequisites for installing a runner.
The various methods for installing a runner, along with the corresponding steps.
The concept of runner labels and how you can use them
Before you begin
Make a note of the following before proceeding with setting up Runner:
You must fulfil the necessary software and hardware requirements for the runner to perform efficiently. For more information, see Software and Hardware Requirements.
Ensure that the machine on which you are installing the Runner can communicate with the APIs and Traceable Platform.
DAST does not need an app to be instrumented, but an environment still needs to be created for the DAST scan to create a default service and list APIs under it.
Runners are not scoped by the environment. They are available for all environments.
Ensure that you have generated the Platform API Token when setting up the runner As a Service or Using a Helm Chart. For the steps to generate the token, see Public APIs.
Ensure you are assigned the Security admin or Account Owner role, or the corresponding permissions to start a runner. For more information about different roles, see Teams and roles - RBAC.
Runner installation methods and steps
Traceable provides various methods for installing runners. Click the tabs according to your requirements to install a runner in your system.
To start configuring a runner on the Traceable platform, navigate to Testing → Settings → Runners, and click + Configure Runner. In the Configure new runner window, complete the following steps:
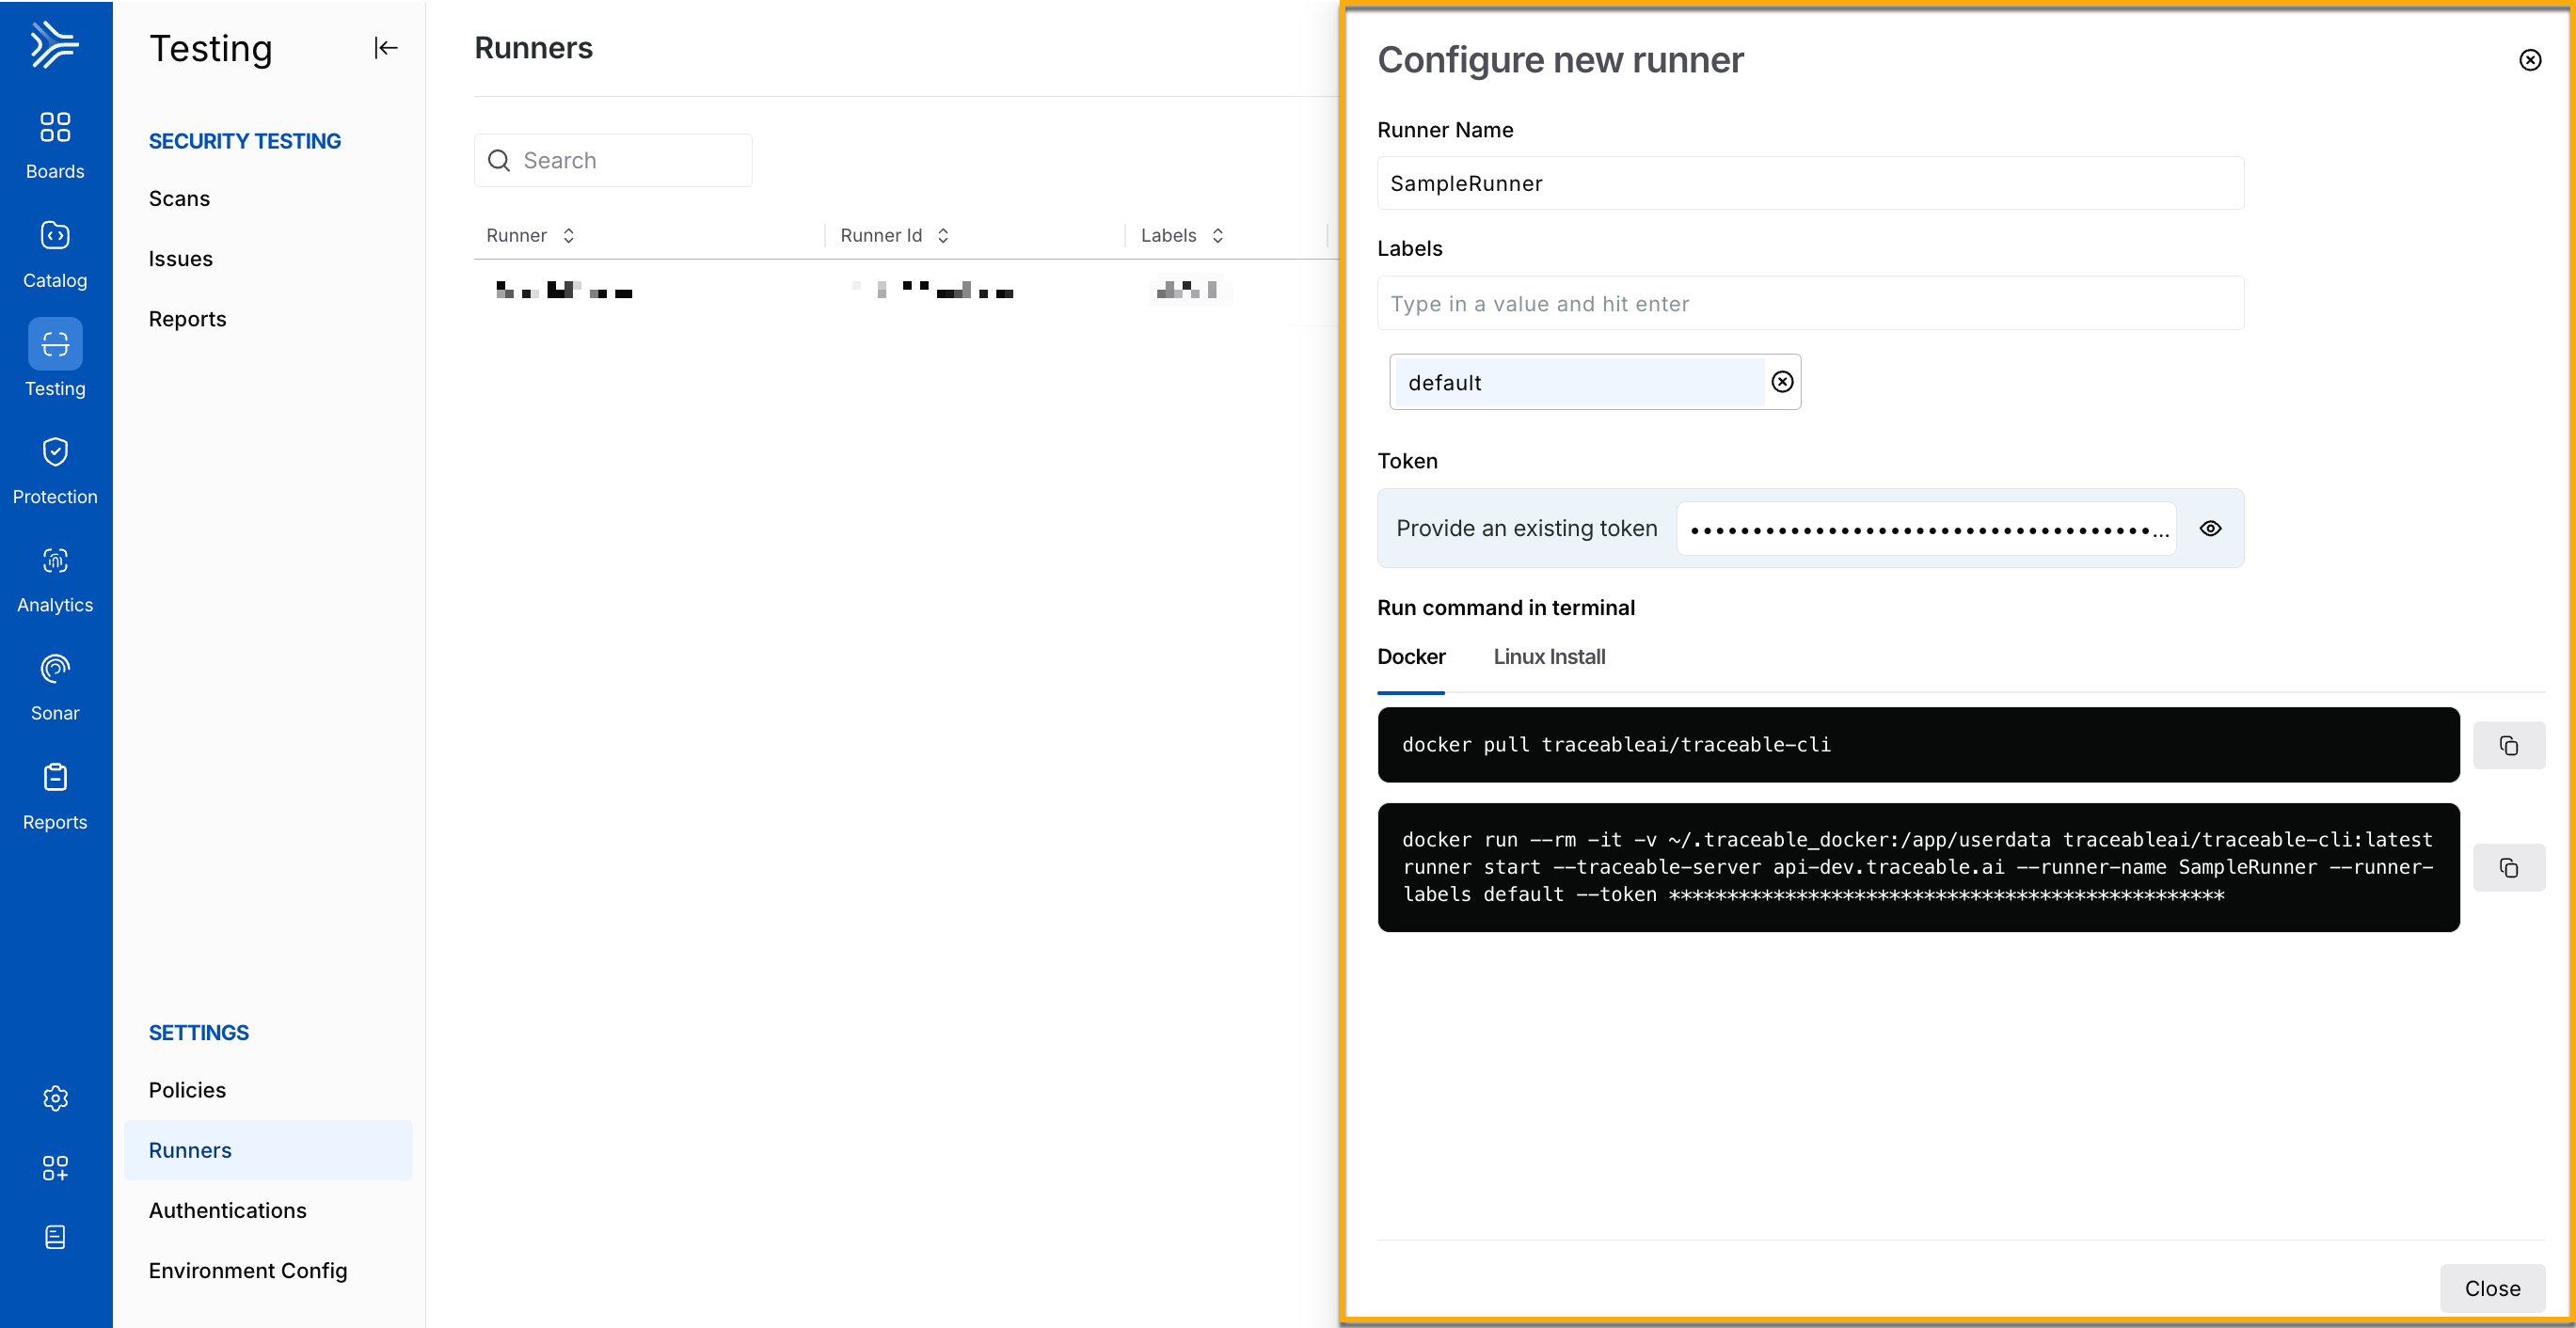
Configuring Runners
Specify the Runner Name, for example, SampleRunner.
Specify the Label(s) you wish to use to identify the runner, for example, default. You can use these labels to assign runners to scans during scan creation. For more information, see Understanding runner labels.
Click Generate New Token or specify an existing platform token to set up the runner.
Traceable displays the commands you must execute in your terminal to set up the runner on your server. You can do this using either Docker or Linux. Upon successful execution, Traceable displays the runner on the Runners page.
By default, the binary command runs in the background. The Docker command displayed on the platform interactively runs in the foreground. To run the Docker command in the background, use the following command. Replace the runner's name with the name of the runner you configured in Step 1 above:
docker run --rm -d -v ~/.traceable_docker:/app/userdata traceableai/traceable-cli:v2 runner start --traceable-server api.traceable.ai --runner-name newrunner --token **** The following is an explanation of the Docker command:
docker runis the command to run a Docker container.--rmremoves the container automatically after it exits.-druns the container in detached mode.-v ~/.traceable_docker:/app/userdatamounts the local directory~/.traceable_dockerto the/app/userdatadirectory inside the container. This allows the container to access and modify files in the local directory.traceableai/traceable-cli:latestspecifies the image to use for the container.runner startruns thestartcommand of the Traceable Runner program within the container.--traceable-server api.traceable.aispecifies the URL of the Traceable Server to connect to.--runner-name newrunnersets the name of the runner to “newrunner”.--token ****sets the authorization token required to connect to the Traceable Server.
You can configure the runner as a systemd service. To do so, see the following steps:
Step 1 — Pre-installation
Before configuring Runner as a service, complete the following step:
Navigate to the terminal on your machine and enter the following command to download the installation script:
curl -O https://downloads.traceable.ai/cli/release/v2/install.shNote
The
install.shscript is supported on a Linux machine.
Step 2 — Installation
Enter the following command to install Runner as a service:
bash install.sh --service --token <traceable-api-token> --server <traceable-server>
# Replace the <traceable-api-token> and <traceable-server> placeholders with the actual values
See the table below for the available options you can use in the above command:
Option | Description | Default Value |
|---|---|---|
| The installation prefix |
|
| The CLI version to install |
|
| A custom name for the runner |
|
| The path to the Traceable distribution zip file | Downloaded from Traceable’s download site |
| Does not provide a prompt on confirmation | - |
| Install the runner as a | - |
| Install the runer as a user. Run as the |
|
| Install the runner as a group. Run as the |
|
| The Traceable server to connect to. |
|
| The Traceable user token for authentication. | - |
| The path to the Traceable home folder. |
|
| The path to the file that should store the runner logs. By default, Traceable outputs to | - |
| The path to the directory that stores all the logs. By default, Traceable uses the | - |
| The level of logs you want for the runner. This can contain the following values:
| - |
| The maximum number of files that Traceable should retain in the logs folder. When the files reach the limit, the oldest ones are replaced with new ones. | - |
| The maximum number of days for which Traceable should retain the log files. | - |
| The maximum size of a log file (in bytes). | - |
| The directory to use during installation and runtime. | System Temp Directory |
| Show this table for reference in your terminal. | - |
Step 3 — Post-Installation
Post-installation of the runner, you must complete the following steps to start the runner:
Enter the following command to restart the service:
sudo systemctl daemon-reloadEnter the following command to start the service:
sudo systemctl start traceable-runnerEnter the following command to check the status of the service:
sudo systemctl status traceable-runnerThe output of the above command should look like this:
● traceable-runner.service - Traceable CLI
     Loaded: loaded (/etc/systemd/system/traceable-runner.service; disabled; vendor preset: enabled)
     Active: active (running) since Mon 2025-01-06 07:07:19 UTC; 9s ago
   Main PID: 283083 (traceable)
      Tasks: 15 (limit: 1069)
     Memory: 405.3M
        CPU: 1.850s
     CGroup: /system.slice/traceable-runner.service
             ├─283083 /home/ubuntu/.local/traceable/bin/traceable runner start --runner-name traceable-runner
             ├─283085 /tmp/staticx-EJFPfK/traceable_shared runner start --runner-name traceable-runner
             └─283086 /tmp/staticx-EJFPfK/traceable_shared runner start --runner-name traceable-runner
Jan 06 07:07:19 loyal-tick systemd[1]: Started Traceable CLI.
Jan 06 07:07:21 loyal-tick traceable[283086]: Traceable CLI 1.10.19 (linux)
Jan 06 07:07:21 loyal-tick traceable[283086]: [2025-01-06 07:07:21,625]:INFO: Refreshing config
Jan 06 07:07:21 loyal-tick traceable[283086]: [2025-01-06 07:07:21,626]:INFO: Connecting to `api.traceable.ai` with token `YTU2**********...`
Jan 06 07:07:23 loyal-tick traceable[283086]: [2025-01-06 07:07:23,999]:INFO: Setting log level to: INFO
Jan 06 07:07:24 loyal-tick traceable[283086]: [2025-01-06 07:07:24,000]:INFO: Acquired lock on /home/ubuntu/.traceable/runner.pid
Jan 06 07:07:24 loyal-tick traceable[283086]: [2025-01-06 07:07:24,001]:INFO: Finding hook files in /home/ubuntu/.traceable/hooks
Jan 06 07:07:24 loyal-tick traceable[283086]: [2025-01-06 07:07:24,015]:INFO: Started runner name: loyal-tick-runner (id: e1f123b7-3815-5e94-b8bd-8eb1234c7814). Listening for scan jobs...
In the above output, the dot (●) shows the status of a runner. The table below describes the dot colors and their corresponding status descriptions:
Color
Status Description
Green
The runner is being activated or is currently active.
Red
The runner has failed.
White
The runner is currently inactive.
(Optional) Enter the following command to enable the service to start on system boot:
sudo systemctl enable traceable-runner
You can run more than one runner on the same machine if you installed it using the platform or as a service. For more information on how to run more than one runner on a single machine, contact Traceable support at support@traceable.ai.
Complete the following steps to install the runner using the Helm chart:
Enter the following command to add the repo:
helm repo add traceableai https://helm.traceable.aiEnter the following command to update the repo:
helm repo updateCreate a
values.ymlfile based on the sample provided below:replicaCount: 1 resources: limits: cpu: 2.0 memory: 4Gi requests: cpu: 2.0 memory: 4Gi astRunnerArgs: name: traceable-runner-helm # Name of the runner traceableServer: api.traceable.ai # Traceable Server traceableToken: "" # Replace this with the Platform token value maxRetries: 1 # Number of Request Retries idleTimeout: 10 # Idle Timeout before aborting a scan requestDelay: 0 # Request delay delay between requests threads: 20 # Number of threads to run on logfile: stdout # Log file name loglevel: INFO # Set log level externalTraceableTokenSecret: name: "" # Name of the secret key: "" # Key of the secret # User configuration file (config.yaml) # When enabled, this will mount a ConfigMap containing the user configuration at /app/userdata/config.yaml # Example: # config: # content: | # scan: # plugins: # pre_hooks: # - xsrf_posthook: # disabled: true # post_hooks: # - xsrf_posthook config: enabled: false content: | # Add your configuration here # User hook scripts # These scripts will be mounted under /app/userdata/hooks/ # Example: # hooks: # - name: foo.py # content: | # print("Hello world") hooks: []Note
Make sure that the
externalTraceableTokenSecret.keythat you provide is valid.If you specify the token as plain text under
astRunnerArgs.traceableTokenand as secret underexternalTraceableTokenSecret.key, Traceable ignores the plain text and uses the secret key.
Enter the following command to install the runner:
helm install <release_name> traceableai/traceable-runner -f values.yaml
You can configure runners on AWS ECS (Elastic Container Service) using CloudFormation. Download the template file by contacting Traceable support, and install the runner in your AWS console. For instructions on how to do this, see Installation using CloudFormation.
You can configure runners on AWS ECS (Elastic Container Service) using Terraform. Download the Terraform file by contacting Traceable support, and install the runner in your shell. For the steps to do this, see Installation using Terraform.
Understanding runner labels
Runner labels help you organize runners and control which ones are eligible to execute specific scans or tasks. By assigning one or more labels to a runner, you can describe its purpose, environment, or deployment context.
For example, labels such as production, sandbox, or us-east can indicate where a runner is deployed or the type of workloads it should handle. This allows you to route scans to appropriate runners without manually selecting individual instances.
When configuring a runner, you assign labels during the setup process. Later, while creating a scan, you select one or more labels to define which runners are eligible to execute that scan. Traceable then matches the selected labels against available runners.
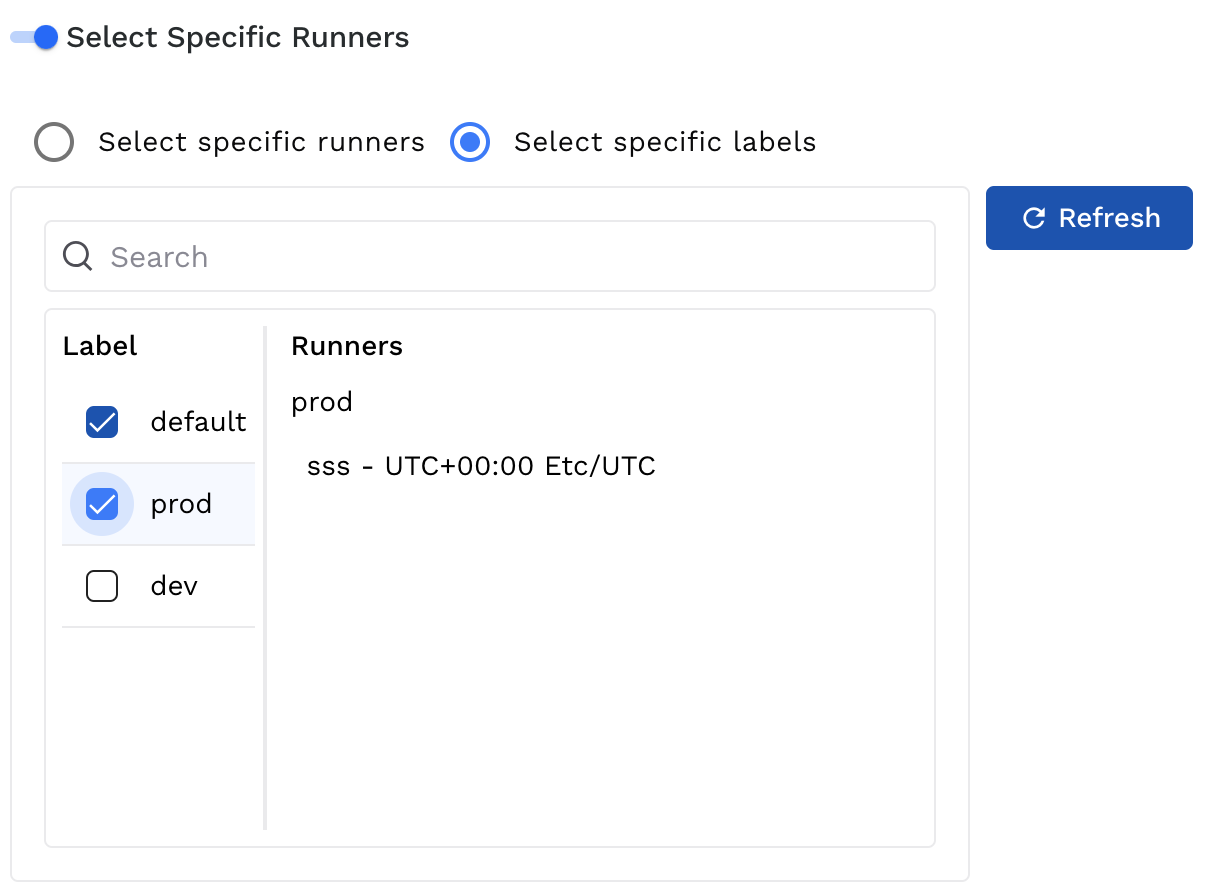
Runner Label selection during scan creation
A runner becomes eligible if it shares at least one label with the labels selected during scan creation. If multiple runners match, Traceable automatically selects one of them to execute the scan based on availability.
The following illustration highlights runner selection based on the label assigned to it.
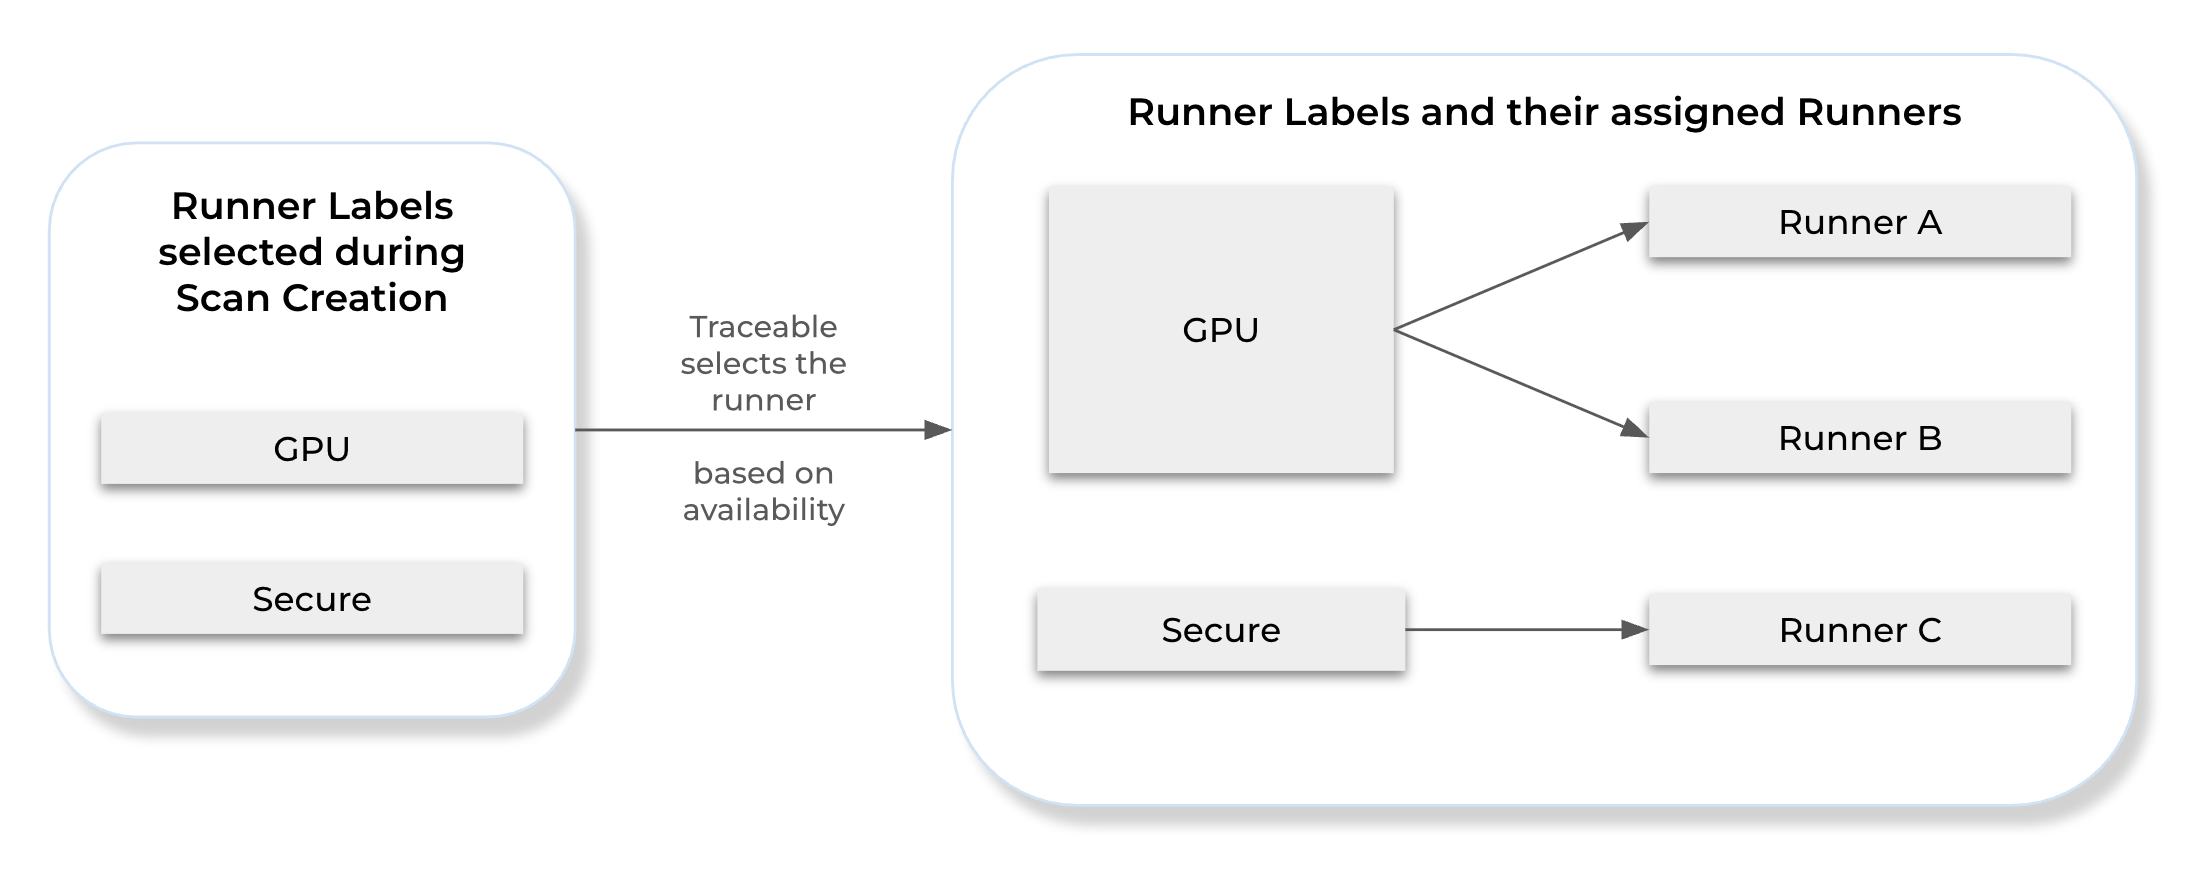
Runner Selection
Using runner labels ensures better workload isolation, simplifies runner management, and enables flexible scan execution across different environments and deployment setups.