Jira templates help you standardize the process of creating Jira tickets from Traceable. Instead of manually selecting Jira fields and entering values each time you create a ticket, you can configure templates that automatically populate fields and map Traceable data to Jira. Using templates ensures consistent ticket creation and reduces manual effort during issue remediation and threat investigation. You can configure Jira templates in the integrations section and use them when creating Jira tickets from supported modules, such as the Issues and Threat Activity page.
What will you learn in this topic?
By the end of this topic, you will be able to understand:
The need for Jira templates and how they simplify Jira ticket creation in Traceable.
How to create and configure Jira templates.
How to map Jira fields using default values or Traceable attributes.
How templates behave when creating Jira tickets from different modules.
How Jira templates work when creating tickets in bulk.
Before you begin
Before you create a Jira template, make a note of the following:
You have configured a Jira integration in Traceable. For more information, see Jira Integration.
The Jira project and issue types that you want to use already exist in Jira.
You have the Edit access RBAC permissions to configure Integrations in Traceable. For more information, see RBAC.
Understand the need for Jira templates
Manually creating Jira tickets for each issue introduces inefficiency and increases the risk of errors. This manual process leads to the following issues:
Inconsistent field values across tickets.
Missing or incomplete context for triage.
Increased time to create and track issues.
Jira templates simplify this workflow by allowing you to configure these values once and reuse them. You define the structure, required fields, and field mappings once, and reuse them across ticket creation flows. As a result, you can reduce manual effort, improve data quality, and accelerate issue triage and resolution.
How Jira templates work
Jira templates are scoped to a specific Traceable module. When creating a template, you explicitly select the module where it should be applied. Templates are not reusable across modules. Limiting templates to a single module ensures that field mappings remain valid and meaningful. For example, the Jira template that you create for the Issue page in the Discovery module cannot be used for the Threat Activity page in the Protection module. This is intentional. Each module in Traceable has its own data model with distinct attributes and context, as follows:
Module-specific context
Issues in Discovery — Comprises vulnerability-centric attributes, such as vulnerability name and severity.
Threat Activity in Protection — Comprises runtime attack context, such as threat severity, attack patterns, source entities, and behavioral indicators.
Create a Jira template
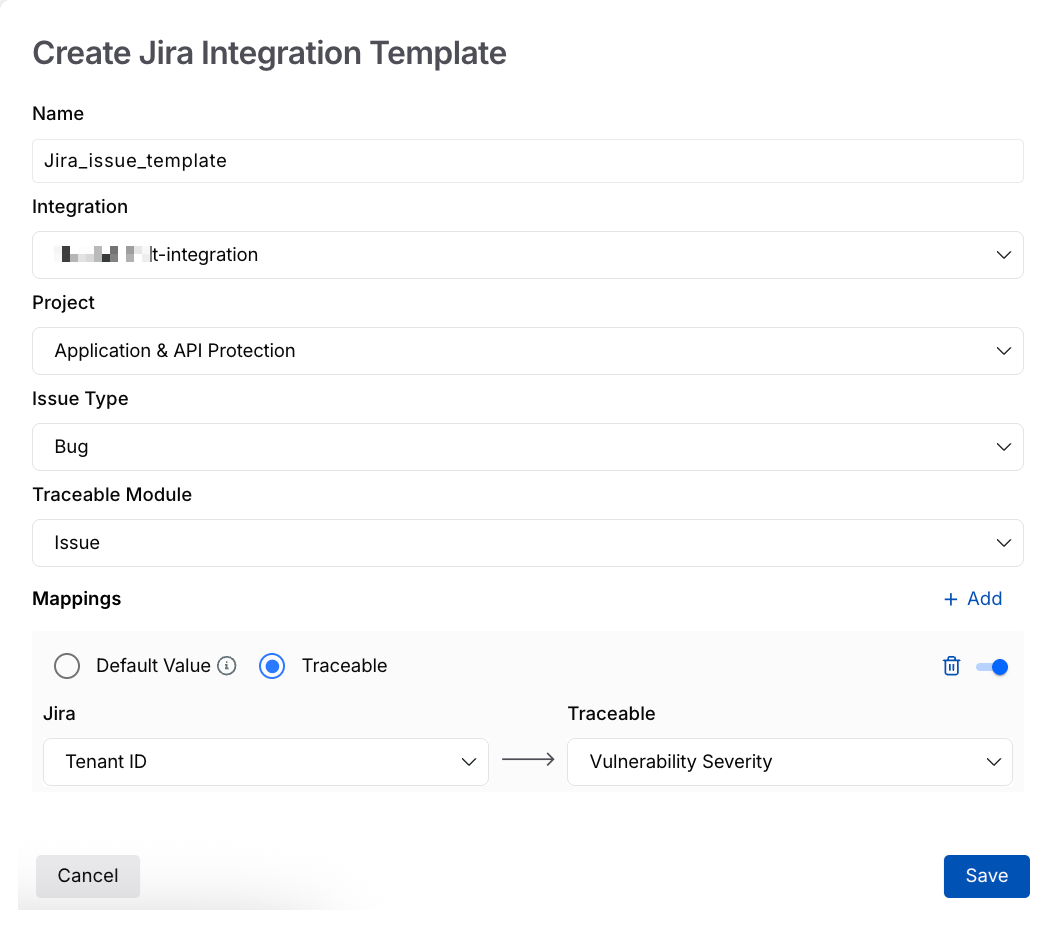
To create a Jira template, navigate to Integrations → Jira Templates, and click Create. In the Create Jira Integration Template slide-out panel, complete the following steps:
.png)
Jira Template
Name — The name of your Jira integration, for example, Jira_issue_template.
Integration — The integration for which you wish to create the Jira template.
Project — The project for which you wish to create the Jira template.
Issue Type — The type of issue for which you wish to create the Jira template, for example, Bug, Task, or Story.
Traceable Module — The modules that are available to create the Jira templates.
Note
Traceable currently supports Jira template selection only on the Issues page in the Discovery module and the Threat Activity page in the Protection module.
Mappings — Define how Jira fields are populated in the template. Assign either default or dynamic values that Traceable uses later when creating Jira tickets. You can map the Jira fields in either of the following ways:
Default Value — This mapping includes a Jira and a Value mapping.
Traceable — This mapping includes a Jira and Traceable mapping.
For more information on configuring the Jira field mappings, see Configure Jira Field Mappings.
Click Save.
Configure Jira field mappings
Field mappings determine how Jira fields are populated when you create a ticket using a template. When you configure mappings, the left side displays the available Jira fields retrieved from Jira, and the right side lets you define how Traceable populates each field. Each module offers a unique set of attributes that provide Jira field values based on the selected module.
You can map Jira fields in either of the two ways, using default values or Traceable values, depending on how dynamic you want your tickets to be, as shown in the tabs below:
Default value mapping assigns a fixed value and applies to every ticket created with the template. You can use this mapping when you want consistent ticket details, such as setting a standard assignee, priority, or label. Once you configure these values, Traceable applies them automatically, so you do not have to update them each time.
Create a Jira Template using Default Value mapping
Note
Traceable checks that default values match the selected Jira field, ensuring only compatible types and formats are allowed.
The values available on the right side of the mapping depends on the Jira field selected on the left side and the Traceable Module selected above.
Traceable mapping dynamically assigns values to Jira fields when a ticket is created. Use this mapping when the field should reflect each item's actual data. For example, mapping a field to vulnerability severity ensures the ticket reflects the actual severity, such as high, medium, or low.
You should choose dynamic mapping if:
The value varies across items, such as severity or endpoint.
You want to avoid manual updates and errors.
You can select a Jira attribute from the drop-down according to your requirements. Traceable retrieves the corresponding value and maps it to the Jira field. It automatically populates the template when you create a ticket.
Create a Jira Template using Traceable mapping
Note
The values available on the right side of the mapping depends on the Jira field selected on the left side and the Traceable Module selected above.
Enable or disable field mappings
You can enable or disable each mapping according to your requirements. You can temporarily disable a mapping using the toggle, without deleting it. When you disable the mapping:
Traceable ignores the mapping when creating tickets.
The corresponding Jira field behaves as if it is not configured in the template.

Enable or Disable mapping toggle
Jira template creation demo
The following interactive demo walks you through the steps to create Jira templates and use them effectively for the module you select.
Create Jira tickets using templates
After you create a template, you can apply it when creating Jira tickets. To create a Jira ticket using a template, complete the following steps:
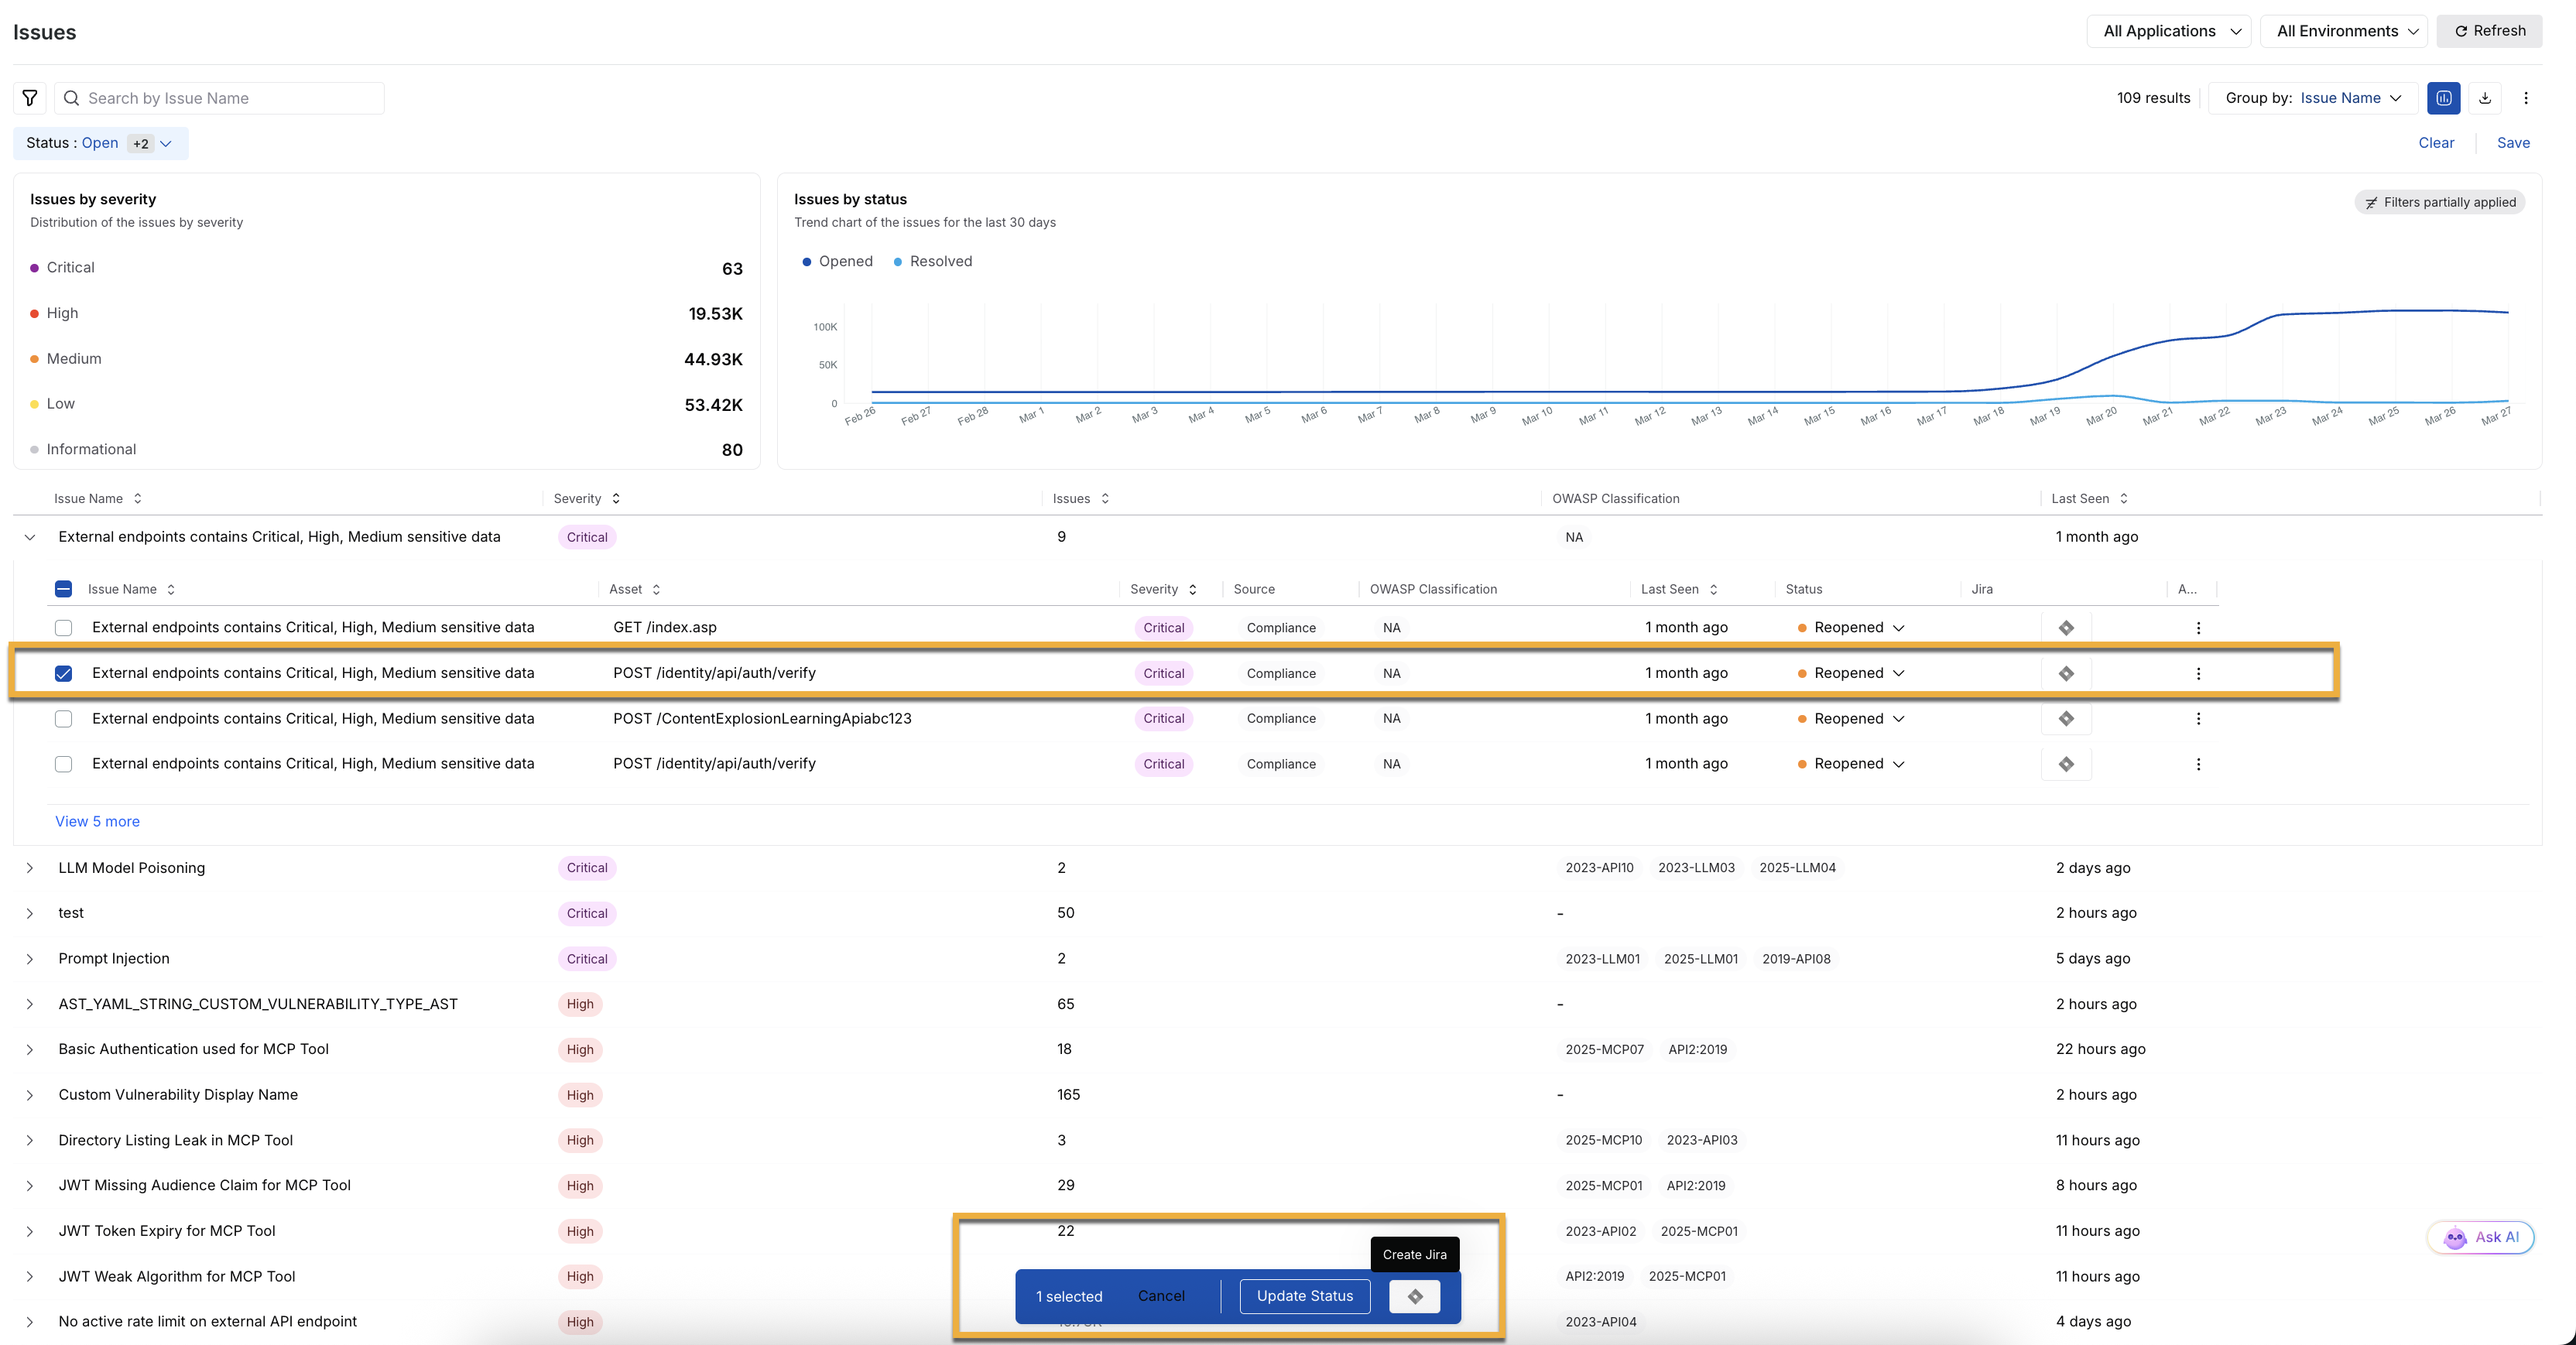
Issues Jira Ticket create
Navigate to the Issues or Threat Activity page.
Select the issue item for which you want to create a Jira ticket.
Click Create Jira Issue.
In the Create Jira issue window, complete the following steps:
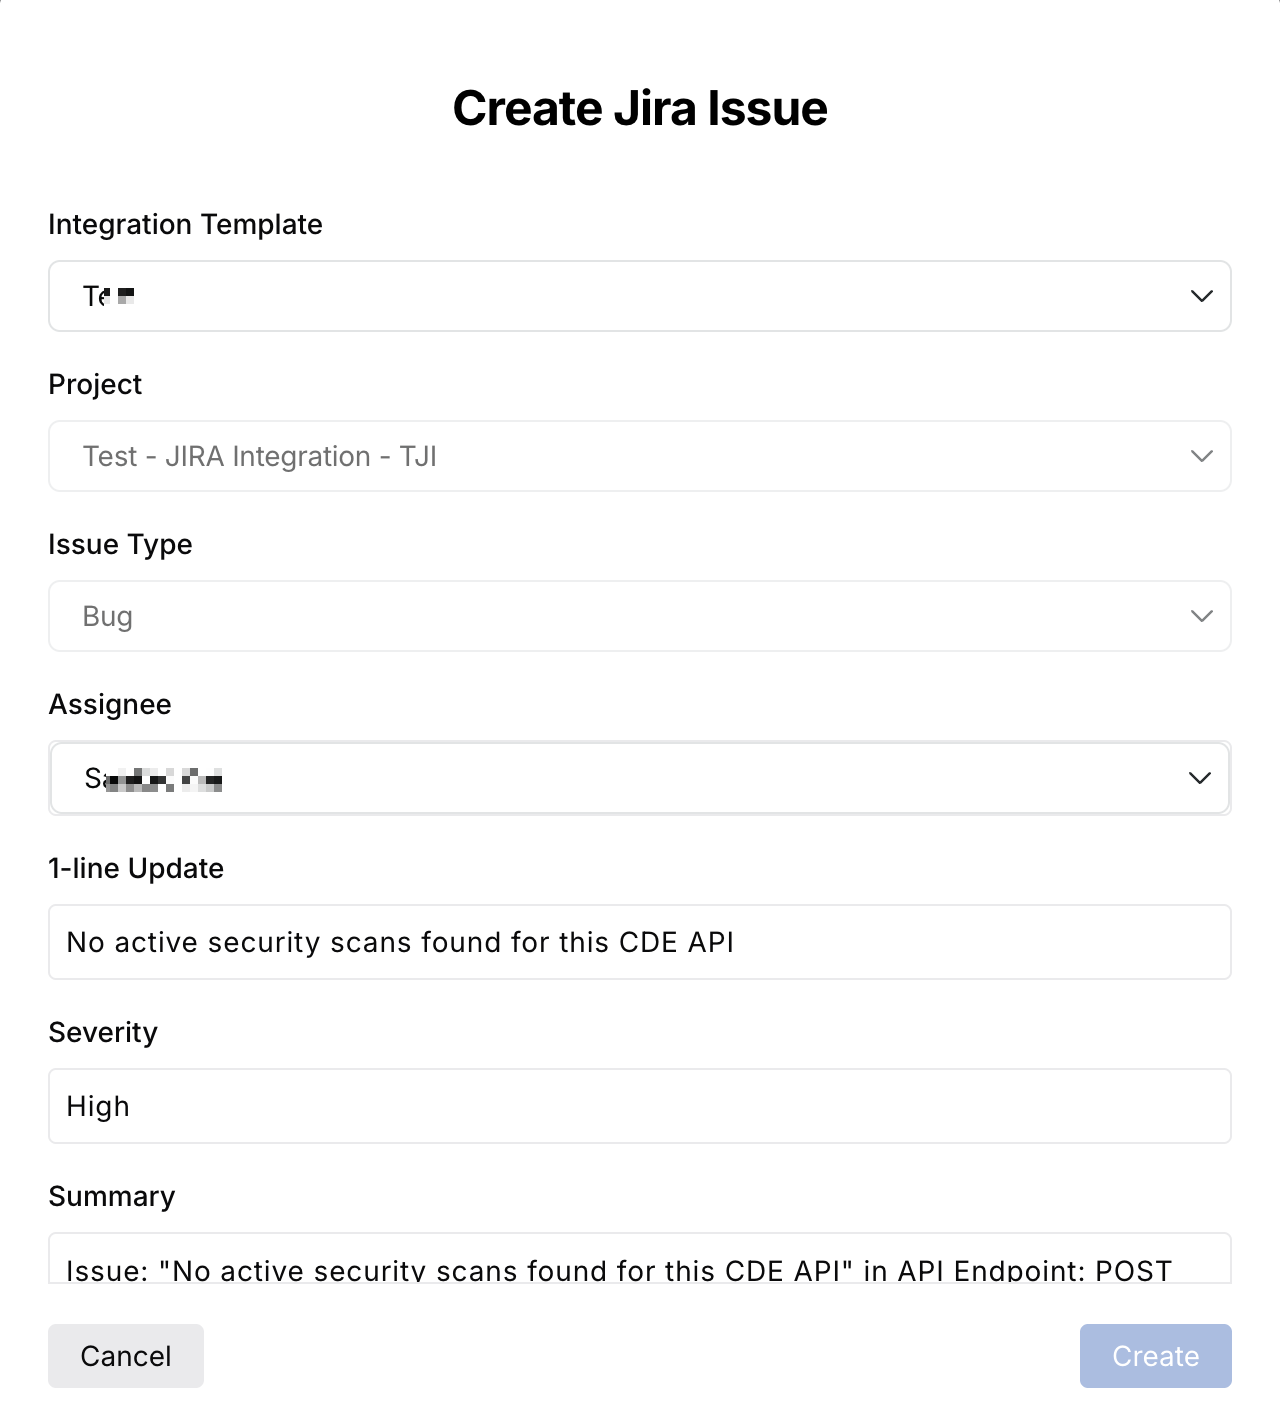
Create a Jira issue
Select the Jira Integration Template that you have created above in Create a Jira Template section.
Note
When you select a template, Traceable automatically fills the configured fields. These fields appear as read-only during ticket creation. You cannot modify the field attributes directly in the ticket creation interface. To change the values of these fields, you must update the template configuration.
Review the automatically populated fields.
Specify the values for any required Jira fields not included in the template.
Click Create to submit the ticket.
Traceable then creates the Jira ticket using the configured template values. For more information, see Issue Remediation and Threat Activity Jira Ticket Creation.
Bulk Jira ticket creation
Traceable allows you to create Jira tickets for multiple issues in a single action, reducing manual effort and speeding up issue tracking. You can choose how tickets are generated based on your workflow. The following table displays the behavior of Jira ticket creation using templates for single as well as bulk options:
Option | Description | Behavior | When to use |
|---|---|---|---|
Single Jira Ticket | Creates one ticket that summarizes all selected items. | Traceable evaluates template mappings across items and fills fields with consistent values. If values differ and no common value is found, the field is left empty. | Use when multiple items represent the same issue or belong to a single investigation. |
Separate Jira Tickets | Creates one ticket per selected item. | Traceable applies the template independently to each item. Dynamic fields are populated using item-specific data. | Use when each item requires separate tracking, ownership, or resolution. |
Manage Jira templates
Traceable enables you to manage templates from the Jira Templates page. You can click the ellipse icon (![]() ) to perform the following actions for your created Jira templates:
) to perform the following actions for your created Jira templates:
Update existing templates.
Enable or disable field mappings.
Note
The changes made to a template apply only to future tickets created with that template. Existing Jira tickets remain unchanged.