Updates (April 2026 to June 2026)
June 2026 — Updated the topic to include support for creating ServiceNow ITSM tickets through bulk issue remediation workflows. For more information, see Issue remediation.
Traceable's Issues page provides a view of detected API security issues, enabling you to monitor, analyze, and remediate them effectively. The Issues page lists these issues, providing important information such as severity, endpoint count, and OWASP category. For more information on issues, their lifecycle, and their key components, see Issues Overview.
What will you learn in this topic?
By the end of this topic, you will be able to:
Understand the issue flow and navigate to each issue to access its evidence and logs.
Update the status of issues and remediation methods.
Understand the auto-resolution and deletion logic for issues based on the detection sources.
Navigate the issues flow
When you first land on the Issues page, Traceable displays a list of detected issues, organized by their names. This list displays key information, including Severity, Last Seen, and the Number of API Endpoints where the issue was observed. The grouping and filtering options enable you to narrow your focus based on a specific indicator. After applying these options, you can drill down into a specific issue to view more detailed information.
You can view the evidence for a particular issue for deeper analysis of the data, including its URL, status code, last seen, mutations, and assertions. The detailed view page for an issue is divided into sections that offer data, logs, and insights that help you understand its impact on your application.
1. Main issues view
Upon navigating to the Issues page, Traceable displays a comprehensive list of issues in the Open or Reopened state. This page serves as a dashboard where you can:
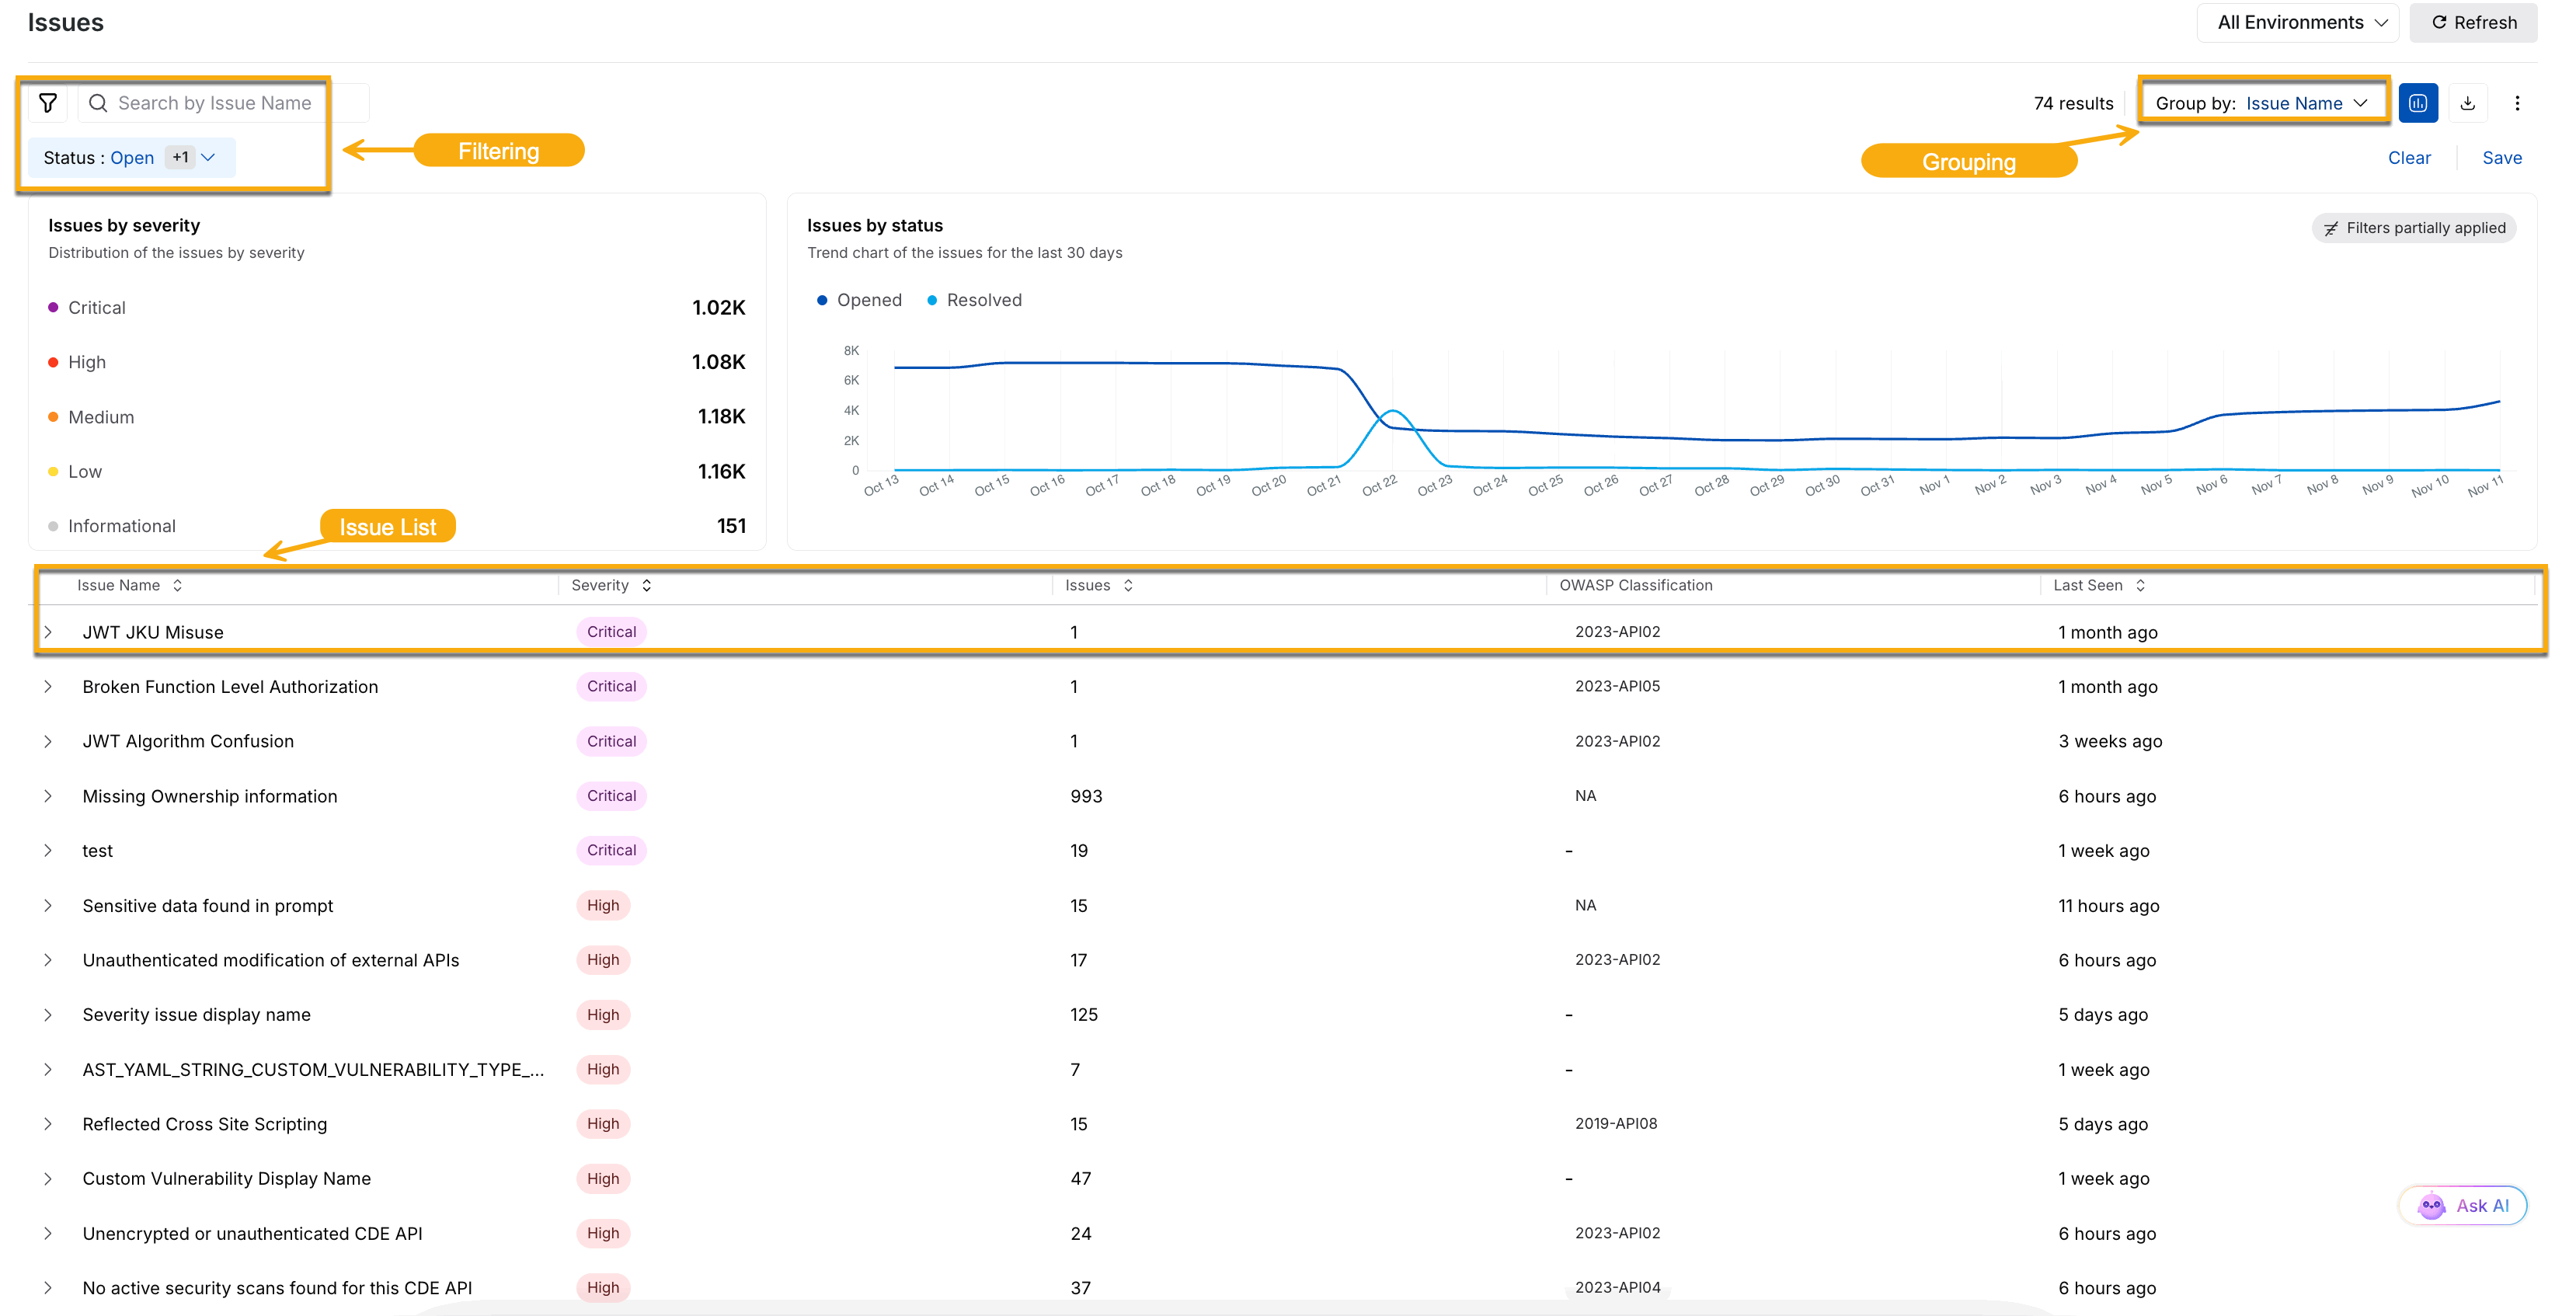
Main Issues View
View listed issues — Each issue is presented with detailed information, including its severity, issue count, and OWASP classification. For more information, see Issue Listings.
Group and filter — While Traceable groups the data on the page based on Issue Names by default, you can group the data based on other categories as well. Additionally, you can filter data based on the issue's impact or your specific requirements. For more information, see Grouping and Filtering Options.
2. Drill down into an issue
After choosing how to group and filter the issues, you can drill down into a specific issue for a more granular view. Based on the grouping, click a list item to view the issues under it, and then click the Issue Name. The detailed view page highlights the following information about the issue:
Issue details — The top section of the page provides details about the issue, including the Endpoint, Source, Last Seen, Severity, CVSS Score, OWASP Rank, and CWE. Using these details, you can take the necessary steps to mitigate such issues and enhance your application security.
Overview — The overview section provides a description of the issue, its impact, the attack methodology, and guidance on mitigating such issues. Traceable also provides you with Issue Evidence, allowing you to drill down for further investigation. Traceable gathers this evidence for each issue. The 5 most recent pieces of evidence from the last 24 hours are shown in the tab. Further, you can view the detailed span for each piece of evidence. Using the evidence, you gain access to critical details about the issue, which helps you assess its severity and work towards its remediation.
Note
For dormant APIs, Traceable shows the 5 latest evidences that it has seen in 90 days.
For issues having API Security Testing as the Source, you can customize the detection conditions according to your requirements. For more information, see Mutation and Assertion Overrides.
If you have enabled AI Features in your account, Traceable shows AI Generated Insights along with the Evidence in the Overview section. These insights are context-sensitive, allowing you to analyze, prioritize issues, and work towards their remediation.
.png)
AI Generated Insight
References — The References tab provides curated links to trusted external sources that offer deeper insights into the nature, impact, and remediation of an issue. This tab helps you understand key details of the issue, such as the attack mechanism and its effects, which you can use for remediation.
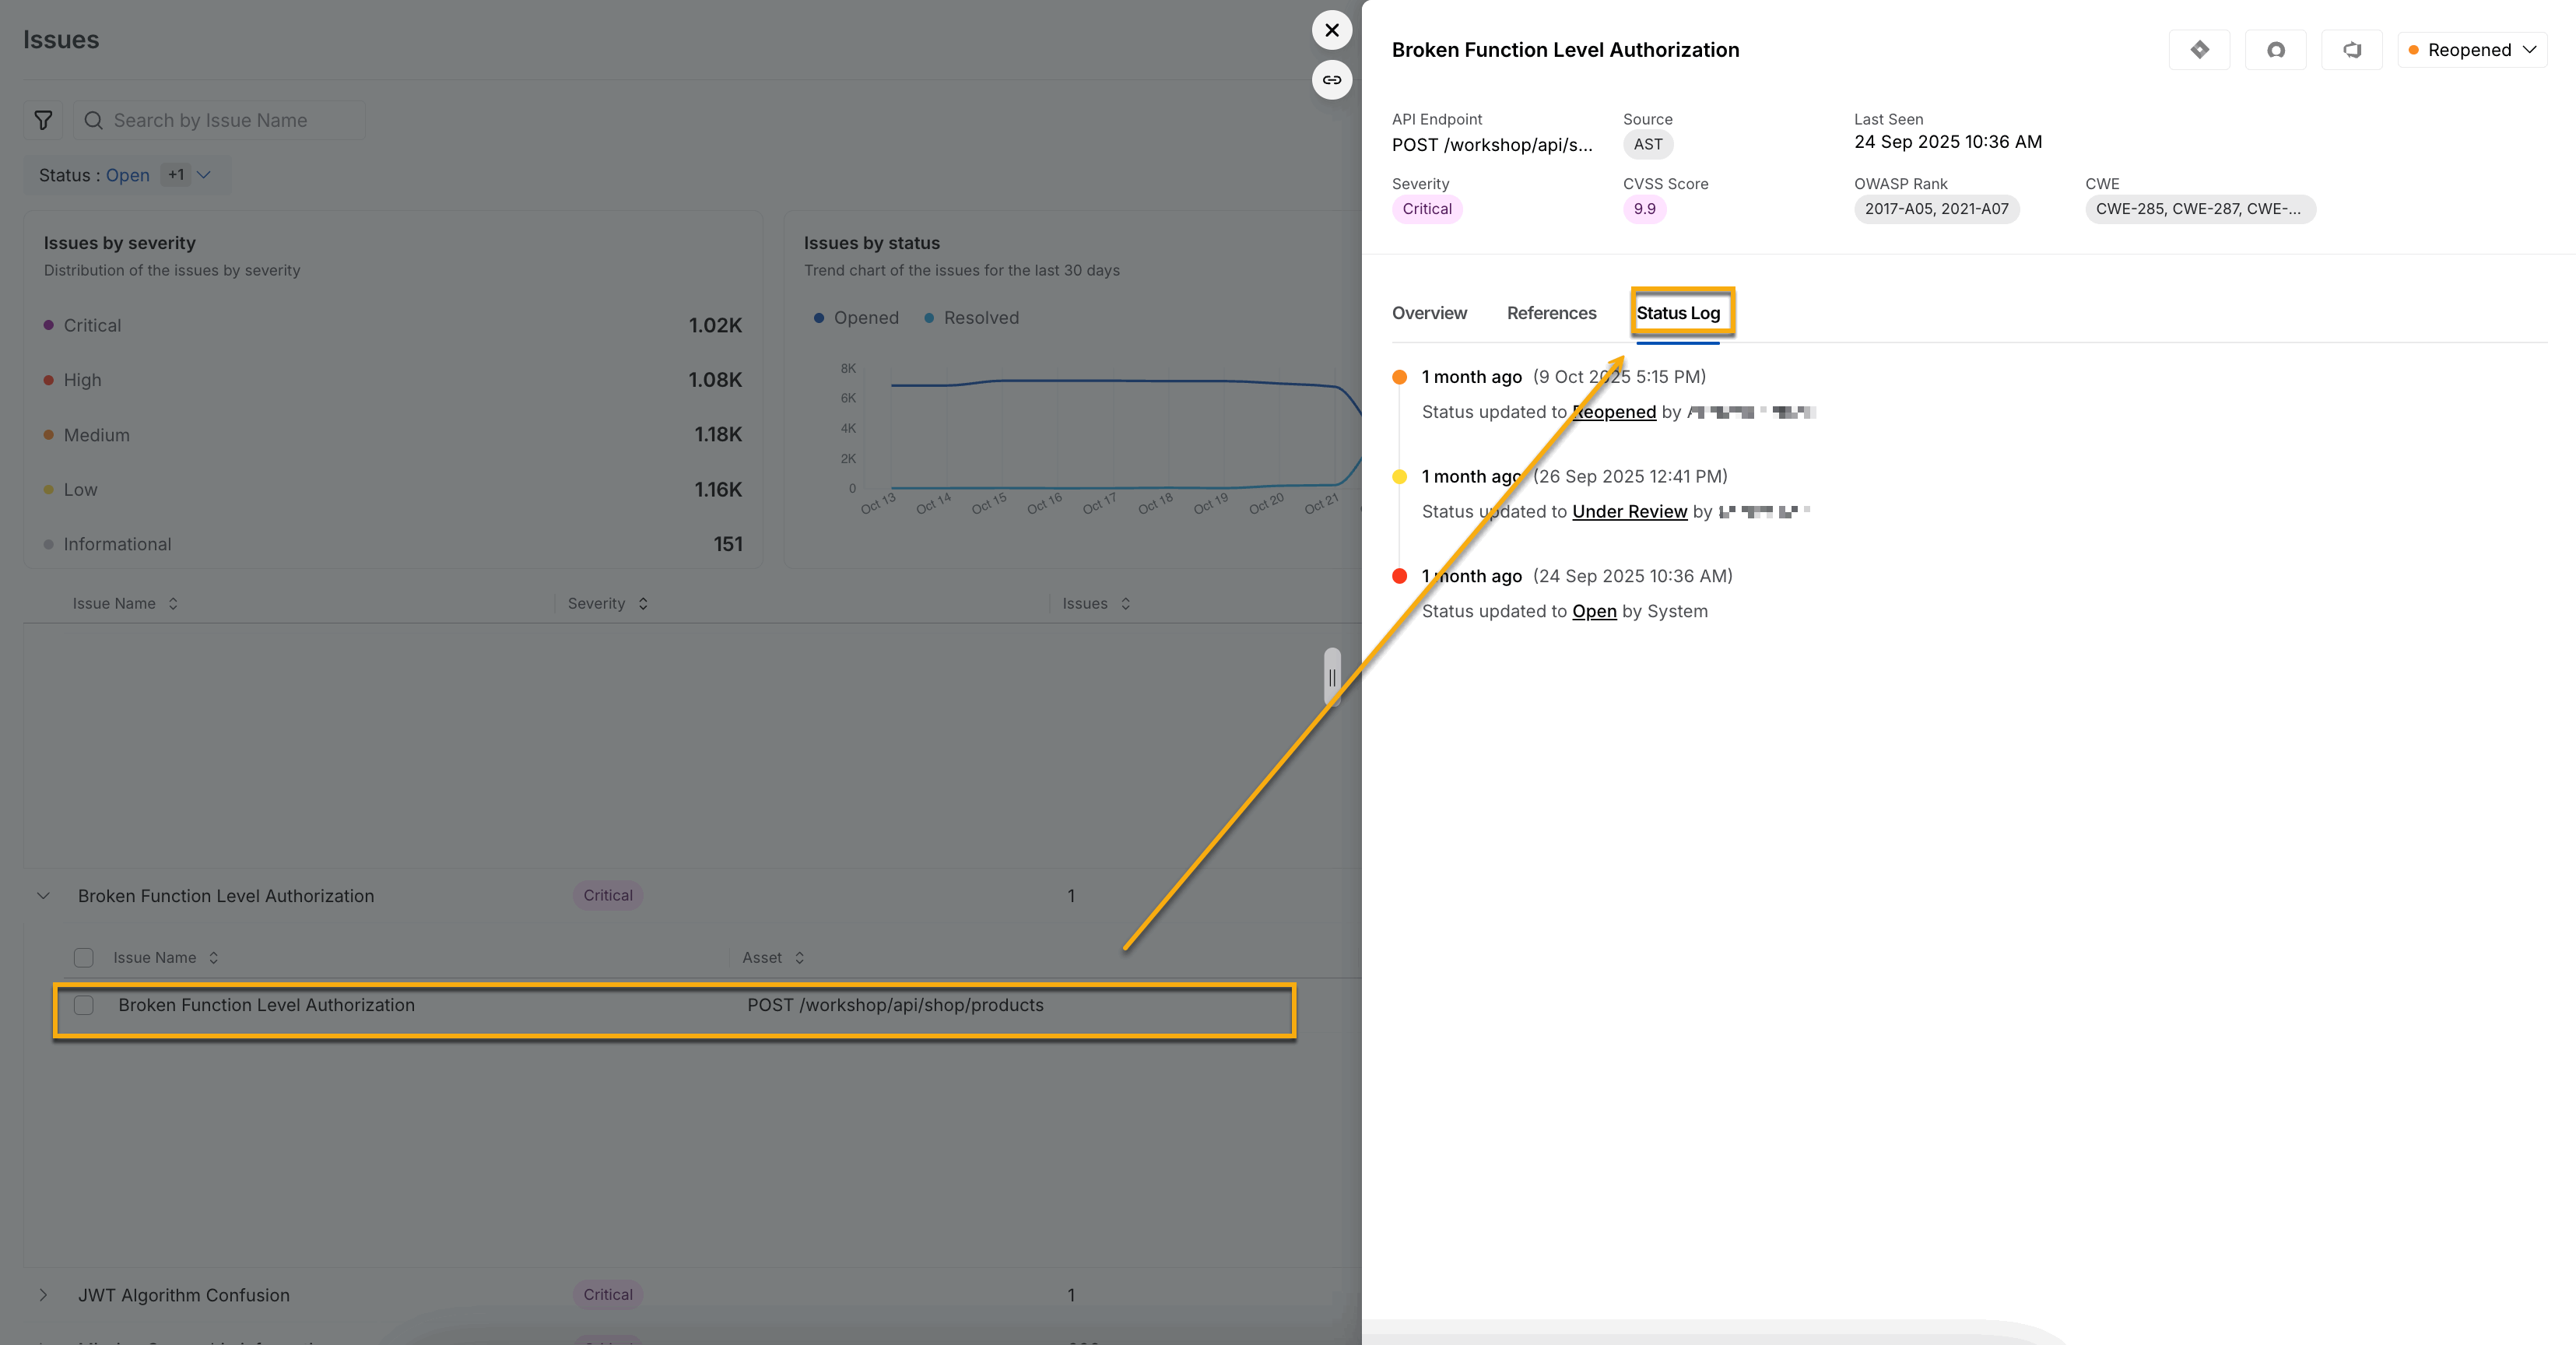
Status Log — The Status Log tab provides a timeline of all status changes for the issue, including timestamps and status updates. This helps you track the issue lifecycle and understand when and how the issue was opened, reopened, or fixed.
Remediation — Based on the above details, you can take the necessary actions to remediate the issue. Traceable provides the following options for you to do so:
Project Management — Traceable supports multiple integrations for you to choose from. You can use either of these to create tickets in your corresponding projects and work towards their remediation. For more information, see Project Management.
Status Change — You can use the drop-down menu to change an issue's status as needed. While changing the status, Traceable also shows a pop-up window where you can specify a comment for the status change. This helps you maintain a log of historical events related to the issue. Further, this comment is visible in the Status Log tab of the issue where you changed the status. For more information on the available statuses, see Issue status management and remediation.
Issue status management and remediation
Traceable enables you to create integration tickets and change their status as needed for issue remediation.
Supported statuses
You can manually change the state of the detected issue to any of the following:
Status | Description |
|---|---|
Open | Traceable has detected an issue. |
Under review | The issue has been acknowledged. You are taking steps to close it. |
Fixed | The issue has been closed. Traceable continues to monitor the asset (API endpoint or service) even after you mark it as fixed. If Traceable identifies new issues, it automatically moves them to an Open state for you to review and resolve. |
Not an issue | Move the issue to a Not an Issue state when you do not want Traceable to report it. If Traceable continues to see this issue category, it does not move it to an open state. |
Accepted risk | You can move the issue to this state when you understand and accept the impact. |
Reopened | The issue was previously closed but has been reopened for review and resolution. |
Issue remediation
You can update the status or create integration tickets using either of the following methods:
Individual update — Update the status or create tickets for each issue individually.
Bulk update — Update the status or create tickets for multiple issues at once.
The following tabs outline the steps for the methods above:
To remediate an issue, complete the following steps:
If the Issues page is grouped by category, click the arrow for the category.
Click the issue name you wish to remediate.
In the Issue Detailed View page’s top right corner, click the Jira Integration icon, ServiceNow ITSM Integration icon, Azure DevOps Integration icon, or Status drop-down according to your requirements.
Note
If you have not configured an integration, you can do so directly by clicking the relevant Integration icon. For the configuration steps, see the corresponding document under Project Management.
Do one of the following:
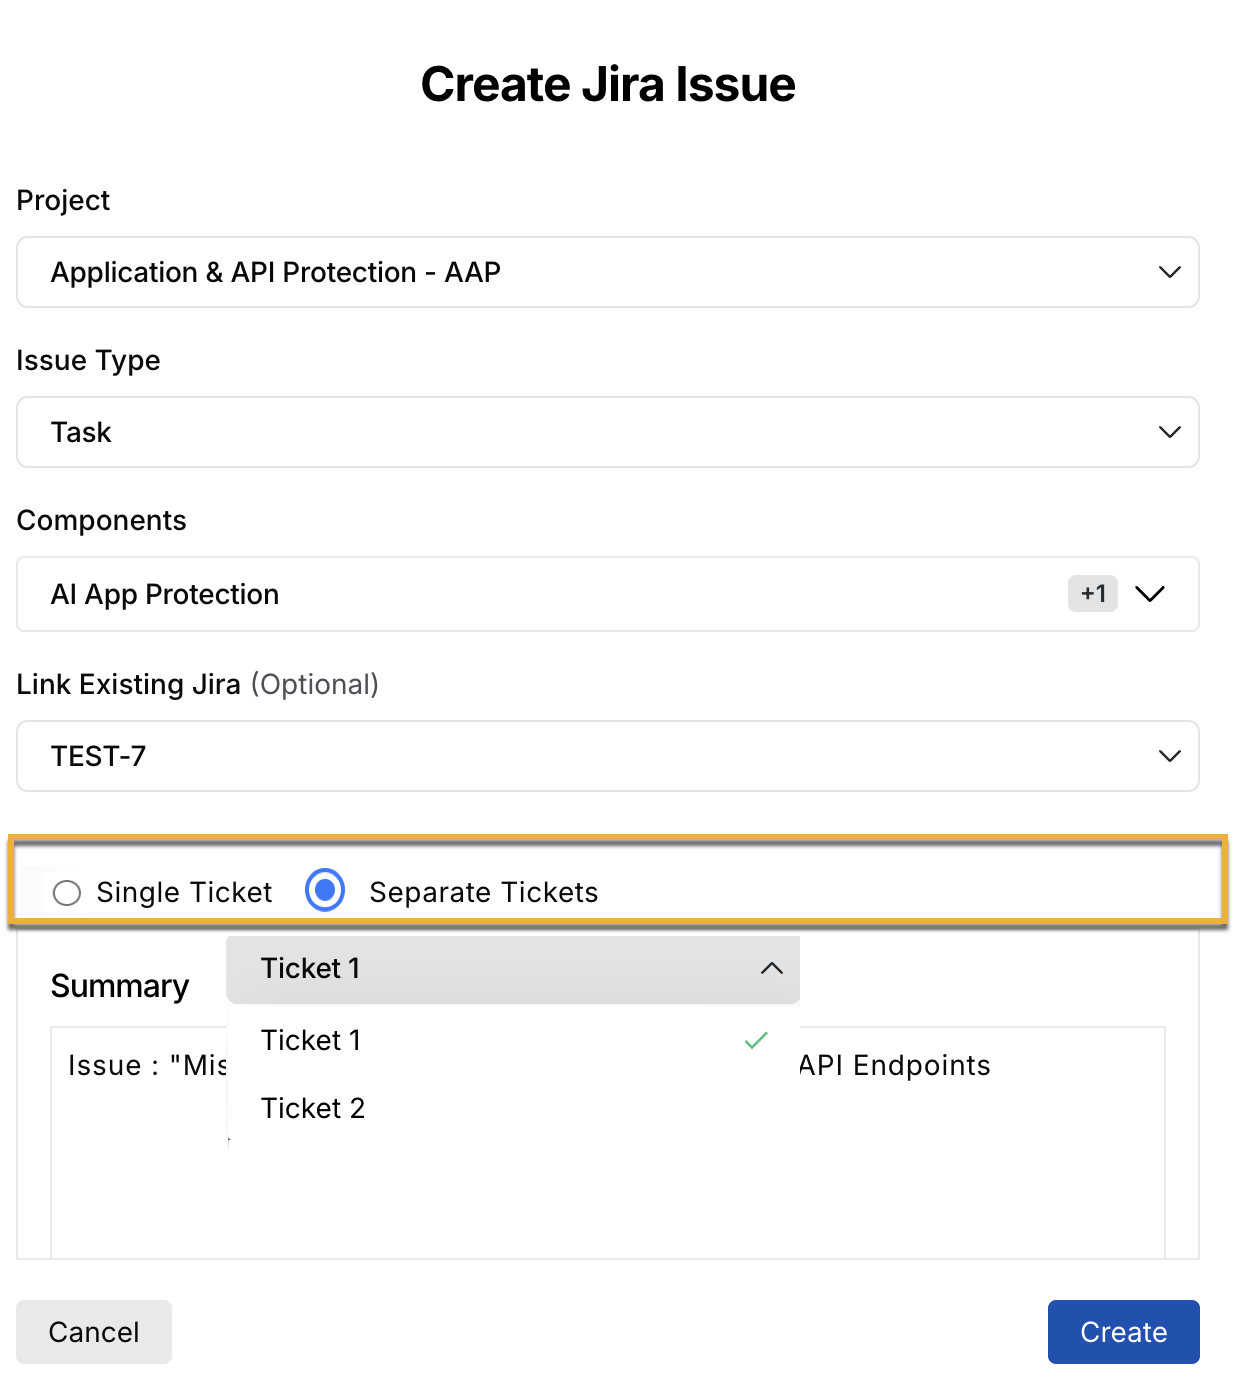
If you clicked the Jira Integration icon, specify the ticket details as needed. You can also link the existing related Jira tickets using the Link Existing Jira option, as shown below. This helps you keep track of related issues and helps resolve issues quickly. For more information, see Jira Linking.
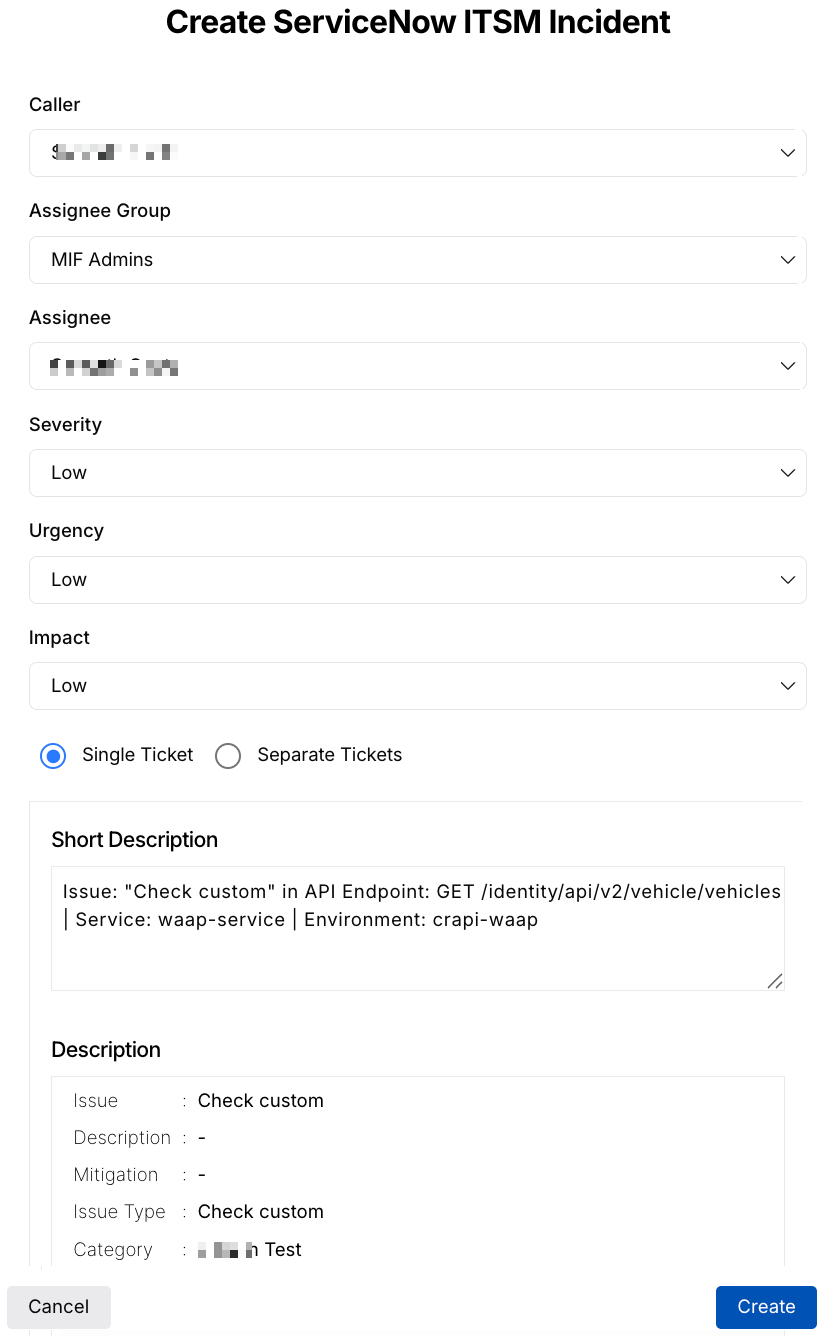
If you clicked the ServiceNow ITSM Integration icon, specify the ticket details according to your requirements. This helps you keep track of related issues and helps resolve issues quickly. For more information, see ServiceNow ITSM Integration.
If you clicked the Azure DevOps Integration icon, specify the ticket details according to your requirements. This helps you keep track of related issues and helps resolve issues quickly. For more information, see Azure DevOps Integration.
If you clicked the Status drop-down, a pop-up window appears where you can select the new status for the selected issue, or you can add a comment to describe the change. This helps you maintain a log of historical events related to the issue. Further, the comment is visible in the Status Log tab of the Issue’s Detailed View.
Status Log Tab
To perform a bulk update, complete the following steps:
Step 1 — Select issues
Navigate to the Issues page.
Use filters or grouping as needed to narrow down the list.
Select the checkboxes next to the issues that you want to update.
Step 2 — Perform bulk action
At the bottom of the page, select one of the following options to either update the status of the issue or create tickets:
.png)
Bulk Status Update
Update Status — If you clicked the Update Status, a pop-up window appears where you can select the new status for the selected issues or add a comment to describe the change. This helps you maintain a log of historical events related to the issue. Further, the comment is visible in the Status Log tab of the Issue’s Detailed View.
Status Log Tab
Jira icon — Click the Jira icon to create Jira tickets for the selected issues. For more information, see Bulk Jira ticket creation. If any selected issues are already linked to Jira tickets, choose one of the following options:
View linked issues — Creates tickets only for unlinked issues and lets you view existing Jira links.
Unlink and create new — Removes existing Jira links and creates new tickets for all selected issues.
Creating Jira Tickets in Bulk
Note
You must have an existing Jira integration configured to create tickets. If not already configured, click the Jira icon to complete the integration setup. For more information, see Jira Integration.
When you create Jira tickets in bulk, you can update the status of the selected issues from the same view. Traceable records each status change in the Status Log and synchronizes the updated status with linked Jira tickets using bidirectional sync.
The following interactive demo walks you through the steps to navigate, create, and link different Jira tickets for issues in Traceable:
ServiceNow ITSM icon — Click the ServiceNow ITSM icon to create tickets for the selected issues, as shown below:
ServiceNow ITSM Bulk Ticket Creation
Note
You must have an existing ServiceNow ITSM integration configured to create tickets. If not already configured, click the ServiceNow ITSM icon to complete the integration setup. For more information, see ServiceNow ITSM Integration.
The following interactive demo walks you through the steps to navigate and create different ServiceNow ITSM tickets for issues in Traceable:
Issue auto-resolution
While you can resolve an issue by changing its status to Fixed, Traceable also auto-resolves it. The following table lists the applicability and scenario of auto-resolution for each source:
Applicability and Scenario → | Auto-Resolution | Scenario 1 | Scenario 2 |
|---|---|---|---|
Live Traffic | Yes | Traceable has not detected the issue in the 14 days since its last occurrence. | Not Applicable. |
API Security Testing | Yes | Traceable has not detected the issue in the 60 days since its last occurrence. | Traceable does not detect the issue in the 15 scans following its last observation. |
Compliance | Yes | Traceable has not detected the issue in the 14 days since its last occurrence. | Not Applicable. |
Note
The updated status of the auto-resolved issues may take up to 24 hours to reflect on the Traceable platform.
While Traceable sets the above auto-resolution timelines for Live Traffic and Compliance by default, you can contact your Account Executive to customize them according to your requirements.
Issue deletion
You can delete detected issues from the Issue Detailed View by changing their status to Fixed or Not an issue. Traceable also deletes issues if they are deleted from all sources. For example, let us say an issue has Live Traffic and API Security Testing as the source. Then, Traceable deletes the issue when it is deleted from both sources.