Updates (January 2026 to March 2026)
March 2026 — Updated the topic to add information about the dynamic match for the payload section. For more information, see Understand Payload Match.
Traceable allows you to configure rate-limiting policies to control how frequently clients can access your APIs within defined time windows. By setting request thresholds and enforcement actions, you can prevent abuse, mitigate automated attacks, and maintain service stability. For more information
What will you learn in this topic?
By the end of this topic, you will be able to:
Understand what Rate Limiting is and how it protects APIs from abuse and traffic spikes.
Identify when to use static and dynamic conditions to control API request thresholds.
Configure source, payload, target, and compute conditions to define precise rate controls.
Select appropriate enforcement actions such as block, temporary block, monitor-only, or testing, based on your security requirements.
Understand Rate-Limiting
Before you create a rate-limiting rule, review the following table to understand why you should use rate-limiting and how you can configure it effectively within your Application and API protection strategy.
Why use it? | When to use it? | How can you leverage it? |
|---|---|---|
Block brute-force and credential-stuffing attacks. Maintain service availability and backend stability. Protect login, token, and password reset flows. Enforce fair API usage and reduce automated abuse. | When APIs are exposed to public or partner traffic. During traffic spikes or unpredictable demand. When securing authentication or other sensitive endpoints. When preventing scraping, enumeration, or internal misuse. | Create a rule by defining the intent, source conditions, payload criteria, and target endpoints. Configure static limits per user or IP within a defined time window, or use dynamic limits based on observed traffic baselines. Choose how to evaluate traffic and select an enforcement action. |
You can configure a custom rate-limiting rule to protect your applications from brute-force attacks. Using this rule, you can control the number of incoming requests from a user within a period. Traceable blocks that notify the user as soon as the limit is exhausted.
Before you begin
Before you proceed to create the rules, it is important to understand how payload match works.
Note
Traceable recommends configuring user attribution to your requirements before setting up a rate-limiting rule. For more information, see User Attribution.
Understand payload match
Traceable supports two types of payload matching when evaluating rule criteria:
Static payload match (default)
In the Step 1 of rule creation, Traceable uses payload matching to evaluate request and response data against defined rule criteria. In static payload matching, the platform compares a selected request or response component against a fixed Value to determine whether a rule condition is met. If you do not enable the Dynamic toggle, it compares a static component against a static value. You must configure the following elements:
Element
Description
Component
The part of the Request or Response to evaluate, for example, the Header.
Operator
The comparison logic used to evaluate the component against a specified value, for example, Matches exactly.
Value
The fixed value used for comparison, for example, /login.
The screenshot below shows static payload matching. In this example, the selected attribute, Request URL, matches the value /login.
.png)
Static Payload Matching
Dynamic payload match
In Step 1 of rule creation, Traceable supports dynamic payload match for the Request, Response, or Attribute criteria field. Dynamic matching allows Traceable to compare two attributes rather than matching a component against a static value. Each side of the comparison can reference values from the request, response, or extracted attributes. The following table displays the different elements, their descriptions, and examples involved in payload match:
Element
Description
Example
First Component
The first attribute selected for comparison. You can choose a value from the Request, Response, or Attributes.
HTTP Method
Operator
The comparison logic is used to evaluate the relationship between the two selected components.
Matches exactly
Second Component
The second attribute selected for comparison from the Request, Response, or Attributes. Traceable dynamically resolves both values during request processing.
Header
Key Value
The key value used for comparison.
POST
The screenshot below shows an example of a dynamic match where the Request HTTP Method attribute is being compared with the Request Header Key Value POST.
.png)
Dynamic Payload Matching
The following interactive demo walks you through the steps to dynamically match payloads in the criteria step of rule creation, if you select request, response, or attribute criteria in the payload:
Steps to create a rule
To create a rate-limiting rule in Traceable, navigate to Protection → Settings → Policies → Custom Policies, navigate to the Rate Limiting tab, and click + Add Rule in the top right corner to start creating a rule. You can create the rule using the following four steps:
Set the Criteria — Configure the conditions the traffic must meet, including source, payload components, and target scope.
Configure the policy conditions — Set the request limits and thresholds that trigger the rule based on traffic behavior.
Configure the Actions — Specify how Traceable should respond when the rule is triggered, such as blocking or monitoring requests.
Review and Submit — Validate the configured settings and submit the rule for activation.
Step 1 — Set the criteria
As part of setting up the criteria, you must complete the following:
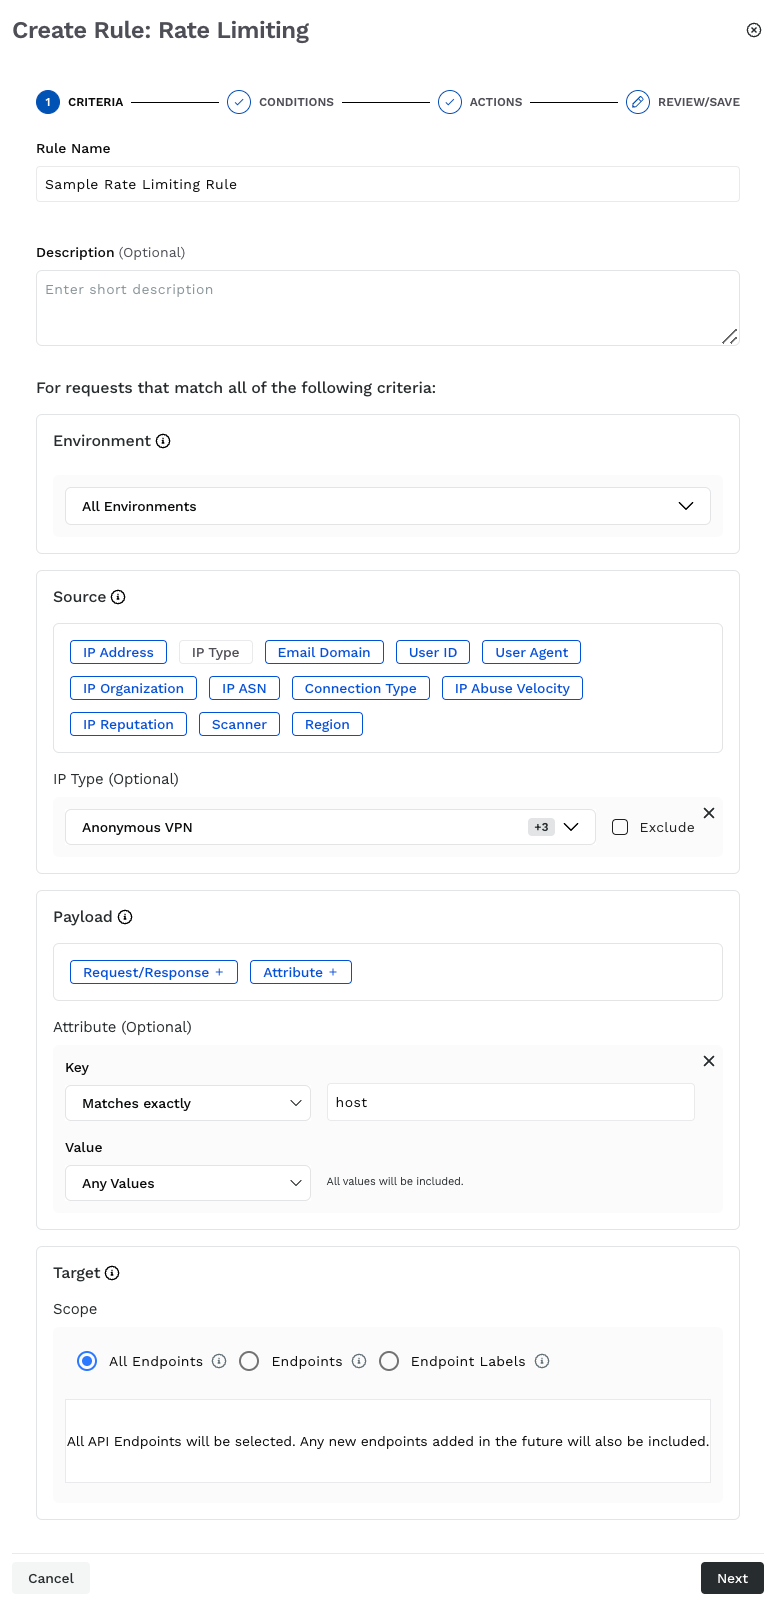
Rate Limiting Criteria
Rule Name — Specify a unique and identifiable name for the rule (for example, Sample rate limiting rule).
Description (Optional) — Specify a summary of the rule’s purpose.
Environment — Select the environment where Traceable should apply the rule, according to your requirements.
Source Criteria — Define the traffic conditions to which the rule applies (for example, IP Addresses → All external IPs). The following table describes the supported source types and their usage for creating a rate-limiting rule.
Source Type
Description
IP Address
Limit traffic from specific internal or external IP addresses.
IP Type
Control usage based on IP types such as Anonymous VPN, Bot, Scanner, etc.
Email Domain
Limit requests from specific or a range of email domains (for example, domains belonging to a specific organization).
User ID
Manage traffic based on unique user IDs or regular expressions (regex).
User Agent
Limit requests based on a user-agent regex that identifies client types, such as bots or scripts.
IP Organization
Manage traffic from specific entities known for generating high API request volumes.
IP ASN
Limit traffic from specific ASNs representing the originating network provider.
Connection Type
Control traffic based on connection types such as Corporate or Data Center.
IP Abuse Velocity
Limit requests from IPs exhibiting high API abuse rates.
IP Reputation
Restrict traffic from IPs with a poor reputation identified through threat intelligence.
Region
Enforce limits by geographic region to address location-based traffic patterns.
Scanner
Manage traffic from automated testing tools such as Traceable’s AST.
Note
All Sources, except IP Abuse Velocity and IP Reputation, have an Exclude checkbox corresponding to their value field. When you select that check box, Traceable applies the policy to all values except the ones you choose.
Specify the Payload on which you want to apply the rule. For more information, see Understand Payload Match.
Specify the Target API endpoints you want Traceable to monitor in the rule. You can select one or more APIs or labels to which the rules should apply. The rule applies to all the underlying APIs when you select a label. Target has the following sub-sections:
Targets
Description
All Endpoints
Apply the rule to all endpoints within the selected service(s).
API Endpoints
Apply the rule to specific API endpoints. This allows granular control at the endpoint level.
Endpoint Labels
Apply the rule to endpoints associated with specific labels, enabling logical grouping and reuse across APIs.
Once you have set the above criteria, click Next.
Step 2 — Configure the policy conditions
Traceable provides the following options for configuring policy conditions. These conditions define the numerical limits after which the rule triggers.
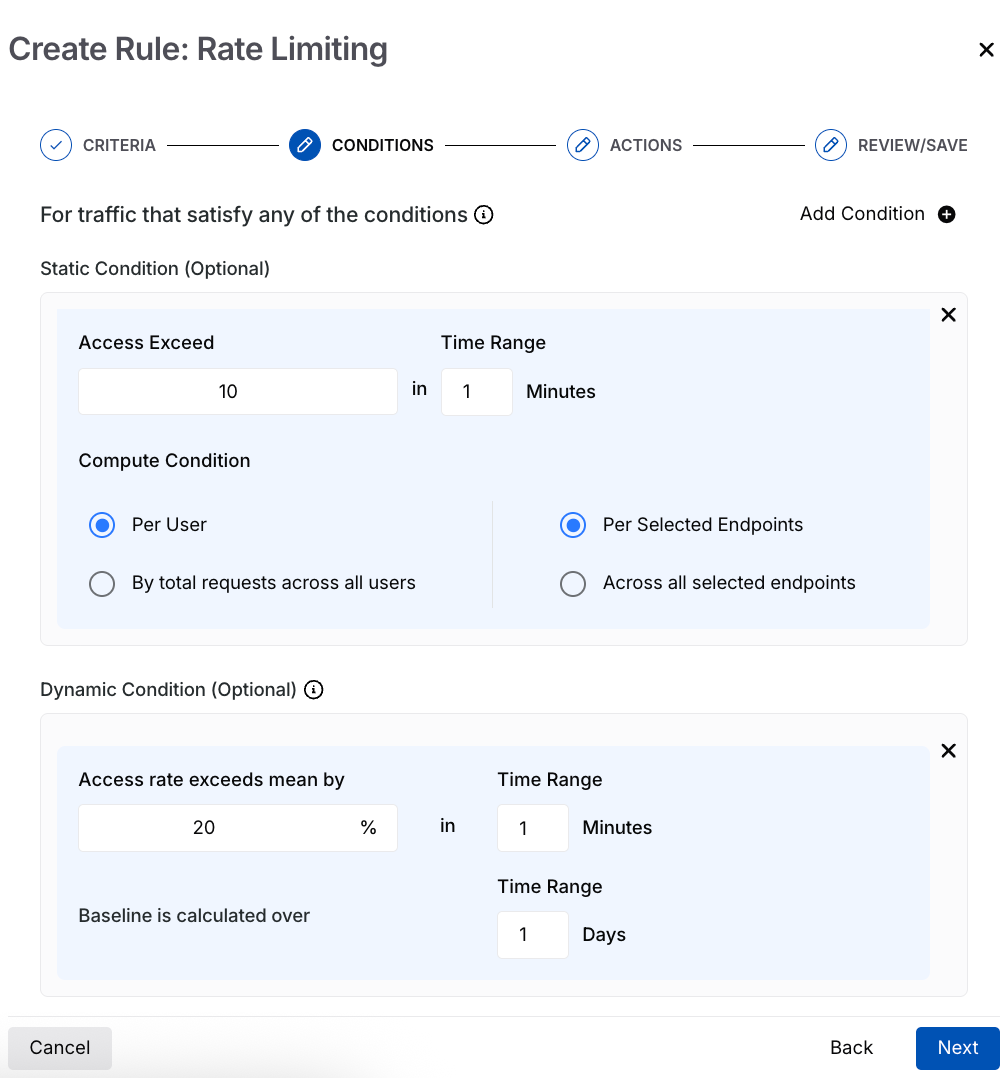
Rate Limiting Static and Dynamic Conditions
The following table summarizes the metrics and configuration options used to define static and dynamic conditions for rate-limiting rules:
Parameter | Static Condition | Dynamic Condition |
|---|---|---|
Purpose | Applies a fixed request limit based on configured values. | Adjusts the request limit dynamically based on observed traffic patterns. |
Access Threshold | Access Exceed — The number of requests allowed before Traceable applies the configured action. Example: 50 requests. | Access rate exceeds mean by — The percentage by which requests can exceed the baseline before Traceable applies the configured action, for example, 20%. |
Time Range | The time window during which the request limit is evaluated, for example: 50 requests within 5 minutes. | The time window during which the dynamically calculated limit is evaluated, for example: 120 requests within 5 minutes when the baseline is 100, and the threshold is 20%. |
Baseline Calculation | Not applicable. | Time Range (Baseline) — The historical period used to calculate baseline traffic, for example, 5 days. |
Evaluation Scope | Compute Condition determines how the limit is evaluated across users and endpoints: • Per user and per selected endpoints — The limit applies to each user per endpoint. • Per user and across all selected endpoints — The limit applies to each user across all selected endpoints. • Total requests across all users and per selected endpoints — The limit is calculated collectively for all users for each endpoint. • Total requests across all users and across all selected endpoints — The limit is calculated collectively for all users across all selected endpoints. | Not applicable. |
Note
You can have one or more static and dynamic conditions working together. For example, you can use the static condition to limit requests to 1000 per hour and the dynamic condition to prevent sudden traffic spikes, ensuring steady API usage while preventing attacks.
Step 3 — Configure the actions
As part of configuring the action, you must complete the following:
Note
The availability of the options below depends on the configurations set in the steps above.
Event Handling — Traceable provides the following options for handling the event generated by the rate-limiting rule. The following options in the table let you verify your rule, observe the generated events, and, if required, block requests.
Option
Description
Block indefinitely
Blocks the user when they meet the defined criteria, preventing any further API requests.
Block for a fixed duration
Blocks the user for a specified period after they meet the criteria.
Block based on condition duration
Blocks the user for the same duration as the time range defined in Step 2.
Monitor only (Do not block)
Does not block the user; it continues to monitor activity and generate events.
Mark for Testing
Tests the rule without impacting traffic. Generates low-severity events and does not send notifications. You can view these events in Protection → Threat Activity using the Testing filter.
Event Severity — Select the severity that Traceable should assign to the event generated by the Rate Limiting rule.
Note
This option is available for all options except Mark for Testing above.
Data Injection — Add the header you wish to include in the request. You can use this data for monitoring to highlight anomalies in the request.
Note
This option is available only when you select the Do not block, monitor only or Mark for Testing options above.
Once you have configured the above, click Next.
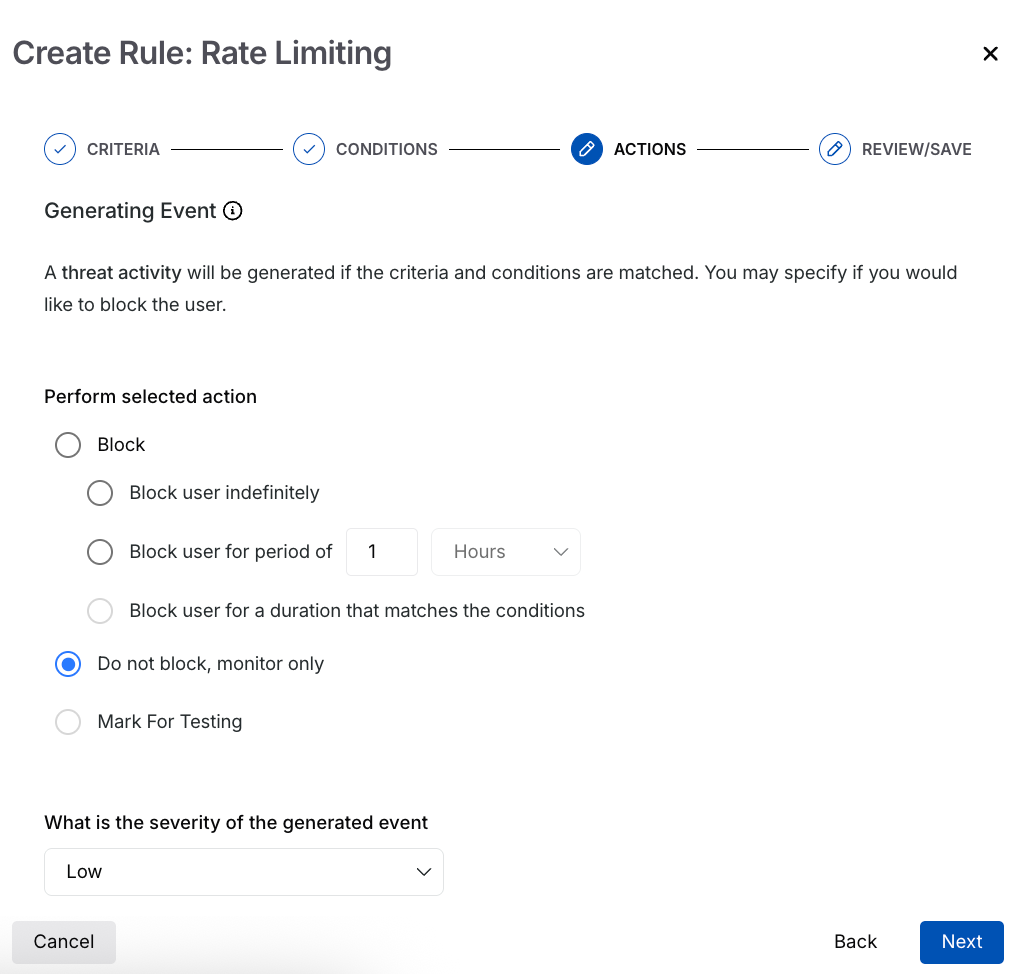
Rate Limiting Actions
Step 4 — Review and Submit
In the final step, review and submit the rule. If you wish to edit any criteria during the review, click the Edit (![]() ) icon corresponding to a section.
) icon corresponding to a section.