Updates (July 2026 to September 2026)
August 2026 — Updated the topic to add information about the availability of the virtual patch as a source filter. For more information, see Understand the virtual patch source filter.
Custom Signatures are signature-based attacks that operate on traffic signatures generated by your application. You can configure a custom signature rule to fine-tune your application and API protection strategy by providing granular control over the event types generated and the requests blocked. These rules apply globally to all the APIs. You can create custom rules for different components of a request and response, such as the header name and value, the body, and the Cookie. You can also create these rules on one or more request components. Traceable provides different preset operations for each part of the request. Traceable lets you choose the rule evaluation points based on the tracing agents used in your deployment. For more information, see Tracing Agents Rule Evaluation for Protection.
What will you learn in this topic?
By the end of this topic, you will be able to:
Understand the need for Custom Signature rules.
Understand Virtual Patch source filter
Understand the steps to create a rule.
The actions that you can take on the created rules.
Before you begin
Before you proceed to create the rules, make a note of the following:
Make sure you have the Settings RBAC permissions under Module Level Access → API Protection to create the rules. For more information, see RBAC.
Make sure you understand how payload matching works. For more information, see Understand payload match.
Understand Custom Signatures
Before you configure Custom Signature rules , it is important to understand how they translate your application’s security requirements into enforceable detection logic. The table below explains when to use Custom Signatures, why they are critical for closing protection gaps that generic detections cannot cover, and how you can strategically implement them to strengthen your API security posture with clarity and control.
Why use it? | When to use? | How can you leverage it? |
|---|---|---|
It allows you to implement granular, application-specific protection for applications and APIs by inspecting request and response components, including headers, parameters, URLs, payload fields, and extracted attributes. They help enforce business logic, detect misuse patterns, reduce false positives, and introduce targeted protections beyond built-in detections. | You should use Custom Signatures when you need precise control over application and API traffic behavior that generic security detections cannot fully capture. For example, detecting suspicious header values, validating request patterns, enforcing application-specific rules, identifying abnormal payload structures, or protecting sensitive API operations from misuse. | Create a rule by defining the intent, criteria, and target scope. Configure the enforcement action (Allow, Monitor, Monitor and Block, or Mark for Testing), define source conditions, specify the payload-matching logic (static or dynamic), and specify the services or endpoints to which the rule applies. |
Understand the virtual patch source filter
Virtual patching provides temporary protection for vulnerable API endpoints identified by API Security Testing (APIST), without requiring an immediate code-level fix. It helps reduce the exposure window between vulnerability detection and remediation by applying a targeted WAF rule.
To view the virtual patch created on the issues page, navigate to Protection → Policies → Custom Policies → Custom Signatures tab to view virtual patches alongside your manually authored signatures. You can apply the Source: Virtual Patch filter to view only the rules Traceable generated from scan findings. The following screenshot highlights the selected virtual patch filter and source column:
.png)
Virtual Patch source in Custom Signature
Note
Supported WAF and environment scope: Virtual patching works only with Traceable's own WAF (inline Tracing Agent), so you get protection only where that agent runs, and only in the environment where the scan found the vulnerability.
What you get depends on eligibility and deployment: Traceable virtually patches only vulnerabilities marked Virtual Patch Eligible on the Issues page. Once a finding qualifies, Traceable checks whether it is deployed with an inline agent or with an out-of-band deployment and perform the following actions:
If it is inline, you can Block the traffic.
If it is out-of band, you can only Monitor it.
Traceable displays its scope (the specific endpoint it protects), threat category, and configured action mode (Monitor or Block) for the issue. For information about setting up a scan and reviewing detected issues, see AST Issue Management and Issues Overview.
Steps to create a rule
To create a custom rule in Traceable, navigate to Protection → Settings → Policies → Custom Policies, select the appropriate rule type, and click + Add Rule. Traceable lets you choose the rule evaluation points based on the tracing agents used in your deployment. For more information, see Tracing Agents Rule Evaluation for Protection. Create the rule using the following three steps:
Define the intent — Specify the rule name, environment, enforcement action, and rule evaluation point to determine how Traceable processes match traffic.
Set the criteria — Configure the conditions the traffic must meet, including source, payload components, and target scope.
Review and submit — Validate the configured settings and submit the rule for activation.
Step 1 — Define the intent
To define the intent, you must complete the following steps:
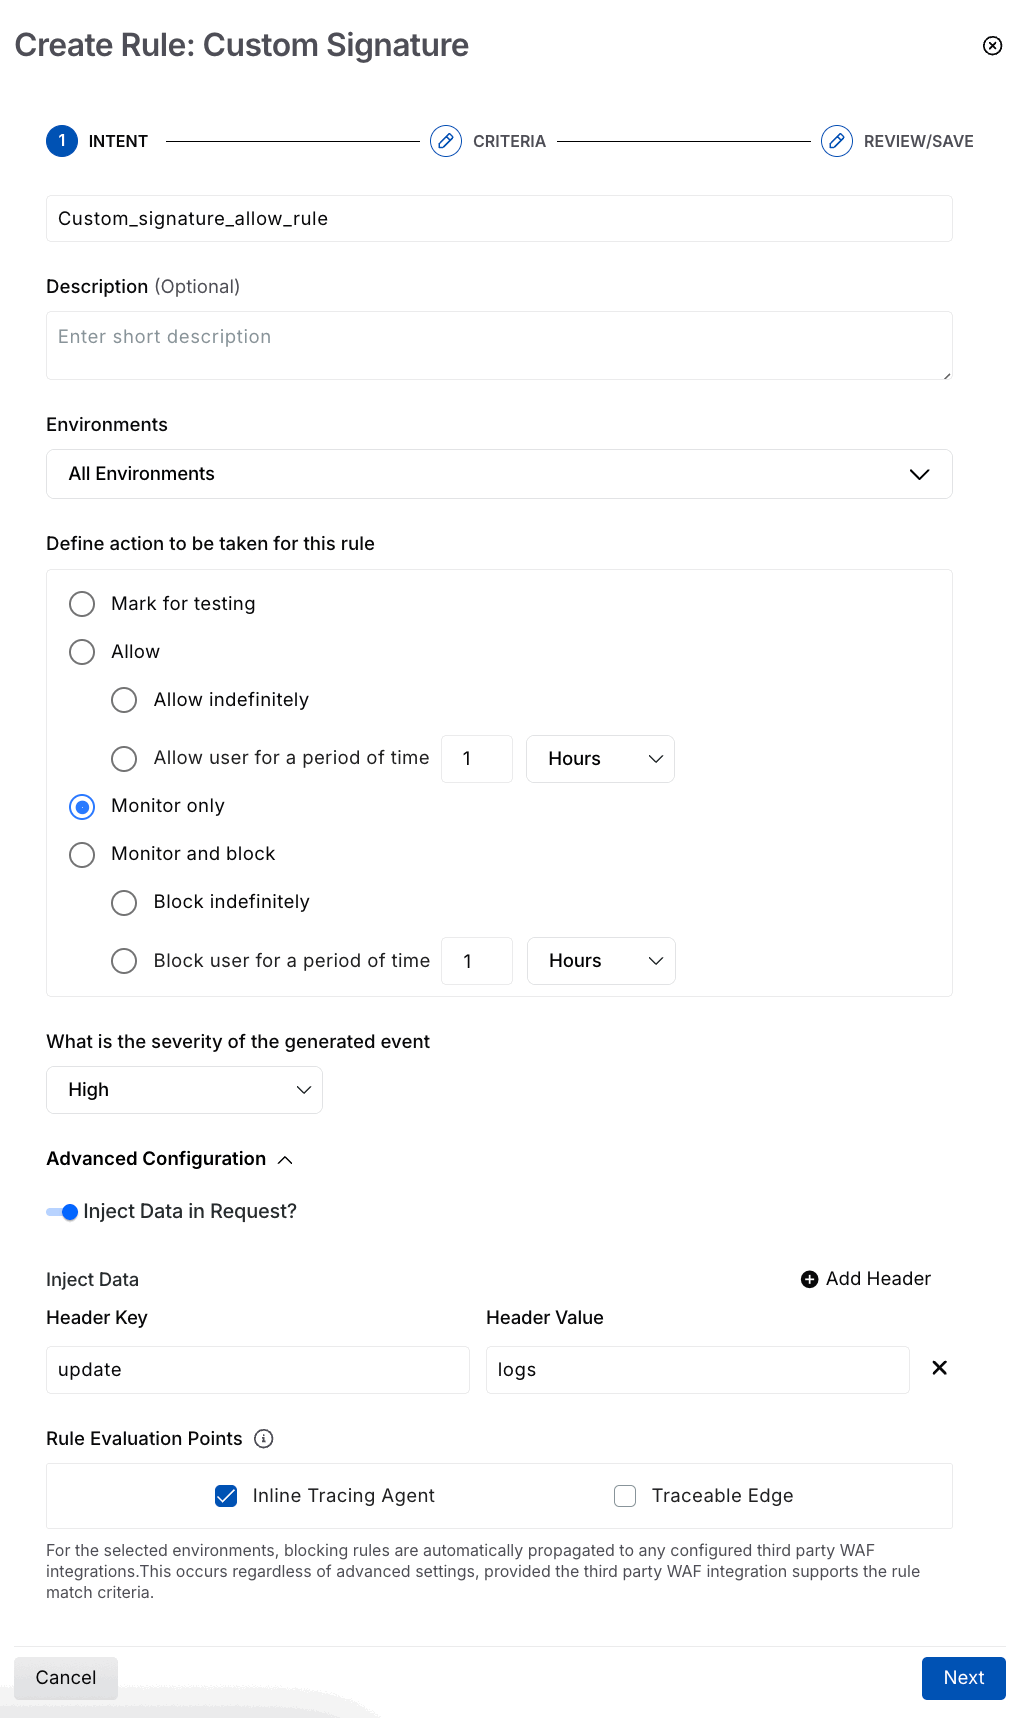
Custom Signature Intent
Rule Name — A unique and identifiable name for the rule, for example, custom signature allow rule.
(Optional) Description — A summary of the rule’s purpose or the type of traffic it controls.
Environment — The environment in which Traceable should apply the rule.
Action — The action Traceable should take when the rule conditions are met. Choose one of the available options from the table below:
Action
Description
Configuration
Mark for testing
Tests the custom signature rule before applying it to production data. Events generated by the rule appear with low severity, and Traceable does not send notifications for them. You can view these events by navigating to Protection → Threat Activity and selecting Testing in the Activity Status filter.
Not applicable
Allow
Allows all requests that match the configured criteria.
Allow indefinitely — Allows matching requests permanently.
Allow user for a period of time — Allows matching requests for a specified duration in minutes, hours, or days.
Monitor only
Monitors traffic for requests that match the configured criteria. No requests are blocked.
Not applicable
Monitor and Block
Blocks requests that match the configured criteria.
Block indefinitely — Blocks matching requests permanently.
Block user for a period of time —Blocks matching requests for a specified duration in minutes, hours, or days.
The following table highlights the availability of the configurations below based on the action you select above:
Actions →
Configurations ↓
Mark for Testing
Allow
Monitor only
Monitor and block
Severity of the event generated
X
X
✔️
✔️
Inject data in the request
✔️
X
✔️
X
Rule Evaluation Point
(The Inline Tracing Agent is selected by default)
✔️
✔️
✔️
✔️
What is the severity of the generated event? — The severity that Traceable should assign to the event generated by the Custom Signature rule, such as Low, High, Medium, or Critical.
Under the Advanced Configuration, you can configure the following:
Inject Data In Request? — Enable the toggle and add one or more headers (Header Key and Header Value) you wish to include in the request. You can use this data for monitoring to highlight any anomalies in the request. If you have selected Mark for testing or Monitor only, the rule is evaluated at the platform level and does not modify live traffic, so header injection is not applicable. For other actions (Allow, Monitor, and block), you can enable the toggle and select the appropriate rule evaluation point(s). Header injection is supported only at the Inline Tracing Agent or Traceable Edge, where traffic can be modified.
Rule Evaluation Points —Select the evaluation point(s) where Traceable should evaluate the rule, depending on your initial deployment setup:
Inline Tracing Agent — It runs within your application traffic path and enforces security rules as requests pass through your system. This evaluation point is selected by default.
Traceable Edge — It routes traffic through Traceable’s cloud, where requests are inspected, and security controls are applied before they reach your services, without requiring internal deployment.
Once you have defined the intent, Next is enabled, click Next.
Step 2 — Set the criteria
To set the criteria, complete the following steps:
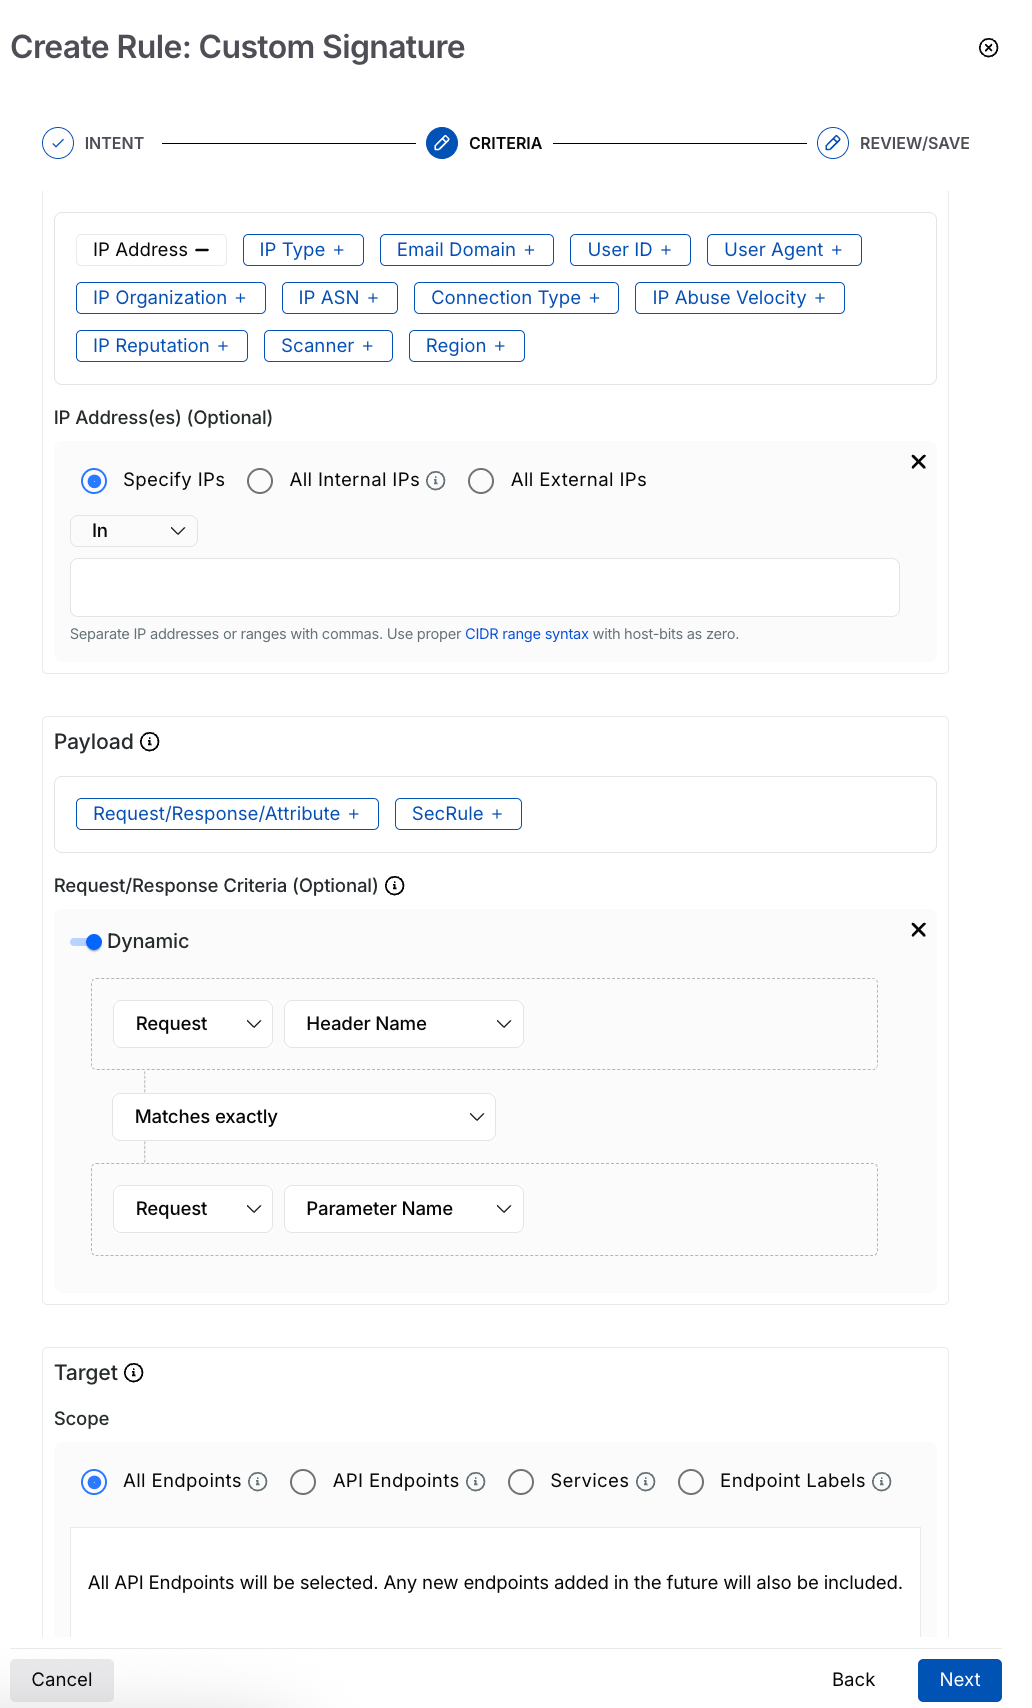
Custom Signature Criteria
Note
The availability of the criteria (Source, Payload, and Target) below depends on the configurations you selected in Step 1 above.
Specify the Source criteria you want to apply the rule to. For example, IP Addresses → All External IPs. Traceable supports the following sources for creating a custom signature rule:
Source
Description
IP Address
Restrict or allow traffic from specific internal or external IP addresses.
IP Type
Control traffic based on IP type, such as Anonymous VPNs, bots, or scanners.
Scanner
Manage traffic originating from automated scanning and testing tools, such as Traceable AST and similar security scanners.
Email Domain
Limit requests originating from specific email domains or domain ranges associated with an organization.
User ID
Manage traffic using specific user IDs or user ID patterns defined through regular expressions (regex).
User Agent
Restrict requests based on user-agent patterns that identify automated clients, scripts, or bots.
IP Organization
Control traffic from known organizations or entities that commonly generate high API request volumes.
Connection Type
Enforce limits based on the connection source, such as corporate networks or data centers.
IP ASN
Restrict traffic from specific Autonomous System Numbers (ASNs) representing network providers.
IP Abuse Velocity
Limit requests from IPs exhibiting unusually high or abusive API request rates.
IP Reputation
Control traffic from IPs flagged as high risk by threat intelligence sources.
Region
Apply limits based on geographic location to manage region-specific traffic patterns.
Specify the Payload or the type of API component on which you want to apply the rule. You can create the rule based on the following:
Request/Response/Attribute Criteria — This option allows you to evaluate specific components from the Request, Response, or Attributes using defined operators and values. You can use it to build conditions based on URLs, headers, parameters, and payload fields. For more information, see Understand payload match.
Static Payload Match (Default) — By default, Traceable compares a static component against a static value.
Dynamic Payload Match — If you enable the Dynamic toggle, it compares two attributes from the request, response, or extracted attributes, allowing Traceable to evaluate their relationship rather than matching against a fixed value.
Note
The Dynamic toggle is only visible if you select Monitor only and Mark for testing actions in the Step 1 — Define the Intent above.
Sec Rule — It helps you define security rules to analyze data as it passes through APIs. These rules are based on the OWASP ModSecurity CRS, which helps detect and block malicious patterns in API traffic. By using this feature, you can create rules that match specific patterns or behaviors in the payload, enhancing API security and automatically blocking or alerting to any suspicious activity. Traceable validates the Sec Rule during rule submission to ensure that it is valid for successful rule creation.
Note
You can add one Sec Rule per custom signature rule.
A Sec Rule must contain the
IDfield.A Sec Rule that includes the
msgfield must also have thelogdatafield. Conversely, if the Sec Rule contains thelogdatafield, themsgfield is optional. If the Sec Rule does not include thelogdatafield, themsgfield should be omitted. This applies to all parent and child Sec Rule chains.
You can add one or more criteria for the same or different payloads. Traceable performs an AND operation across all the conditions defined in the rule.
Target — The API endpoints you want Traceable to monitor under this rule. You can select one or more APIs or the scope to which the rules should apply. The rule applies to all the underlying APIs and Services. The following table describes the different targets and their corresponding descriptions:
Targets
Description
All Services
Apply the rule across all services that Traceable discovers and monitors.
Services
Apply the rule to one or more specific services. You can search or filter services based on your requirements.
All Endpoints
Apply the rule to all endpoints within the selected service(s).
API Endpoints
Apply the rule to specific API endpoints. This allows granular control at the endpoint level.
Endpoint Labels
Apply the rule to endpoints associated with specific labels, enabling logical grouping and reuse across APIs.
URL Regex (Optional)
Further restrict rule scope by matching endpoint URLs using regular expressions for example, /login.
Once you have configured the above criteria, click Next.
Step 3 — Review and submit
In the final step, you can review the selections and create the rule. If you wish to edit any intent or criteria during the review, click the Edit ( ) icon corresponding to a section.
Actions available for a rule
After you add a rule, you can perform the following actions using the Ellipse ( ) icon corresponding to a row:
Enable or Disable Toggle — Use the toggle(
.png) ) corresponding to a row to perform this action. It updates the status as active or inactive based on the enable or disable action, respectively.
) corresponding to a row to perform this action. It updates the status as active or inactive based on the enable or disable action, respectively.Edit — Add or remove attributes as needed.
View — View a rule after you have created it.
Clone — Clone a rule to create a copy of an existing rule with the same values as the existing rule.
Delete — Delete the rule.
Change Logs — Log the changes of each activity occurring within the rule created.