Updates (April 2026 to June 2026)
April 2026 — Updated the topic to add information about edge-based traffic distribution across multiple origin servers. For more information, see Origin Server(s).
Edge cluster deployment allows you to deliver and secure your application traffic through Traceable’s global edge network. When an edge cluster is provisioned, Traceable inspects, routes, and protects your application traffic in real time while applying your configured security policies. In both cases, Traceable continues to enforce your security policies and route validated traffic to your origin. The deployment process is essentially about gathering configuration details from you. Once these details are submitted, Traceable provisions the cluster and assigns a unique subdomain for secure traffic routing.
What will you learn in this topic?
By the end of this topic, you will be able to:
Interpret Traceable’s edge deployment models and traffic flow.
Choose the deployment type that best fits your environment.
Prepare routing, network, and TLS prerequisites.
Navigate to the Edge Cluster section and start a deployment.
Configure general and service-level settings.
Submit your configuration for provisioning.
Track deployment progress using lifecycle states.
Deployment models
Traceable Edge supports two methods for sending traffic to the Traceable WAAP edge. Choose the model that best matches your current setup.
CDN/Gateway ahead of Traceable WAAP
Your CDN, for example, CloudFront, Cloudflare, or gateway, remains the primary entry point. You configure it to forward traffic to your Traceable-assigned subdomain. Traceable’s WAAP inspects traffic, applies policy, and only validated traffic is forwarded to your origin.
Best if you already rely on a CDN/gateway for caching, performance, or DDoS protection.DNS-based traffic steering (direct to Traceable)
You update DNS, so your public domain CNAME points to the Traceable-assigned subdomain. Requests are routed directly to Traceable WAAP, inspected, and/or policy-enforced, and then forwarded to your origin.
Best if you want Traceable to be the primary entry point and security layer.
How it works (traffic flow)
A client (browser, API, bot) requests your public domain, for example, customer.com.
Depending on your model:
CDN/Gateway model: client → CDN/Gateway → Traceable WAAP
DNS model: client → (CNAME) → Traceable WAAP
Traceable WAAP enforces your security policies, for example, WAF, API protection, bot controls, L7 DDoS.
Only validated traffic is forwarded to your origin, for example, real-customer.com.
Before you begin
Before you proceed to create your first edge cluster, make a note of the following:
Domain and routing
DNS model — Configure DNS with a CNAME pointing to the Traceable-assigned subdomain (provided during deployment).
CDN/Gateway model — Configure your CDN or gateway to forward traffic to the Traceable-assigned subdomain.
Secure network configuration
Restrict your origin to accept traffic only from Traceable WAAP egress.
Allowlist Traceable AWS subnets on the origin.
Block or restrict direct internet access to the origin, where applicable.
TLS configuration
Upload TLS certificates if you plan to terminate HTTPS at the edge. For more information, see Manage TLS Certificates.
Additional requirements for managed deployment (AWS)
Infrastructure is deployed within your AWS environment.
TLS certificates must be available in AWS Certificate Manager (ACM).
Certificates must be in the same AWS region as the edge cluster.
Provide certificate ARNs and related details during setup.
Required information
Public domain(s), for example, app.customer.com.
Origin hostname or IP address and port.
TLS certificate and private key (for HTTPS).
Health-check path (if enabling origin health checks).
Steps to configure
When you create a new edge cluster, you configure it in two main sections:
General Settings — Defines the scope of the cluster, environment, and AWS regions.
Service Settings — Defines domains, certificates, origin servers, health checks, and advanced traffic handling.
Each section contains required and optional fields. The following tables describe the fields, their meaning, and default values.
Step 1 — Navigate to the edge cluster
Navigate to Settings → Edge Cluster.
Click Add New Cluster.
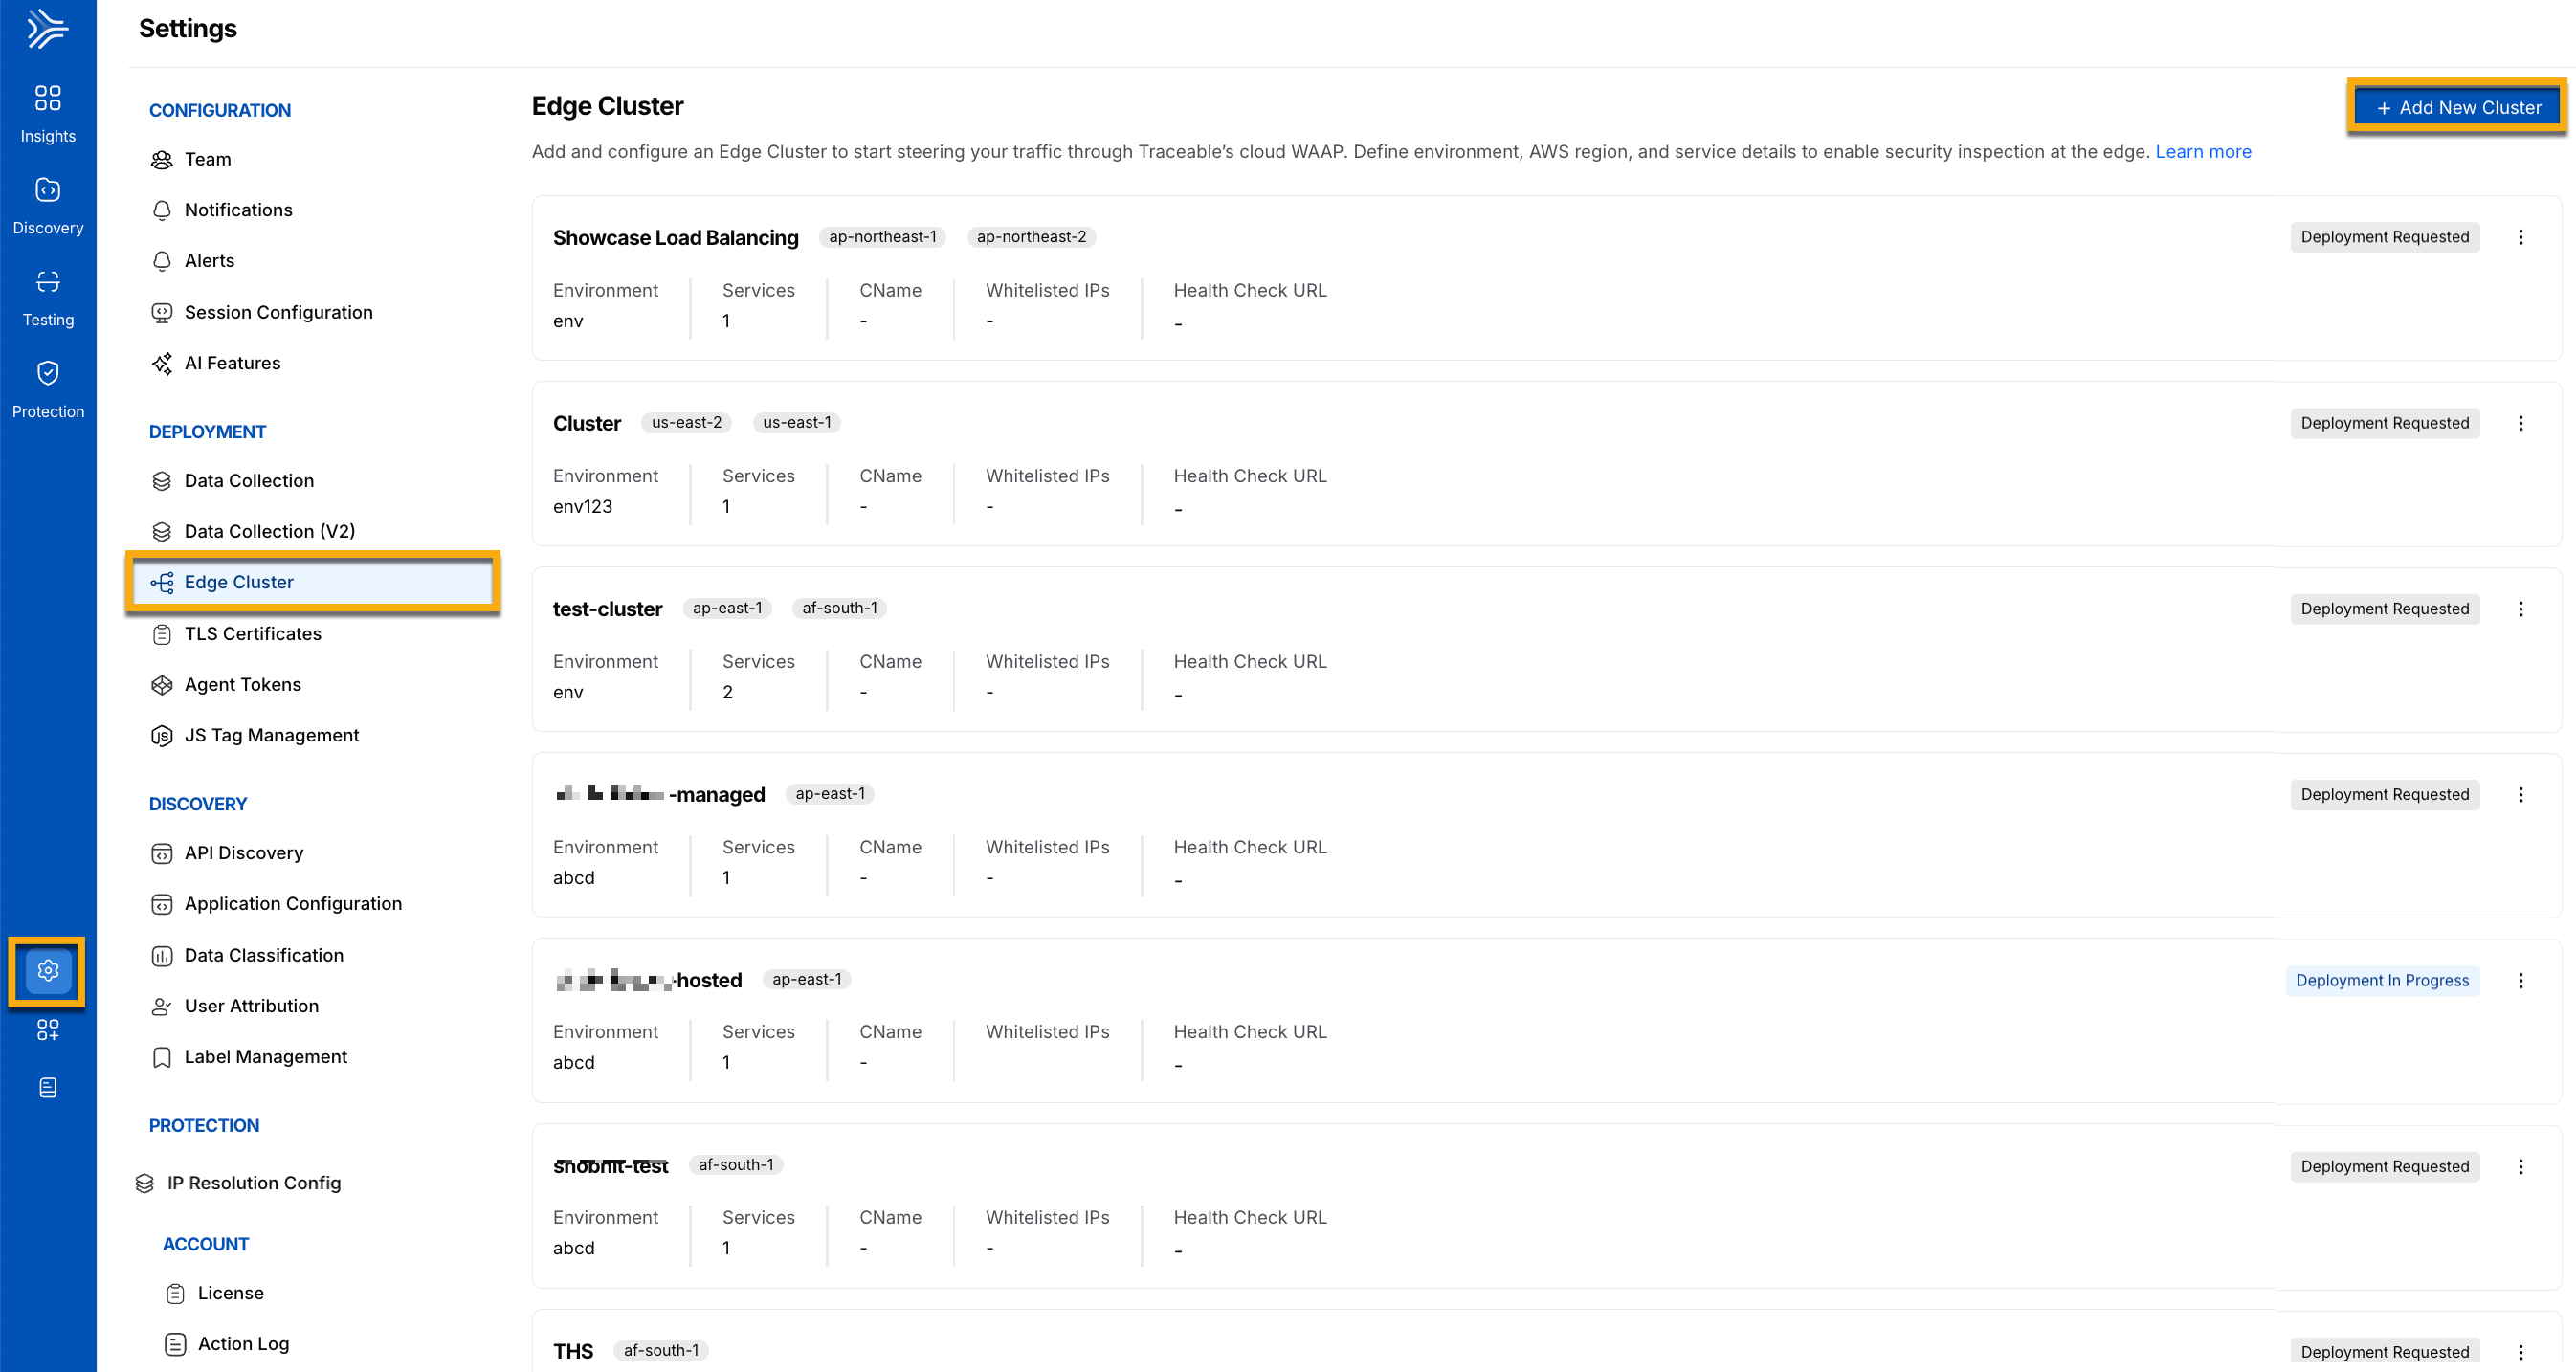
Edge Cluster Navigation
Step 2 — Configure general settings
In the New Edge Cluster slide-out panel, to complete the following steps, refer to the table below:
Field | Description | Default Value |
|---|---|---|
Cluster Name | Descriptive label for the cluster, for example, customer_portal_prod. | — |
Deployment Type | Where the edge infrastructure will run | Hosted |
Environment | Traceable environment, such as Production, Staging, or Development. | — |
Primary AWS Region | AWS region from which your application traffic will be delivered. Choose the region closest to your users for the lowest latency | — |
Secondary AWS Region (Optional) | Backup AWS region for failover. The traffic is automatically routed to this region if the primary region is unavailable. | — |
Idle Timeout (s) | The time a connection can remain idle before closing. | 60 |
Max Connection Duration (s) | Maximum lifetime of a connection. | 3600 |
Max Header Count | Maximum number of HTTP headers per request. | 100 |
Max Requests per Connection | Requests allowed on a single keep-alive connection. | 1000 |
Request Header Timeout (s) | Max time to receive headers. | 2 |
Header Case Insensitivity | Treats HTTP headers as case-insensitive. Set to false if you require strict case sensitivity. | Enabled |
General settings define the cluster's overall scope, identity, environment, and regions, as well as connection behavior defaults, such as timeouts and retry limits. These values shape the cluster's operation at a foundational level.
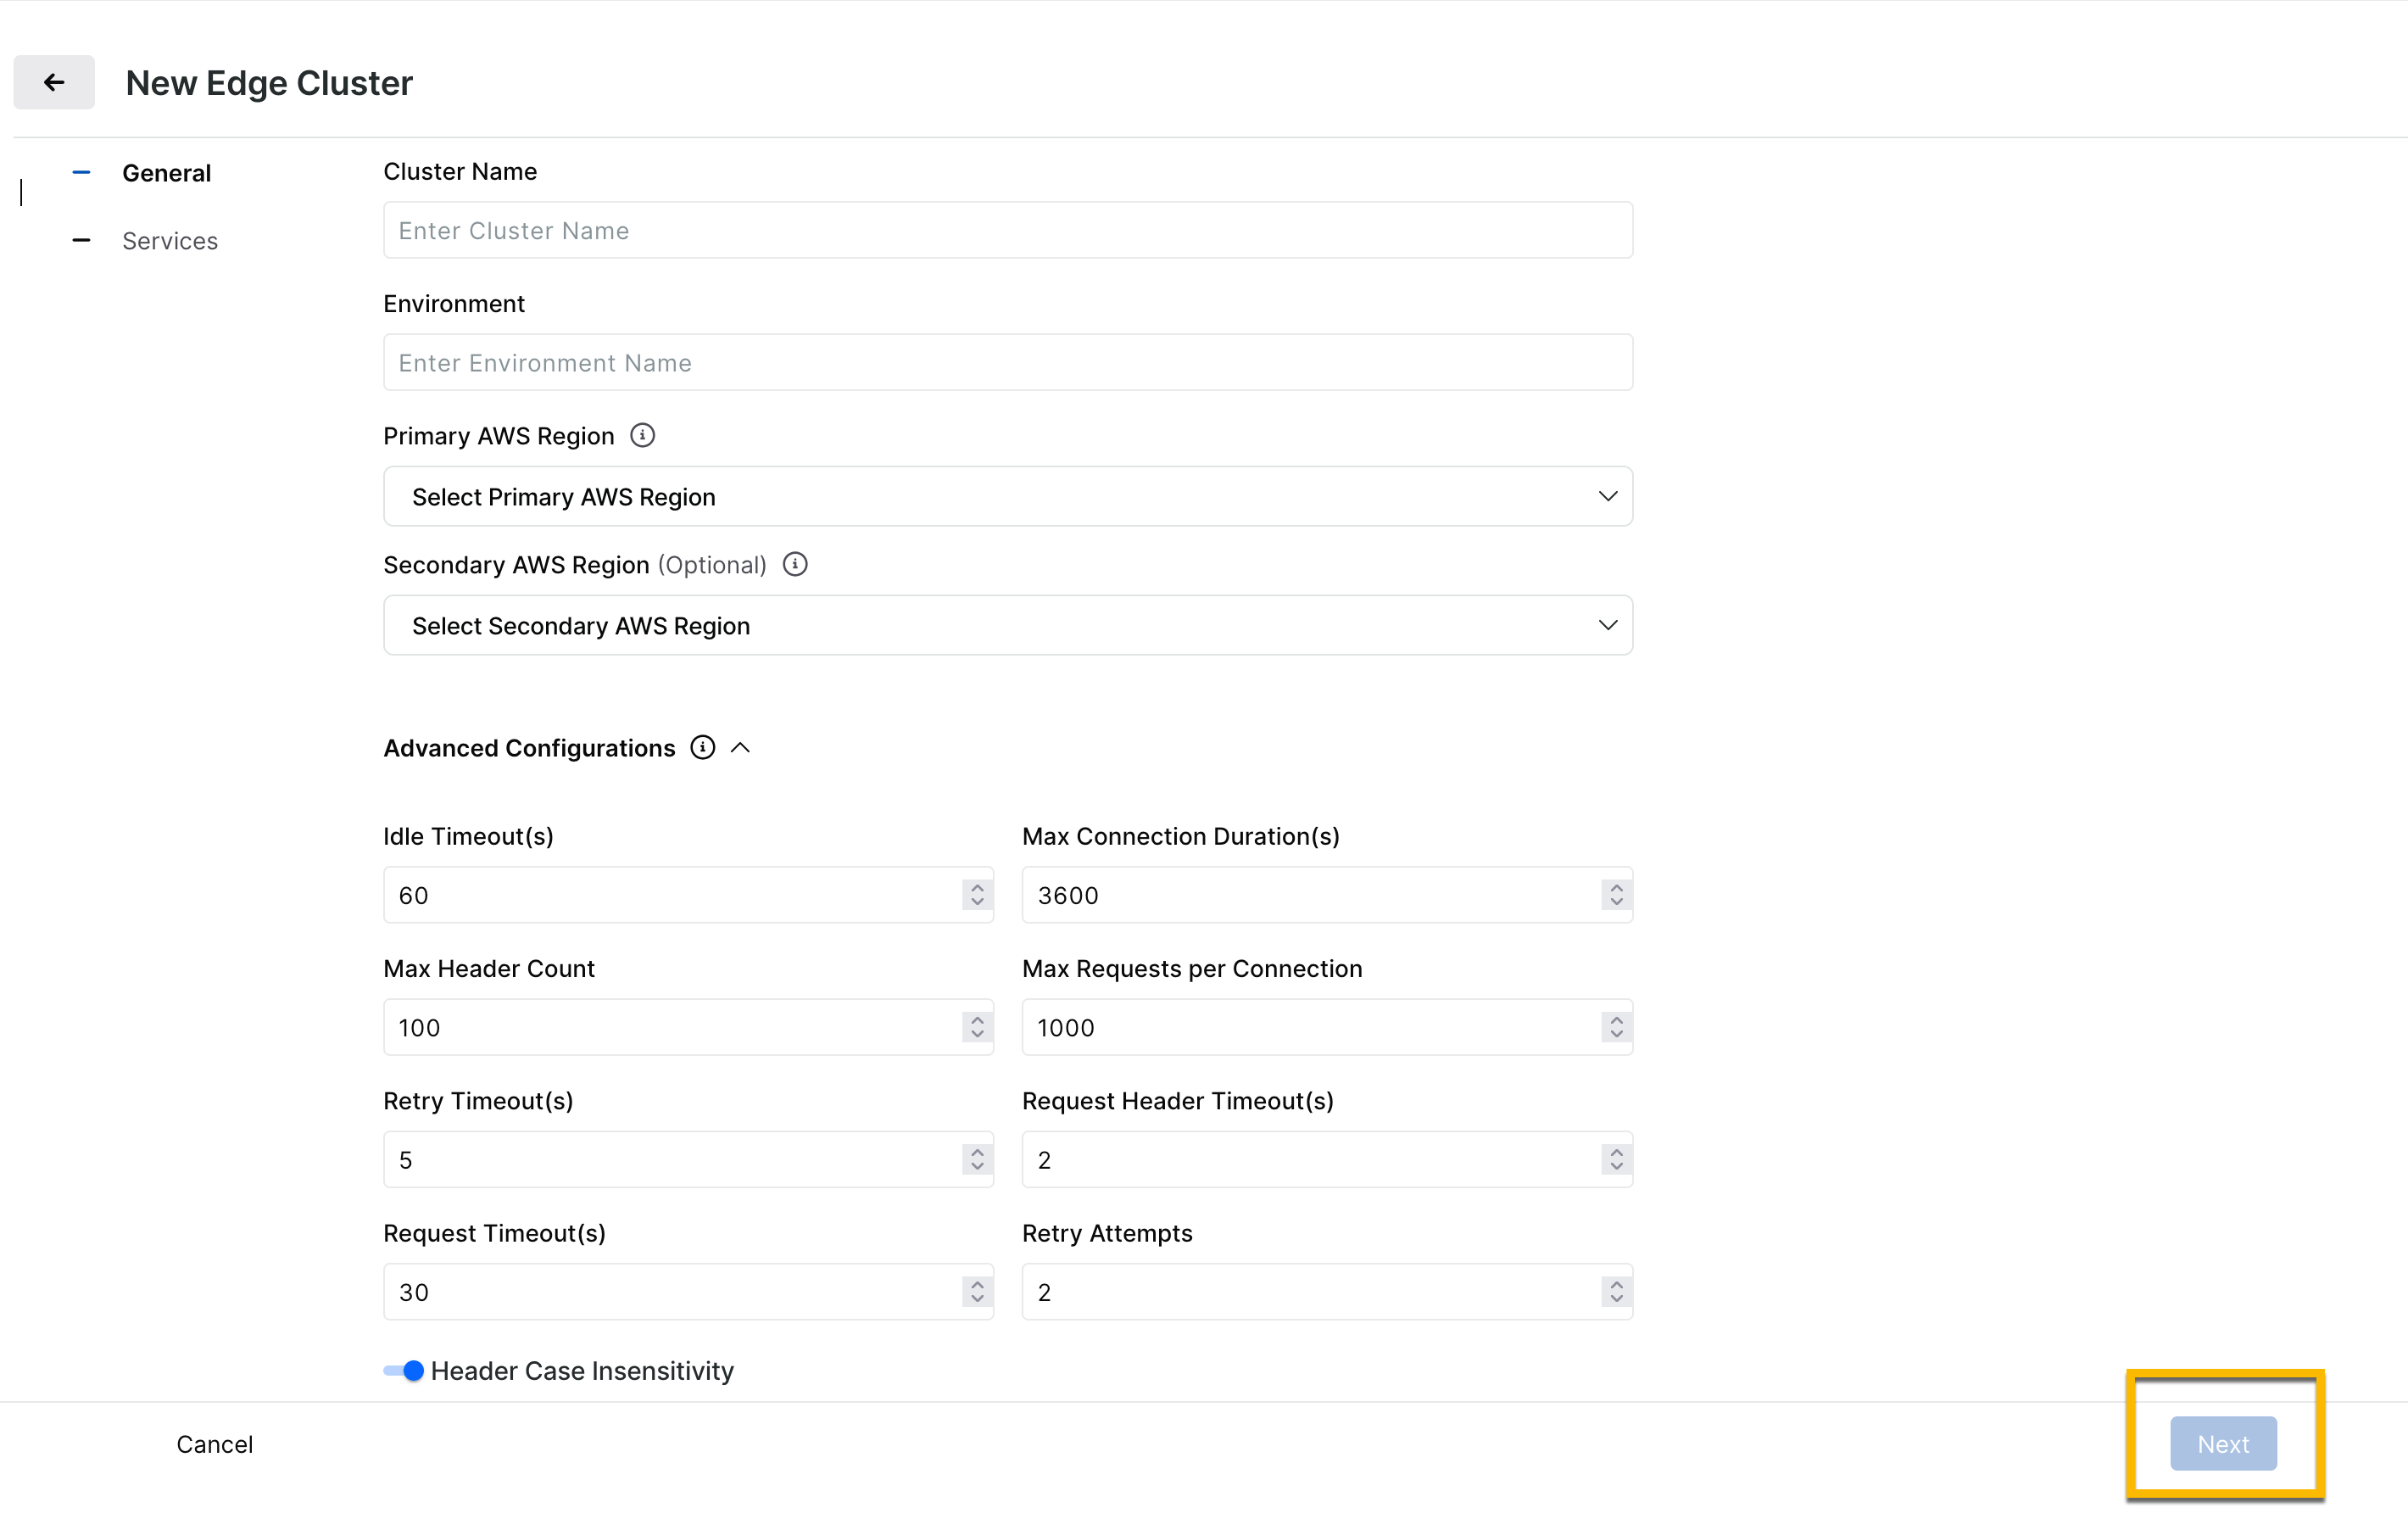
Create a New Edge Cluster
Step 3 — Configure services
Each cluster includes one or more services. Services define how a domain is secured and routed through Traceable. At the beginning, provide the Service Name, then configure Domain(s) and Origin Server(s).
Domain(s)
The following table displays the domain configuration options:
Field | Description | Default Value |
|---|---|---|
Domain(s) | Domain to be delivered and secured, for example, app.example.com must be valid. | — |
Protocol | HTTP or HTTPS. | HTTP |
Port | Port used by the domain. | 80 (HTTP), 443 (HTTPS) |
Certificate Name | TLS certificate used for HTTPS. Displays certificates uploaded for the selected domain and region(s). | — |
Enable Redirection | Select this if you wish to redirect the HTTP traffic to HTTPS | Off |
Origin server(s)
Origin servers are the backends of your applications to which Traceable forwards traffic. The following table displays the origin server configuration options, which tell Traceable where to send requests and how to connect to your app:
Field | Description | Default Value |
|---|---|---|
IP Address or Hostname | Address of your backend origin server. | — |
Port | Port on which the origin listens. | — |
Origin Type | Either IP or Hostname. Must be consistent across all origins. | — |
Protocol | Protocol between Traceable and the origin (HTTP or HTTPS). | HTTP |
Note
When multiple origin servers are configured, Traceable distributes incoming traffic across the defined origins at the edge. No additional configuration is required. This behavior provides:
Distribution of incoming requests across multiple origin servers.
Improved availability by routing traffic only to healthy origins (when health checks are enabled).
Increased resiliency by reducing dependence on a single origin server.
Traffic is distributed evenly across origin servers using a round-robin approach, ensuring balanced load and efficient utilization of backend resources.
Health check (Optional — all fields required if one is set)
Health checks allow Traceable to automatically verify that your origin servers are available and responding as expected before routing traffic to them. The following table displays the health check configuration options:
Field | Description | Default Value |
|---|---|---|
Health Check Path | Path used for health checks, for example, /health. | — |
Healthy Threshold | Number of consecutive successes required. | 3 |
Unhealthy Threshold | Number of consecutive failures required. | 3 |
Timeout (s) | Maximum time to wait for a health check response. | 5 |
Interval (s) | Interval between health checks. | 30 |
Success Codes | List of HTTP code ranges. | - |
Advanced configurations
Advanced configurations let you fine‑tune connection handling and performance parameters beyond the basic service setup. These values control limits such as pending requests, TCP connections, and probe timings. Adjust them if you have specialized traffic patterns or scaling requirements; otherwise, defaults are typically sufficient. The following table displays the advanced configuration options:
Field | Description | Default Value |
|---|---|---|
HTTP Max Requests | Maximum number of active requests to a destination. | 5000 |
Max Pending HTTP Requests | Maximum number of queued requests. | 2048 |
Max TCP Connections | Maximum simultaneous TCP connections. | 1024 |
Retry Timeout (s) | Wait time before retrying a failed connection. | 5 |
Max Probes | Maximum probes allowed. | 5 |
Probe Interval (s) | Interval between probes. | 30 |
Request Timeout (s) | Max time to process a request. | 30 |
Retry Attempts | Number of times retries are attempted | 2 |
TCP Connection Timeout (ms) | Max time to establish TCP connection. | 200 |
TCP Keepalive Time (s) | TCP keep-alive time in seconds. | 300 |
TCP Idle Timeout (s) | Max idle time before closing TCP connection. | 3600 |
Step 4 — Submit deployment
Review your configuration.
Click Submit to request provisioning of the cluster.
Provisioning can take several hours.
Deployment states update automatically in the UI.
Deployment states
When you submit or modify an edge cluster deployment, it goes through a series of states. These states represent the lifecycle of your deployment request and determine who controls the next action: you or Traceable.
Deployment states are important because:
They give you visibility into where your request currently stands.
They ensure safe handoff between your actions (submitting, editing, canceling) and Traceable’s actions (provisioning, validating, approving).
They help you understand when you can make changes and when you must wait for Traceable to process your request.
They provide a clear resolution path if something is blocked or requires additional input.
There are three workflows that follow this state model:
Deployment creation — First-time creation of an edge cluster.
Deployment change — Making configuration changes to an existing cluster.
Deployment removal — Decommissioning or stopping a cluster.
Each workflow moves through similar states: Requested → In Progress → Blocked → Done.
Note
Blocked is a conditional state. A deployment only enters Blocked if Traceable needs more information or a fix; many deployments go straight from In Progress to Done without ever being blocked.
This section describes the states visible in the user interface and the actions you can take at each step.
States and actions
This section lists each deployment state, who can trigger it, and the available actions. Use this as a reference to understand what you can do at each stage of the deployment lifecycle.
The Who Can Trigger column clarifies control of the state:
User — You can move the deployment into this state.
Traceable → User — Traceable places the deployment into this state, and then control passes back to you (for example, when a deployment is blocked and needs your changes).
Traceable — Only Traceable can act at that stage (for example, moving a request to In Progress or Done).
State | Workflow(s) | Who can trigger | Description and actions available |
|---|---|---|---|
Deployment Requested | Creation | User | Initial state after submitting a new deployment. While in this state, you can: • Edit the configuration • Put the deployment On Hold |
On Hold | Creation, Removal | User | Suspends the request without deleting the configuration. From here you can: • Resume by moving back to Requested • Permanently delete the configuration |
Deployment Blocked | Creation | Traceable → User | Indicates that additional input is required. Traceable adds a comment explaining the issue. You must edit and resubmit the configuration. |
Deployment Change Requested | Change | User | Created when you edit an already deployed cluster. You can cancel before Traceable picks it up. |
Deployment Change Blocked | Change | Traceable → User | Indicates that a change could not be applied. You must review comments, fix the configuration, and resubmit. |
Deployment Removal Requested | Removal | User | Requests the removal of an active cluster. You can cancel before Traceable picks it up. |
Deployment Removal Blocked | Removal | Traceable → User | Indicates that removal could not proceed due to missing or invalid details. You must resolve the issue before removal continues. |
How transitions work
User control — You can edit, put on hold, or cancel a deployment while it is in the Requested or On Hold state. Once Traceable picks it up and the state changes to In Progress, you can only view the configuration.
Traceable control — Traceable moves deployments into In Progress, Blocked, or Done. When a deployment is blocked, it returns to your control, and you must edit and resubmit the configuration.
Examples
Blocked — If you submit a cluster with missing certificate details, the deployment will move to Blocked, and you will see a comment explaining what needs to be fixed.
On Hold — If you start creating a deployment but want to pause before Traceable provisions it, you can place it On Hold instead of deleting it.
Change Requested — If you edit an active cluster to update a domain or certificate, it enters Deployment Change Requested until Traceable processes the update.