Malicious Sources help you identify and control high-risk traffic using threat intelligence signals. They enable you to block, monitor, or allow requests from suspicious entities, such as malicious IPs, anonymized networks, and compromised email addresses, before they reach your APIs. This reduces attack surface, prevents abuse, and strengthens your API security with targeted, risk-based controls.
What will you learn in this topic?
By the end of this topic, you will be able to:
Understand what malicious sources are and how they impact APIs.
Identify different types of malicious traffic.
Configure rules to allow, block, or monitor traffic.
Apply targeted controls based on risk signals and threat intelligence.
Understand Malicious Sources
Before you configure Malicious Source rules, it is essential to understand how Traceable uses threat intelligence signals to identify and control high-risk traffic. The table below explains when to use these rules, why they are critical for reducing exposure to known threats, and how you can implement them to strengthen your API security posture with precision and control.
Why use it? | When to use? | How can you leverage it? |
|---|---|---|
It helps you proactively protect APIs by filtering traffic from known or suspected high-risk entities, such as suspicious IP addresses, anonymized networks, compromised emails, and restricted regions. They reduce attack surface, prevent abuse, and improve signal quality by blocking noise from untrusted sources. | You can use Malicious Source rules to restrict or control access based on risk signals external to application logic. For example, block traffic from Tor or public proxies, restrict access from specific regions, prevent account creation using disposable or leaked emails, or monitor activity from hosting providers and bots. | Create a rule by defining source criteria, such as an IP range, region, email intelligence, or IP type. Select an action such as Allow or Block. Configure severity and duration, and apply the rule to the required environment. Combine multiple rules to create layered protection across different traffic dimensions. |
Steps to create a rule
To create a malicious source rule in Traceable, navigate to Protection → Settings → Policies → Custom Policies, navigate to the Malicious Source tab, and click + Add Rule in the top right corner to start creating a rule. You can create the rule using the following three steps:
Set the Criteria — Configure the conditions the traffic must meet, including source, payload components, and target scope.
Configure the Action — Configure the actions that you wish to take when traffic is encountered.
Review and Submit — Validate the configured settings and submit the rule for activation.
Step 1 — Set the criteria
As part of setting up the criteria, you must complete the following:
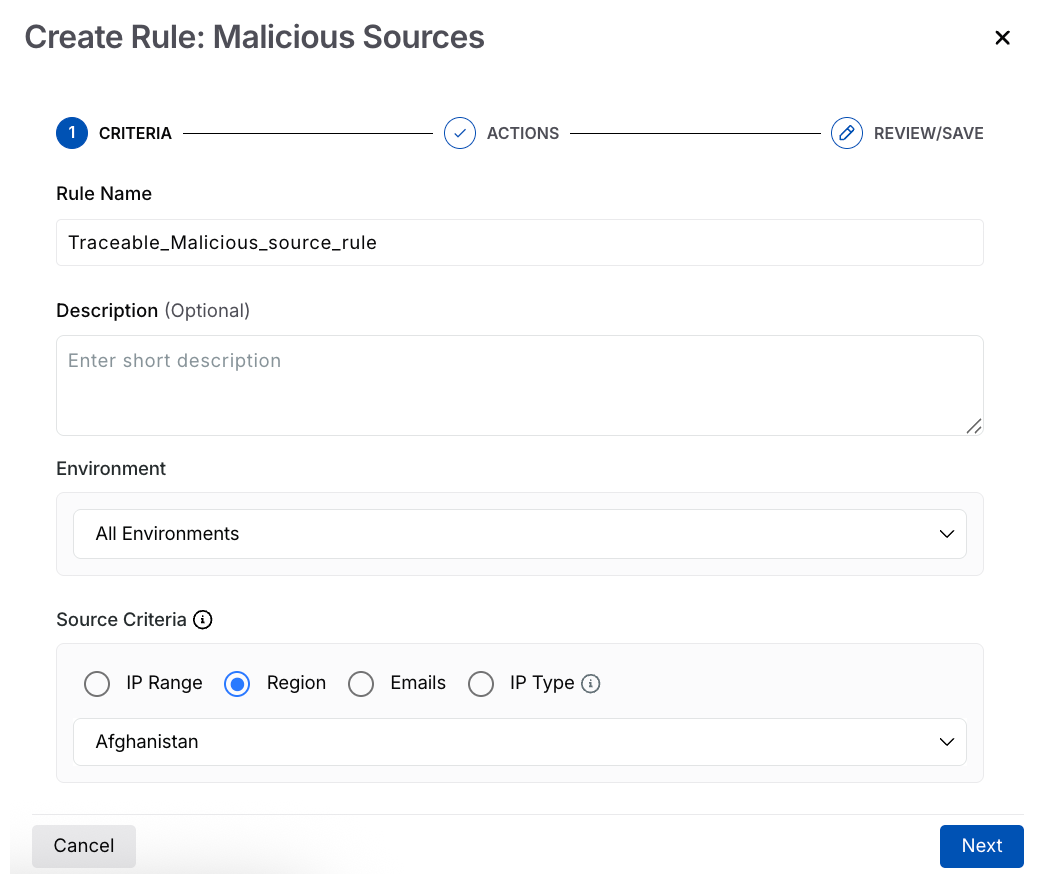
Malicious Source Criteria
Rule Name — A unique and identifiable name for the rule.
Description (Optional) — A summary of the rule’s purpose.
Environment — The environment in which Traceable should apply the rule.
Source Criteria — The traffic conditions to which the rule applies. Select the appropriate criteria from the table below according to your requirements.
Source
Supported Values
Description
IP Range
CIDR, single IP, or range (for example,
192.168.1.0/24)Matches traffic from specific IP addresses or ranges.
Region
Country or geographic region (for example, Afghanistan)
Filters traffic based on location.
Emails
Disposable domains, leaked emails, domains, regex, fraud score
Applies rules based on email intelligence and patterns. For more information, see the table below.
IP Type
Anonymous VPN, hosting provider, public proxy, Tor, bot
Identifies traffic based on IP classification.
If you select Email as the Source Criteria, you can use the following table:
Field
Description
Disposable domain
Matches temporary or throwaway email providers.
Leaked emails
Matches emails found in known data breaches.
Email domain
Matches specific domains (for example, company domains).
Email regex
Matches custom patterns using regex. Press Enter or use commas to add multiple values.
Fraud score
Filters emails based on risk scoring.
Once you have set the above criteria, click Next. You can also create multiple rules for the same environment, each with a different criterion. For example, you can block the Afghanistan region across all environments, or use an IP-based rule that applies to all environments.
Step 2 — Configure the action
Traceable allows you to define how to handle traffic when a Malicious Source rule is triggered. Complete the following steps to configure the actions:
Note
The availability of the actions (Block requests, Allow requests, Block all requests except this, and Monitor only, no blocking) above depends on the criteria you selected in Step 1 above.
Action — Select an action based on the source criteria. You choose how Traceable should respond when traffic matches the defined criteria. The following table shows the available actions for each source criterion:
Action →
Criteria ↓Block requests
Allow requests
Block all requests except this
Monitor only, no blocking
IP Range
✔️
✔️
✔️
✔️
Region
✔️
X
✔️
✔️
Email
✔️
X
X
✔️
IP type
✔️
X
X
✔️
Event Security — Select the severity of the generated event from the following options: Low, Medium, High, and Critical. By default, Traceable assigns Low severity to the event.
Duration — The duration for which the rule should apply. By default, the rule applies indefinitely.
.png)
Malicious Source Actions
Once you have configured the above, click Next.
Step 3 — Review and submit
In the final step, review and submit the rule. If you wish to edit any criteria during the review, click the Edit (![]() ) icon corresponding to a section.
) icon corresponding to a section.