Updates (July 2025 to September 2025)
July 2025 — Updated the page to add information about creating and managing labels for API endpoints. For more information, see Labels.
Labels in Traceable categorize APIs, services, backends, and third parties for easier management and tracking. You can use these labels to apply custom tags to related APIs or filter specific data within the platform. For example, you can label APIs by functionality, environment, severity, and authentication. These labels enable efficient monitoring and reporting of data within your application ecosystem.
Note
When classifying APIs as external or internal and authenticated or unauthenticated, the labels you apply take precedence over Traceable's identification based on IP addresses or traffic. This ensures user-defined classifications are prioritized for accurate API categorization.
What will you learn in this topic?
By the end of this topic, you will understand:
The concept of label management and its components.
The ways to automate label assignment based on API attributes.
The ways to create and manage labels to categorize APIs, services, and backends.
What is Label Management?
Label management is the process of creating rules and labels to tag the API endpoints, services, backends, and third parties. This process consists of two components:
Rules — Create labeling rules that allow Traceable to automatically add labels to data if your defined conditions match the incoming traffic.
Labels — Create labels to categorize your data. You can do this from the Discovery → Inventory or Settings → Label Management page.
The following sections discuss the steps to create label rules and, using examples, how to utilize them for data monitoring.
Rules
You can create meaningful rules to automate label addition in Traceable. Based on the rules you define, Traceable evaluates the incoming data against the rule, and if a match is found, it either creates new labels or uses existing ones.
Note
A rule can create up to 100 labels automatically.
Traceable evaluates the rules only when it receives successful response codes (between 2xx and 3xx) from APIs.
When classifying APIs as external or internal and authenticated or unauthenticated, the labels created using rules take precedence over Traceable's identification based on IP addresses or traffic. This is applicable for all APIs discovered post-rule creation.
Creating Rules
You can create rules in either of the following ways:
From the Label Management page
From the Explorer page
The following tabs discuss the steps to create rules using the above methods.
Navigate to Settings → Discovery → Label Management → Rules tab, and click + Create Rule. In the Create Label Rule window, complete the following steps. The example in the following steps helps create a rule to automatically label APIs that process credit card transactions to ensure compliance with PCI DSS.
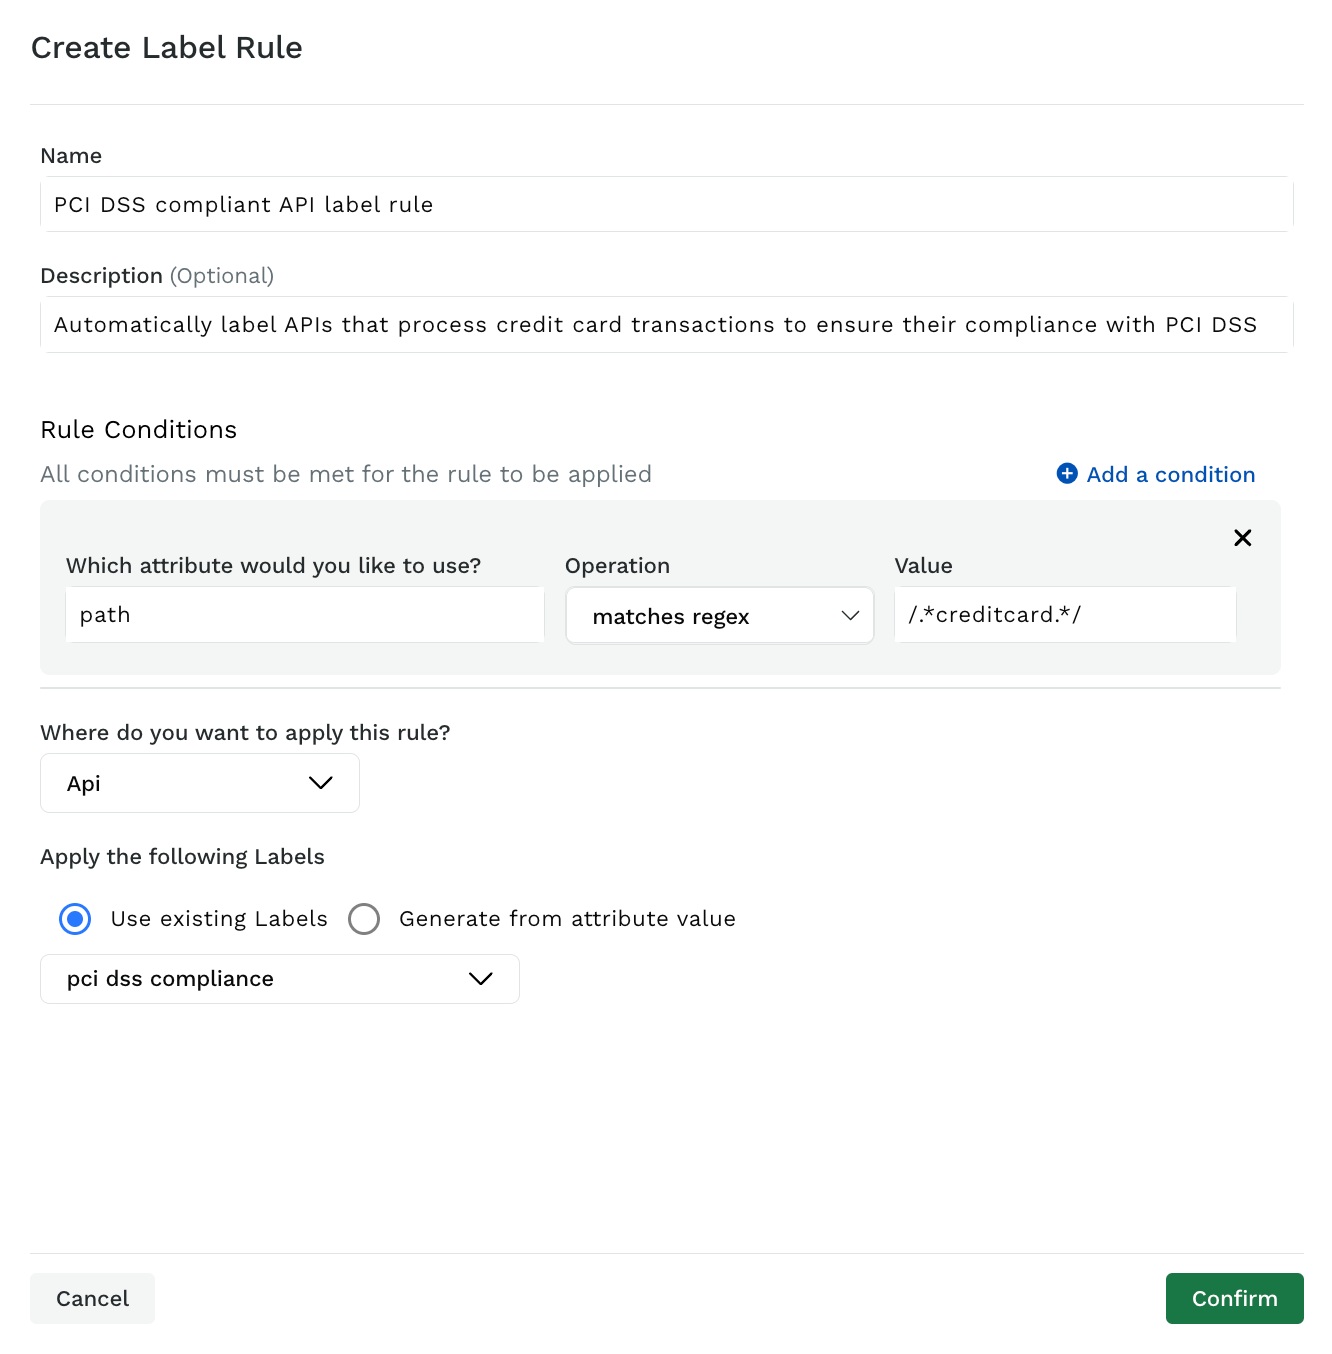
Label Rule
Specify the rule Name, for example, PCI DSS compliant API label rule.
(Optional) Specify a description of the rule.
Specify the Rule Conditions:
The Attribute on which you wish to create the rule, for example, path.
The Operation you wish to apply to the attribute and value, for example, matches regex.
The Value corresponding to the attribute, for example,
/.*creditcard.*/.
Note
Traceable applies an AND operation between rule conditions, which means that all conditions must be satisfied for the rule to apply.
Select one or more components where you wish to apply the rule, for example, API.
Select the method of label application:
Use existing Labels — Select from the list of existing labels or specify a name to create a new one, for example, PCI DSS compliance.
Generate from attribute value — Specify the attribute and optionally the regex to use some part of the attribute value instead of the complete attribute value to generate labels.
Click Confirm.
You can create label rules after observing the traces or spans from the Explorer page in Analytics or the Traces tab in the Endpoint Details page. While creating this rule, Traceable also shows the list of attributes associated with a protocol. You can select the attributes from this list, and Traceable applies the rule accordingly. For more information on creating these rules, see Explorer.
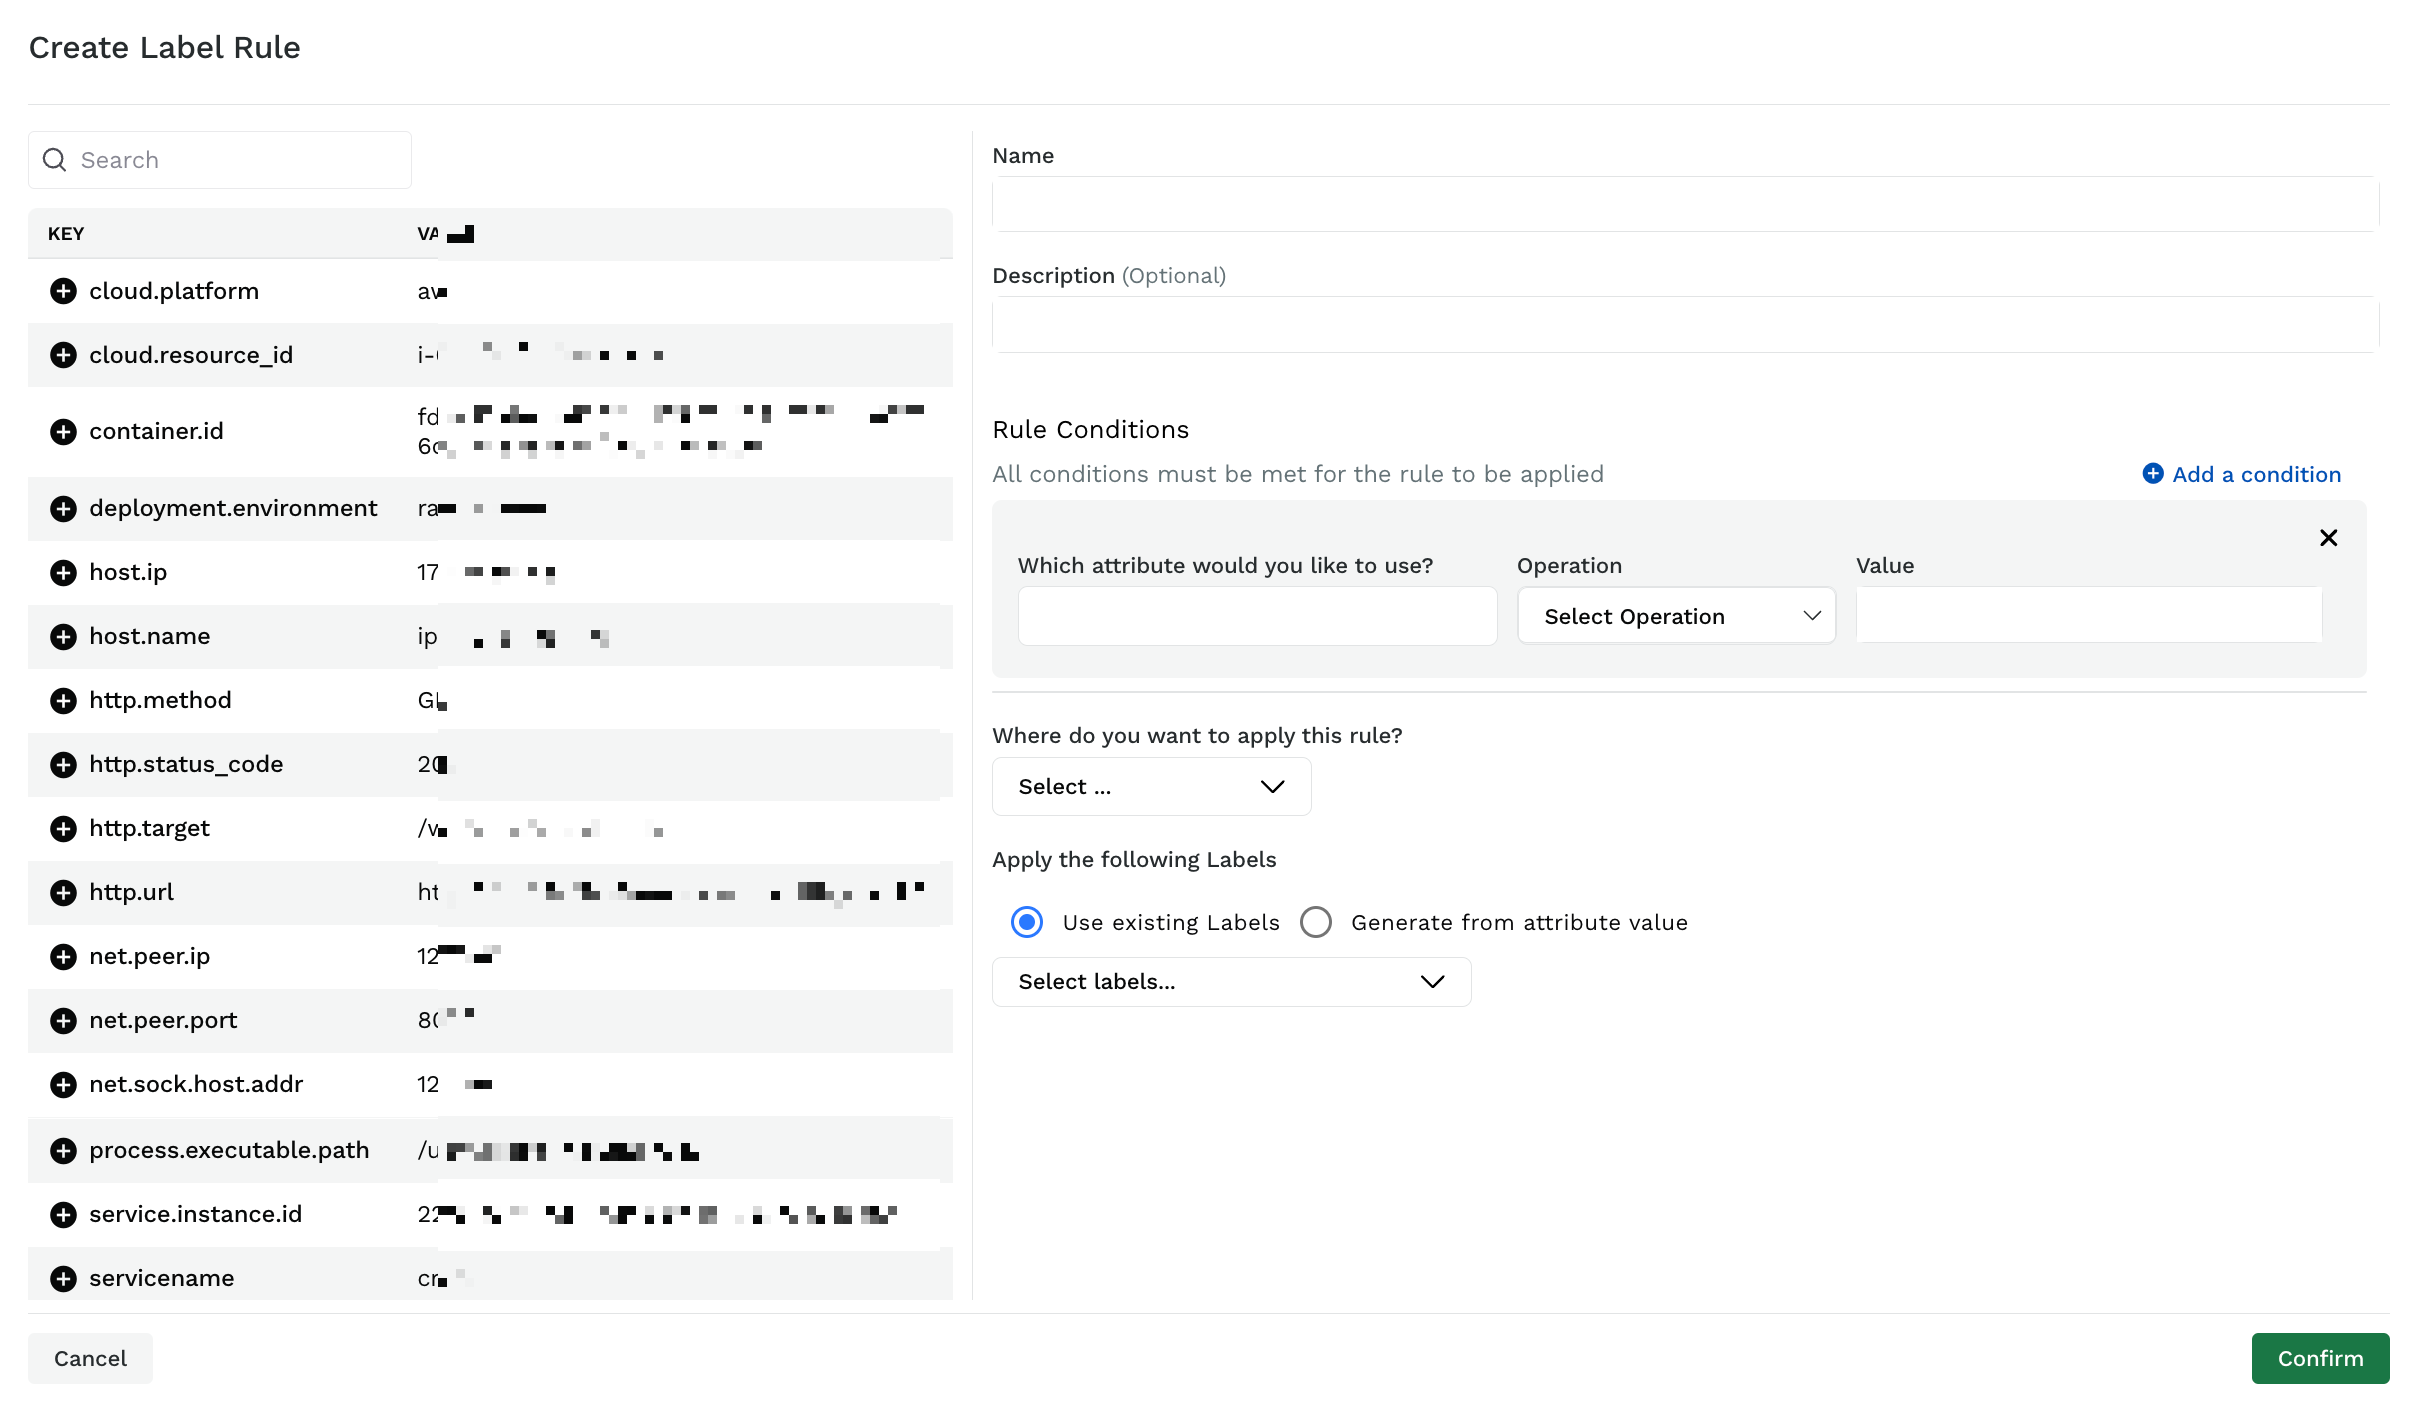
Create a Rule from the Explorer page
Managing Rules
Traceable displays the configured rule in the Rules tab. In this tab, you can also do the following:
Enable or disable a rule using the toggle corresponding to a rule.
Click the Ellipse (
 ) icon corresponding to a rule to Edit or Delete it.
Labels
Labels are metadata tags you can use to classify and organize your APIs. This helps you streamline API monitoring and efficiently respond to critical ones.
Creating Labels
To create a label, navigate to Settings → Discovery → Label Management → Labels tab, and complete the following steps:
Click + Create Label.
In the Create Label pop-up, specify the following:
.png)
Name — A name for the label, for example, PCI DSS.
Description (Optional) — A description for the label.
Color (Optional) — A color you wish to assign to the label, for example, Blue.
Click Create.
Traceable displays the created labels in the Labels tab and on the Inventory page in Discovery. For information on operations on labels in the Inventory page, see Manage Labels added to APIs.
Managing Labels
While the Labels tab displays the list of created labels along with their descriptions and associated rules, you can click the Ellipse (![]() ) icon corresponding to a label to Edit it. In the Update Label window, you can modify the Name, Description, and Color of the label according to your requirements. Alongside these details, in the Label Rules Assigned section, Traceable also displays the rules associated with the label. As soon as you click a rule, Traceable redirects you to the Rules tab, View Label Rule window, where the rule details are displayed.
) icon corresponding to a label to Edit it. In the Update Label window, you can modify the Name, Description, and Color of the label according to your requirements. Alongside these details, in the Label Rules Assigned section, Traceable also displays the rules associated with the label. As soon as you click a rule, Traceable redirects you to the Rules tab, View Label Rule window, where the rule details are displayed.
The following demo illustrates how to do this.