Updates (January 2026 to March 2026)
January 2026 — Updated the topic to add information about the rules supported in Traceable. For more information, see Integration Overview.
The F5 Application Security Manager (ASM) is a component of F5’s broader Application Delivery Controller (ADC) platform, specializing in advanced security features for web applications. ASM functions as a Web Application Firewall (WAF) and offers a range of capabilities to protect web applications from various attacks and vulnerabilities. ASM protects against common threats and employs a positive security model. It also performs behavioral profiling in conjunction with SSL/TLS inspection.
What will you learn in this topic?
By the end of this topic, you will be able to understand:
An overview of the steps required to set up the integration.
The prerequisites for setting up the integration.
The detailed steps for the integration.
The verification of the integration.
Integration Overview
This section provides high-level information on integrating Azure WAF with Traceable and managing threats.
Installation — Traceable allows you to choose from an agent-less or agent-based deployment option. For more information on Traceable agents, see Installation.
Integration Setup — After deploying the agent, you can retrieve the credentials and configure the Azure integration. To do so, you must complete the following steps:
Prerequisites — Login to your F5 account, and retrieve the credentials such as F5 server URL, F5 Application Policy Name, F5 Login Credentials comprising username and password to log in to your F5 account. For more information, see Before you begin.
Integration — After obtaining the credentials from the previous steps, navigate to the Traceable platform and configure the integration. For more information, see Set up the Integration.
Threat Management — After setting up the integration, you can establish rules to allow, block, or monitor IP addresses according to your specific requirements. Traceable’s integration with F5’s ASMI supports the following two types of rules:
Threat Actors — Any status change of threat actor on the Traceable Platform is propagated to F5 WAF. For example, if Traceable detects a threat actor and changes it to a deny state, then the requests from this threat actor can be blocked using Azure. Traceable recommends going through the allow list conditions before creating any IP-range rules. Traceable allows creating allowlists using allowed and snoozed states, and supports blocking using deny and suspended states under threat actors. Moreover, if you make any changes, such as adding a threat actor to the allowlist or resolving the status, these changes are reflected in F5 within a few minutes.
Malicious Source Rules (IP Range only) — If you configure any malicious source rules under Protection → Policies → Custom Policies → Malicious Sources tab to enforce blocking or allow for IP ranges to be executed through F5.
Note
Traceable recommends reviewing the allow list conditions before creating IP-range rules. For more information, see IP address allowlist.
The following is a high-level integration diagram:
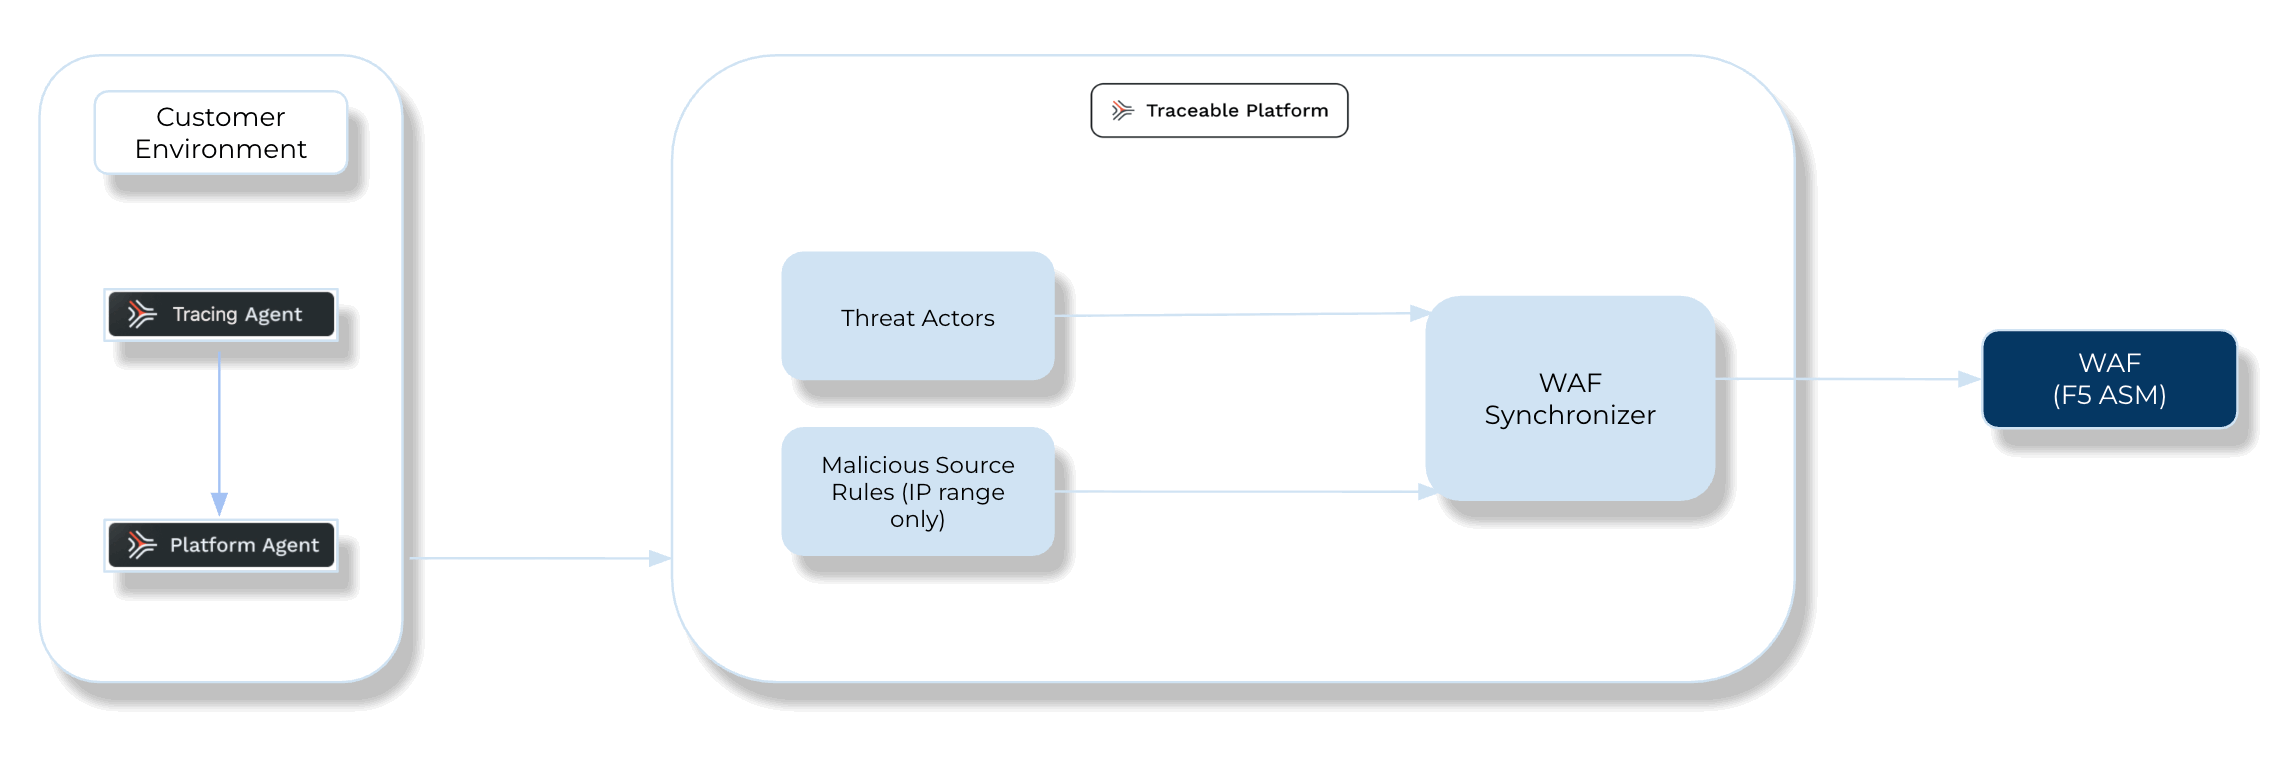
Traceable F5 Integration Diagram
Before you begin
Make a note of the following before proceeding with the integration steps:
Traceable requires a pre-configured F5 security policy to complete the integration with F5. If you do not have a pre-configured policy, complete the following steps to create a security policy in F5.
Note
Ensure that you have configured only the HTTPS F5 server URL. An HTTP URL is not supported.
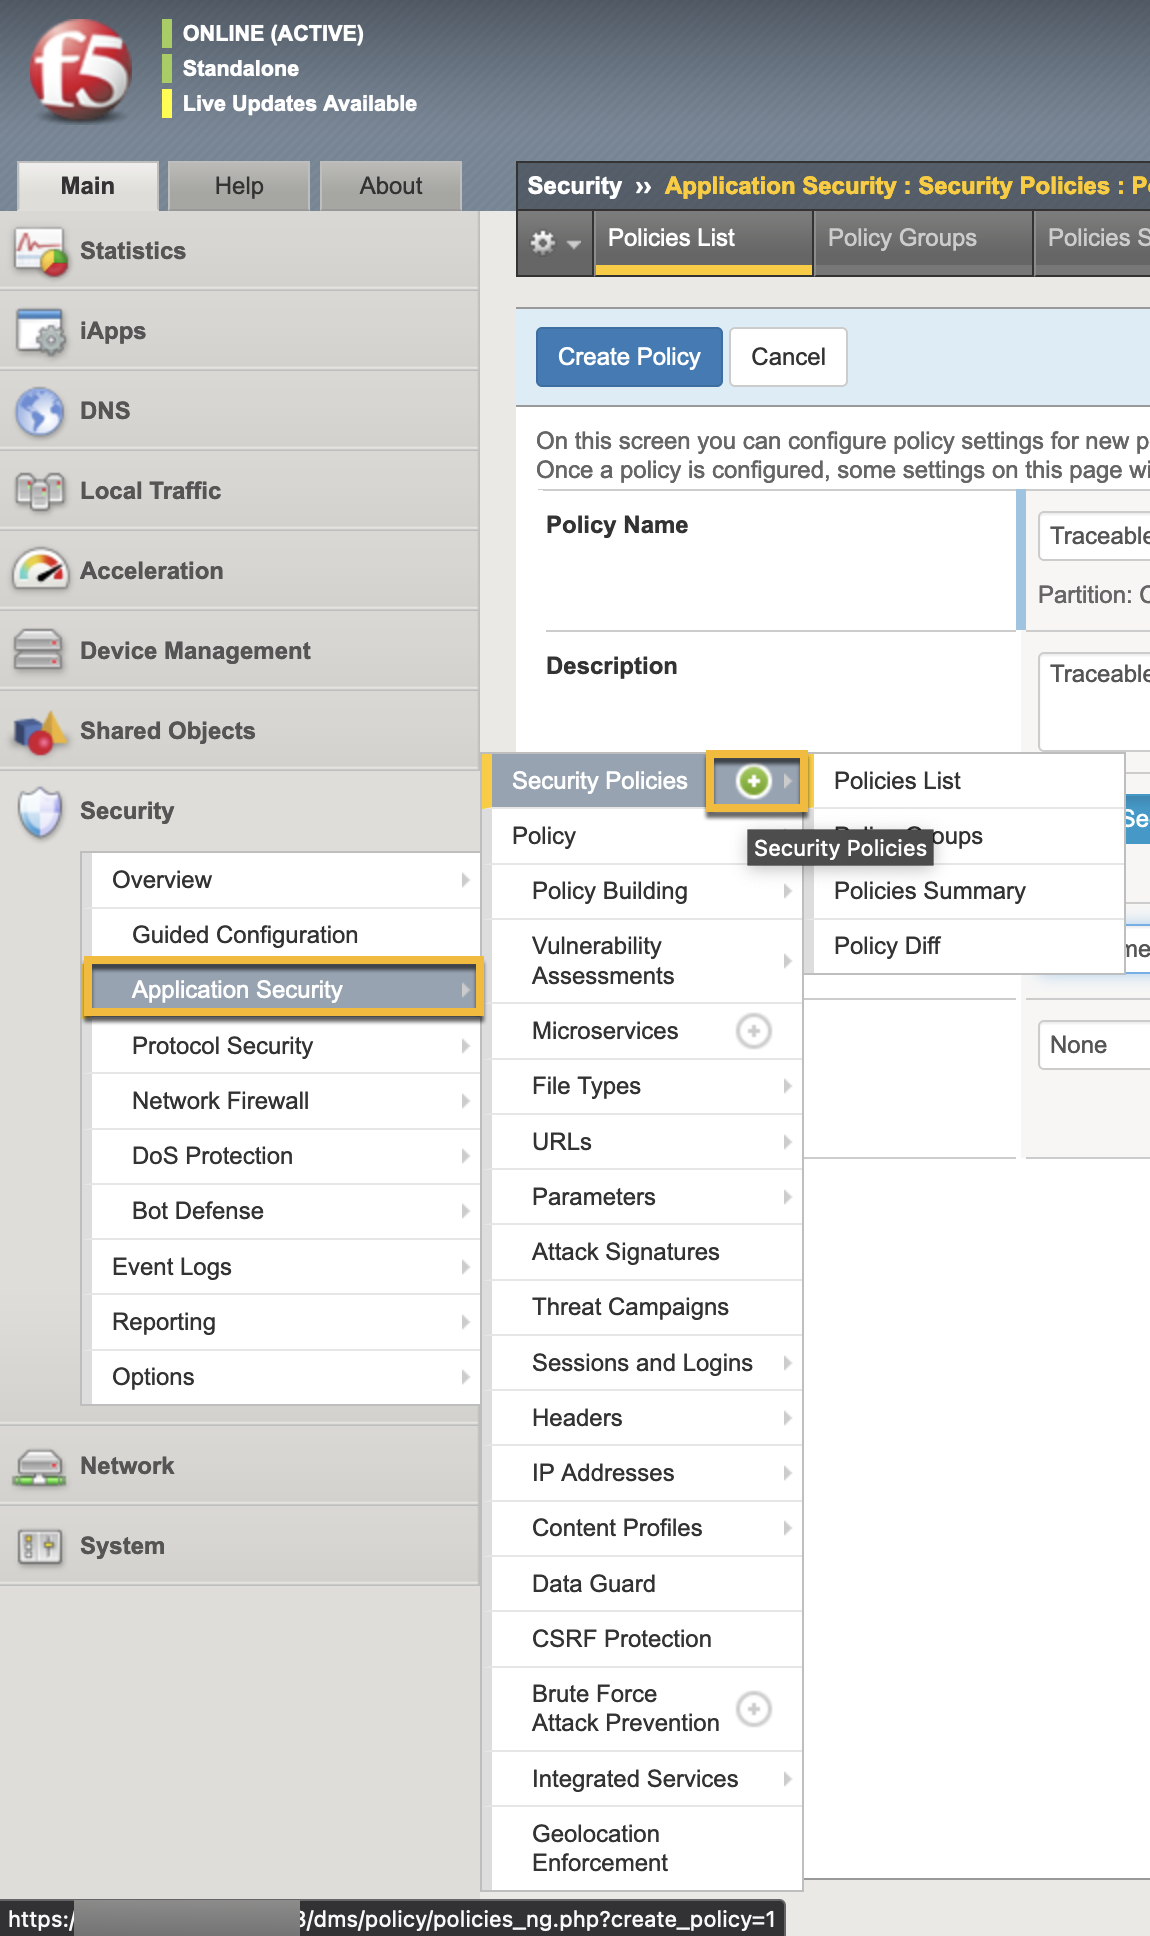
Navigate to Security → Application security → Security policies. Click the + icon to create a new policy.
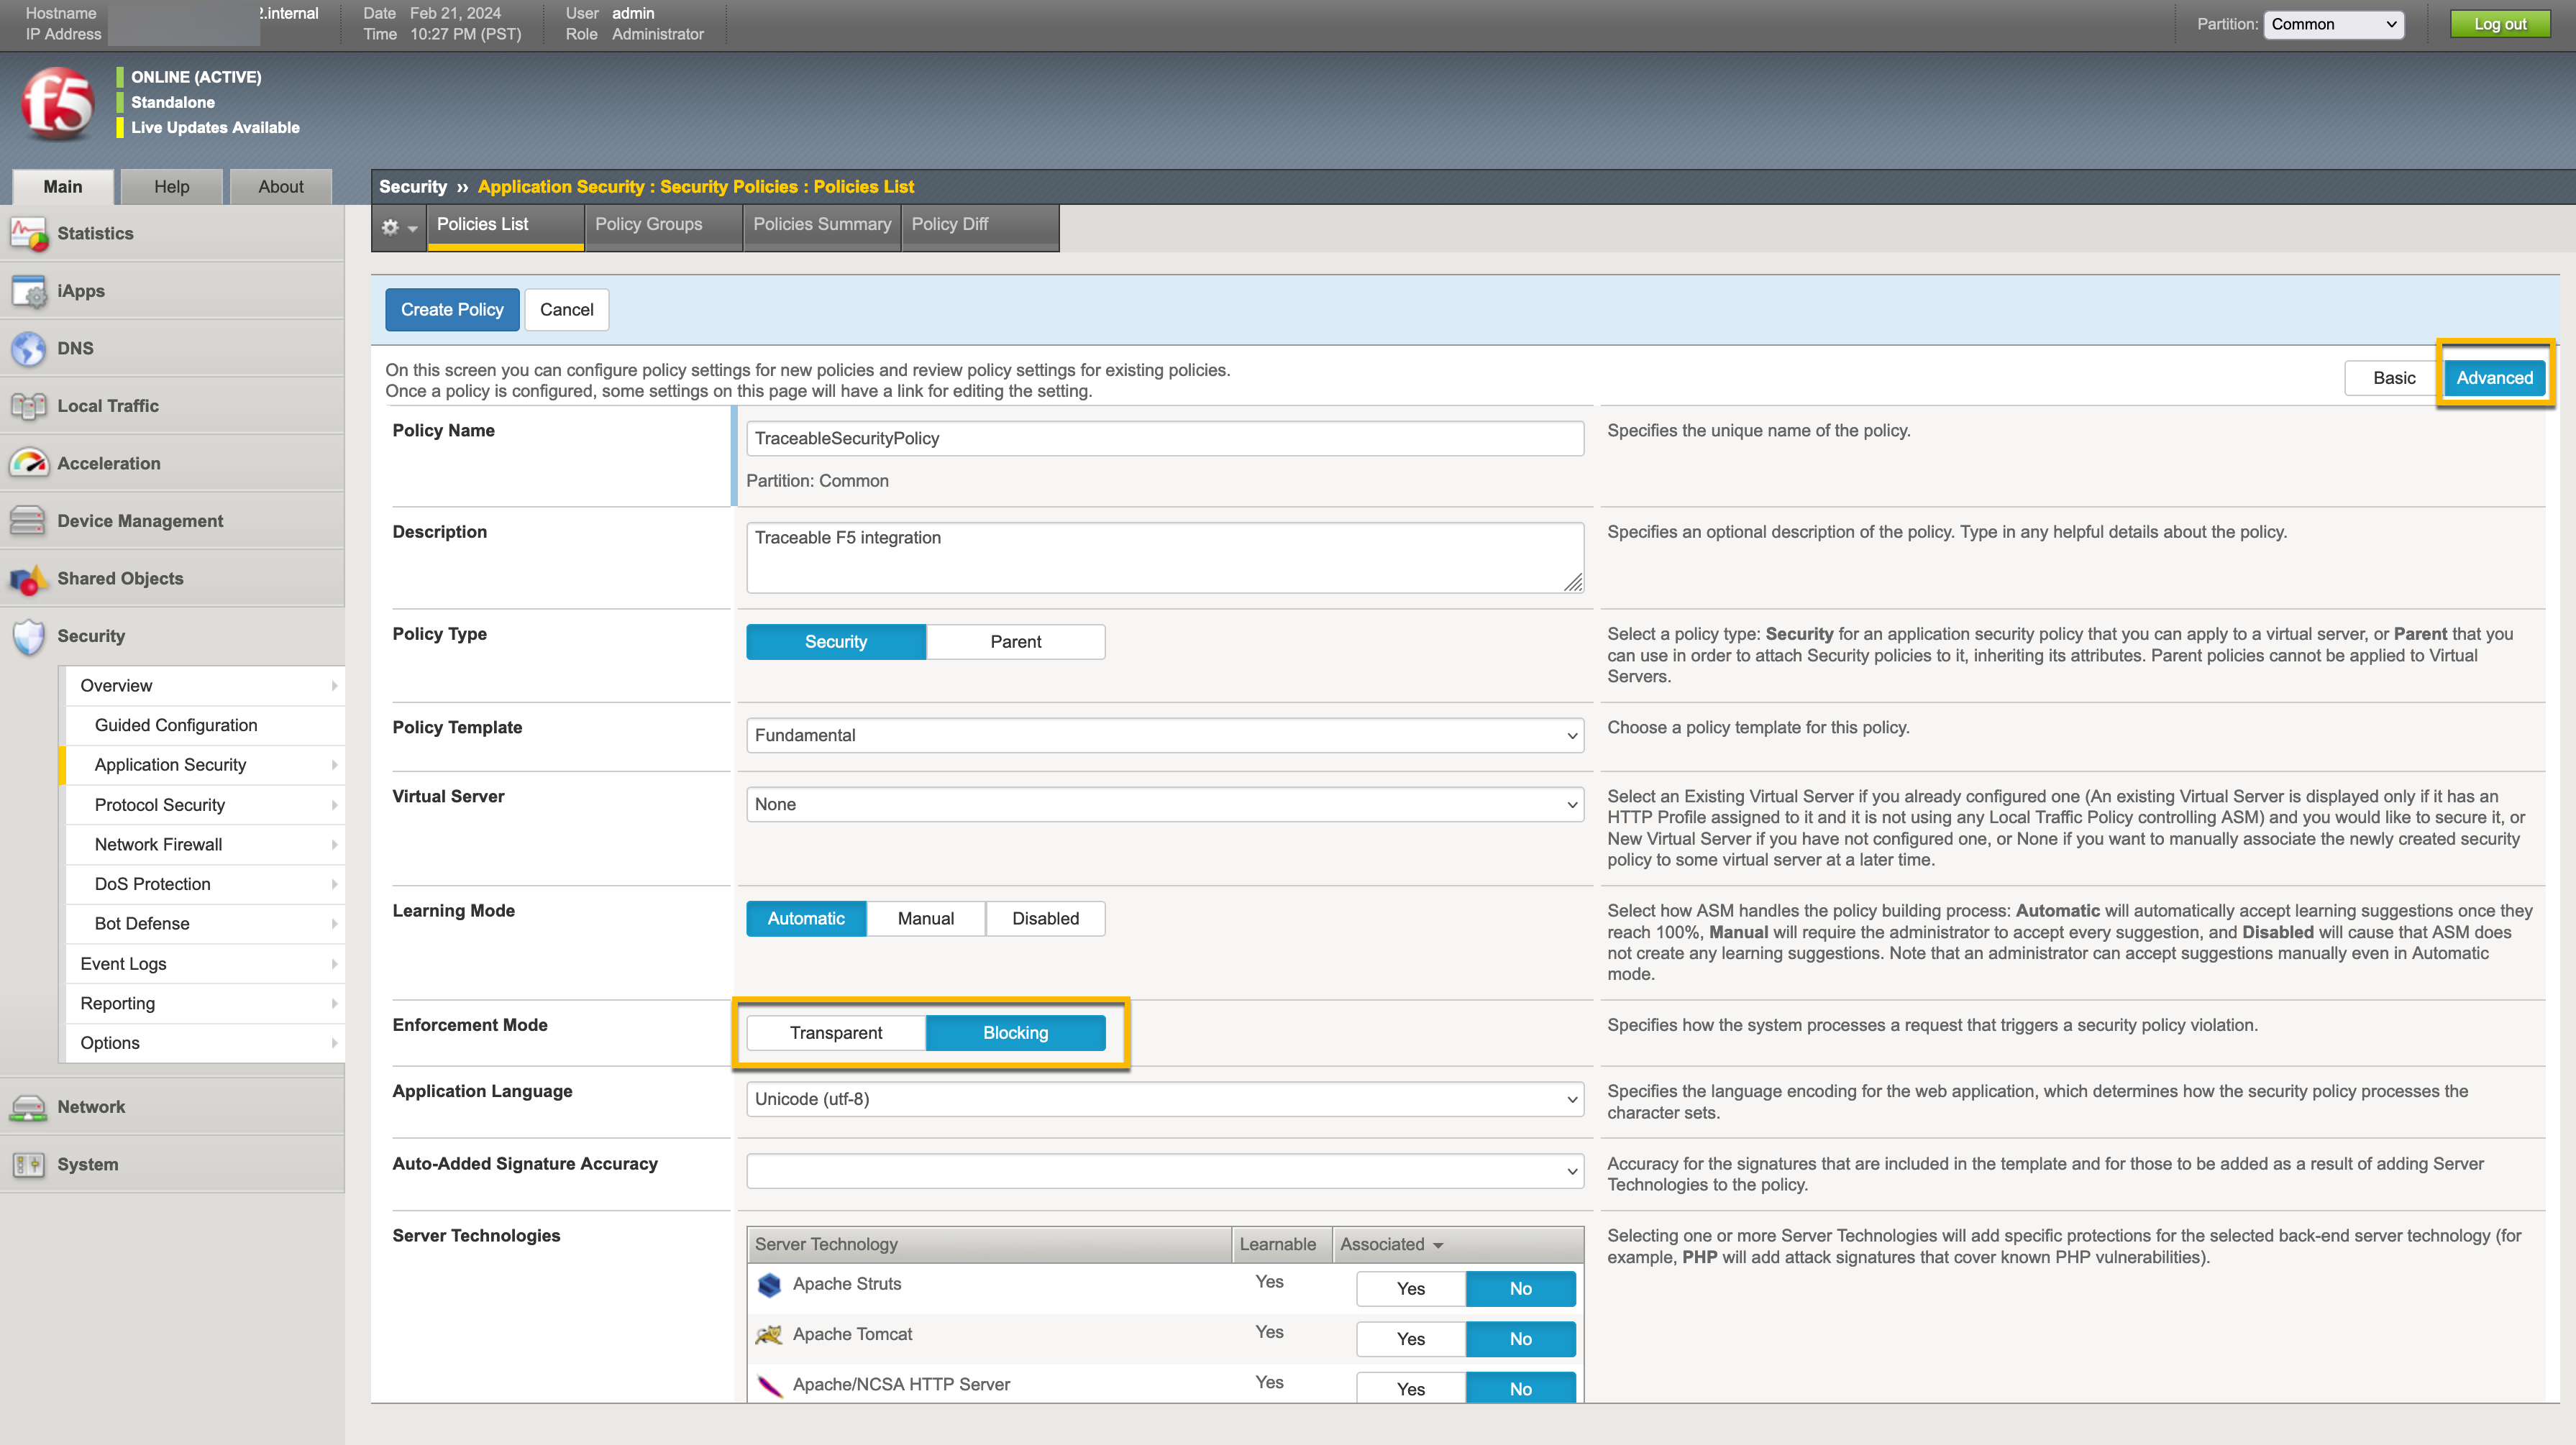
Provide the required information to configure the policy.
Set up the Integration
After creating a security policy in F5, you must complete a few configurations in the Traceable Platform to integrate it with F5. Navigate to Integrations ( ![]() ), and do one of the following:
), and do one of the following:
Search for F5 in the search bar.
Under All Integrations, navigate to WAF → F5 and click Configure.
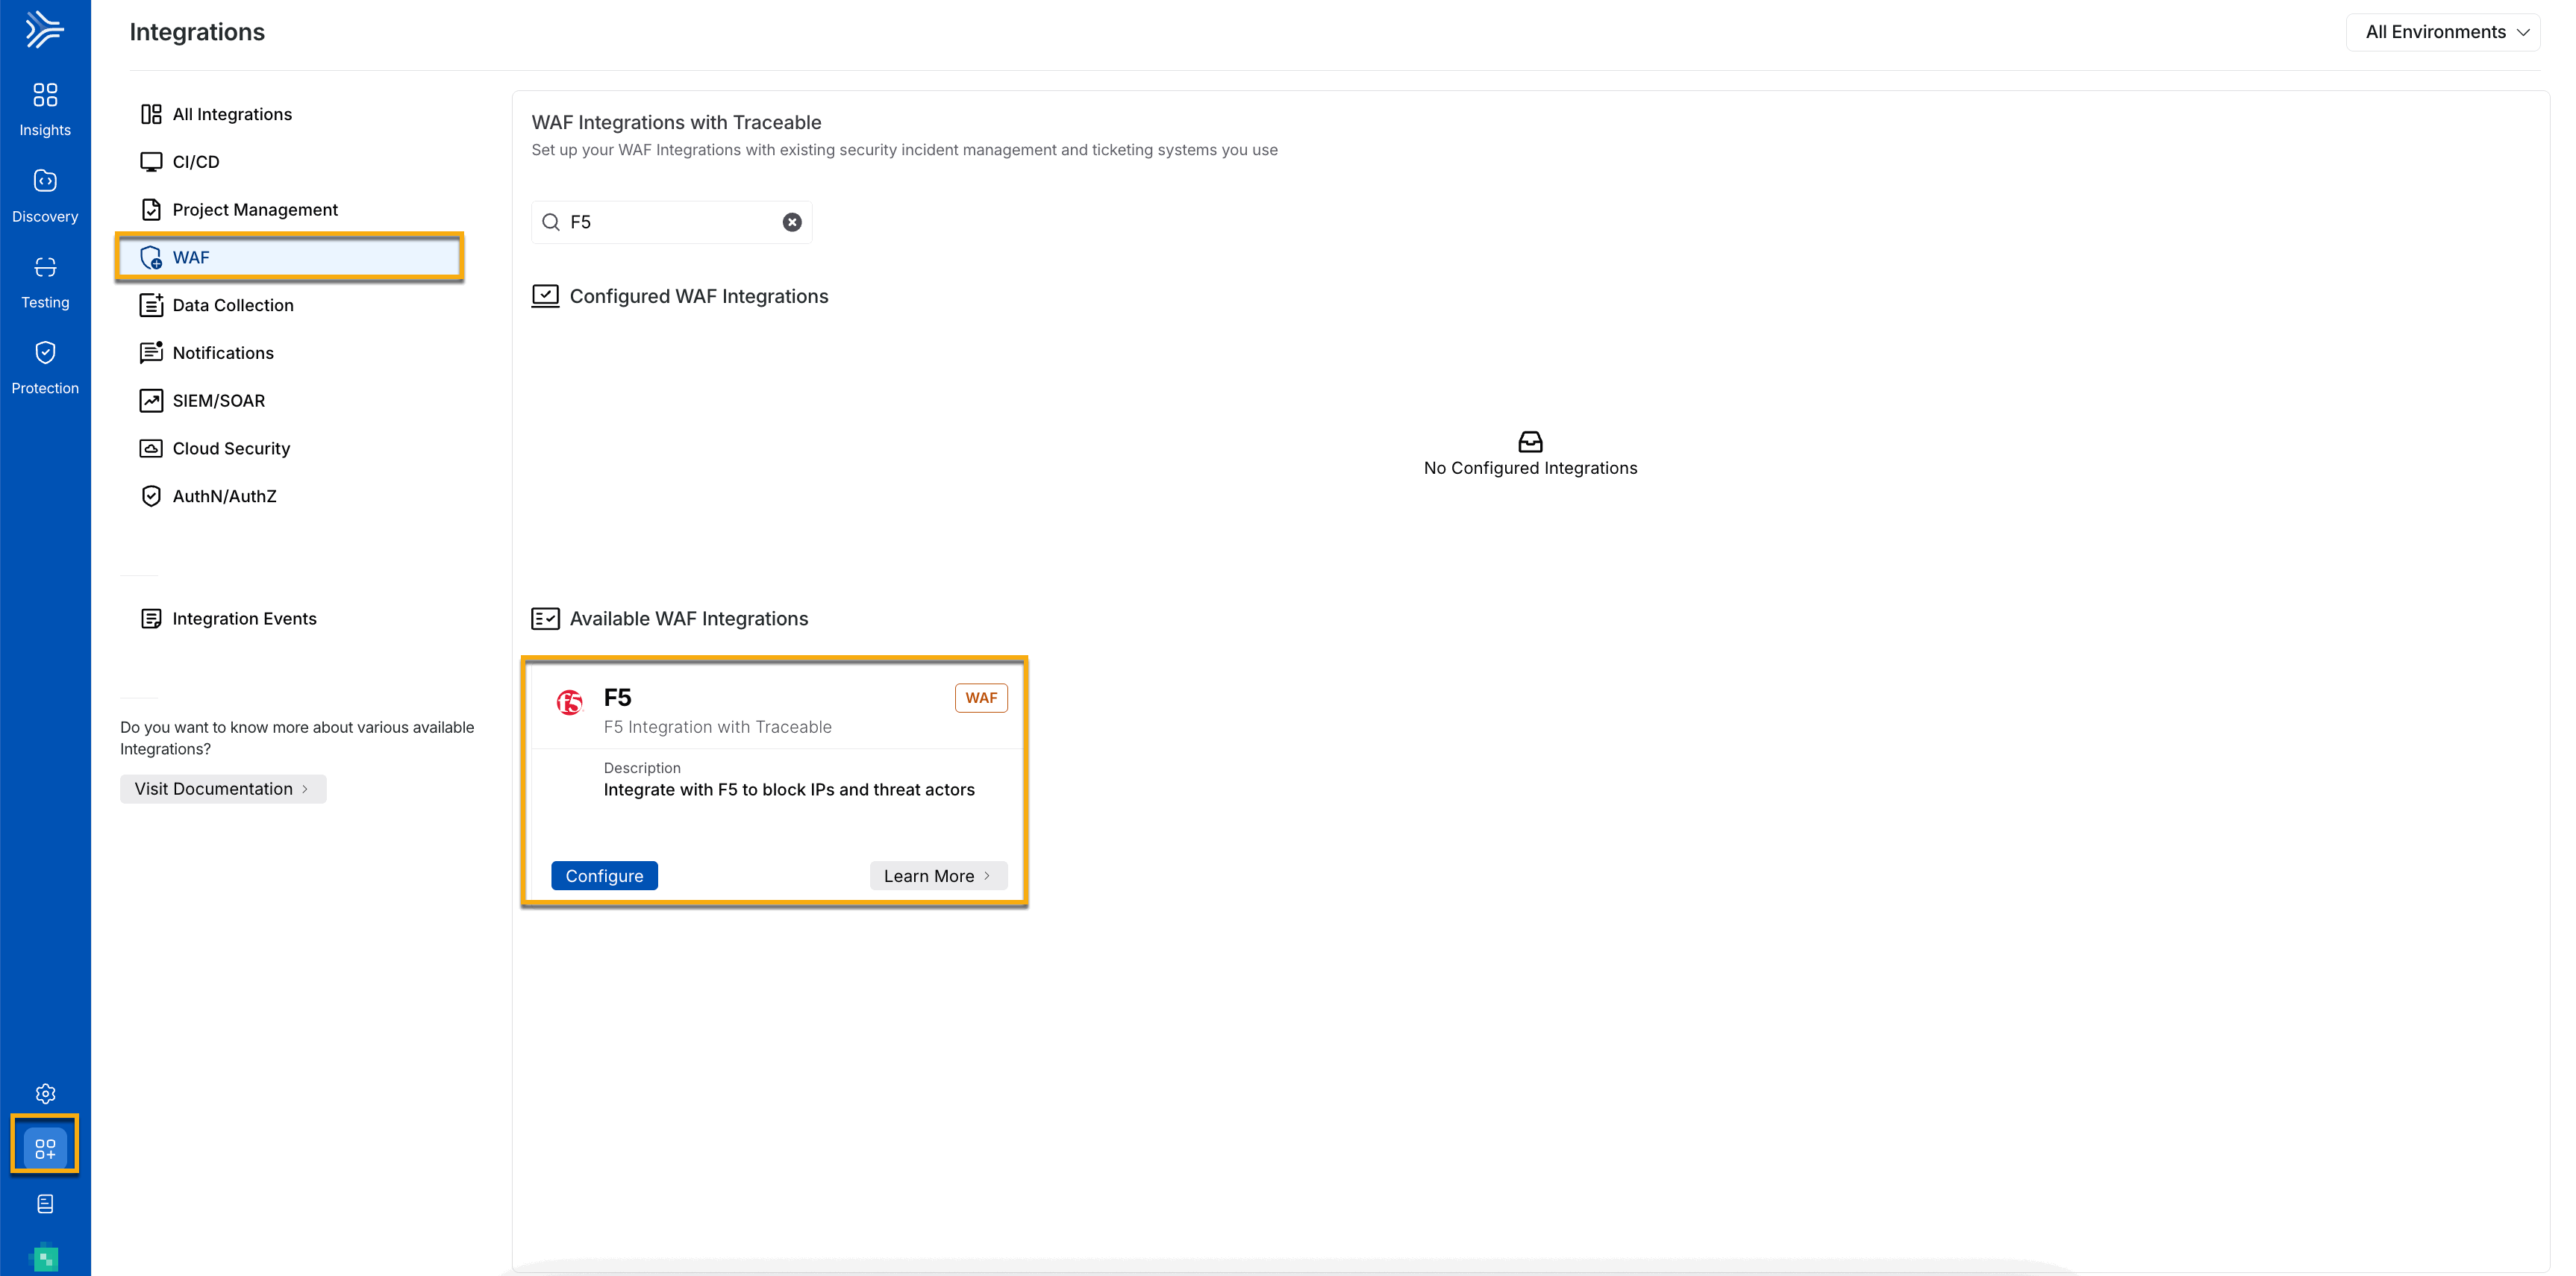
Configure the following:
Specify an Integration Name to the integration.
(Optional) Specify a Description for the integration.
Select the Environments for which you wish to configure the integration. You can configure the integration for all environments or specific environments.
Provide your F5 server URL to log in. For more information, see Before you begin.
Provide the exact F5 Application Policy Name. Traceable adds its rules to this security policy.
Provide the F5 Login Credentials, comprising Username and Password, to log in to your F5 account.
Click Test Connection to validate the connection between Traceable and F5. The Save button is only enabled if the connection is successful.
.png)
Add new F5 integration
Note
If any Traceable rule contains more than one IP address, then multiple rules are created in the F5 security policy.
If a Traceable IP range is given in CIDR format with a network mask, then in F5, it is separated into IP address and network mask.
Make sure that the
Trust XFF headeris enabled when you create a security policy in F5. This is required forthe X-Forwarded-Forrequest header.When you delete the integration configuration in Traceable, the security policy is also deleted in F5.
At present, F5 does not support IP range rules with condition
BLOCK_ALL_EXCEPT.
Verification
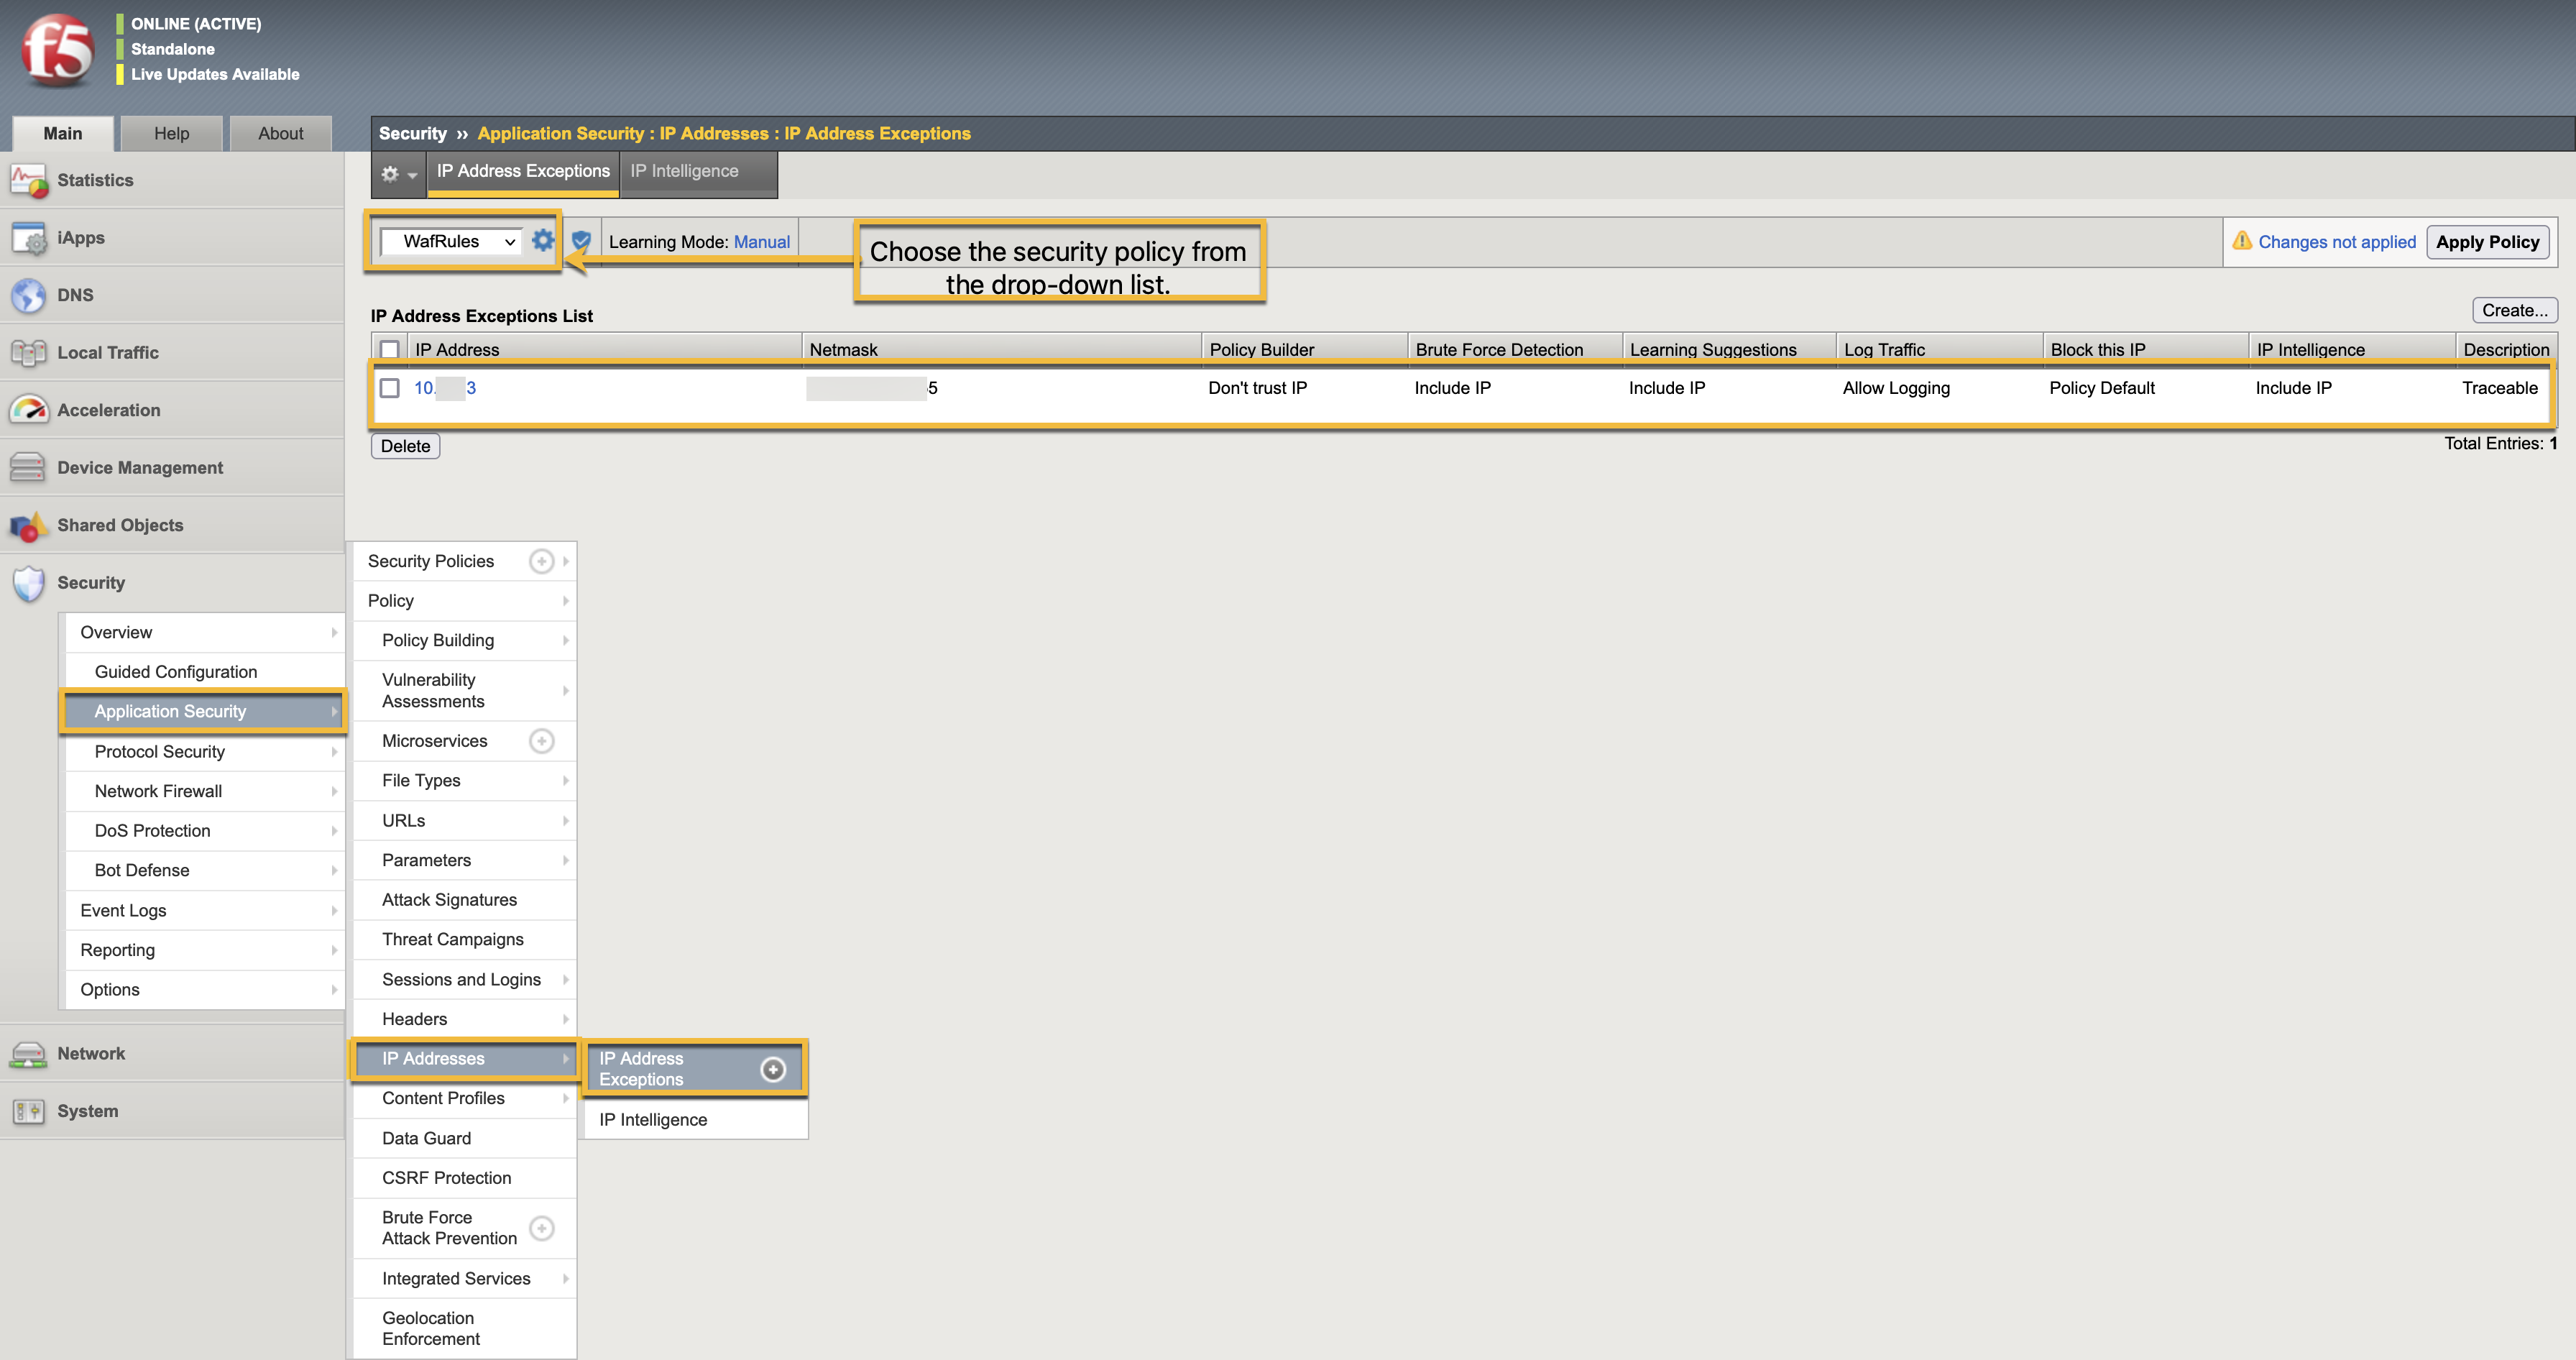
To verify a successful integration, send traffic through F5 and, after a while, verify in F5 by navigating to the Application security → IP addresses → IP address exception. You would see the rules for a specific policy. Ensure that you select the security policy from the drop-down list that you have configured in Traceable.
