Updates (April 2026 to June 2026)
May 2026 — Updated the topic to add information about the availability of the enable and disable options for configured Cloudflare integration. For more information, see Manage configured integration.
Cloudflare WAF (Web Application Firewall) helps protect your applications and APIs from cybersecurity threats. Traceable integrates with Cloudflare’s WAF to block IP addresses and threat actors. As part of the integration, Traceable identifies the IP address that violates a rule, such as a rate limit. Upon identification, Traceable sends these IP addresses to Cloudflare’s WAF, where you can view and edit them.
What will you learn in this topic?
By the end of this topic, you will be able to understand:
An overview of the steps required to set up the Cloudflare integration.
The prerequisites for setting up the integration.
The detailed steps for the Cloudflare integration.
The support matrix for the creation of Custom Signature rules in Traceable.
Integration Overview
This section provides high-level information on integrating Cloudflare WAF with your environment and managing threats.
Installation — Traceable allows you to choose between agent-based and agentless deployment. You must deploy an agent to integrate Cloudflare WAF in your Traceable account. For more information, see Installation.
Integration Setup — After deploying the agent, you can retrieve the credentials and configure the Cloudflare integration. To do so, you must complete the following steps:
Prerequisites — Log in to your Cloudflare account and retrieve the required credentials to configure the integration. For more information, see Before you Begin.
Fetch the Ruleset ID — Create a new ruleset for your Cloudflare account and use its ID for configuring the integration. For more information, see Fetch the Ruleset ID.
Integration — Once you have the credentials from the steps above, navigate to the Traceable platform and configure the integration. For more information, see Add a New Cloudflare Integration.
Threat Management — After setting up the integration, you can set up rules to allow, block, or monitor IP addresses according to your requirements. Traceable supports the following rules for the Cloudflare integration:
Threat Actors — On the Threat Actors page, Traceable displays the IP addresses that pose a threat, where you can change the status of an actor to deny or suspend it. For more information, see Threat Actors. Traceable allows creating allowlists using allowed and snoozed states, and supports blocking using deny and suspended states under threat actors. For more information, see Threat Actors.
Malicious Source Rules (IP range only) — You can set up Malicious Source rules to block unwanted IPs based on IP ranges. To configure these rules, navigate to Protection → Policies → Custom Policies → Malicious Source tab. For more information, see Custom Policy.
Custom Signature Rules — You can set up Custom Signature rules to block incoming requests from a specific URL by matching the corresponding endpoints. To configure these rules, navigate to Protection → Policies → Custom Policies → Custom Signatures tab. For more information, see Custom Policy and Custom Signature rules support matrix.
The following is a high-level diagram of Traceable’s integration with Cloudflare:
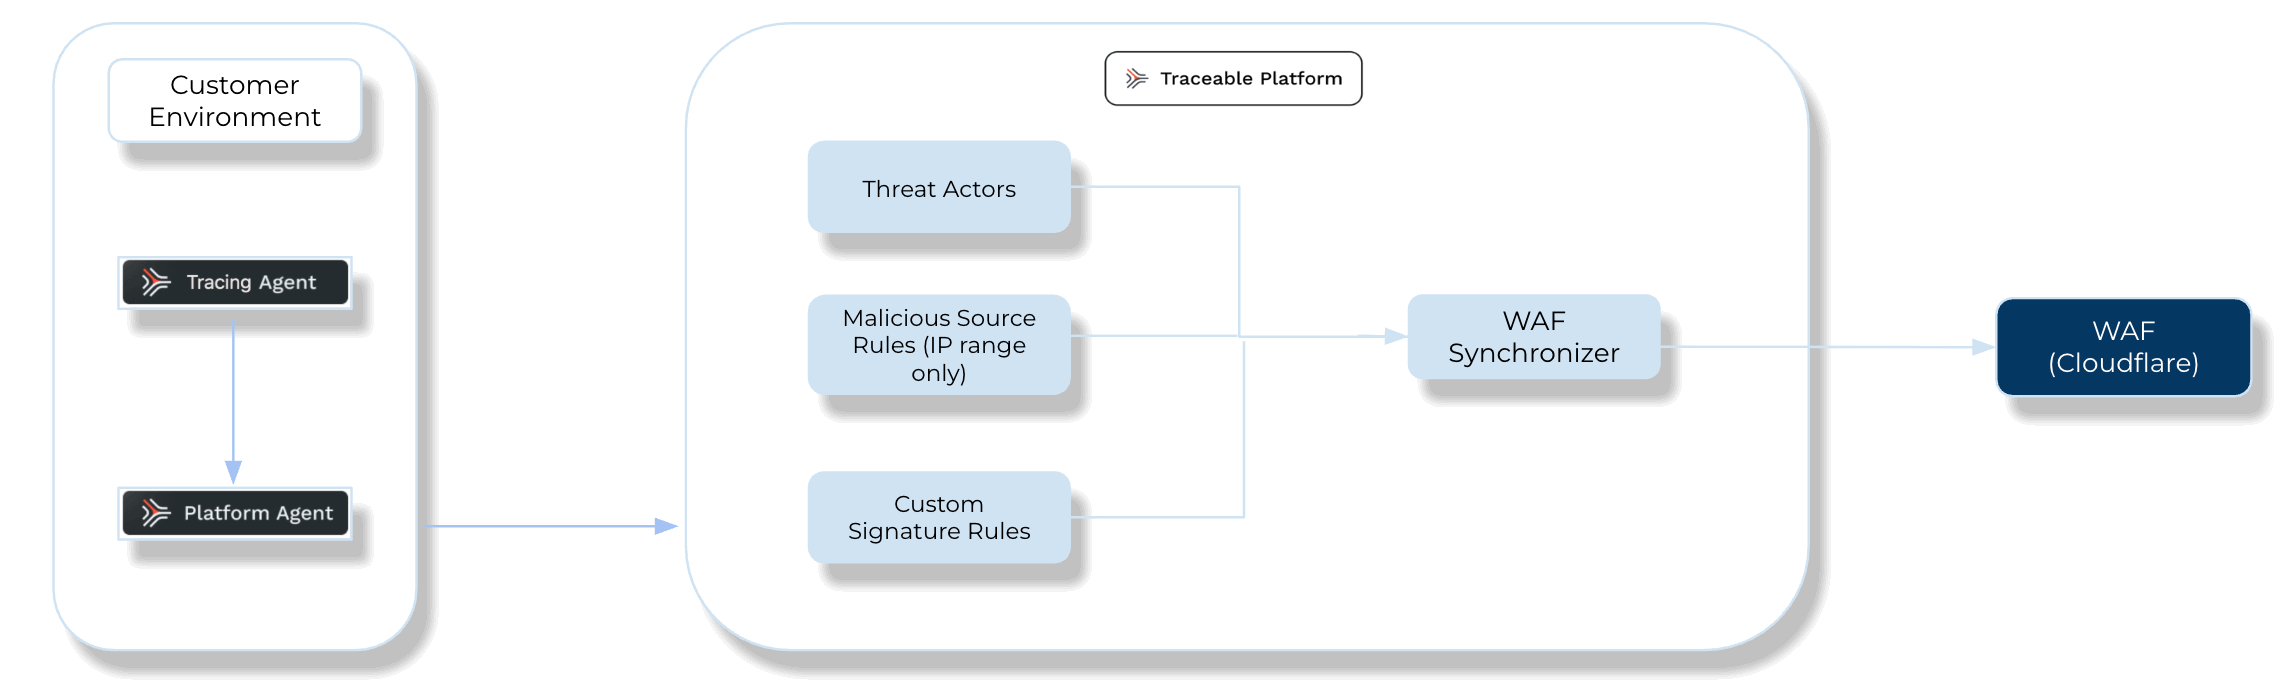
Traceable Cloudflare Integration Diagram
Before you begin
Make a note of the following before you proceed with the integration:
Make sure you have the Authorization Email Address associated with your Cloudflare account.
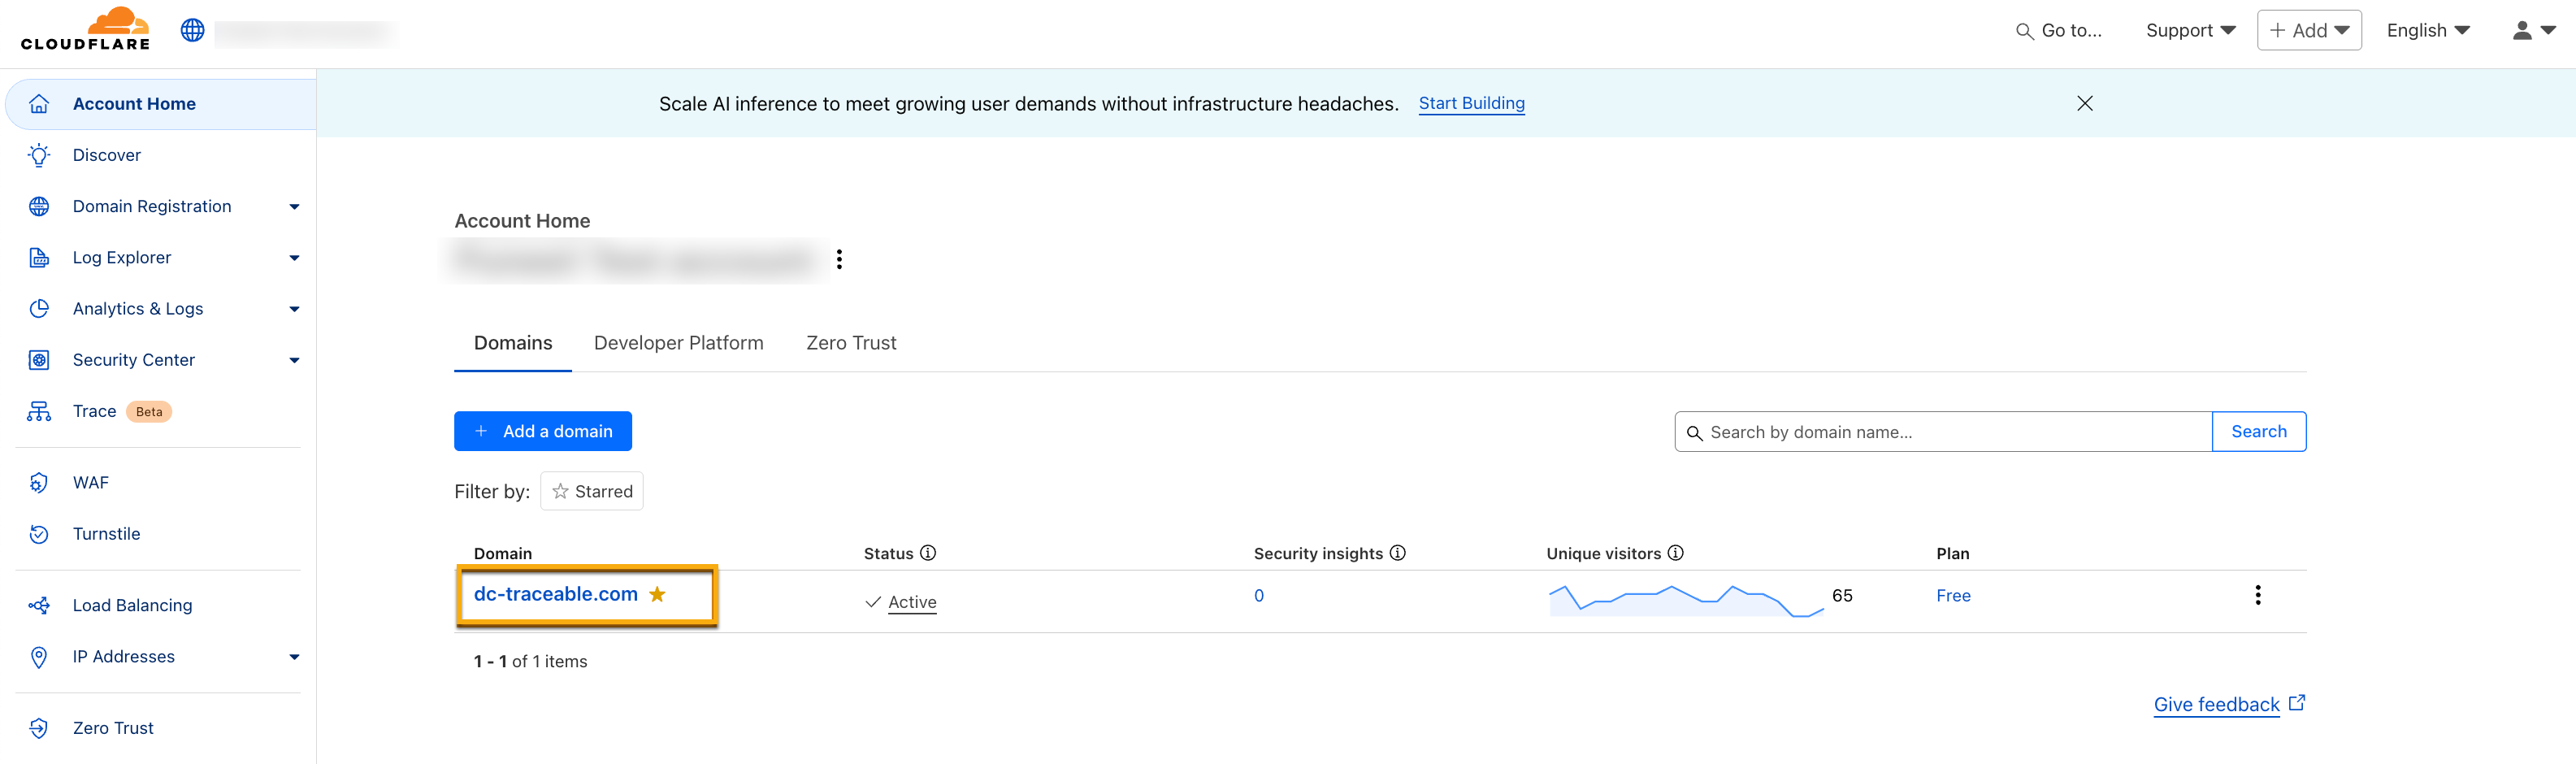
Make sure you have the Domain name, for example, dc-traceable.com, from your Cloudflare account. This Domain name is used as the Zone while configuring the integration in the Traceable platform.
Make sure you have the Zone ID associated with the above Domain from your Cloudflare account. For more information, see Copy your Zone ID.
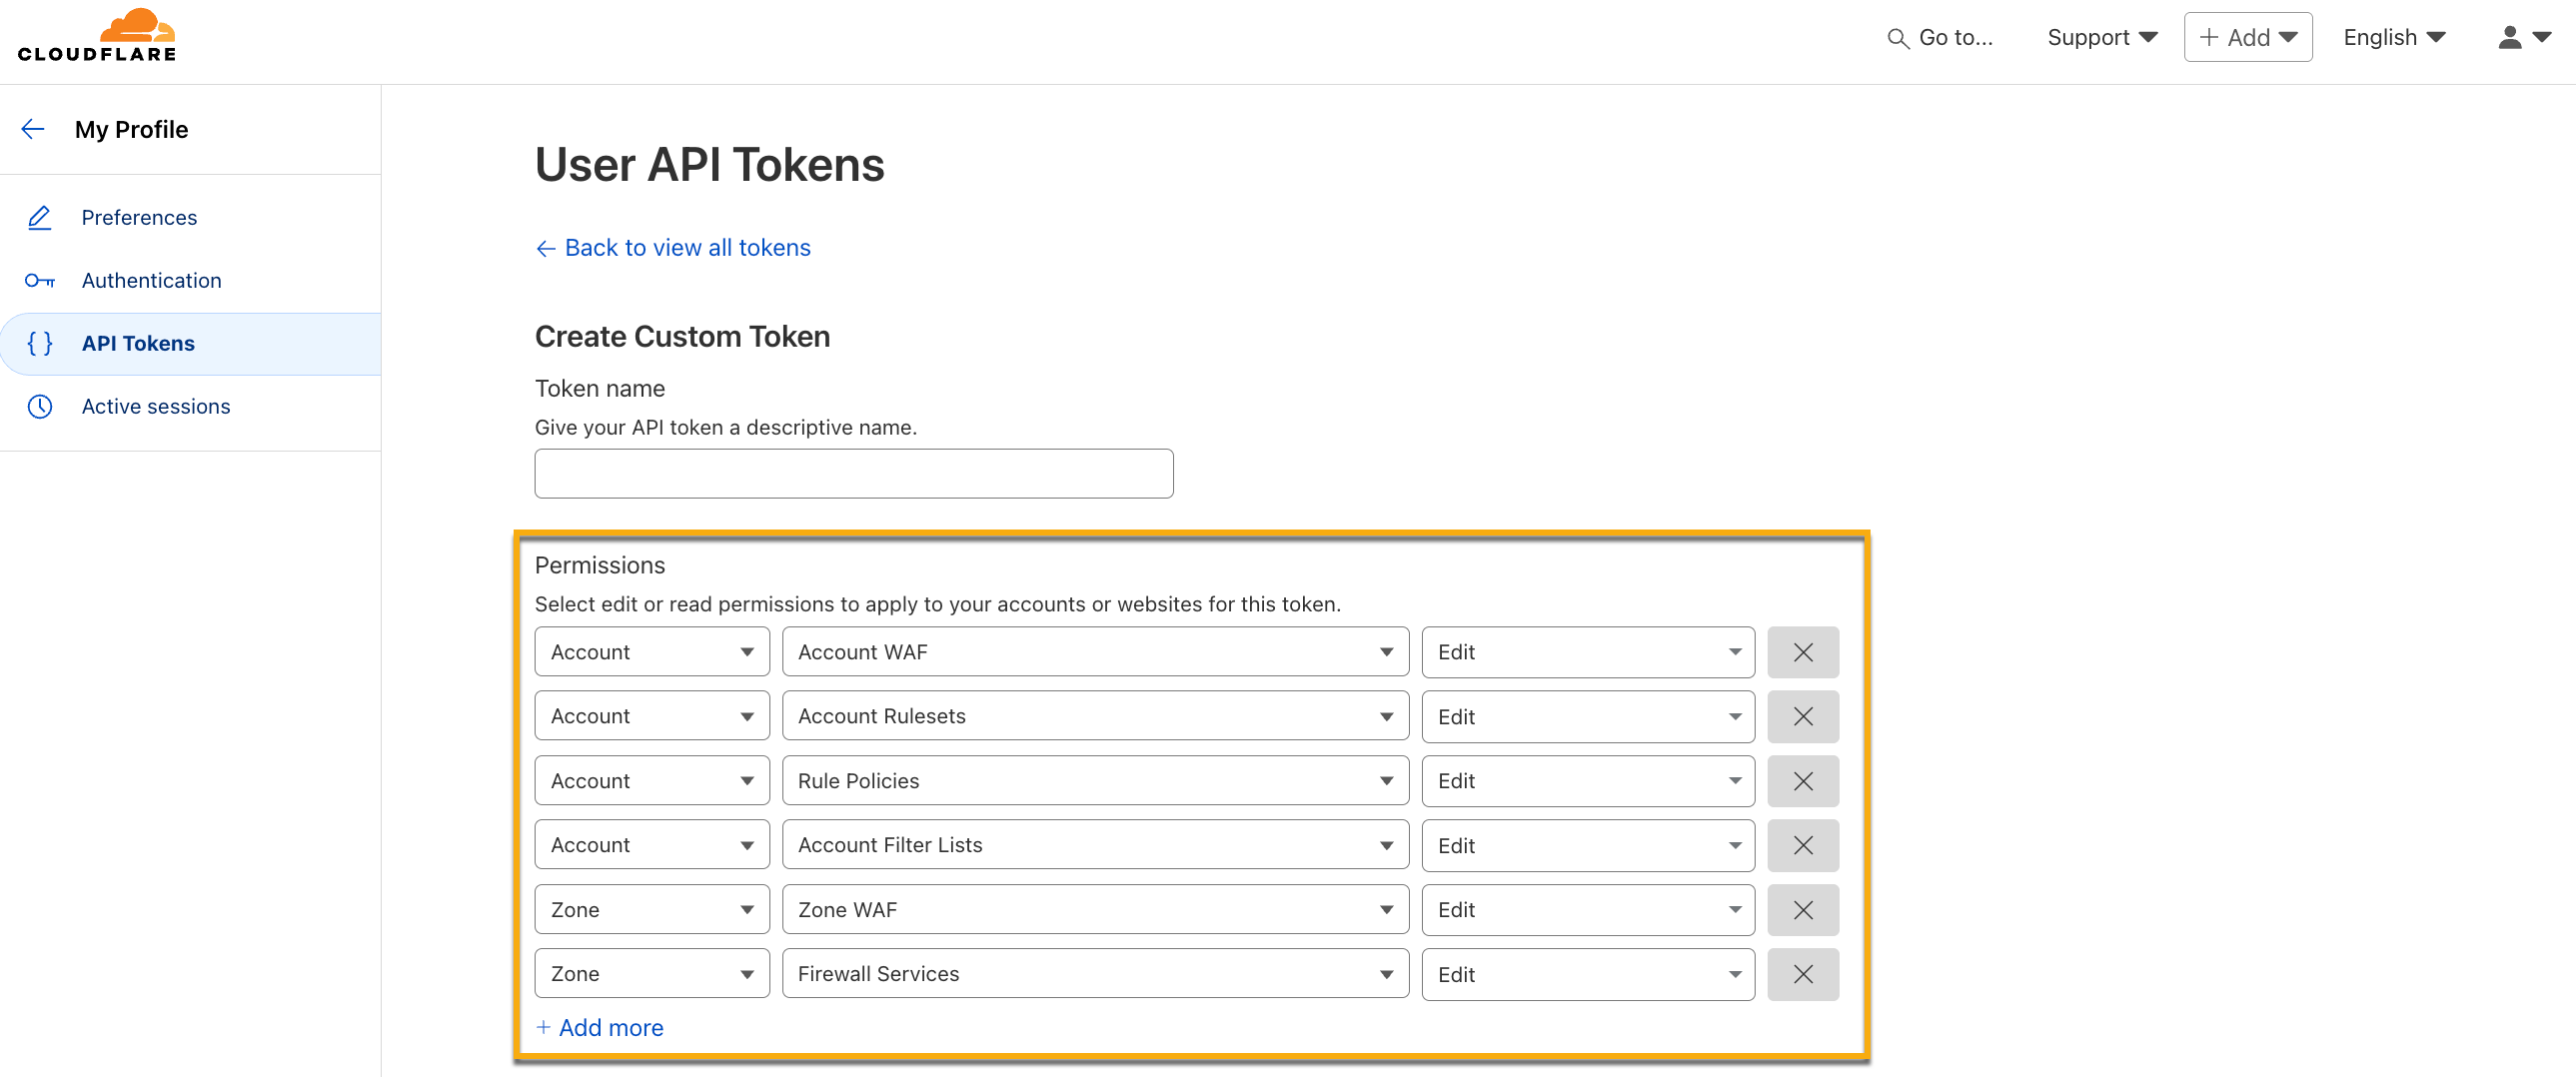
Make sure you have the API token associated with your Cloudflare account, along with the permissions specified below. For more information, see Create API token.
Note
If you wish to use an existing token, make sure you add the below permissions to the token.
Permission Category
Attribute
Access Type
Account
Account WAF
Edit
Account
Account Rulesets
Edit
Account
Rule Policies
Edit
Account
Account Filter Lists
Edit
Zone
Zone WAF
Edit
Zone
Firewall Services
Edit
The above permissions allow Traceable to communicate the IP addresses to Cloudflare and add or modify them in the future.
Set up the integration
To set up the Cloudflare integration in Traceable, complete the following steps:
Step 1 — Fetch the Ruleset ID
A ruleset in Cloudflare defines how and what traffic is to be allowed or filtered. Each ruleset is assigned a unique identifier known as the Ruleset ID. To integrate Cloudflare with your Traceable account, you must create a ruleset and fetch its ID. This ID is required while configuring the integration in the Traceable platform.
To create a ruleset, use the below API:
curl --location 'https://api.cloudflare.com/client/v4/zones/{zoneId}/rulesets' //Replace the <zoneId> placeholder with the value you retrieved from your Cloudflare account.
--header 'Content-Type: application/json'
--header 'Authorization: Bearer <Bearer Token>' //Replace the <Bearer Token> placeholder with the value from the Authorization tab of your API tool
--data '{
      "kind": "zone",
      "name": "Traceable Ruleset",
      "phase": "http_request_firewall_custom",
      "description": "My ruleset to execute managed rulesets"
}'
The above API request returns the following response:
{
    "result": [

        {
            "description": "My ruleset to execute managed rulesets",
            "id": "10ff1234e82a4a0e91234fc9875e1b13",
            "kind": "zone",
            "last_updated": "2025-06-20T12:54:00.558586Z",
            "name": "Traceable Ruleset",
            "phase": "http_request_firewall_custom",
            "source": "firewall_custom",
            "version": "5"
        }
    ],
    "success": true,
    "errors": [],
    "messages": []
}
From the above response, copy the value corresponding to the id field. This is required while configuring the Cloudflare integration in Traceable.
Step 2 — Add new Cloudflare integration
The following interactive demo walks you through the steps to navigate and integrate Cloudflare with Traceable.
To configure a new Cloudflare integration, navigate to the Integrations page from the bottom left corner of your Traceable account, and do one of the following:
Search for Cloudflare in the search bar.
Navigate to WAF → Cloudflare.
In the Cloudflare widget, click Configure, and in the Add New Cloudflare Integration slide-out panel, complete the following steps:
(1).png)
Add New Cloudflare Integration
Integration Name — A unique name for your integration, for example, CF_integration.
(Optional) Description — A summary for your integration, for example, CF_int_desc
Environment — The environment for which you wish to integrate from the drop-down list.
Target(s) — You can select one or more targets from Threat Actors, Custom Signature, Malicious Sources IP Range, and Malicious Source Region.
Zone (Domain name) — The zone that you fetched from your Cloudflare account. For more information, see Before you begin.
Authorization Email — The authorization email where the above Zone is available. For more information, see Before you begin.
Ruleset ID — The unique identifier associated with the Cloudflare ruleset used to manage and enforce traffic filtering rules you fetched in Step 1 above.
API Token — A unique API token associated with the above Cloudflare account. For more information, see Before you begin.
(Optional) Specify the Custom List Detail by providing the Block List Name and Allow List Name, for example, block_list1 and allow_list1. This allows you to create your own allow-lists and block-lists.
Note
You must specify both the Block List Name and the Allow List Name under the Custom List Detail.
Click Test Connection.
Upon validation, Traceable allows you to Save the integration.
Manage configured integration
After configuring the integration, you can view the Cloudflare WAF Integration under Configured WAF Integrations, as shown below:
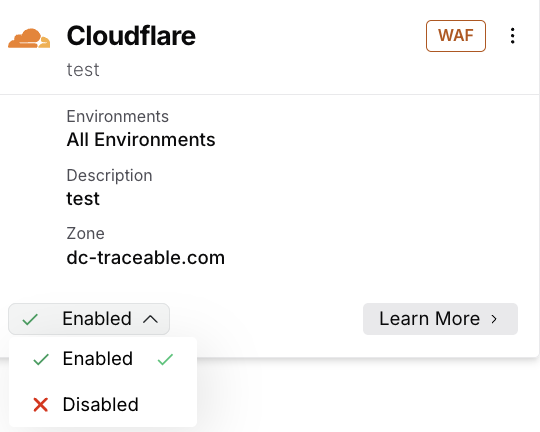
Configured Integration Enable Disable
Traceable gives you the flexibility to control how the integration operates. You can choose either of the following actions using the drop-down, according to your requirements.
Enabled — You allow Traceable to actively update the WAF with the latest rules to enforce protection and monitor or block threats. When enabled, Traceable continuously sends new rules and updates to the WAF based on policy activity, helping enforce protections with the latest threat information and block suspicious traffic.
Disabled — You stop Traceable from updating the WAF, so it no longer enforces new protections for that environment or region. When disabled, Traceable stops sending new rules and updates to the WAF for the selected environment or region, while other environments continue using their existing integration settings without impact. The WAF continues to enforce existing rules based on their last applied state, without receiving new updates. Traceable continues to detect and evaluate threats, but it does not enforce them through WAF.
Custom Signature rules support matrix
Cloudflare supports the creation of Custom Signature rules based on various request attributes. You can use logical operators, such as AND and OR, to combine multiple conditions and build advanced rule logic. For more information on the support matrix, see Support Matrix for Custom Signature Rules.
Note
Cloudflare only supports Custom Signature rules based on headers or parameters, where the corresponding keys are matched using the
==operator.