Updates (January 2026 to March 2026)
January 2026 — Updated the topic to add information about the rules supported in Traceable. For more information, see Integration Overview.
Azure Web Application Firewall (WAF) is a cloud-based service provided by Microsoft Azure that helps protect web applications from common web-based threats and attacks. It acts as a reverse proxy and inspects incoming web traffic to your web applications, filtering out malicious requests and traffic before they reach your application servers. Traceable integrates with Azure’s WAF to block IP addresses and threat actors.
What will you learn in this topic?
By the end of this topic, you will be able to understand:
An overview of the steps required to set up the Azure integration.
The prerequisites for setting up the integration.
The detailed steps for the integration.
Integration Overview
This section provides high-level information on integrating Azure WAF with Traceable and managing threats.
Installation — Traceable allows you to choose from an agent-less or agent-based deployment option. For more information on Traceable agents, see Installation.
Integration Setup — After deploying the agent, you can retrieve the credentials and configure the Azure integration. To do so, you must complete the following steps:
Prerequisites — Log in to your Azure account and retrieve the necessary credentials, including the Azure tenant ID, subscription ID, client ID, and client secret. For more information, see Before you begin.
Integration — After obtaining the credentials from the previous steps, navigate to the Traceable platform and configure the integration. For more information, see Set up the Integration.
Threat Management — After setting up the integration, you can establish rules to allow, block, or monitor IP addresses according to your specific requirements. Traceable's integration with Azure WAF supports the following two types of rules:
Threat Actors — Any status change of threat actor on the Traceable Platform is propagated to Azure WAF. For example, if Traceable detects a threat actor and changes it to a deny state, then the requests from this threat actor can be blocked using Azure. Traceable recommends going through the allow list conditions before creating any IP-range rules. Traceable allows creating allowlists using allowed and snoozed states, and supports blocking using deny and suspended states under threat actors. For more information, see IP address allowlist. Moreover, if you make any changes, such as adding a threat actor to the allowlist or resolving the status, these changes are reflected in Azure within a few minutes.
Malicious Source Rules (IP Range only) — If you configure any malicious source rules under Protection → Policies → Custom Policies → Malicious Sources tab to enforce blocking or allow for IP ranges to be executed through Azure.
Note
Traceable’s Azure integration does not block IP addresses with
x-forwarded-forandx-real-ipheaders.
The following is a high-level integration diagram:

Traceable Azure Integration Diagram
Before you begin
Make a note of the following before proceeding with the integration steps:
Tenant ID — In Microsoft Azure, a Tenant ID, also known as a Directory ID or a Directory Tenant ID, is a unique identifier for an Azure Active Directory (Azure AD) tenant. Azure AD is Microsoft's identity and access management service, which manages and secures access to Azure resources. To retrieve the Tenant ID, see Tenant ID.
Client ID — A Client ID, or an Application ID, is a unique identifier associated with an application or service registered in Azure AD. This Client ID uniquely identifies and authenticates the application when it interacts with Azure AD for various purposes.
Client Secret — A secret key associated with the Azure app registration, used by Traceable to obtain access tokens and authenticate API requests.
Azure Subscription ID — An Azure Subscription ID is a unique identifier associated with a specific Azure subscription. You can find your Azure Subscription ID in the Azure portal, typically in the subscription section. To retrieve the Tenant ID, see Subscription ID.
Reasonable knowledge of Azure WAF and policies in Azure.
The policies set by Traceable begin with the prefix
Traceable.
Set up the Integration
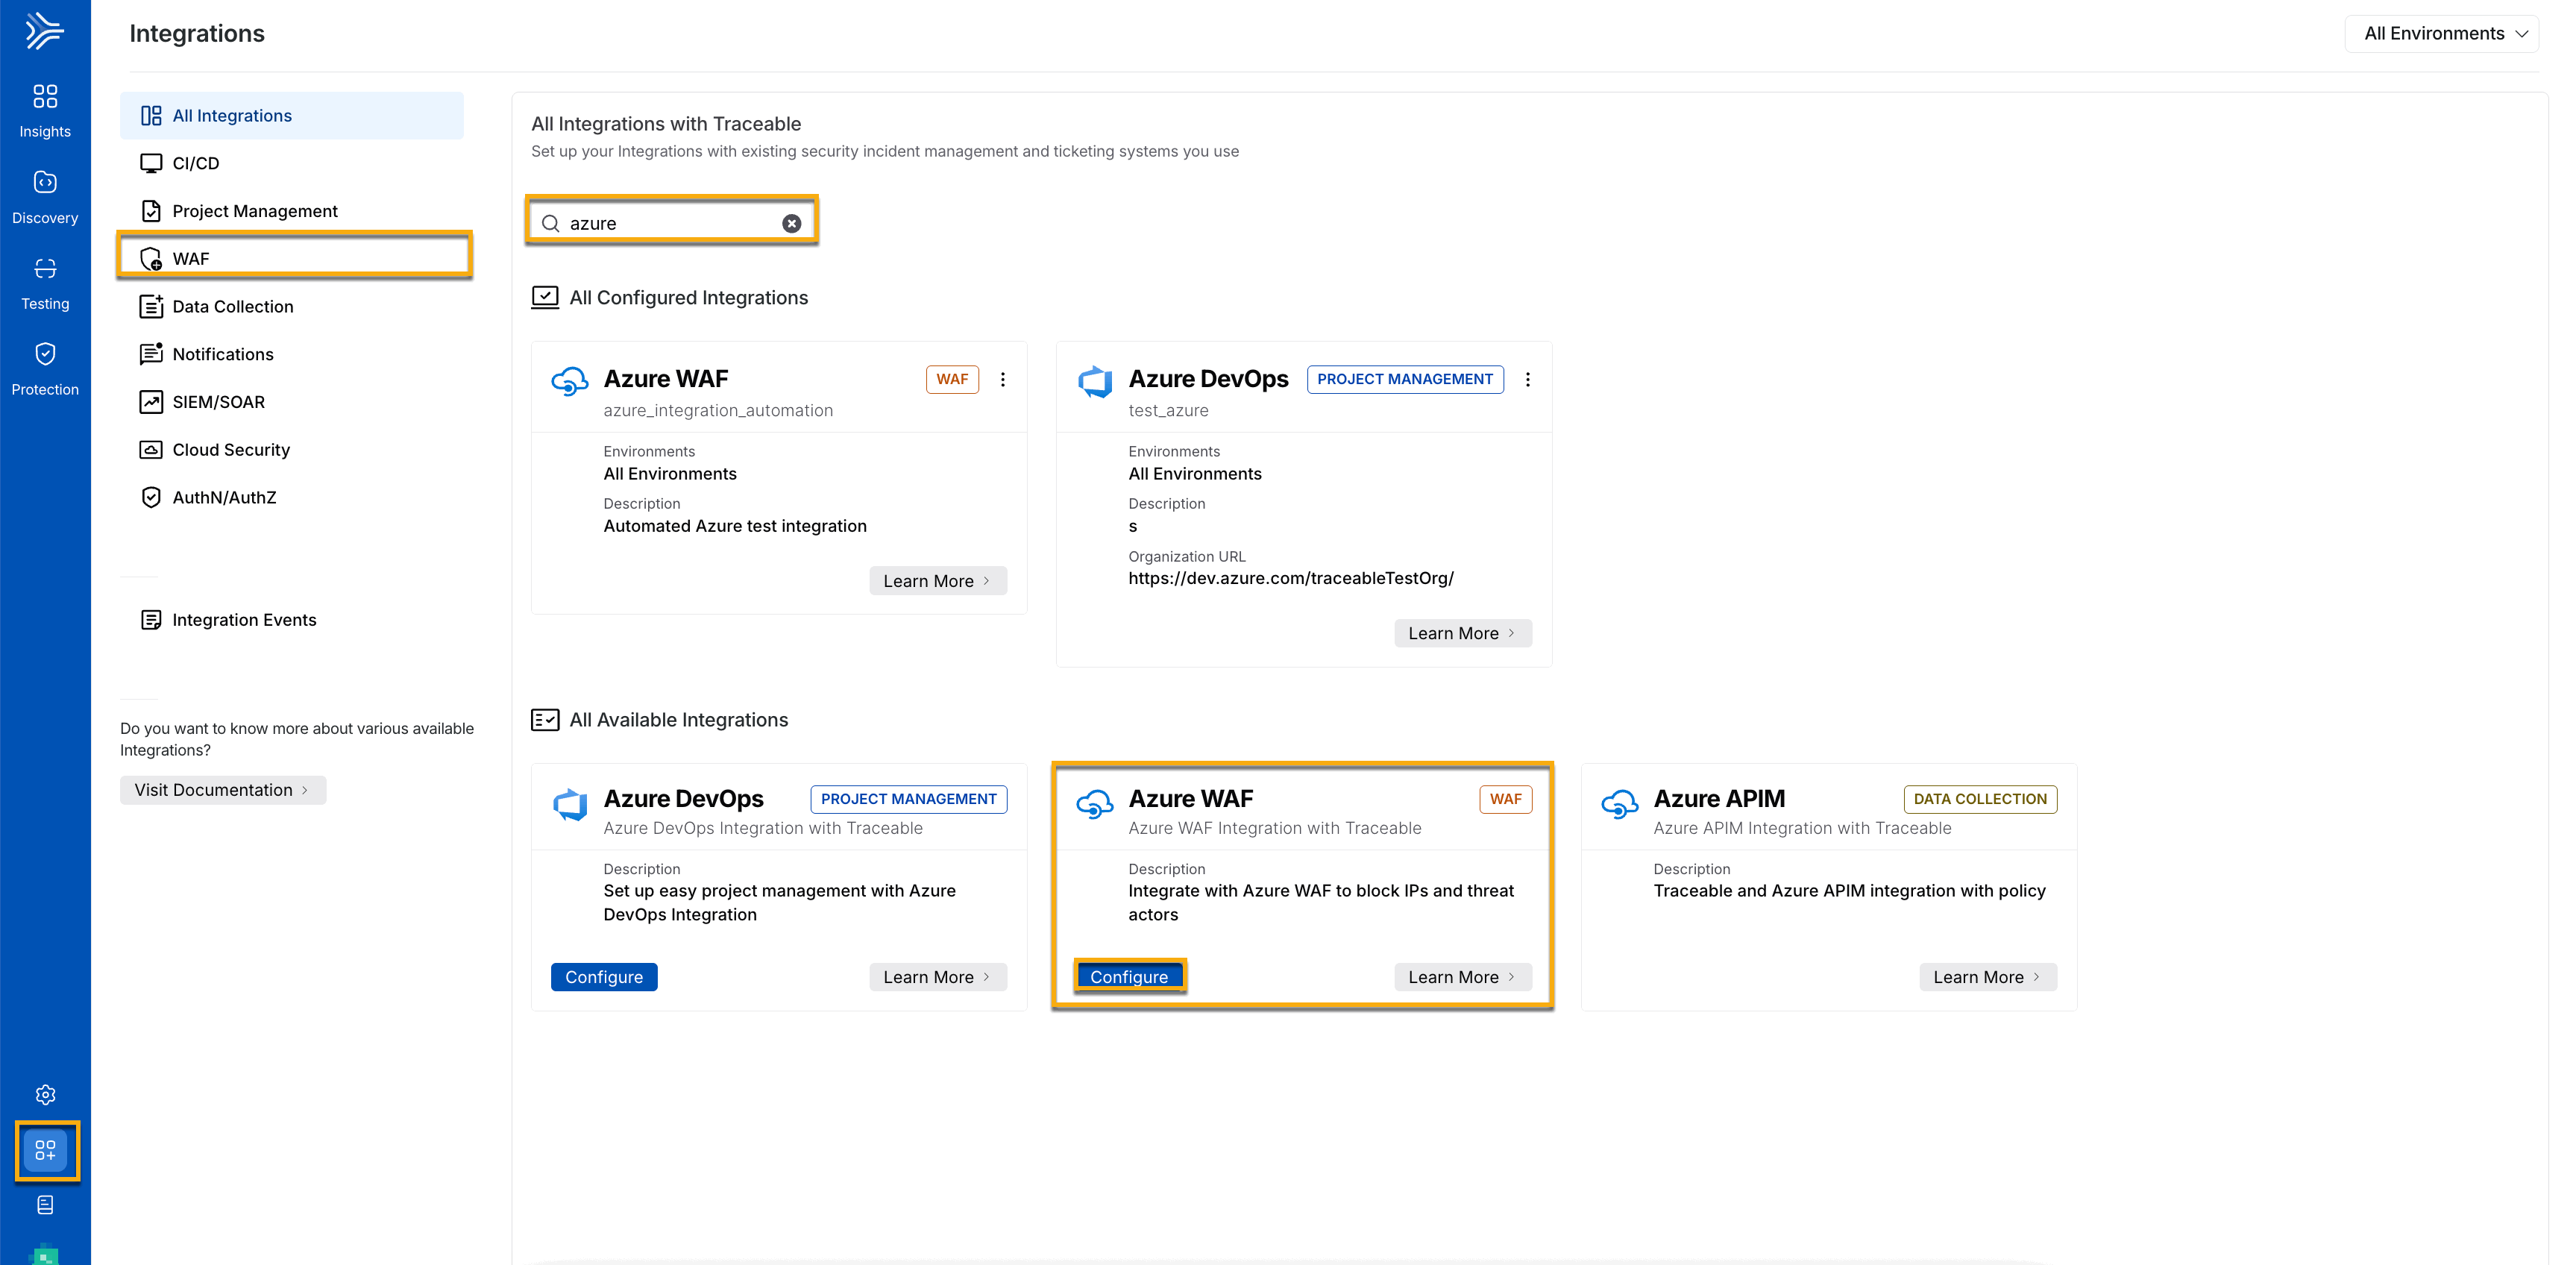
To configure a new Azure integration, navigate to the Integrations page from the bottom left corner of your Traceable account, and do one of the following:
Search for Azure in the search bar.
Navigate to WAF → Azure

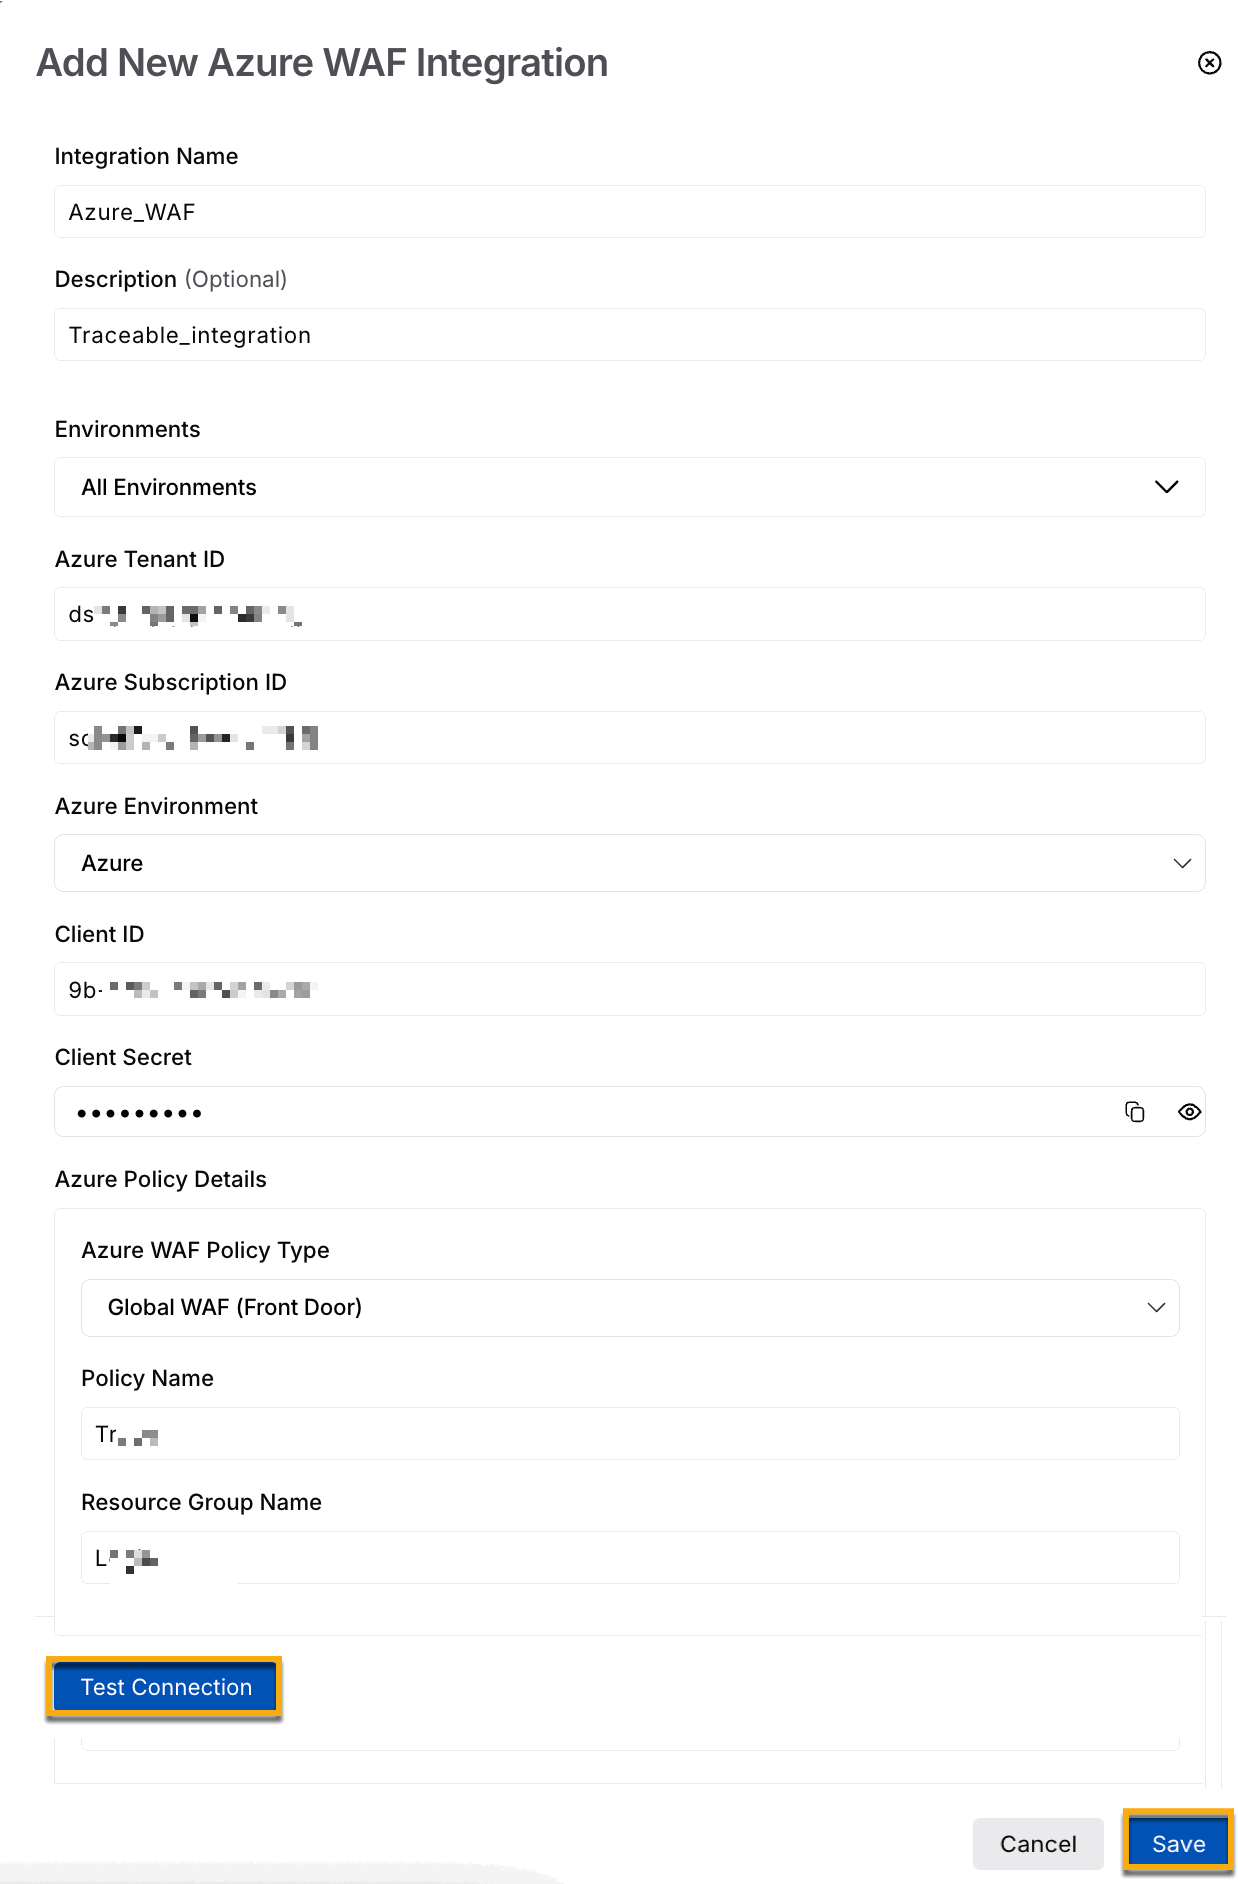
In the Azure WAF widget, click Configure, and in the Add New Azure Integration window, complete the following steps:

Specify the Integration Name for your integration, for example, Azure_WAF.
(Optional) Specify a Description for your integration, for example, Traceable_integration.
Select the Environments from the drop-down list. These environments could be, for example, production, sandbox, QA, and so on. You can choose one or more environments, or all of them.
Specify the Azure Tenant ID. For more information, see Before your begin.
Specify the Azure Subscription ID. For more information, see Before your begin.
Choose from one of the three Azure environment — Azure, China, or the US government.
Specify the Client ID. For more information, see Before your begin.
Specify the Client Secret that you created when registering the application.
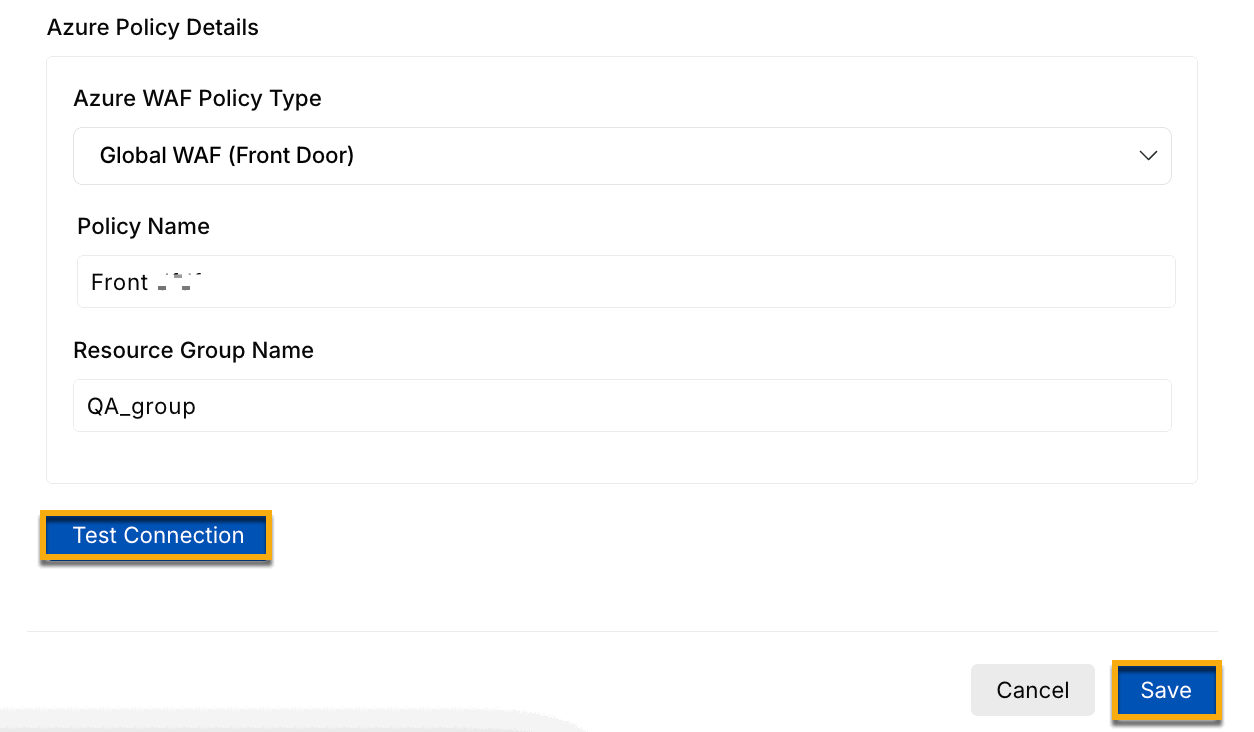
Azure Policy Details
Provide the following policy details for Azure. When you provide the policy name, make sure that you already have a corresponding policy in Azure with the same name. Traceable uses this policy and adds custom rules to it.

Select the Azure WAF Policy Type from one of the WAF options — Global WAF (Front Door) or Regional WAF (Application Gateway). Choose the policy based on the type of policy you have chosen in Azure.
Specify the Policy Name of the existing policies associated with the respective Global WAF or Regional WAF.
Specify the Resource Group Name, for example, QA_group.
Click Test Connection to test the connection with Azure. You can Save the integration details only when the test connection is successful.
Note
You can add one or more than one integration. The same policies are pushed to all the integrations.
To verify the integration, check the rules in your security policy in Azure.