Updates (April 2026 to June 2026)
May 2026 — Updated the topic to add information about the availability of the enable and disable options for configured Akamai integration. For more information, see Manage configured integration.
Akamai Web Application Firewall (WAF) is a robust, cloud-based security solution that protects web applications from malicious attacks, including SQL injection, cross-site scripting (XSS), and other common threats. Integrating Traceable with Akamai WAF enhances the security posture by leveraging Traceable's deep API observability, AI-driven insights, and advanced anomaly detection capabilities. This integration enables organizations to gain comprehensive visibility into their API traffic and security events while also benefiting from Akamai WAF's scalable protection. Together, they offer a powerful solution for detecting, preventing, and responding to sophisticated threats targeting modern web applications and APIs.
What will you learn in this topic?
By the end of this topic, you will be able to understand:
An overview of the steps required to set up the integration.
The prerequisites for setting up the integration with Traceable.
The steps to integrate Akamai with Traceable.
Integration overview
This section provides high-level information on integrating Akamai WAF with Traceable and managing threats.
Installation — Traceable offers agentless or agent-based deployment options. For more information on Traceable agents, see Installation.
Integration Setup — After deploying the agent, you can retrieve the credentials and configure the Akamai integration. To do so, you must complete the following steps:
Prerequisites — Log in to your Akamai and fetch the required credentials, such as the network list ID and Akamai policy ID, to configure the integration. For more information, see Before you begin.
Integration — After obtaining the credentials from the previous steps, navigate to the Traceable platform and configure the integration. For more information, see Set up the integration.
Threat Management — After setting up the integration, you can establish rules to allow, block, or monitor IP addresses according to your specific requirements. Traceable’s integration with Akamai supports the following three types of rules:
Threat Actors — Any status change of the threat actor on the Traceable Platform is propagated to Akamai. For example, if Traceable detects a threat actor and changes it to a deny state, Akamai can block requests from that threat actor. Moreover, if you make any changes, such as adding a threat actor to the denylist or resolving the status, these changes are reflected in Akamai within a few minutes. Traceable allows creating allowlists using allowed and snoozed states, and supports blocking using deny and suspended states under threat actors. For more information, see Threat actors.
Malicious Source Rules (IP Range only) — If you configure any malicious source rules under Protection → Policies → Custom Policies → Malicious Sources tab to enforce blocking for IP ranges to be executed through Akamai.
Custom Signature Rules — You can set up Custom Signature rules under Protection → Policies → Custom Policies → Custom Signatures tab to block incoming requests from a specific URL by matching the corresponding endpoints. For more information, see Custom Policy. To see the support matrix for Custom Signature Akamai WAF, see Support Matrix for Custom Signature Rules.
Note
Each update to a custom signature rule results in the creation of a new Akamai policy version, which must be activated before enforcement begins. While activation is in progress (typically 7–8 minutes), the new rule is not active, although existing rules remain in effect.
During this activation window, no additional custom signature rules can be pushed. Akamai does not allow cloning or modifying a policy version that is in the middle of an activation cycle. Attempting to do so may result in integration failure or silent rejection. Subsequent custom rules must wait until the previous version has completed activation before being processed.
The following is a high-level integration diagram:
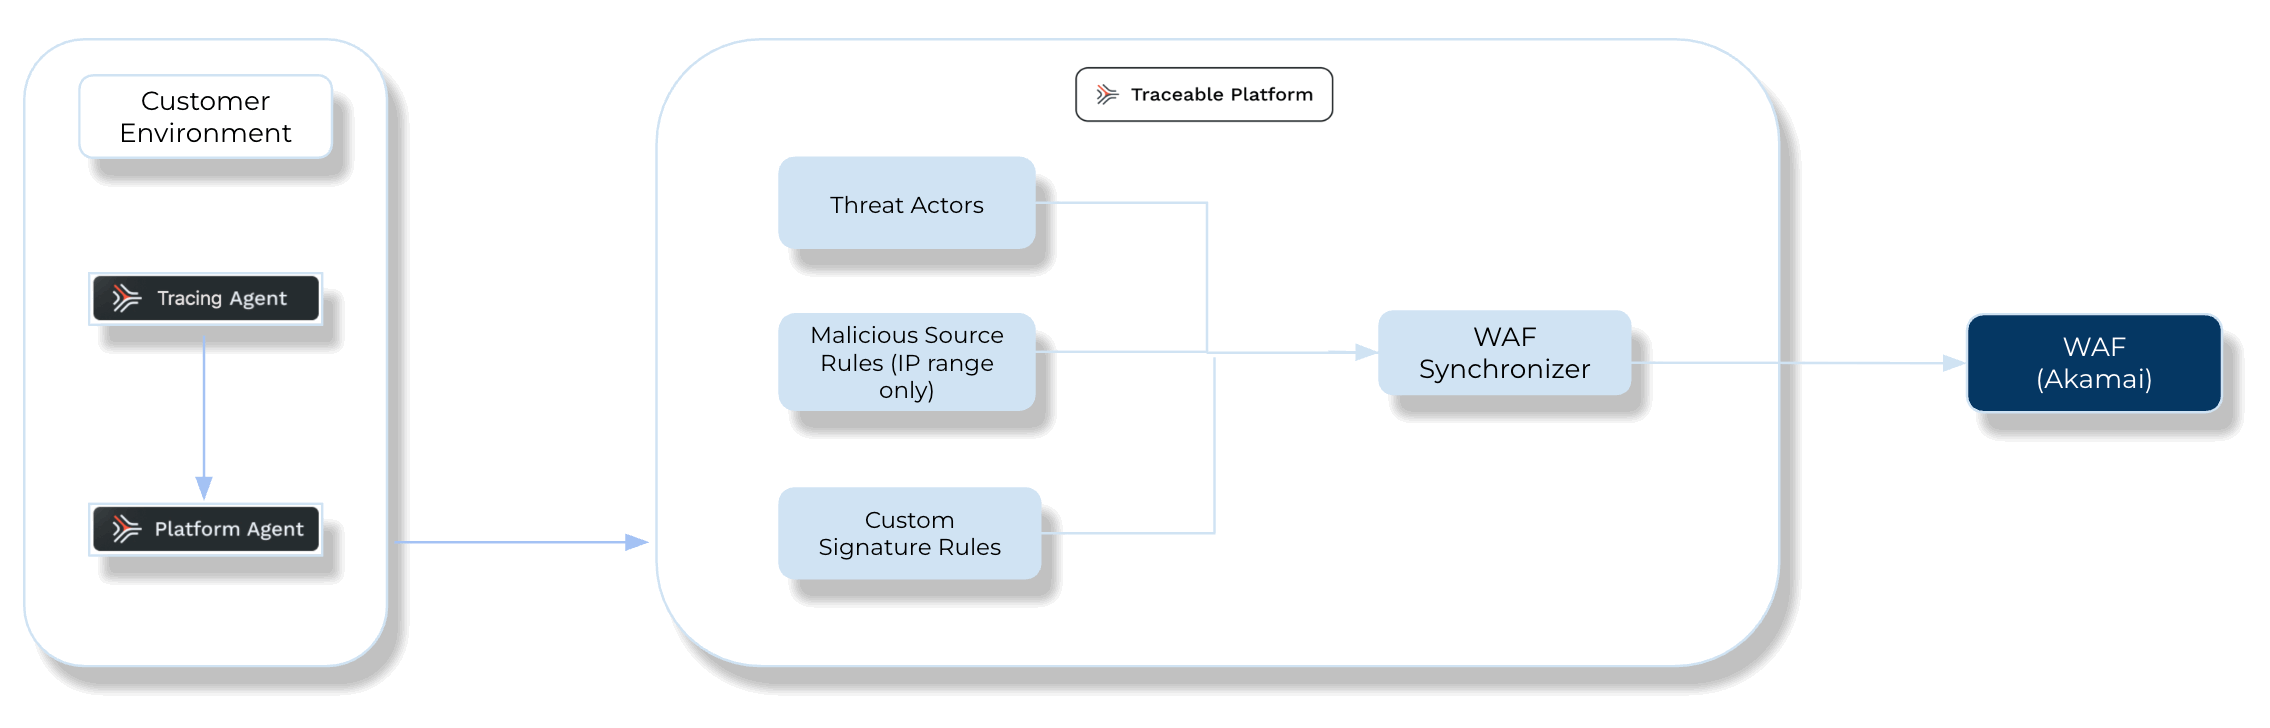
Traceable Akamai Integration Diagram
Before you begin
Make a note of the following before you proceed with the integration:
Ensure you understand the Akamai network list, policy, and how to attach a network list to a policy.
The network list must be explicitly attached to the Akamai policy you plan to use with the Traceable integration. The integration will fail validation if the network list is not attached to the selected policy version. There are two supported approaches depending on your scenario:
Suppose you are creating a new policy specifically for this integration. In that case, it is recommended that the policy be created, the network list be attached during configuration, and the policy ID and network list ID be activated before retrieving them.
If you want to use an existing active policy, note that Akamai does not allow modifying active policies. In this case, you must:
Clone the existing policy to create a new version.
Attach the network list to this unactivated version.
Activate the new version.
Once the policy version and network list are active and associated, use their IDs in the Traceable integration. This combination is validated during setup. If the list is not found to be attached to the activated policy, the integration will fail validation. Follow these steps to ensure your Akamai policy and network list are correctly configured and validated for successful Traceable integration:
A network list is created in the Web Security section of the Akamai Control Center.
The network list is attached to a policy version that has not yet been activated.
The updated policy version is then activated. Akamai does not allow editing an already-activated policy version.
The Policy ID and Network List ID used in the integration must reference active and associated configurations.
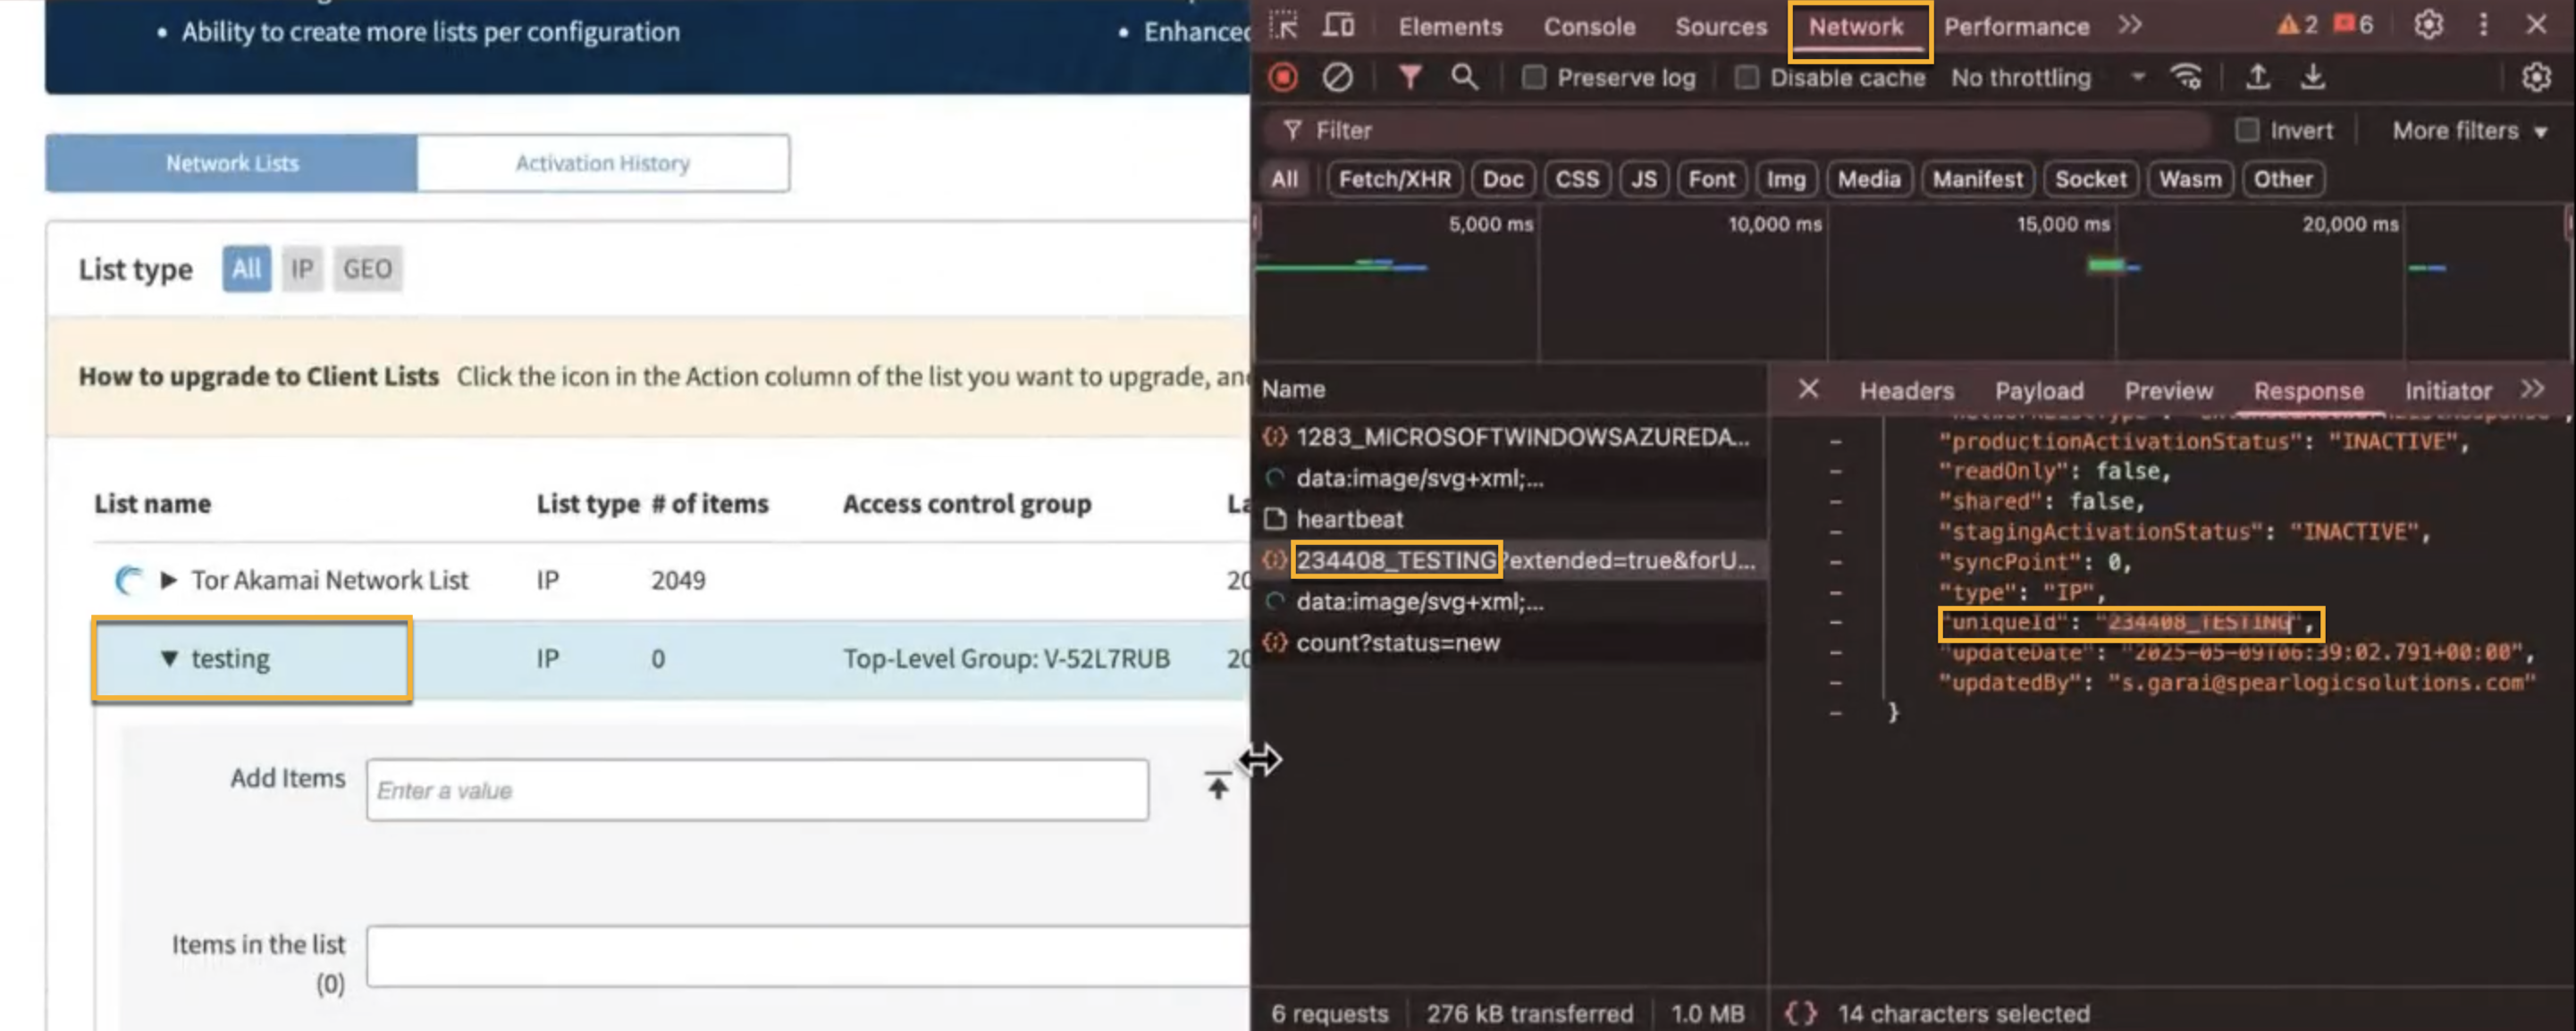
The Network List ID field references an existing network list configured in the Akamai Control Center. This list is required for IP-based blocking and enforcement of threat actor rules. All IP addresses sent through the Traceable integration are appended to the specified network list, which must be associated with an activated Akamai policy. To obtain the Network List ID, complete the following steps:
Log in to the Akamai Control Center.
Navigate to Web Security → Network Lists.
Open the browser’s developer tools and go to the Network tab.
Click the desired network list entry. The request URL or response payload will display the Network List ID.
Copy the portion of the ID that appears before the query parameters.
Note
Only network lists that are attached to active policy versions can be used in the integration.
The notification emails field accepts one or more email addresses that will receive alerts regarding the status of their activation. Notifications are sent when configurations are updated, IPs are added or removed, or policy changes are activated. The notification mechanism uses a push-based model. A default internal address may be used for system-level logging if no email addresses are provided.
The Akamai auth credentials comprise the access token, client token, and client secret. For more information, see Akamai documentation.
Set up the integration
To configure a new Akamai integration, navigate to Integrations → WAF, and do one of the following:
Search for Akamai in the search bar.
Navigate to WAF → Akamai.
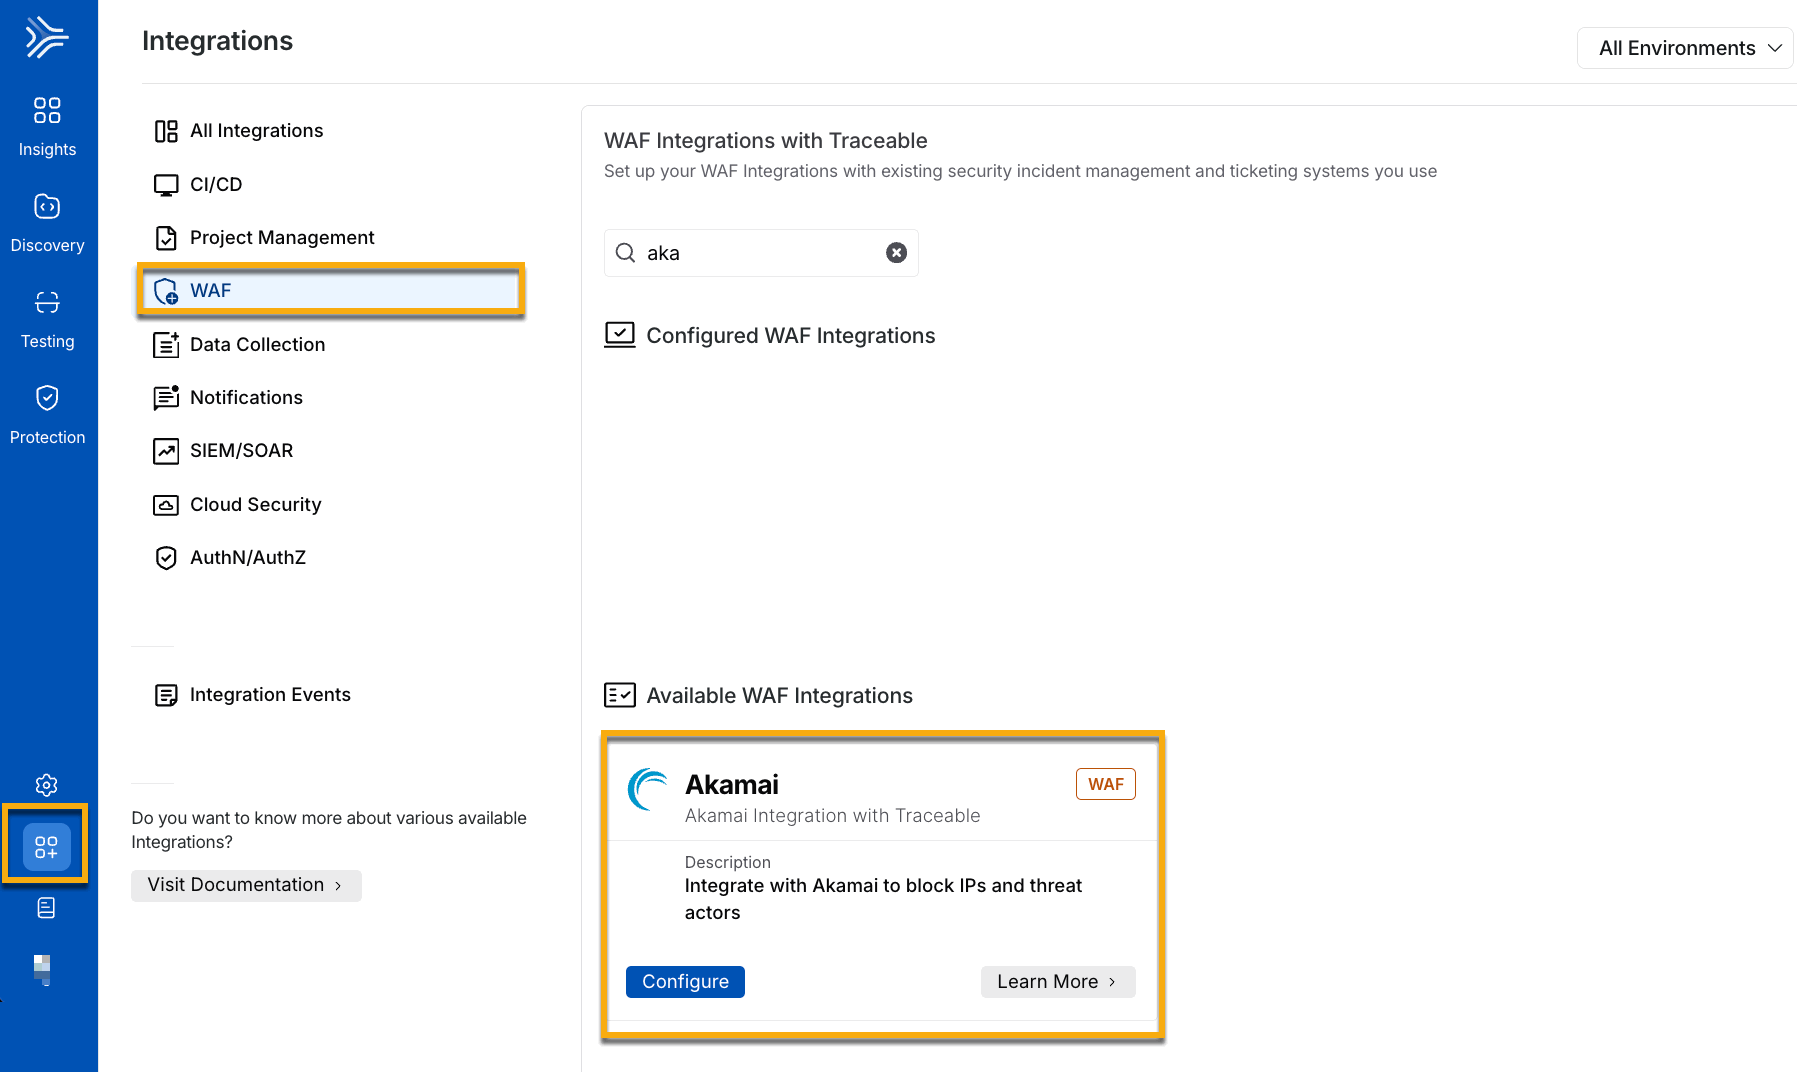
Akamai Integration Navigation
In the Akamai widget, click Configure, and in the Add New Akamai Integration slide-out panel, complete the following steps:
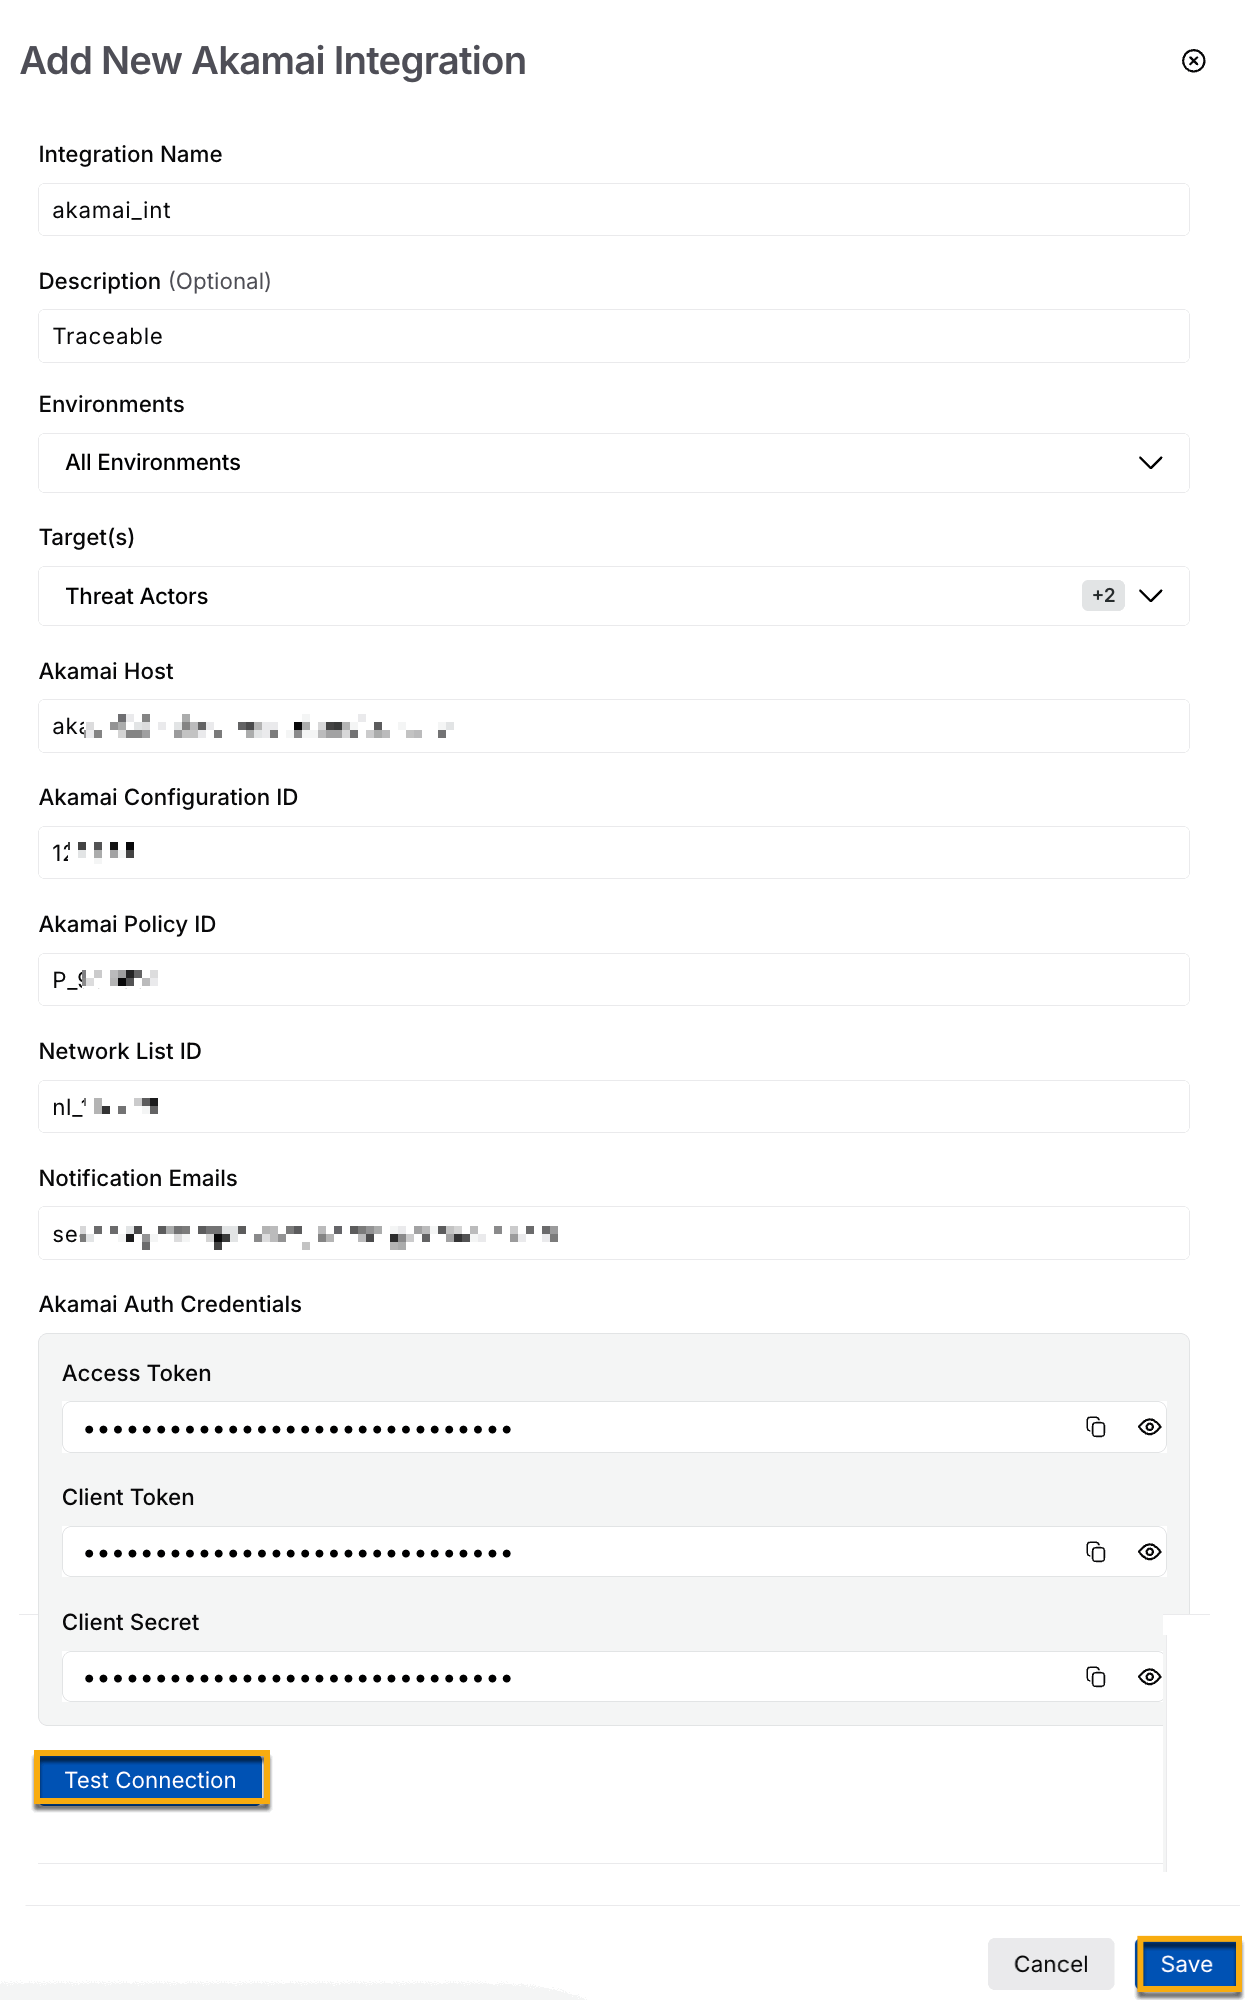
Add New Akamai integration
Integration Name — A unique name for your integration, for example, Akamai_int.
(Optional) Description — A summary for your integration.
Environments — The environment for which you wish to integrate Akamai.
Note
Each environment can have more than one Akamai integration.
Target(s) — The target field to specify one or more enforcement categories for which the integration will take action, for example, Threat Actors.
Depending on the scope of protection you want to configure through Akamai, you can select one, multiple, or all available options. To proceed with the integration, at least one target must be selected. If no target is selected, the integration setup will not be allowed:
Akamai Host — The Akamai host URL used for API communication between Traceable and Akamai. You can contact your Akamai administrator to fetch this value.
Akamai configuration ID — The identifier associated with the Akamai security configuration. You can contact your Akamai administrator to fetch this value.
Akamai Policy ID — The identifier of the Akamai security policy where Traceable synchronizes rules and updates. of the policy that you wish to integrate with Traceable. Each integration can have only one Policy ID. If you wish to combine multiple policies, create separate integrations for each policy. Navigate to Web and Data Center Security → Security Configurations in your Akamai account. All the security policies are listed in the Security Configurations. Each policy has a Policy ID. Choose the Policy ID for which you wish to complete the integration.
Note
You can create only one integration with a unique policy ID in the same environment or across environments.
Network List ID — The identifier of the Akamai network list used to manage blocked IP addresses and threat actors. Each time a new IP address or threat actor is identified, it is automatically pushed to the same network list. This centralized list is continuously updated without requiring the creation of new custom rules or policy versions. Once the network list is configured and activated, Traceable handles subsequent additions through API calls without user intervention. For more information, see Before you begin.
Notification Emails — The email addresses that receive Akamai activation and integration-related notifications. For more information, see Before you begin.
Under the Akamai Auth Credentials, specify the following:
Access Token — A token used to authenticate API requests and generated in the Akamai Control Center.
Client Token — A token used to identify your API client and is included in the Akamai credentials file.
Client Secret — A secret key used to sign requests securely and generated during the initial creation of the API client. For more information, see Before you begin.
Click Test connection. The Save button is enabled only after the connection test is successful.
Manage configured integration
After configuring the integration, you can view the Akamai WAF Integration under Configured WAF Integrations, as shown below:
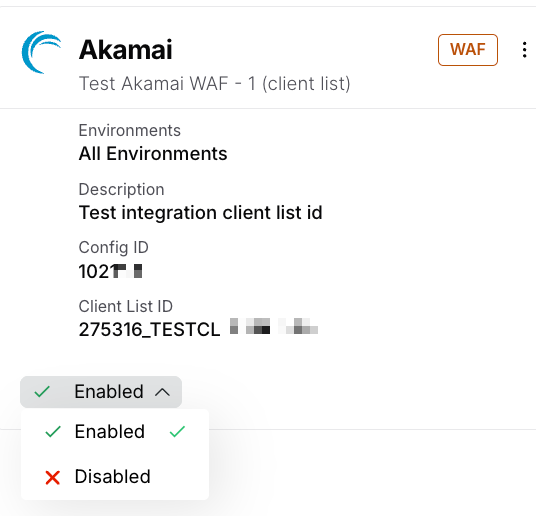
Configured Akamai Integration
Traceable gives you the flexibility to control how the integration operates. You can choose either of the following actions using the drop-down, according to your requirements:
Enabled — You allow Traceable to actively update the WAF with the latest rules to enforce protection and monitor or block threats. When enabled, Traceable continuously sends new rules and updates to the WAF based on policy activity, helping enforce protections with the latest threat information and block suspicious traffic.
Disabled — You stop Traceable from updating the WAF, so it no longer enforces new protections for that environment or region. When disabled, Traceable stops sending new rules and updates to the WAF for the selected environment or region, while other environments continue using their existing integration settings without impact. The WAF continues to enforce existing rules based on their last applied state, without receiving new updates. Traceable continues to detect and evaluate threats, but it does not enforce them through WAF.
Understand synchronization behavior
When Traceable blocks an IP address or threat actor, it automatically adds the corresponding IP address to the configured Akamai network list. Akamai then starts an activation cycle, which typically takes five to seven minutes to complete. During this period, previously active rules and IP entries continue to function normally until the latest updates are fully activated. If the same IP address belongs to multiple rule categories, such as IP-based rules and threat actor rules, Akamai removes the IP address only after Traceable deletes it from all associated rule sources. When you delete the integration, Traceable removes the IP addresses that it added to the Akamai network list. However, the network list itself remains available in Akamai.
View synchronized rules in Akamai
The location and behavior of synchronized rules in the Akamai Control Center depend on the configured target type. Depending on the target type selected during integration configuration, Traceable synchronizes the following rule types with Akamai:
Custom Signature rules — Synchronizes API protection rules directly with Akamai security policies to help enforce rule-based protections at the WAF layer.
To view Custom Signature rules in Akamai:
Navigate to Web and Data Center Security → Security Configurations → Custom Rules.
Open the policy configured for the Traceable integration.
After Traceable synchronizes Custom Signature rules, the following behavior applies:
The same rule can exist across multiple Akamai policies.
Different policies can apply different actions for the same rule, such as allow or deny.
Akamai does not allow deletion of rules that are currently used in active policy versions.
When Traceable deletes a rule, Akamai updates the rule status to Not Used instead of deleting it immediately.
Deleting the Traceable integration does not remove Custom Signature rules from Akamai because active Akamai configurations may still reference them.
Malicious Source and IP-based threat actor rules — Synchronizes malicious IP addresses and threat actor entries through Akamai network lists to help enforce IP-based blocking and traffic control.
To view Malicious Source and IP-based threat actor rules in Akamai:
Navigate to Web Security → Network Lists.
Open the configured network list.
After Traceable synchronizes IP-based rules, the following behavior applies:
Traceable updates all blocked IP addresses within the same network list.
IP addresses remain active until Traceable explicitly removes them.
If the same IP address belongs to multiple rule categories, Akamai removes it only after Traceable deletes it from all associated sources.
Note
Akamai supports a maximum of 100 custom rules. If rule creation fails due to Akamai’s 100-rule limit, users must manually delete rules via the Akamai console. Once the rule count drops below 100, successful creation events are generated for valid configurations.