Staying informed about important security and application events is critical to maintain a strong security posture. Alerts in Traceable help you proactively monitor activity across your environments and ensure that the right teams are notified when malicious events are identified. With Alerts, you can define specific conditions to track, such as newly discovered vulnerabilities, policy violations, and changes in risk levels. When those conditions are met, Traceable generates notifications through your configured channels, helping you respond quickly and focus on the issues that require attention.
Alerts also give you control over how and when notifications are delivered. You can tailor alert conditions, choose notification destinations, and configure delivery frequency to reduce noise while ensuring that critical events do not go unnoticed. It also helps you streamline the types of alerts you wish to receive and the frequency at which you wish to receive them.
What will you learn in this topic?
By the end of this topic, you will be able to learn:
Understand how alerts help monitor security events, operational changes, and application activity across the platform.
Create and configure channels to deliver alerts through Email, Slack, Webhooks, Syslog, Splunk, Amazon S3, and other supported destinations.
Create alerts for different Traceable modules and event categories, as required.
Configure alert conditions, environments, and notification frequency to reduce noise and focus on relevant events.
The steps to manage existing alerts.
Before you begin
Before you proceed to create an alert channel and an alert, make a note of the following:
Make sure you have the View and Edit RBAC permissions under Administration → Notifications to create the channels and alerts. For more information, see Team and roles - RBAC.
For Wiz-based alerts, make sure you have configured the Wiz integration under Integrations. For more information, see Wiz Integration.
Steps to configure alerts
Before creating alerts, you must create a channel to identify the channel to which you wish to send alert notifications. Complete the following steps:
Step 1 — Create a channel
To create a new channel, navigate to Settings ( ) → Configuration → Alerts. Click + Add New Channel under the Channels tab.
In the New Channel, slide-out panel, complete the following steps:
.png)
Create a new channel for alerts
Name — A name associated with your channel that will receive the alert notifications, for example, ast-scan_run_alert.
Alert Destination — A channel is a group of media or people you want to notify when a type of event is triggered. You can send notifications to one or more of the following channels:
Email Addresses — Sends notifications directly to the specified email address(es), ensuring that users receive alerts in their inbox(es). You can send these alerts to one or more users by adding a comma-separated list of email addresses.
Slack Webhook — Delivers notifications to Slack channels, enabling real-time collaboration and immediate visibility of events within team workflows. For information, see Sending messages using Incoming Webhooks.
S3 Webhook — Stores notification payloads in Amazon S3, allowing integration according to your requirements for further analysis or compliance. For more information, see S3 Integration.
Note
When configuring an S3 Webhook, ensure that you configure the Audience in your S3 bucket. Contact Traceable's support at support@traceable.ai to obtain the Audience value for configuration in AWS.
Splunk Webhook — Integrate with Splunk to forward notification data, which supports advanced log analysis and monitoring capabilities using its dashboard. For information, see Splunk documentation.
Syslog Server — Sends notifications to a Syslog server, enabling centralized logging and integration with traditional IT operational tools. For more information, see Syslog documentation.
HTTP Event Collector Webhook — Once enabled, this sends a notification to the specified channel if any HTTP Event Collector events are triggered on Splunk. For more information, see HTTP Event Collector (HEC) Integration.
Custom Webhook — Provides a customizable endpoint for delivering notifications, allowing integration with third-party systems or workflows according to your requirements.
Click Save.
Step 2 — Create a new alert
Once you have created a channel that should be notified, you should set up alert notifications for different categories. To create alerts, navigate to Settings → Alerts → +Add New Alert and complete the following steps:
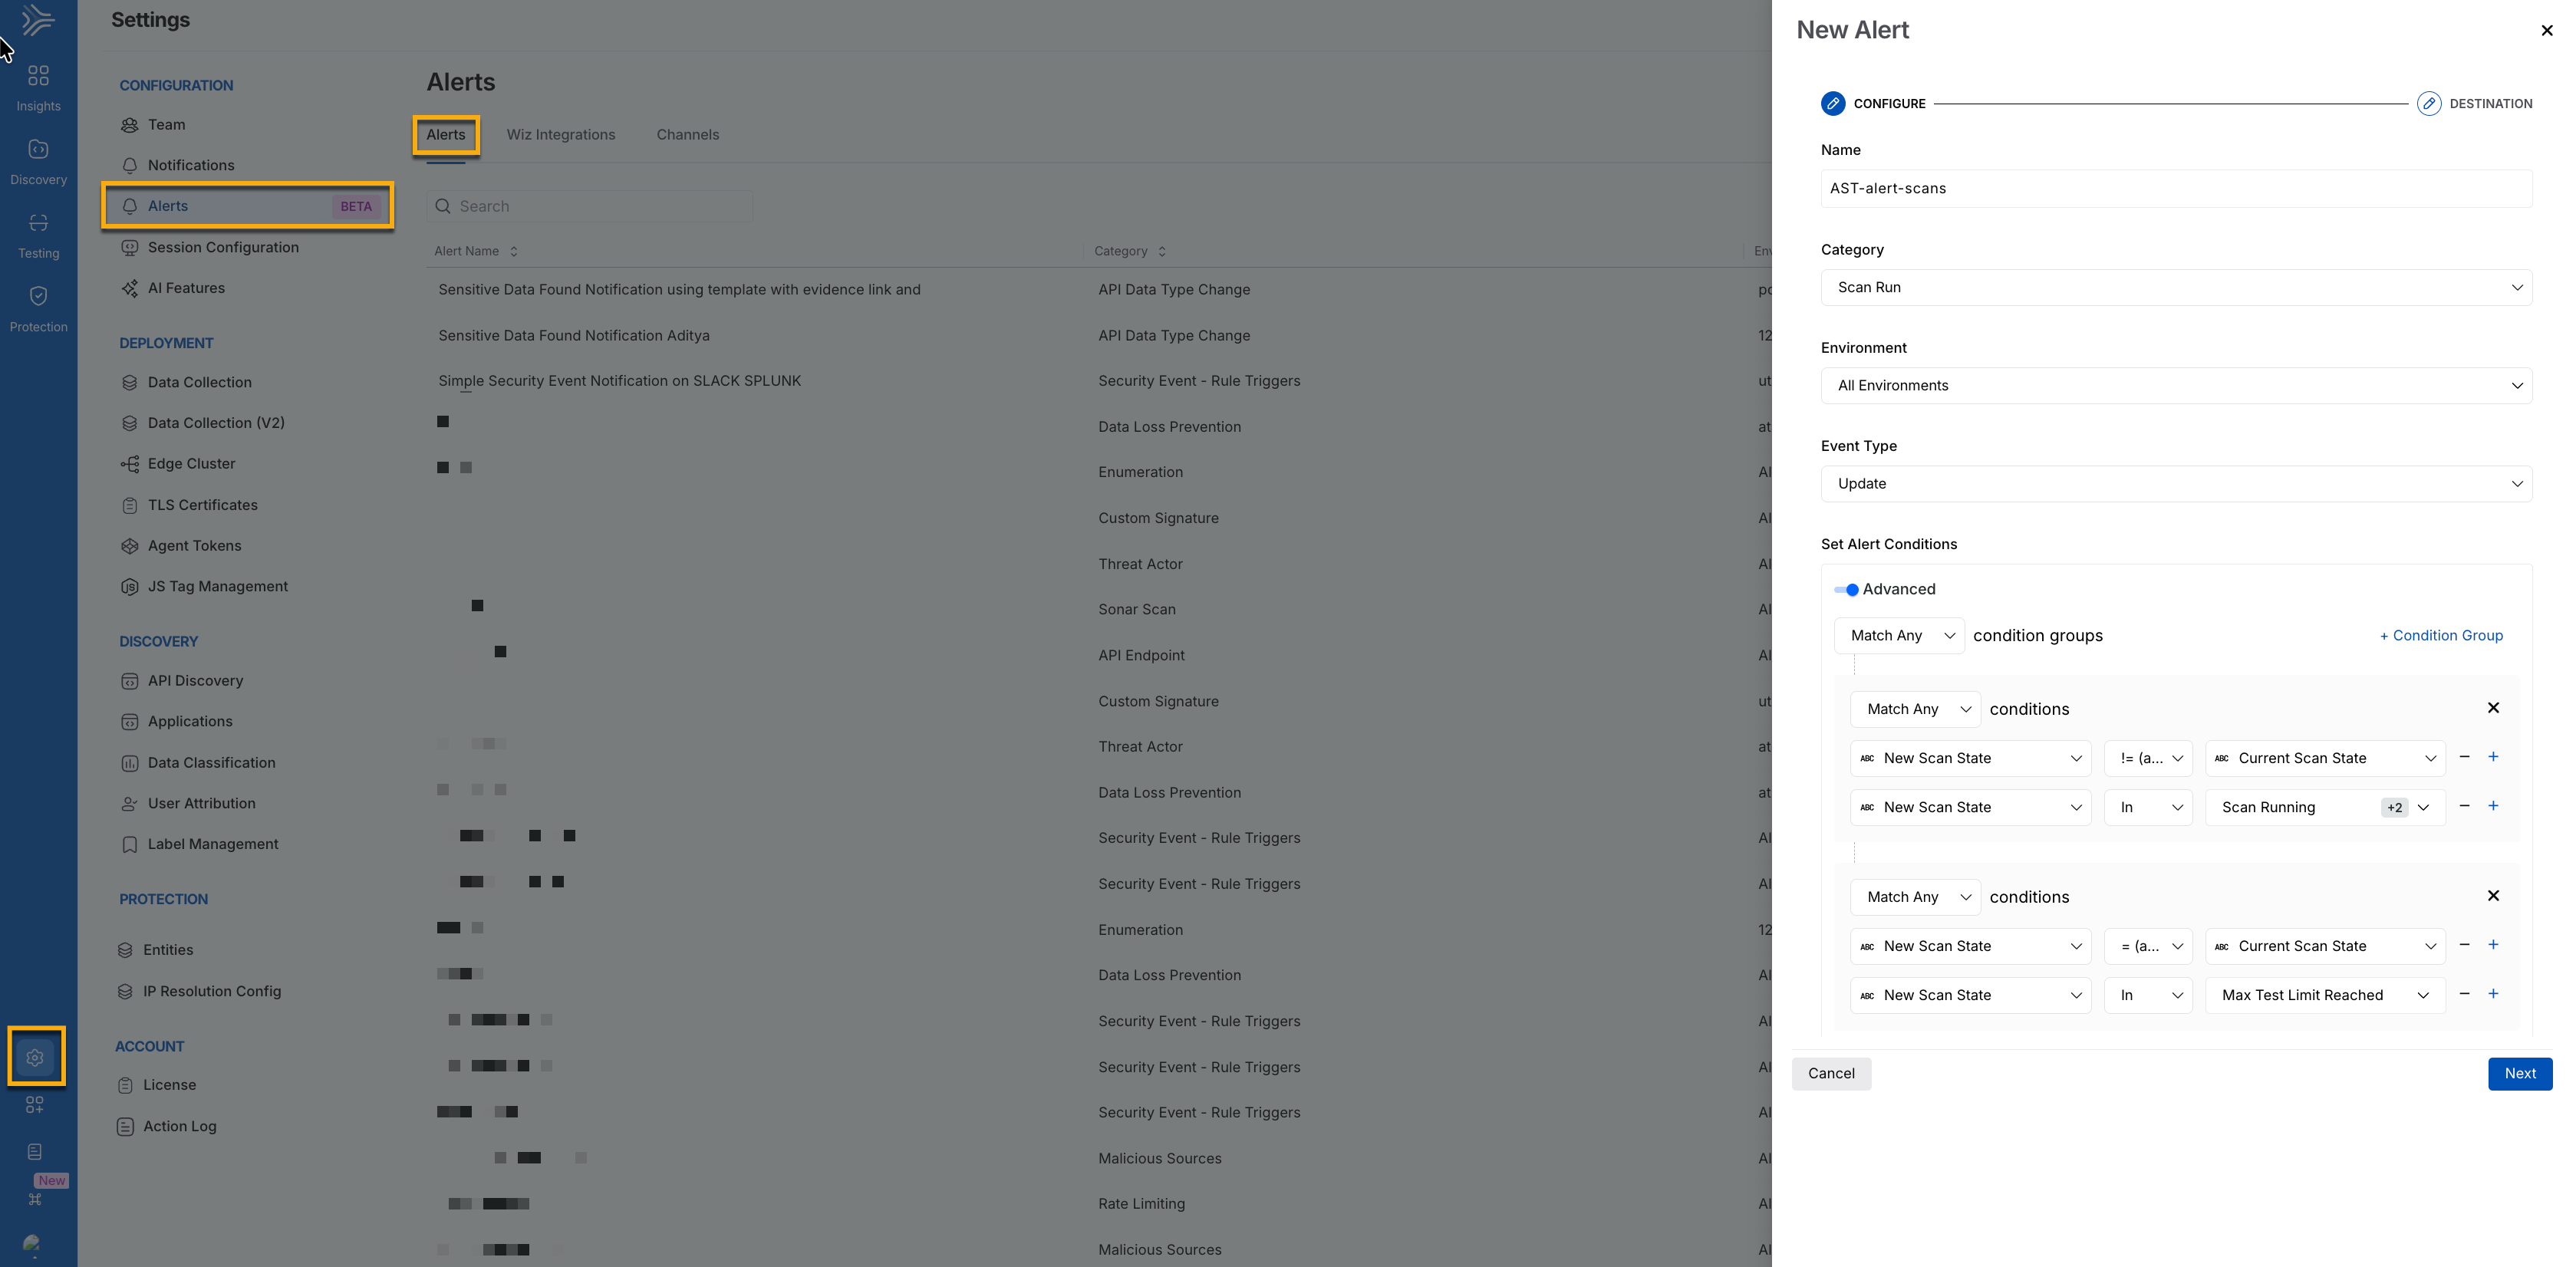
Create a new alert
Step 1 — Configure
In the New Alert slide-out panel, complete the following steps:
Specify a Name for your alert, for example, AST-alert-scans.
Specify a Category for which you wish to create the alert, for example, Scan Run.
Specify the Environments for which you wish to create an alert, for example, All Environments.
Specify the Event Type you wish to create an alert for, for example, Create or Update.
Note
The event type depends on the category you select.
Create — Triggers the alert when a new resource is created.
Update — Triggers the alert when a new resource is updated.
Delete — Triggers the alert when a new resource is deleted.
In the Set Alert conditions section, you can enable the Advanced toggle to add multiple condition groups. This enables you to compare different attributes using operators, according to your requirements. You can choose to send an alert when all or any of the conditions match using the Match All and Match Any attributes, as shown below:
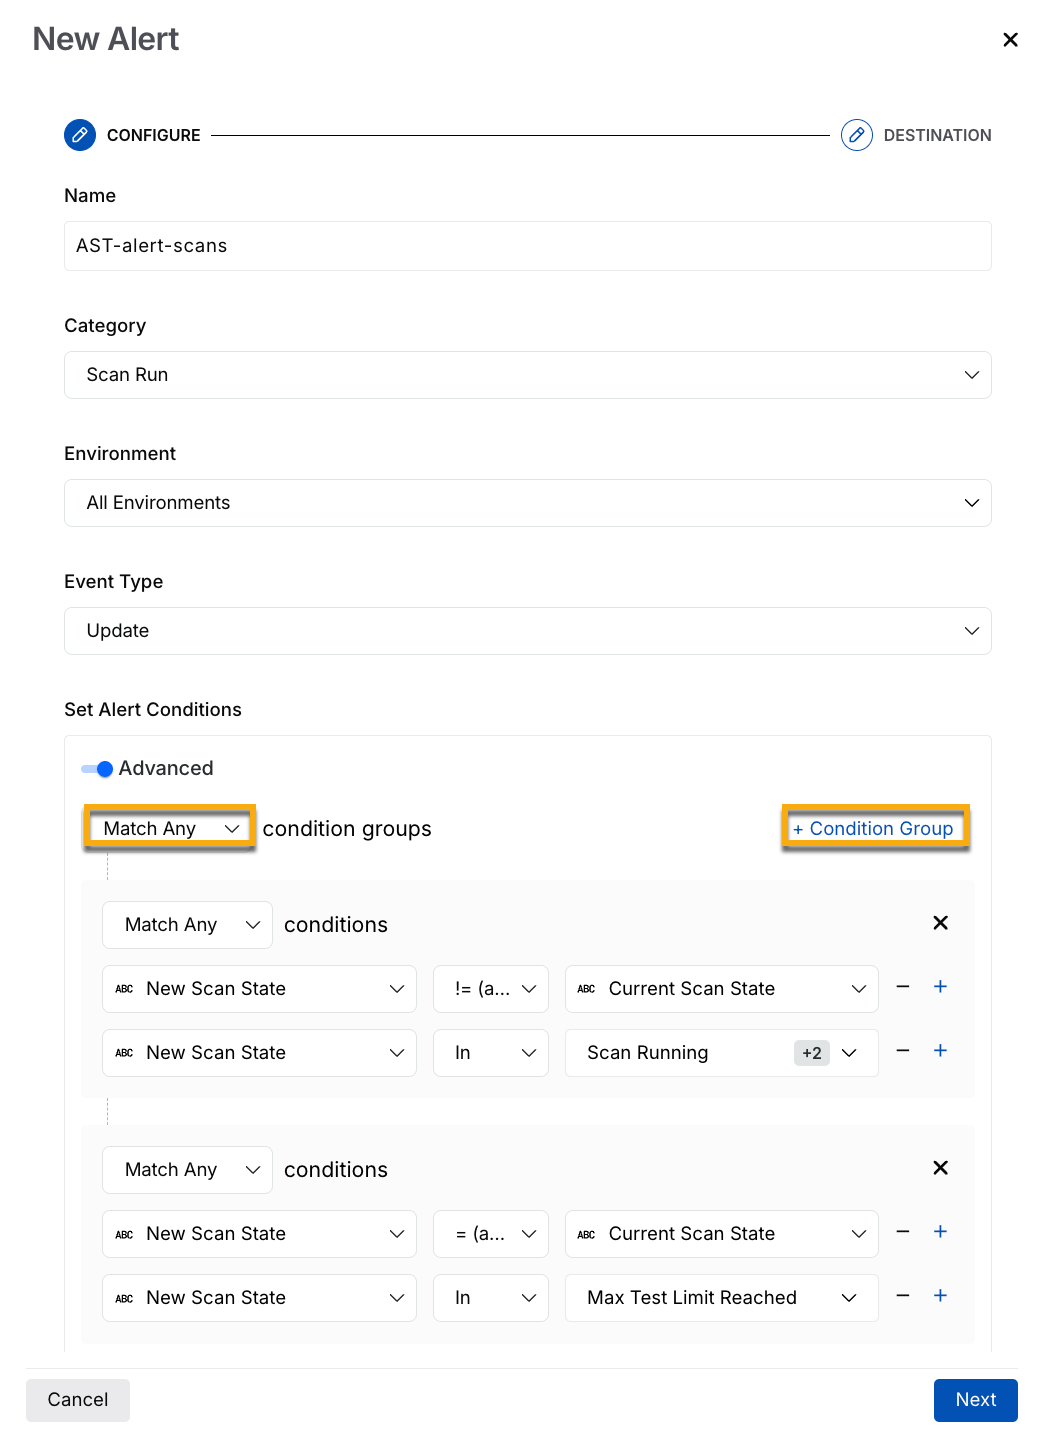
Set Alert Conditions
Condition Groups — The outermost layer of the alert logic, where each group contains one or more conditions. When multiple condition groups are configured, they are evaluated together using a Match All or Match Any operator at the outer level.
Conditions — The inner layer, nested within a condition group. Each condition evaluates a single attribute against a specified value or field. Conditions within the same group are also connected using a Match All or Match Any operator.
Match Any — Triggers the alert when at least one condition or condition group is met.
Match All — Triggers the alert when all conditions or condition groups are met.
Condition Groups — The outer layer that contains one or more conditions, connected to other groups using Match All or Match Any.
Condition — The inner layer that evaluates a single attribute against a specified value or field.
Operators — The comparison logic used within a condition, such as equals (
=), not equals (!=), matches any value in a list (In), and excludes values in a list (Not In). You can select one of these according to your requirements.Set Alert Conditions
Note
The Advanced toggle is visible based on the category of alert you select above.
Click Next.
Step 2 — Destination
The Destination step allows you to specify the email addresses, channels, or both to notify for a particular alert. In the Destination step, complete the following steps:
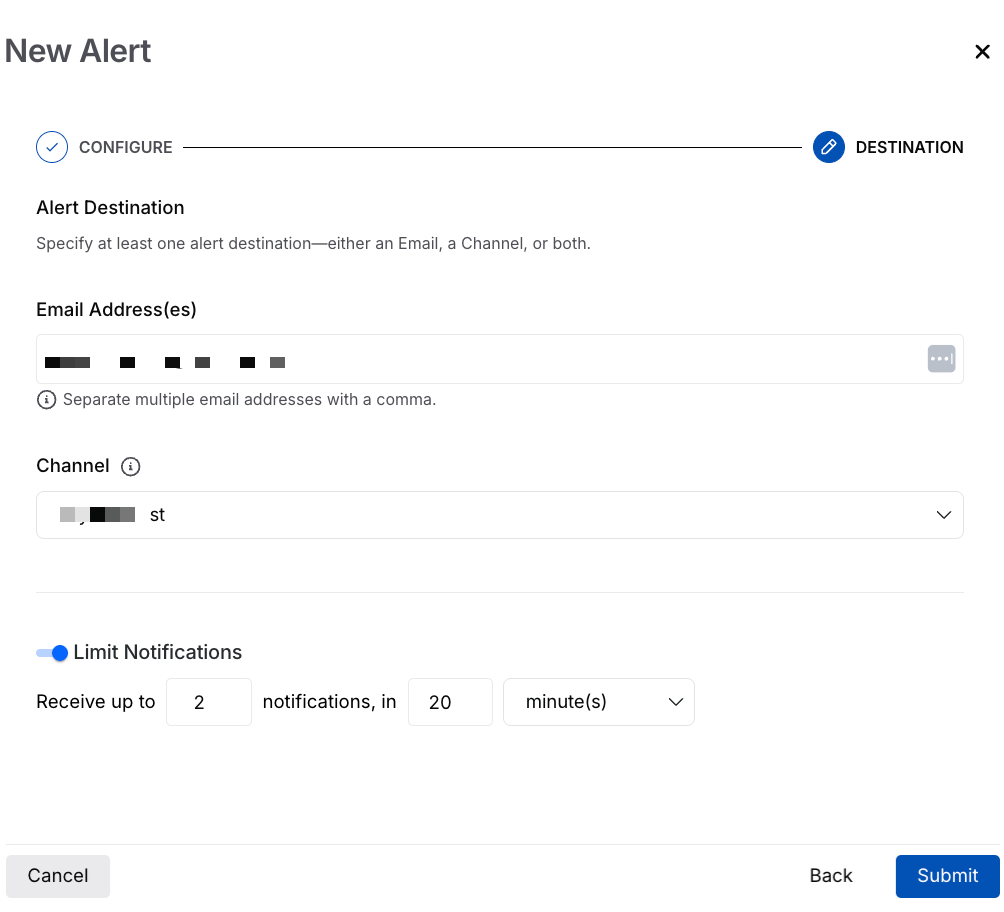
Destination
Specify the Email Addresses of the associated accounts or people that should be notified for this alert.
Specify the Channel you wish to notify of this alert. You can choose the channel you created above in the Create a channel section, or any other channel that can take action on the alert.
You can set the frequency limit for notifications sent for an alert. You can enable the Limit Notification toggle to add the following details:
Receive up to — The number of notifications to be sent for a particular alert, for example, 2.
Notifications, in — The time span during which the notification alert should be sent, for example, 20 minute(s). You can also choose the time span in hour(s), minute(s) or days according to your requirements.
Module-specific alert categories and attributes
You can create an alert for different modules in Traceable. The following table lists the different categories for each module within Traceable:
Module category | Category attributes |
|---|---|
| |
| |
|
Manage alerts
After you have created your alerts, under the Alerts tab, you can perform the following actions. The following table describes the actions available for managing alert notifications:
Action | Description |
|---|---|
Enable/Disable | Use the toggle to enable or disable the alert notification according to your requirements. |
View | View the alert notification configuration and details using the Ellipse ( |
Edit | Modify the alert notification configuration using the Ellipse ( |
Delete | Permanently remove the alert notification using the Ellipse ( |

Wiz integration
You can use the Wiz Integration tab to configure the threat activity events that Traceable forwards to Wiz. This integration helps you correlate API threat activity detected by Traceable with cloud security findings in Wiz, enabling centralized investigation and risk analysis. Unlike standard notification channels, Wiz Integration allows you to define Wiz-specific attributes, such as Environment, Threat Type, Severity Level, and Confidence Level. Traceable sends only the events that match the configured criteria to Wiz.
To add a wiz integration alert, navigate to Settings → Configuration → Alerts. Select the Wiz Integration tab and click + Add New Wiz Integration. In the New Wiz Integration slide-out panel, complete the following steps:
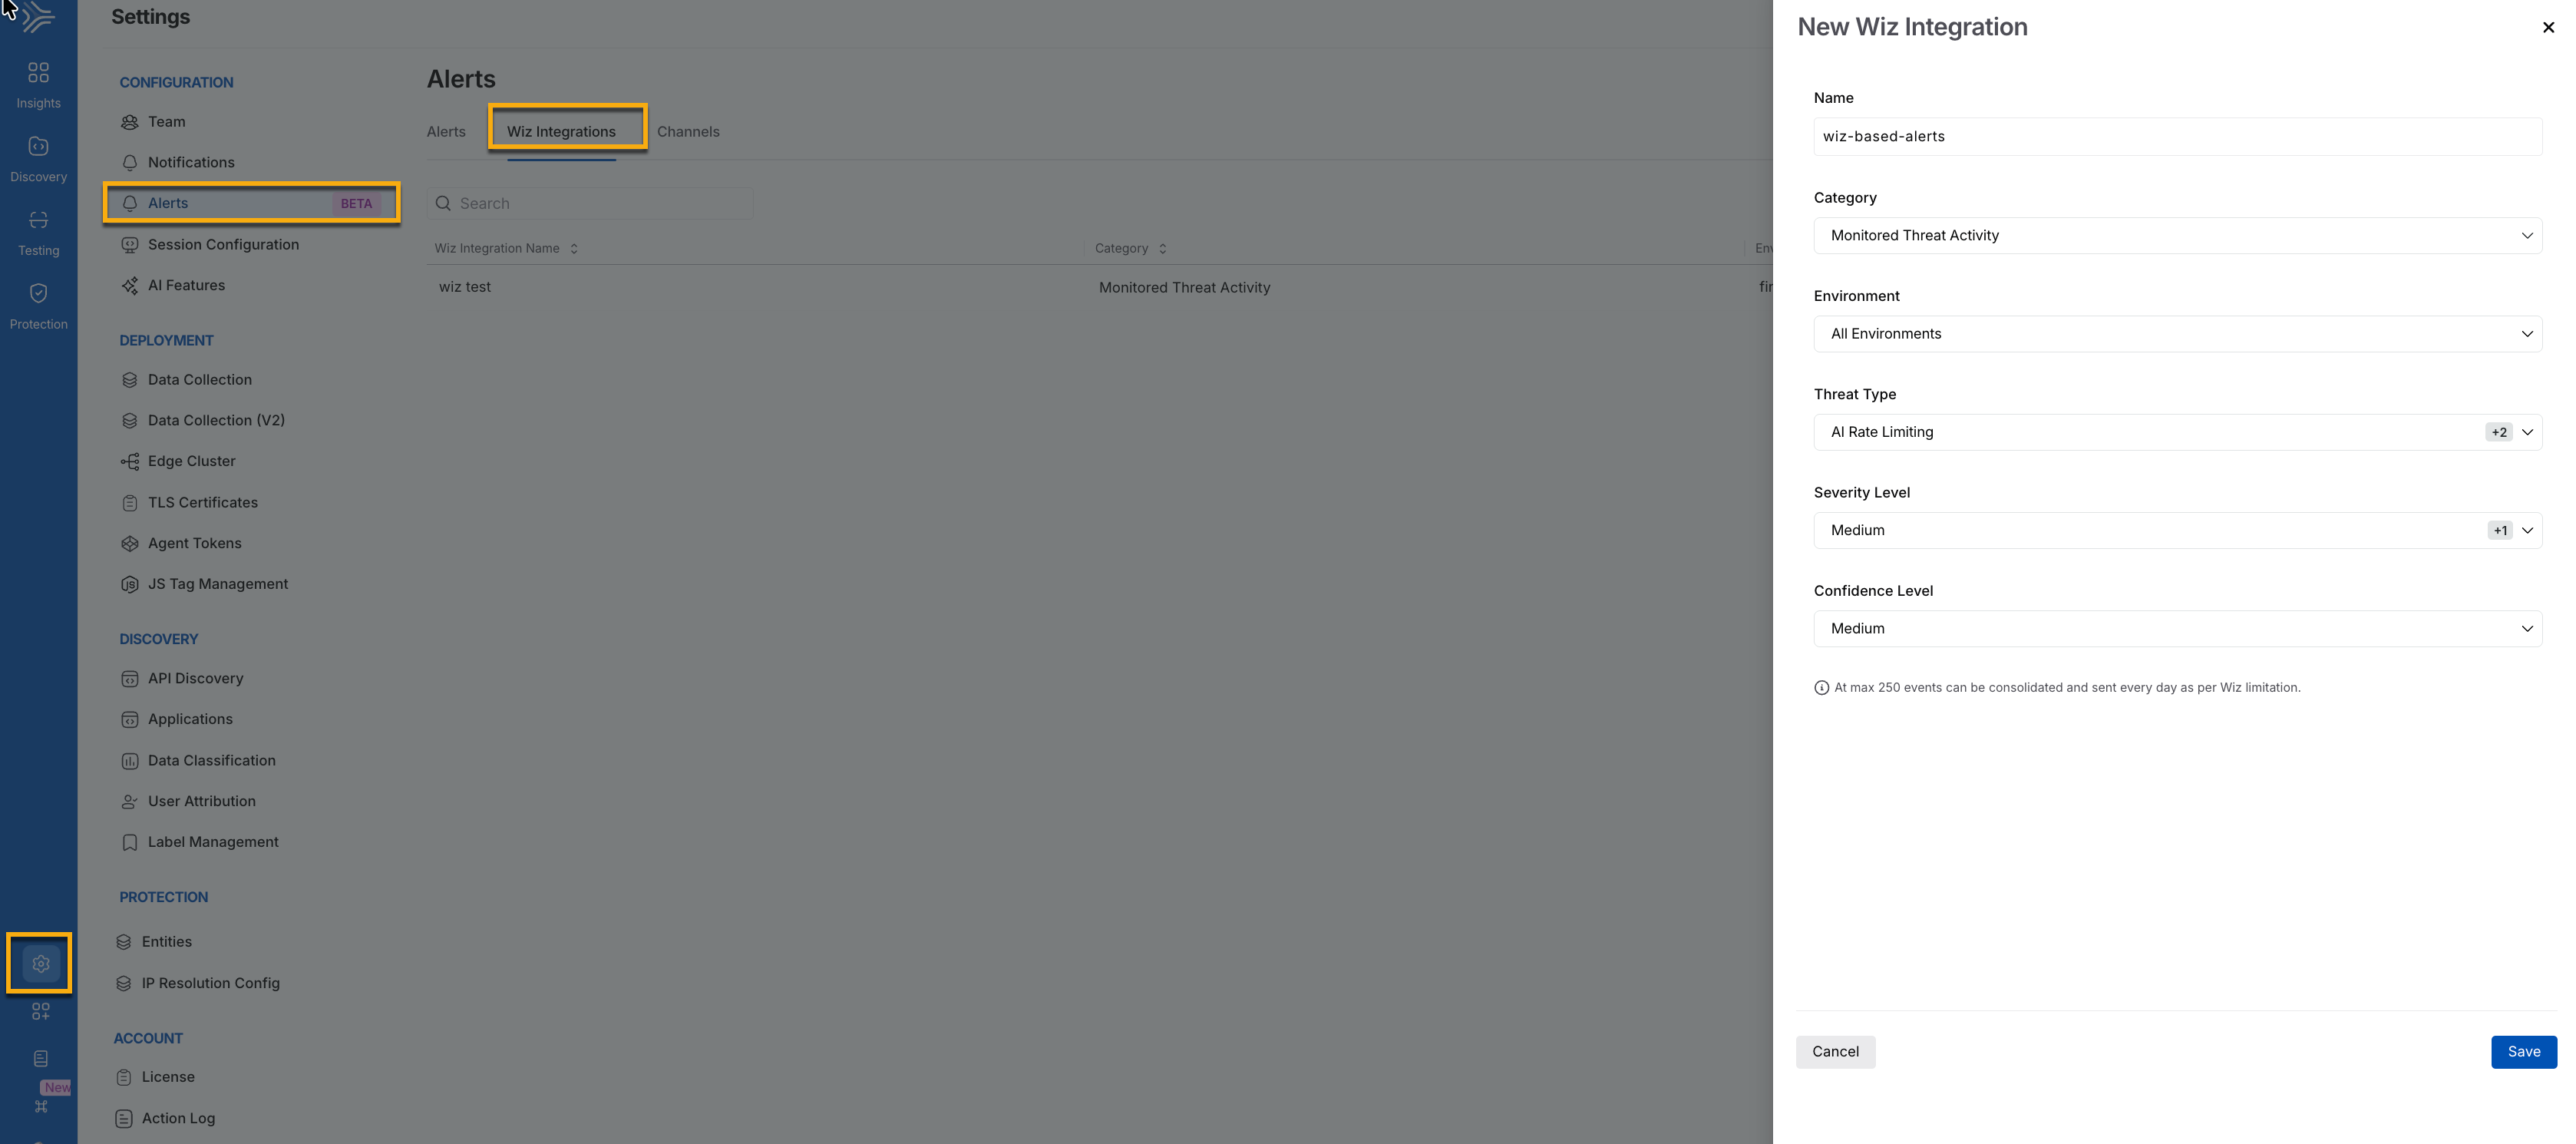
Wiz Integration
Specify a unique Name for the Wiz alert configuration, for example, wiz-based-alerts.
Specify the Category of threat activity events to forward to Wiz, for example, Monitored Threat Activity.
Specify the Environment from which Traceable sends events to Wiz, for example, All environments.
Specify one or more relevant Threat Types to send to Wiz.
Specify one or more Severity Levels for the events that Traceable forwards to Wiz, for example, High, Critical.
Specify one or more Confidence Levels for the events that Traceable forwards to Wiz, for example, High.
Click Save.