Updates (April 2026 to June 2026)
May 2026 — Updated the topic to add information about the addition of risk and risk category columns to keep track of high-risk APIs. For more information, see Threat scoring flow.
May 2026 — Updated the topic to add information about the decay logic in threat scoring. For more information, see Understand threat actor score decay.
Traceable enables you to quantify API risk using threat scoring, helping you prioritize investigations and automate defensive responses. You can use threat scoring to assign customizable scores to anomalous behavior and security events, helping identify users exhibiting suspicious or malicious activity. Based on the accumulated threat score, Traceable categorizes threat actors and can automatically enforce security actions.
What will you learn in this topic?
By the end of this topic, you will be able to understand:
How threat scoring quantifies API risk using anomalies and security events.
How to configure scoring values, severity levels, and threat score thresholds.
How severity adjustments based on response codes affect scoring.
How the threat actor score decay logic works.
How auto-blocking works and how it is enforced across environments.
How exclusions and IP allowlisting impact enforcement while preserving detection.
Understand threat scoring
Anomalies are deviations from normal behavior. By analyzing these behavioral deviations along with known Common Vulnerabilities and Exposures (CVE) patterns, Traceable identifies potential security events early in the attack lifecycle. When a user begins exhibiting anomalous activity, Traceable classifies them as a monitored user. At this stage, the user is observed, but no confirmed malicious action has occurred. If the user later attempts an attack, Traceable reclassifies them as a threat actor.
To evaluate this progression from Anomaly detection to confirmed malicious intent, Traceable uses a threat-scoring framework. Threat scoring continuously assesses user behavior, anomalies, and attack signals to determine risk levels and trigger appropriate security actions. The following flow chart provides a high-level overview of the threat scoring process:
.png)
Threat Scoring Flowchart
Before you begin
Before you proceed to exclude or allow users based on threat scoring, make a note of the following:
Make sure you have the Settings RBAC permissions under Module Level Access → API Protection to navigate to the threat scoring page. For more information, see Team and roles - RBAC.
Threat scoring process
Threat scoring quantifies the risk posed by a threat actor by continuously analyzing anomalies and security events. By assigning configurable weights to different signals, it generates a dynamic score that helps you identify, prioritize, and respond to high-risk activity with precision.
The threat score is derived from the following components:
Anomaly scores — You can configure a score for an Anomaly. This score is the same across all detected anomaly types. The default value is 1. You can set a value between 1 and 10. Every time a user generates an anomaly, its score increases by the configured value. For example, if you assign the anomaly score to 2 per anomaly and the user generates 5 anomalies, the total score would be 2*5 = 10.
Security event scores — Security events are categorized into four different levels: Critical, High, Medium, and Low. You can customize the score for each event category to a value between 1 and 10. The default values for each of the levels are:
Critical - 10
High - 1
Medium - 0
Low - 0
The security event score is added to the threat actor's threat score. A threat actor may create security events on different APIs. APIs can be high, medium, or low risk. You can view the different API categories and their risk scores on the API Endpoints page.
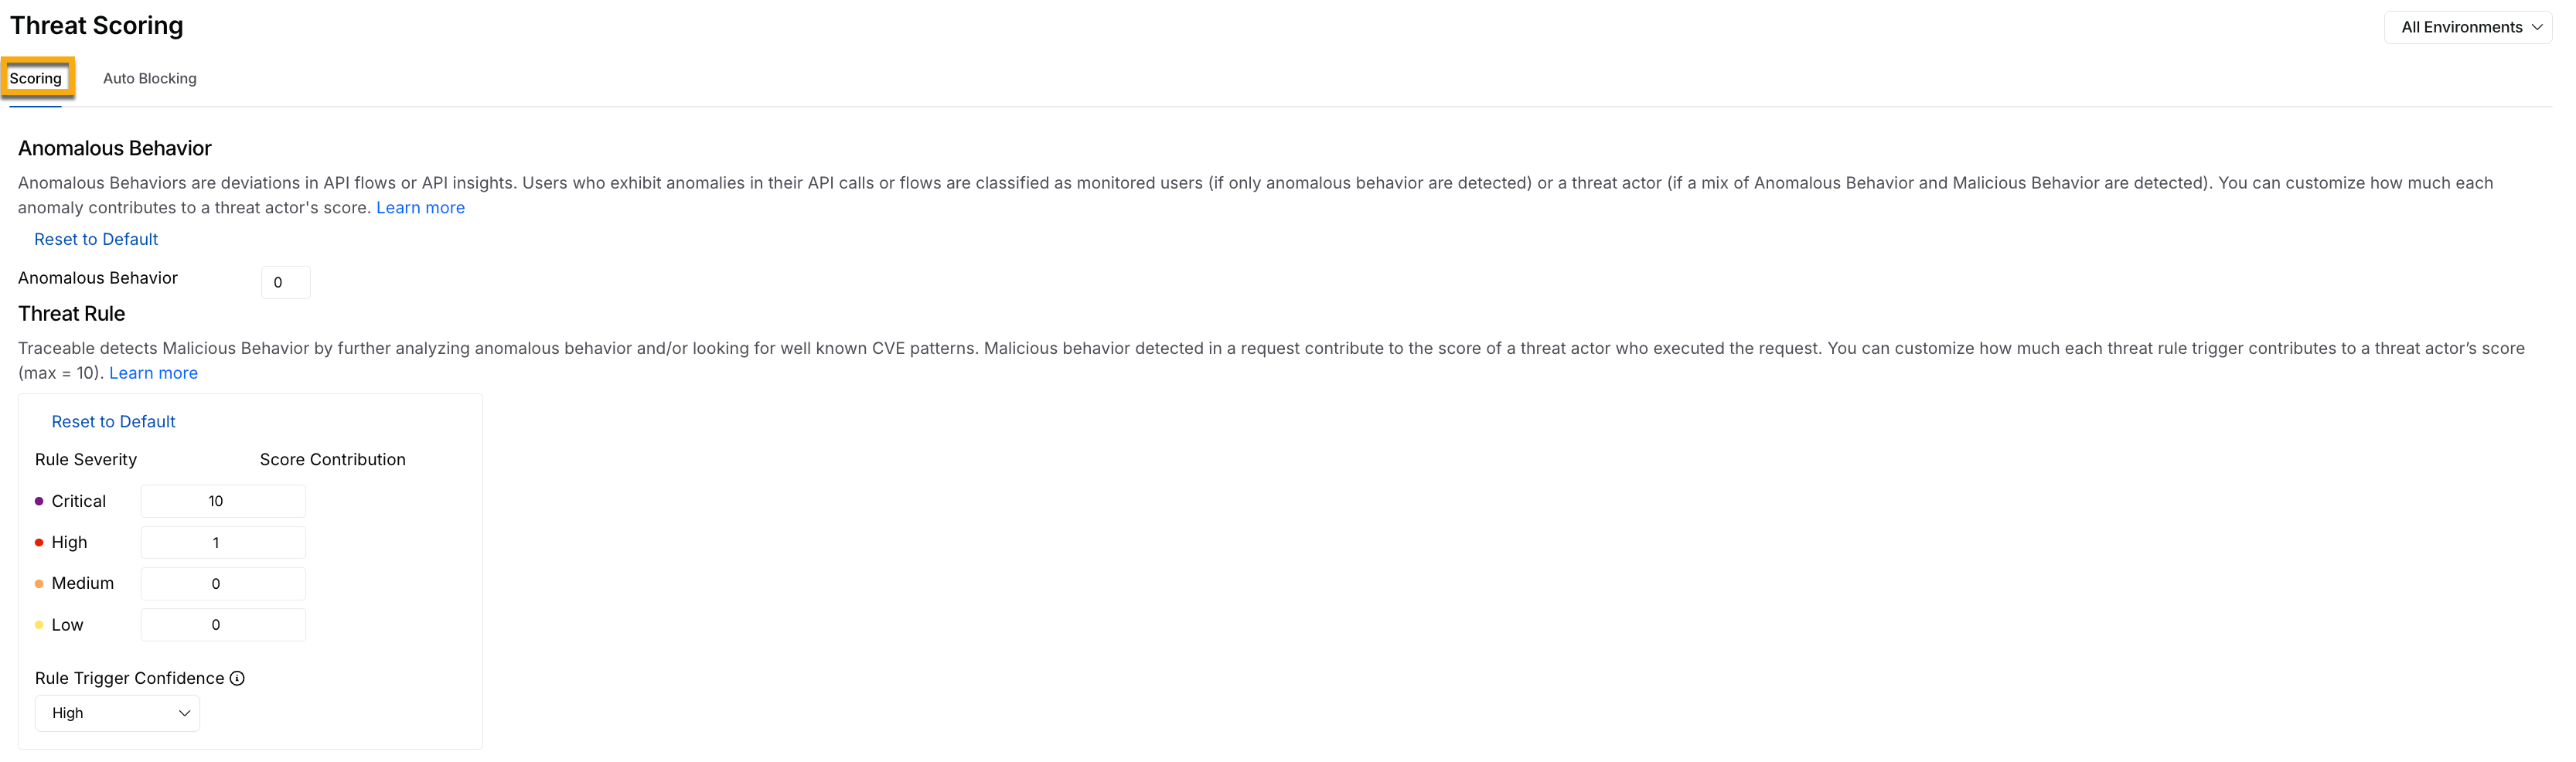
Threat Scoring Threat Rule Security Events Score
You can choose which types of security events to include in a threat actor's score. You can choose from the following:
All events — Add the security event score of all the security events that the threat actor creates, irrespective of the API (Critical, High, Medium, or Low risk).
Events affecting high-risk APIs — You can select the security events that affect only the high-risk APIs. This enables you to focus on threats to high-risk APIs. To identify high-risk APIs, navigate to Discovery → Inventory → API Endpoints and add Risk and Risk Category columns using the Edit Columns option, as shown below:
(1).png)
Identifying High Risk APIs
The cumulative score determines the threat actor's severity classification and reputation, and it drives automated enforcement decisions.
Severity adjustment based on response codes
There may be cases where Traceable detects an attack attempt, but the backend service rejects the request and returns an error response code. In such scenarios, the backend service may already be resilient enough to handle the malicious input. You may not want the threat score to increase when the backend service has successfully mitigated the attempt.
One way to identify such cases is by evaluating the response status code. You can configure an error status code regex in Traceable, for example, 4[0-9]{2}. When the response status code matches the configured regex, you can choose to:
Ignore For Scoring — Choose this when you want to exclude this from threat scoring.
Downgrade One Step — Choose this when you want to reduce the severity by one level, for example, from High to Medium.
Downgrade Two Steps — Choose this when you want to reduce the severity by two levels, for example, from Critical to Medium.
For example, if the current severity is Critical and you downgrade by one step, the new severity will be High. In such a case, the most recent high-severity score will apply. Click Save to apply the changes, as shown below:
.png)
Downgrade Severity Adjustment based on Response Code Criteria
IP reputation assignment
Traceable assigns a reputation to an IP address based on its derived threat score. This helps you identify the threat actors that you can block. You can view the IP reputation for threat actors by navigating to Protection → Threat Actors.
.png)
Threat Actor IP Reputation View
Threat score threshold
The addition of anomaly and security event scores gives the threat actor score. The threat actor score graph shows the active threat actors over the last seven days.
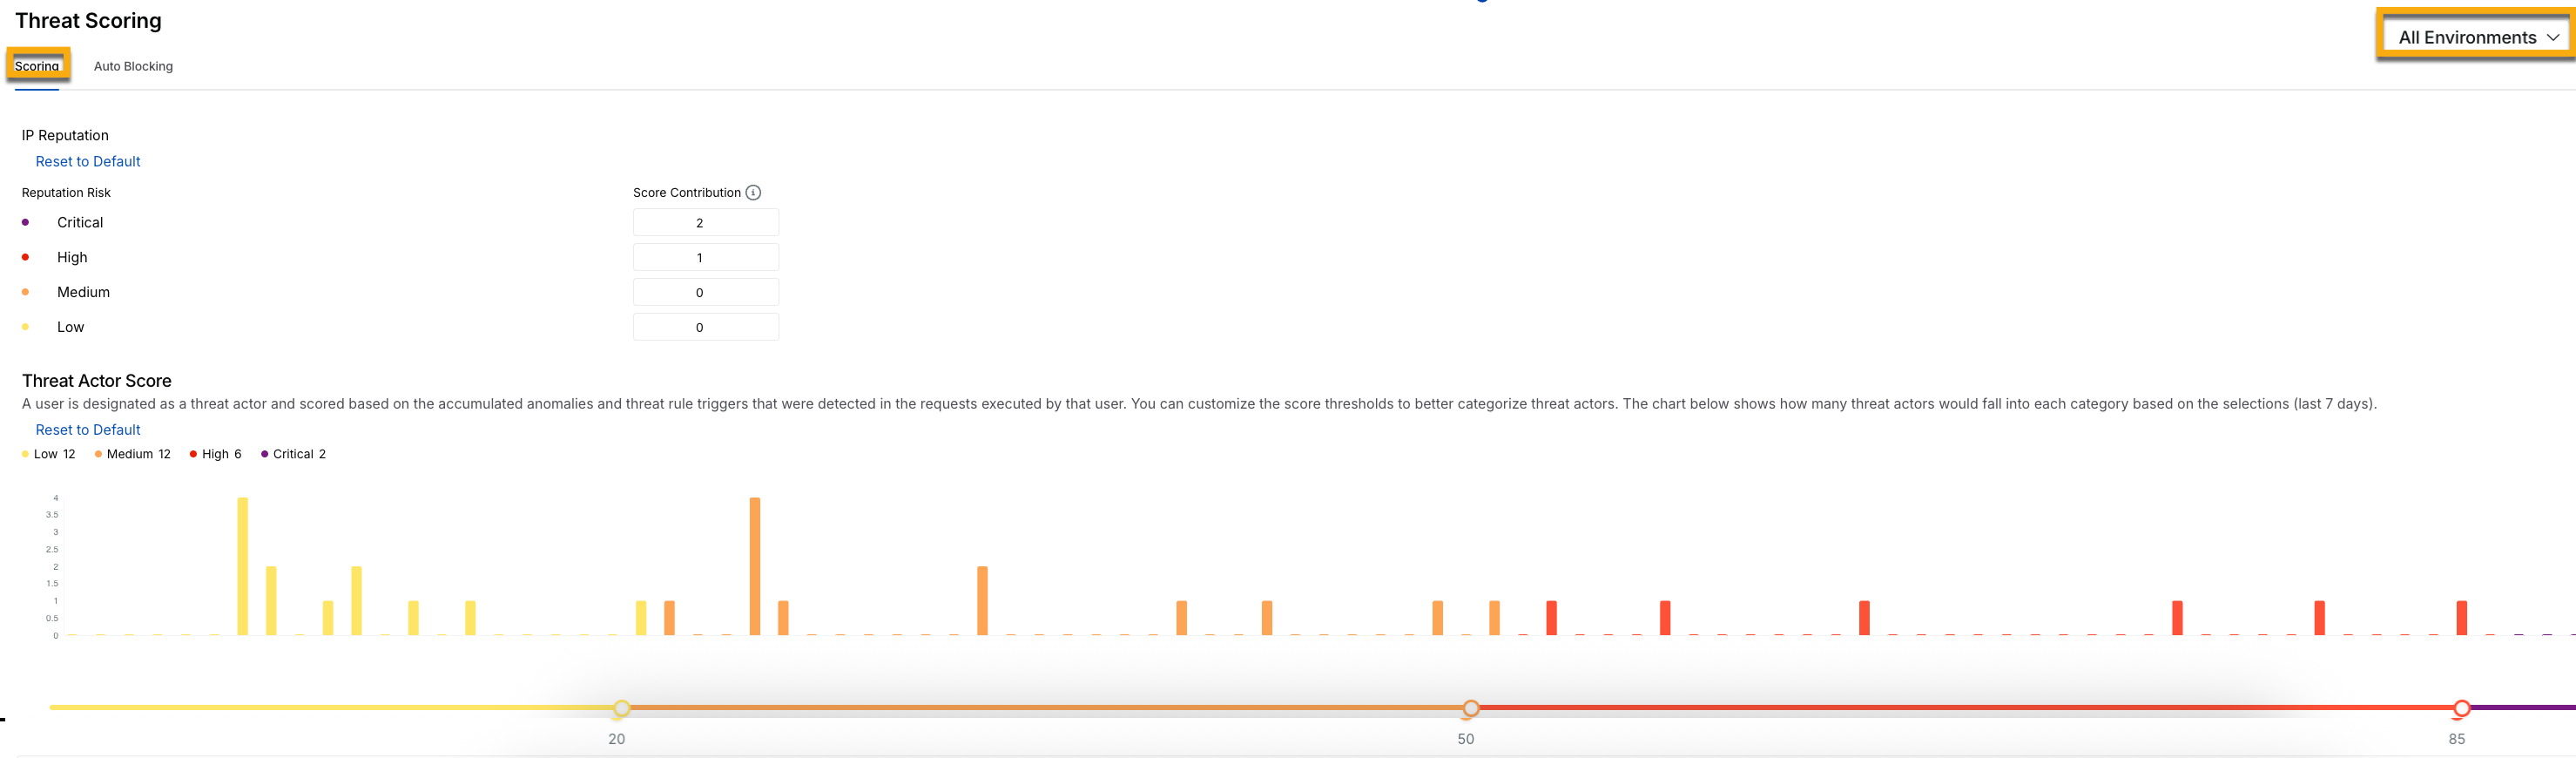
Threat Score Threshold
You can configure the threshold for categorizing the threat actors in the following four categories:
Low — Default threat score between 0 and 20.
Medium — Default threat score between 21 and 50.
High — Default threat score between 51 and 85.
Critical — Default threat score between 86 and above.
You can move the slider in the Threat Actor Score graph to adjust the scores according to your requirements. For example, if you want the threat actor category to start at Medium, move the first slider (on the left-hand side) to 0. This categorizes threat actors into only medium, High, and Critical threat categories.
Understand threat actor score decay
Threat activity is not always continuous. An actor who was previously active may become inactive or stop exhibiting suspicious behavior. In such scenarios, if Traceable does not detect any new malicious activity for a threat actor, its score decreases automatically over time. This score decay helps prevent outdated activity from keeping an actor classified as high risk, allowing you to focus on current threats. It also ensures that risk levels reflect current behavior rather than past activity.
Threat actor score decay helps you in the following ways:
Prioritize active threats — It focuses on actors with increasing or consistently high scores.
Track behavior over time — It uses score trends to distinguish between persistent threats and temporary anomalies.
Reduce manual intervention — It allows scores to naturally decline instead of manually adjusting actor severity.
Tune enforcement decisions — It combines decay, thresholds, and auto-blocking to ensure actions apply only to actively risky actors.
This approach helps you maintain an accurate view of risk while avoiding unnecessary action on inactive or low-risk actors.
Working of threat score decay
Traceable reduces a threat actor’s score by 14% per day when no new security events are generated. As a result, the score gradually decreases, and the actor’s severity level adjusts accordingly.
The following sample scenario illustrates how a threat actor’s score gradually decreases over time due to inactivity. For example, the threat actor score starts at 100 on Day 0, drops to 86 on Day 1, and further declines to 74 on Day 2, reflecting a reduced risk level as no new malicious activity is observed.

Threat Actor Score Decay Logic
While Traceable decreases the threat score for an activity, it automatically increases the score upon new activity detection. This is done based on the configured scoring rules.
Auto-blocking
Auto-blocking is an automated enforcement mechanism that stops malicious users from continuing activity once their risk level reaches a critical threshold. Threat scoring continuously evaluates anomalies, behavioral deviations, and confirmed attack signals. As activity escalates and the accumulated score reaches the Critical threshold, the user is automatically blocked without requiring manual intervention. This capability is useful during an active attack. Every additional malicious request increases the potential for data exposure, service disruption, or abuse. Auto-blocking ensures that enforcement happens at the exact moment risk crosses the defined limit, reducing response time and limiting impact.
Auto-blocking is configured per environment scope. You must decide whether enforcement applies to a specific environment or across all environments in your organization. This flexibility allows you to control operational risk. For example, you may want to observe and tune scoring in sandbox environments before enabling enforcement in production. Careful tuning of scoring rules, validation of detections, and review of user behavior help ensure that automated enforcement targets genuine threats while minimizing false positives. To configure auto-blocking, navigate to Protection → Settings → Threat Scoring, define the appropriate score thresholds, and enable Auto-blocking for the desired environment.
Note
A change in the scoring applies to all future security events and anomalies.
Auto-blocking is triggered when a user’s threat score reaches the configured Critical threshold. Ensure that the Critical score in the Scoring tab is configured correctly to avoid unintended blocking or missed threats.
Environment scope
Auto-blocking is environment-scoped. You can enable auto-blocking for:
A specific environment — Auto-blocking is applied only to the selected environment. Traffic in other environments remains unaffected, maintaining strict isolation across environments, for example, staging, testing, and production. This approach is ideal for validating enforcement behavior in a controlled setup before broader rollout, as scoring thresholds, exclusions, and enforcement actions are limited to that environment. To prevent unintended impact, Traceable displays a confirmation alert when enabling this option.
All environments — Auto-blocking is applied across every environment, ensuring a consistent threat response and centralized risk management across the platform. This approach is ideal when you wish to enforce a uniform security posture globally. Since this option applies across the platform, Traceable prompts you to confirm your selection, as shown below.
.png)
Enable Auto-Blocking for All Environments
Exclude users
Auto-blocking automatically restricts a user once their threat score reaches the configured critical threshold. This is useful during active attacks on your API infrastructure. You may also choose to take no automated action. Enforcement is triggered based on the critical score defined in the Scoring tab. In some environments, specific identities must continue operating even if their threat score becomes vital. The Exclude Users capability allows you to define one or more regular expressions that match particular user identities. When a user matches an exclusion rule:
Threat scoring continues
Anomalies and events are still recorded
The user may still be classified as Critical
Auto-blocking is not applied
For example, a regular expression can exclude all users from specific domains, such as traceable.ai, whose usernames follow a defined pattern. These users would not be blocked, regardless of their threat score. For more information, see Exclusions.
(1).png)
Threat Scoring, Auto-Blocking, and Add regex option
IP address allowlist
An IP address allowlist serves as a policy-level enforcement override in Traceable and is configured through Custom Policies. When you create a policy for an IP range, such as a Custom Signature or Malicious Source policy, and set the action to Allow, you explicitly instruct Traceable to permit traffic from that IP range at the enforcement layer.
This implies that blocking controls defined in other custom policies do not apply to traffic originating from the allowlisted IP range. Requests from those IP addresses are not blocked at the policy layer. This behavior also extends to auto-blocking. Even if a user or threat actor associated with an allowlisted IP reaches the Critical threat score threshold, enforcement actions are not triggered for traffic from that IP range. It is essential to distinguish between enforcement and detection. Allowlisting suppresses blocking actions, but it does not disable monitoring. Threat scoring continues, anomalies may still be identified, and security events are still generated. You retain complete visibility into activity from the allowlisted IP range, and only enforcement actions are overridden. Out-of-the-box detections configured under Protection → Settings → Policies remain active, and custom signature policies continue to evaluate requests. For more information, see Custom Policies.