Updates (April 2026 to June 2026)
May 2026 — Updated the topic to add information about the availability of the enable and disable options for configured AWS integration. For more information, see Manage configured integration.
AWS WAF (Web Application Firewall) is a service offered by Amazon Web Services (AWS) that helps protect web applications from common web exploits that could affect their availability, compromise security, or consume excessive resources. It allows you to create custom rules that block common attack patterns, such as cross-site scripting (XSS). You can also define customized rules that protect against more specific threats.
What will you learn in this topic?
By the end of this topic, you will be able to understand:
An overview of the steps required to set up the integration.
The permissions and configurations required for integration.
The prerequisites for setting up the integration with Traceable.
The steps to integrate AWS with Traceable.
The steps to manage configured integrations.
Integration overview
This section provides high-level information on integrating AWS WAF with Traceable and managing threats.
Installation — Traceable offers agentless or agent-based deployment options. For more information on Traceable agents, see the Installation section.
Integration Setup — After deploying the agent, you can retrieve the credentials and configure the AWS integration. To do so, you must complete the following steps:
Prerequisites — Log in to your AWS console and retrieve the required credentials, such as the AWS secret access key or the Role ARN, to configure the integration. For more information, see Before you begin.
Authentication — Traceable allows you to authenticate the Traceable AWS WAF integration by using either of the following two ways:
AWS Access Key — Authenticate using an IAM user’s access key ID and secret access key to allow Traceable to access and manage AWS WAF resources.
Role ARN — Authenticate using an IAM role that trusts Traceable’s OIDC identity, allowing Traceable to assume the role and securely access AWS WAF resources without long-term credentials.
Integration — After obtaining the credentials from the previous steps, navigate to the Traceable platform and configure the integration. For more information, see Set up the integration.
Threat Management — After setting up the integration, you can establish rules to allow, block, or monitor IP addresses according to your specific requirements. Traceable supports the following rules for the AWS integration:
Threat Actors — On the threat actors page, Traceable displays the IP addresses that pose a threat, where you can change the status of an actor to deny or suspend it. Traceable allows creating allowlists using allowed and snoozed states, and supports blocking using deny and suspended states under threat actors. For more information, see Threat actors.
Malicious Source Rules — You can set up Malicious Source rules to block unwanted IPs based on IP range and Region. To configure these rules, navigate to Protection → Policies → Custom Policies → Malicious Source. For more information, see Malicious Sources.
Custom Signature Rules — You can set up Custom Signature rules to block incoming requests from a specific URL by matching the corresponding endpoints. To configure these rules, navigate to Protection → Policies → Custom Policies → Custom Signatures. For more information, see Custom Signature rules.
The following is a high-level integration diagram:

Traceable AWS Integration Diagram
Before you begin
Make a note of the following before proceeding with AWS WAF integration:
Make sure you have a reasonable understanding of the AWS Management Console, including how to create Web ACLs, Access keys, Secret keys, and role ARNs. For more information, see AWS Documentation.
(For Access Key authentication only) Please make sure you have access to the AWS Access Key ID and AWS Secret Access Key from the AWS Management Console.
Make sure that you have the Web ACL ARN for the resource you wish to integrate with Traceable. You can apply the Traceable rules for a region or CloudFront Resources.
(For Role ARN authentication only) Make sure you have the Role ARN. For more information, see IAM role creation.
AWS permissions
The following table lists the Sample policy for AWS permissions required:
Resource Type | Actions | Description |
|---|---|---|
RuleGroup |
| Manage rule groups by creating, modifying, viewing, listing, or deleting them as needed. Rule groups help organize security rules for easier management and consistent policy enforcement. |
IPSet |
| Manage IP sets by defining, updating, viewing, listing, or removing allowed or blocked IP addresses. IP sets are used to efficiently control access and enforce network-level restrictions. |
WebACL |
| Manage web ACLs by updating configurations and retrieving details. Web ACLs apply rule groups and IP sets to protect web applications from malicious traffic and attacks. |
For more information on AWS IAM permissions, see AWS IAM Permissions.
Note
Ensure the WebACL has RuleGroup permissions in the region so Traceable RuleGroups can be associated with it.
The
IPSetsandRuleGroupare created, updated, and deleted, whileWebACLsare only updated. You need access to these resources in the corresponding regions while setting up the WAF.
Sample policy for AWS permissions
The following is a sample policy to help you configure various permissions in AWS WAF:
{
  "Version": "2012-10-17",
  "Statement": [
    {
      "Sid": "IPSetStatement",
      "Effect": "Allow",
      "Action": [
        "wafv2:GetIPSet",
        "wafv2:CreateIPSet",
        "wafv2:UpdateIPSet",
        "wafv2:DeleteIPSet"
      ],
      "Resource": [
        "arn:aws:wafv2:*:<AWS_ACCOUNT_ID>:*/ipset/*/*"

      ]
    },
    {
      "Sid": "RuleGroupStatement",
      "Effect": "Allow",
      "Action": [
        "wafv2:GetRuleGroup",
        "wafv2:CreateRuleGroup",
        "wafv2:UpdateRuleGroup",
        "wafv2:DeleteRuleGroup"
      ],
      "Resource": [
        "arn:aws:wafv2:*:<AWS_ACCOUNT_ID>:*/rulegroup/*/*",
        "arn:aws:wafv2:*:<AWS_ACCOUNT_ID>:*/ipset/*/*"
      ]
    },
    {
      "Sid": "WebACLStatement",
      "Effect": "Allow",
      "Action": [
        "wafv2:GetWebACL",
        "wafv2:UpdateWebACL"
      ],
      "Resource": [
        "arn:aws:wafv2:*:<AWS_ACCOUNT_ID>:*/webacl/*/*",
        "arn:aws:wafv2:*:<AWS_ACCOUNT_ID>:*/rulegroup/*/*",
        "arn:aws:wafv2:*:<AWS_ACCOUNT_ID>:*/managedruleset/*/*",
        "arn:aws:wafv2:*:<AWS_ACCOUNT_ID>:*/ipset/*/*"
      ]
    },
    {
      "Sid": "ListStatement",
      "Effect": "Allow",
      "Action": [
        "wafv2:ListRuleGroups",
        "wafv2:ListIPSets"
      ],
      "Resource": "*"
    }
  ]
}
IAM role creation
Traceable integrates with AWS WAF to securely manage and update WAF rules in your AWS account using temporary credentials obtained via OpenID Connect (OIDC).
The following steps describe how Traceable securely integrates with AWS WAF to manage and update rules in your AWS account:
You create an IAM Role in your AWS account with the required WAF permissions.
You update the IAM Role trust policy to allow Traceable’s OIDC identity to assume the role.
Traceable’s service pod retrieves an OIDC token from the environment.
Traceable calls AWS Security Token Service (STS) using AssumeRoleWithWebIdentity with the OIDC token. For more information, see AWS Assume Role Web Identity.
AWS STS validates the token and returns temporary security credentials.
Traceable uses these temporary credentials to securely interact with AWS WAF APIs and push or update WAF rules. For more information, see IAM Role AWS.
Using the script below, you can generate the Role ARN value to use in the integration later.
{
    "Version": "2012-10-17",
    "Statement": [
        {
            "Effect": "Allow",
            "Principal": {
                "Federated": "arn:aws:iam::<AWS_ACCOUNT_ID>:<OIDC_PROVIDER_URL>"
            },
            "Action": "sts:AssumeRoleWithWebIdentity",
            "Condition": {
                "StringEquals": {
                    "<OIDC_PROVIDER_URL>:aud": "sts.amazonaws.com",
                    "<OIDC_PROVIDER_URL>:sub": "system:serviceaccount:traceable:integration-service"
                }
            }
        }
    ]
}
Note
The
<OIDC_PROVIDER_URL>in the above script is a placeholder for the actual value. To retrieve the actual value, contact the Traceable Account Executive.
Set up the integration
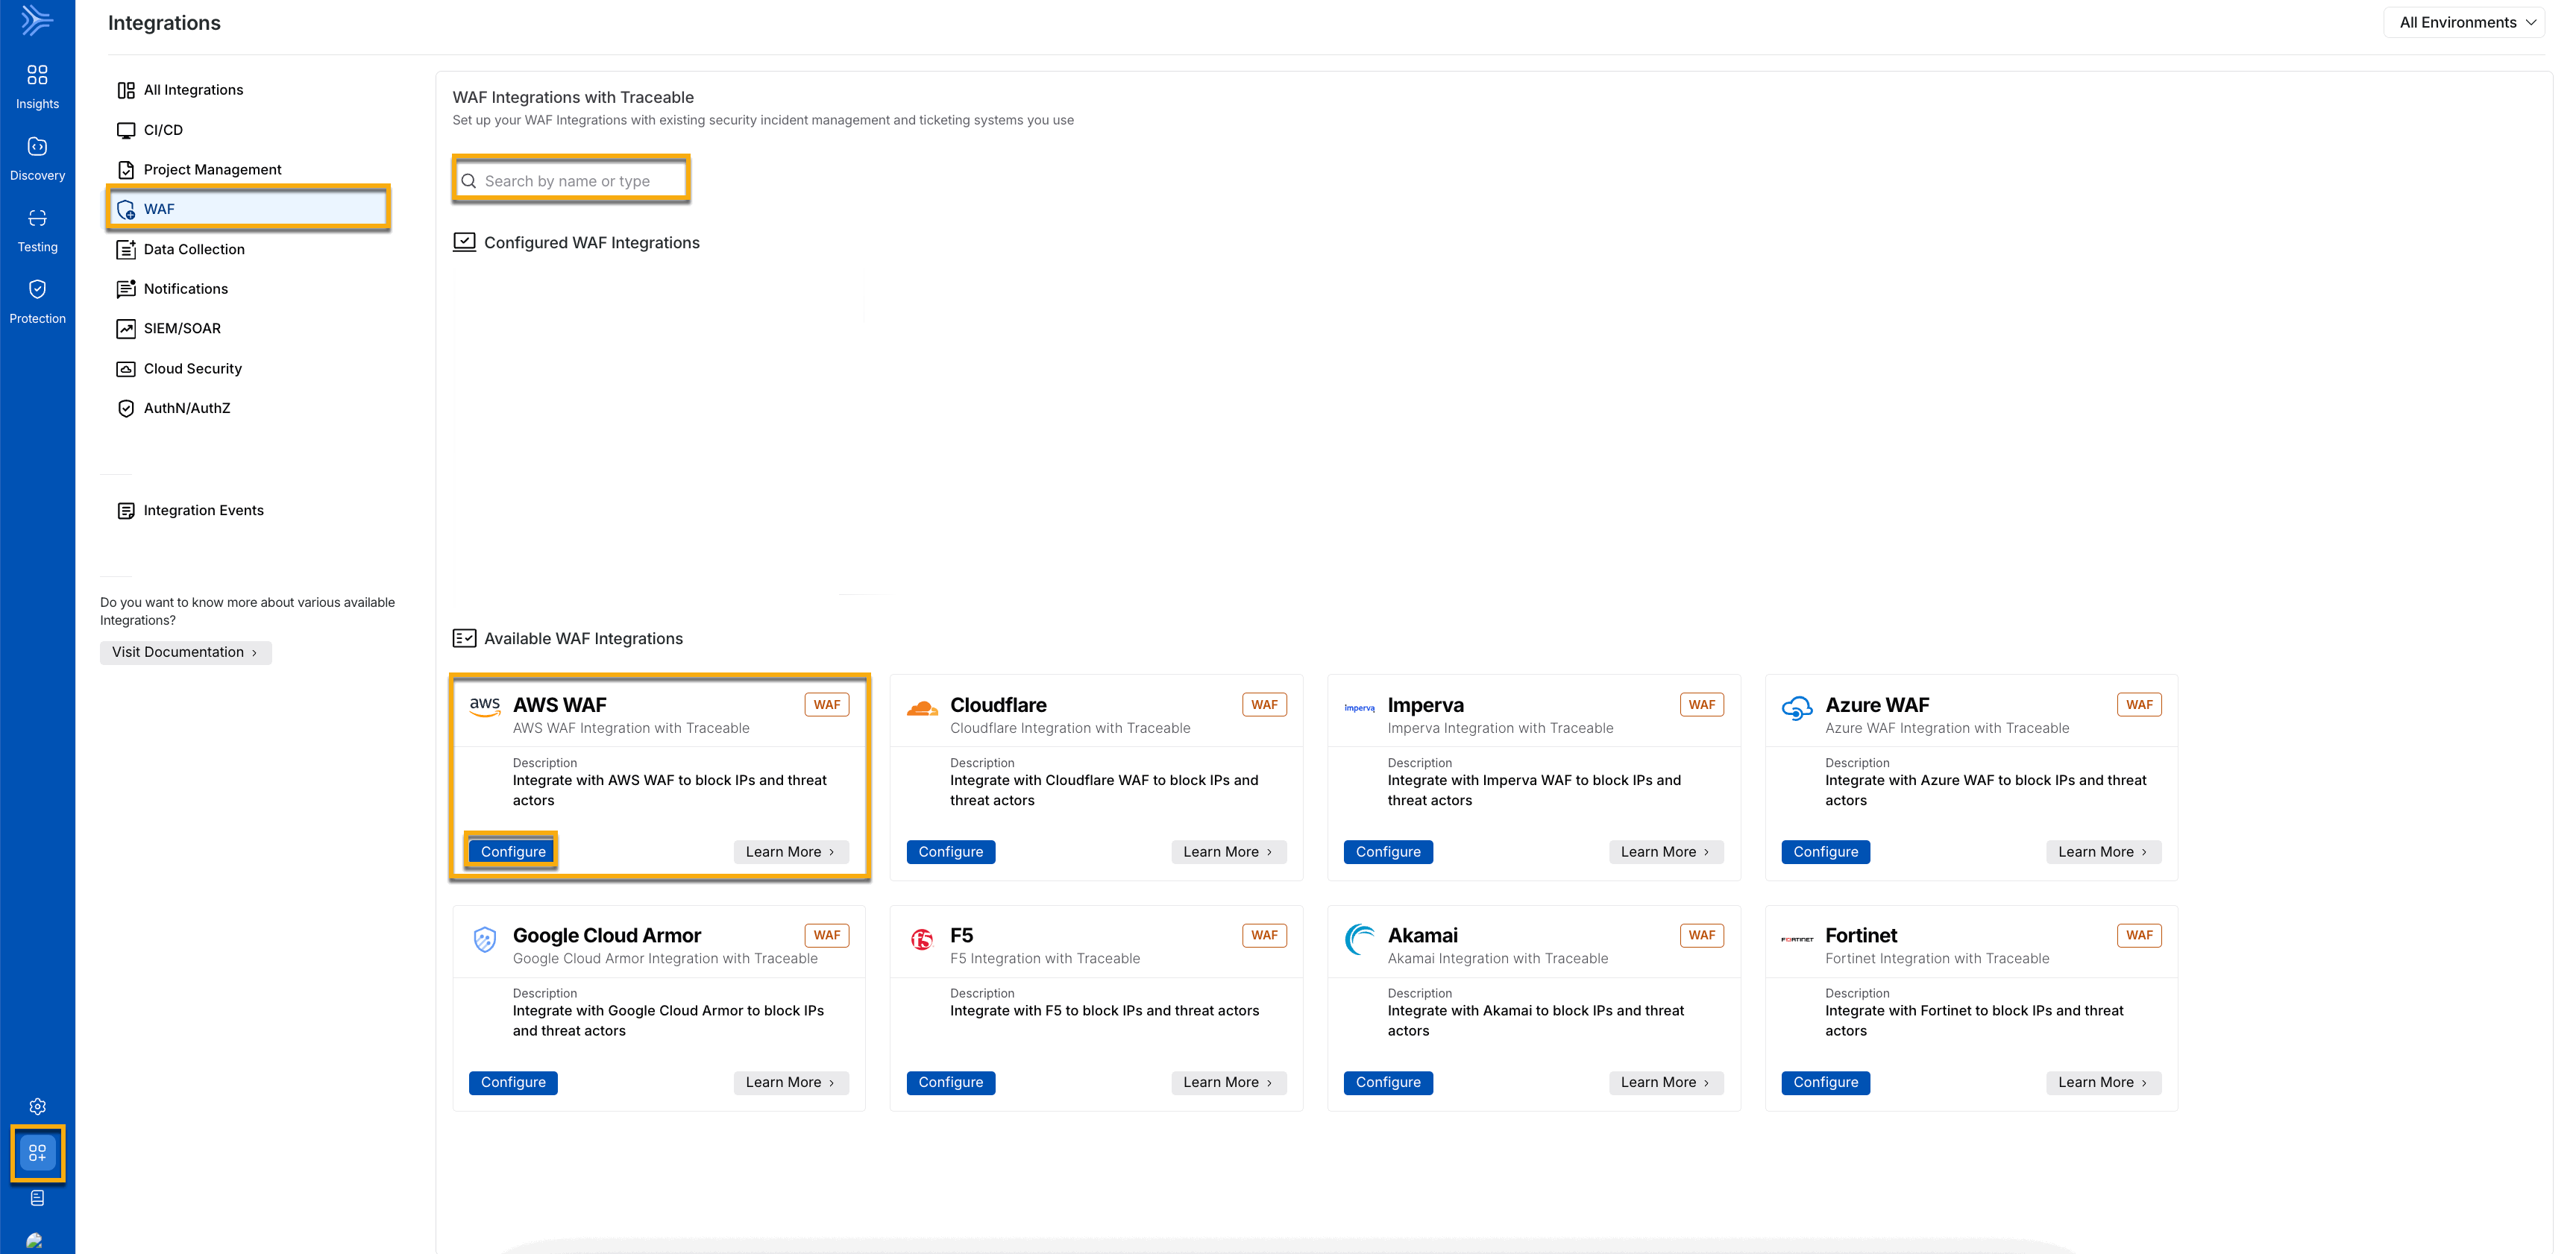
To set up the AWS WAF integration, log in to your Traceable account, navigate to Integrations ( ![]() ), and do one of the following:
), and do one of the following:
Search for AWS in the search bar.
Under All Integrations, navigate to WAF → AWS.
AWS Integration
Click Configure, and in the Add New AWS WAF Integration slide-out panel, complete the following steps:
.png")
Add New AWS WAF Integration using access key
Integration Name — A name for your integration, for example, AWS WAF Integration.
(Optional) Description — A summary of the purpose of your integration, for example, Automated test integration.
Environment — The environment for which you wish to apply the integration. You can select one or more environments to integrate AWS WAF from the drop-down list.
Note
You can have multiple integrations for the same environment if the WebACL ARN numbers differ.
Authentication — An authentication method that you wish to use for authenticating the integration from the drop-down, based on your requirements.
Access Keys — The AWS Secret Access Key is used to authenticate API requests.
Specify the AWS Access key ID.
Specify the AWS Secret Access Key. For more information, see Manage Access Keys in AWS.
(Recommended) IAM Roles — Select this authentication and provide the Role ARN value fetched from the AWS Platform. For more information, see IAM Role Creation.
(1).png)
Add new AWS WAF using IAM roles
Action Type — Select the action type. You can select from Allow, Block, or Count.
Allow or block — The allow or block action is decided based on the IP range rules, which are configured as part of the Malicious source policy.
Count — When you select Count, none of the requests are blocked; in other words, it acts like an allow-all rule. The Count action also applies to the existing blocked IP addresses and rules. In this case, only metrics are recorded. For more information, see AWS WAF Rule Action.
Target(s) — You can select one or more targets from Threat Actors, Custom Signature, Malicious Sources IP Range, and Malicious Source Region. Only the selected rules from these are exported to AWS WAF.
Under Resources, select the Region and its corresponding WebACL ARN. You can choose to add one or more resources.
Click Test Connection to validate the credentials.
Click Save.
After saving your integration, you can manage the integration, as discussed in the following sections.
Manage configured integration
After configuring the integration, you can view the AWS WAF Integration under Configured WAF Integrations, as shown below:
.png)
Configured AWS Integration
Traceable gives you the flexibility to control how the integration operates. You can choose either of the following actions using the drop-down, according to your requirements:
Enabled — You allow Traceable to actively update the WAF with the latest rules to enforce protection and monitor or block threats. When enabled, Traceable continuously sends new rules and updates to the WAF based on policy activity, helping enforce protections with the latest threat information and block suspicious traffic. For more information, see Threat management.
Disabled — You stop Traceable from updating the WAF, so it no longer enforces new protections for that environment or region. When disabled, Traceable stops sending new rules and updates to the WAF for the selected environment or region, while other environments continue using their existing integration settings without impact. The WAF continues to enforce existing rules based on their last applied state, without receiving new updates. Traceable continues to detect and evaluate threats, but it does not enforce them through AWS WAF.
Threat management
Threat management in Traceable helps you identify, track, and control malicious sources interacting with your APIs. By combining threat actor intelligence, policy-based blocking, and integration with external enforcement systems such as AWS WAF, Traceable enables you to respond quickly to suspicious activity and apply protective actions across your environment.
Threat actors
Traceable synchronizes all threat actors moved to the Denylist with AWS WAF. You can view these threat actors by navigating to Protection → Threat Actors and selecting Denylist under the Status filter.
In addition to denylisting, Traceable supports allowlisting through the Allowed and Snoozed states, and blocking through the Deny and Suspended states for threat actors. For more details on managing threat actor states, see Threat actors.
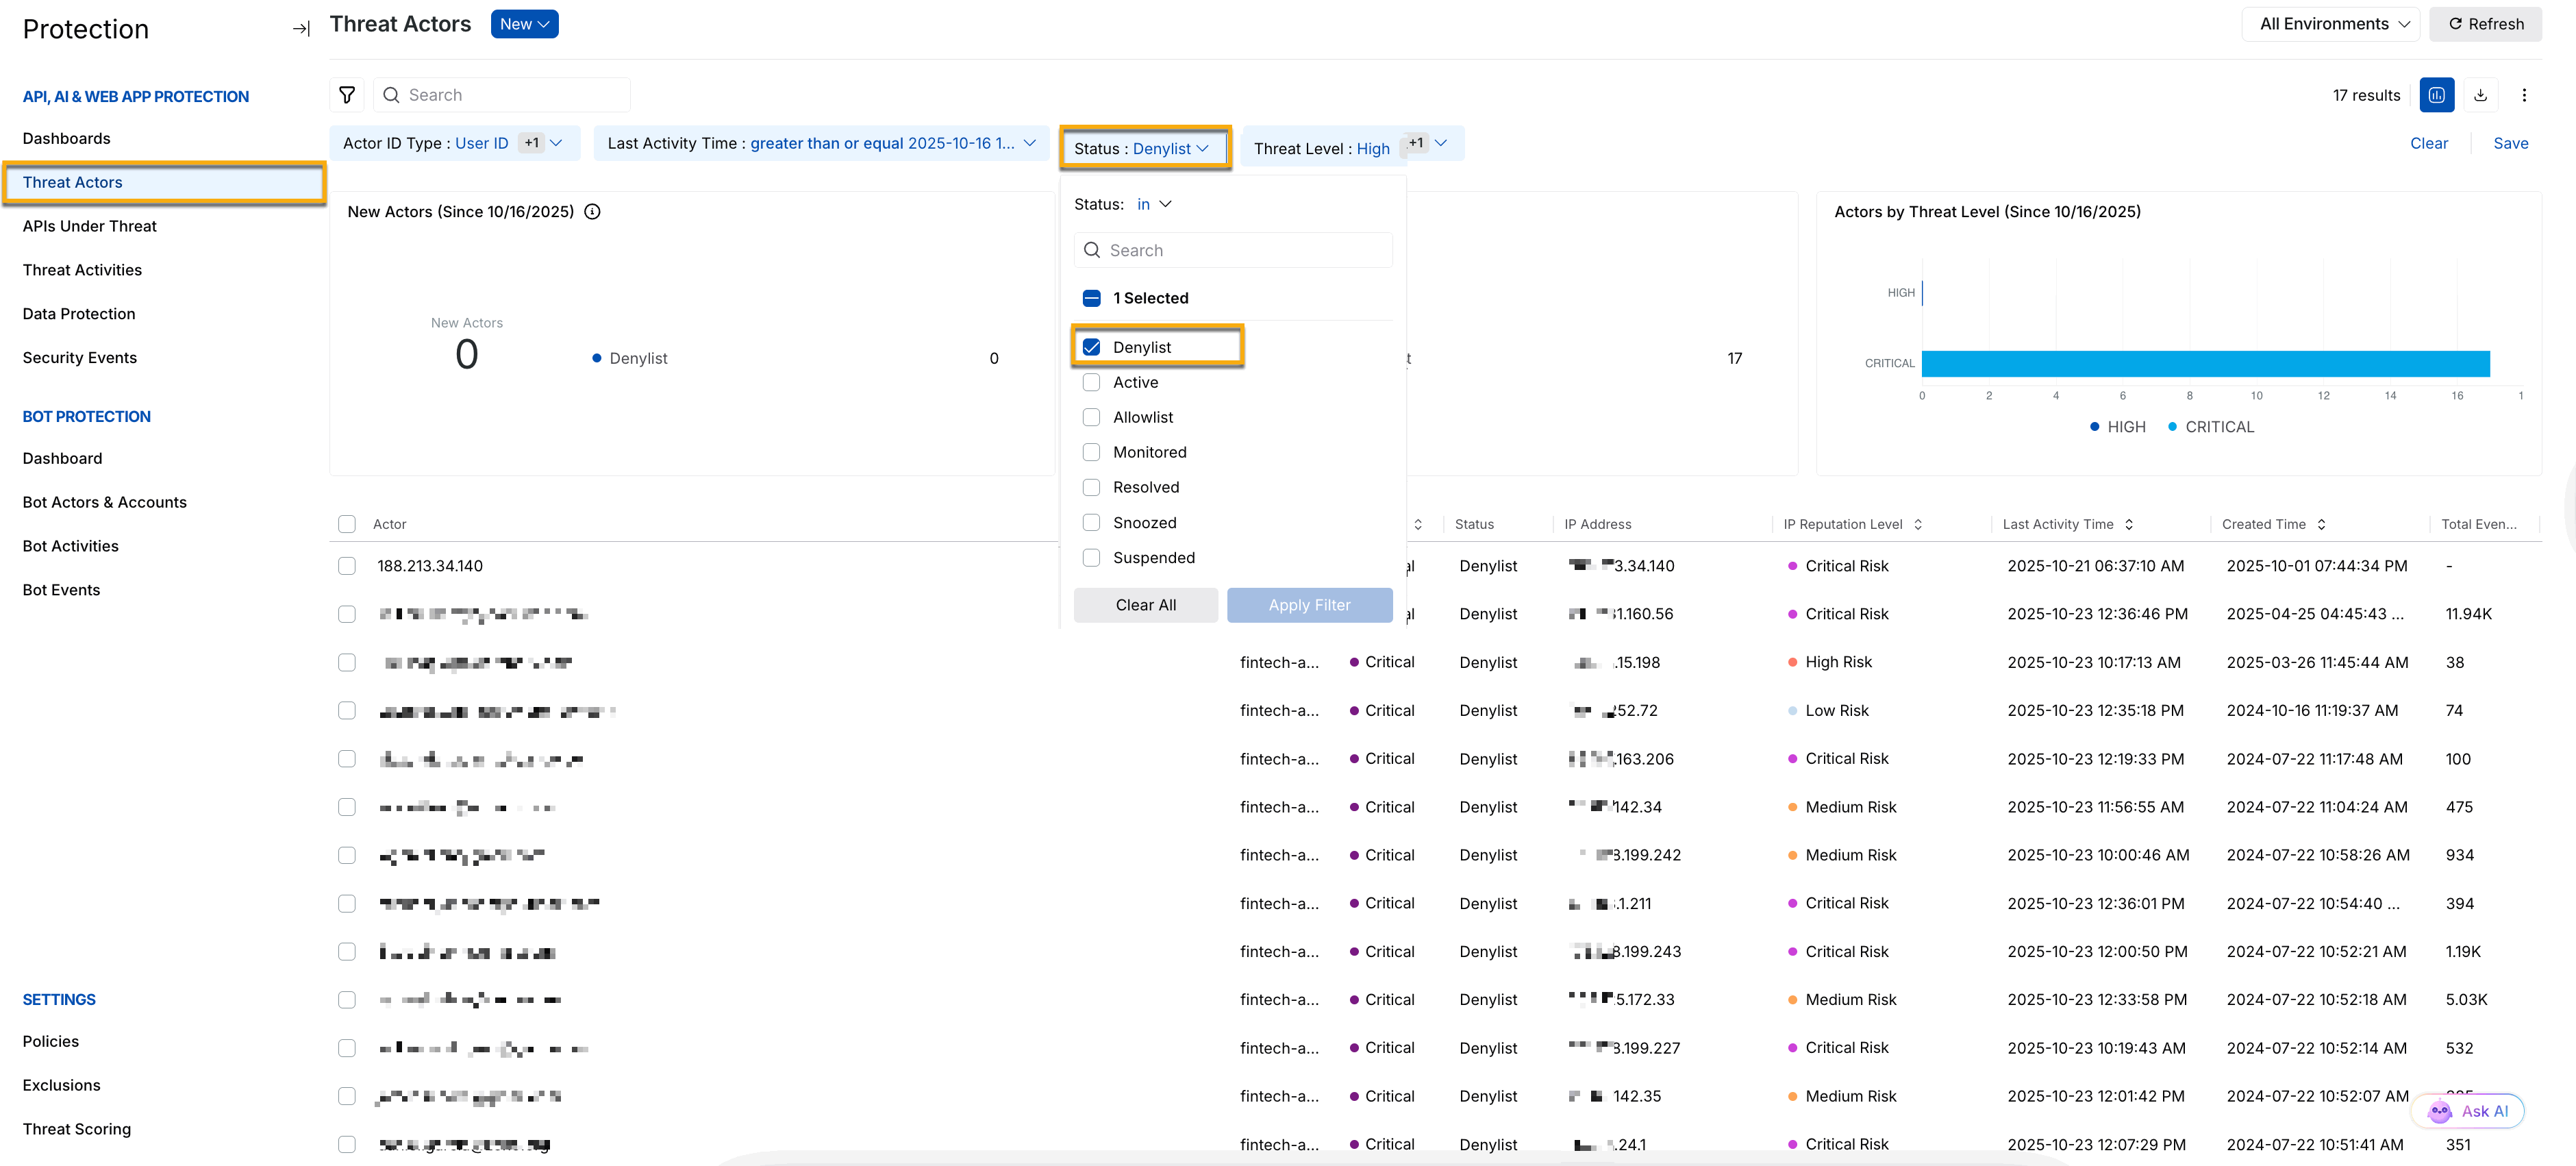
Threat Actor Status
Malicious Source
After you configure the AWS integration, create the IP-range-based Malicious Source or Region-based Malicious Source rules you want to synchronize with AWS WAF. To configure these rules, navigate to Protection → Custom Policy → Malicious Sources. For more information, see Custom Policies.
Note
Only policies created, enabled, or disabled after the integration is completed are propagated to AWS WAF. Policies already enabled before the integration was completed are not propagated to AWS WAF.
For example, the screenshot below shows that the IP address range 117.254.1.136/32 has been configured. All requests coming from this range of IP addresses will be blocked.
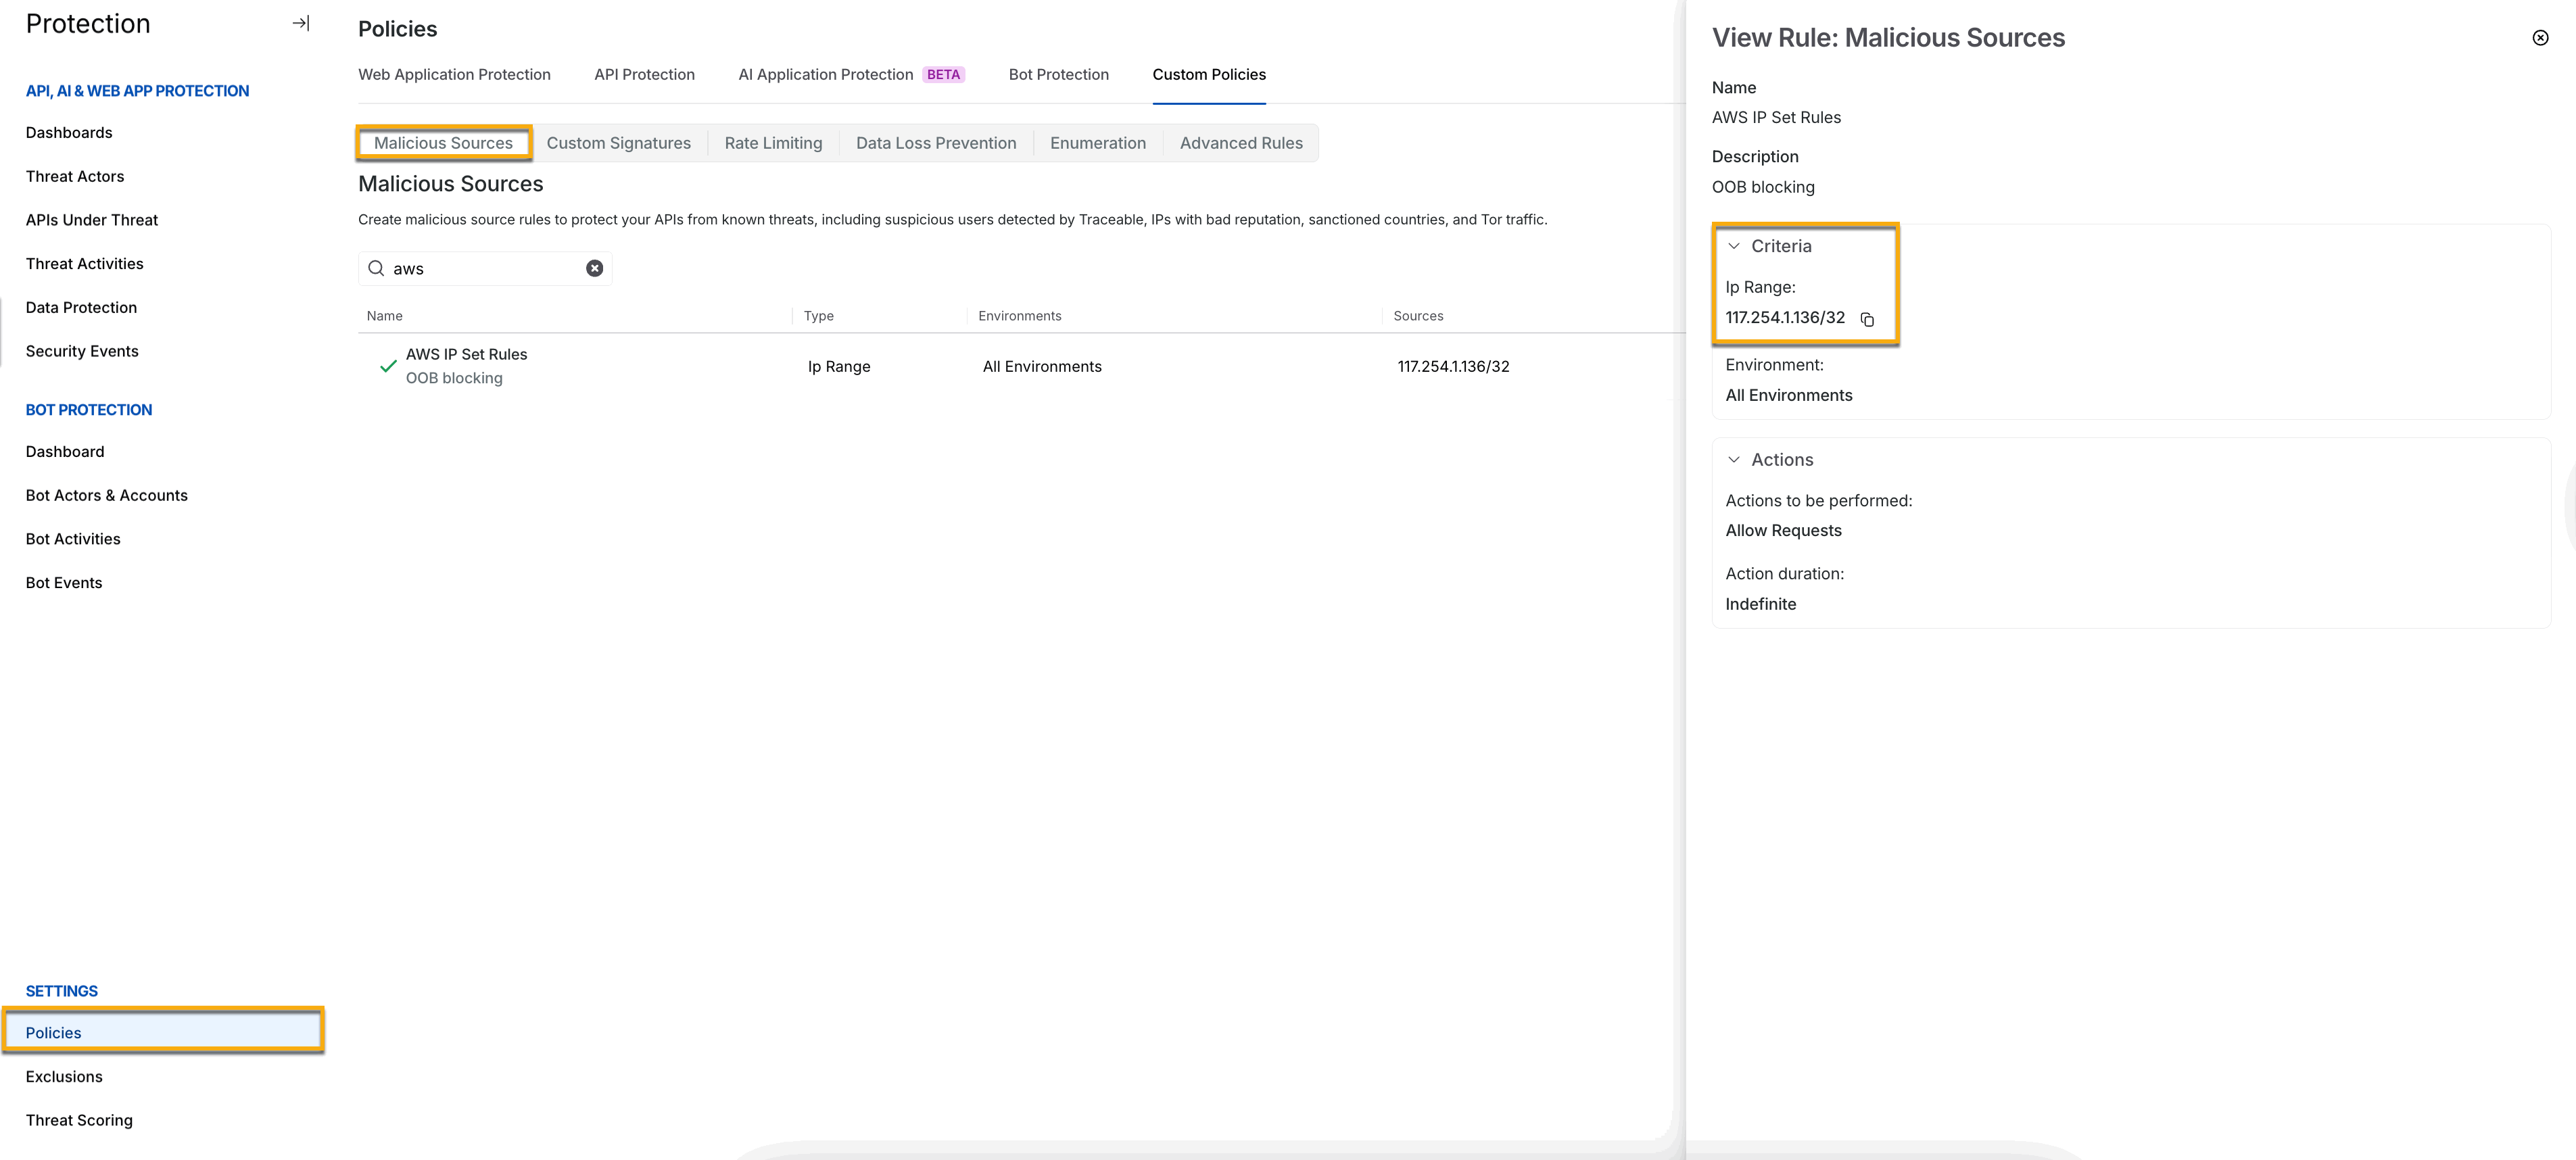
Malicious Source IP range
Custom Signature rules
You can configure Custom Signature rules that you can use in detection. The custom signature rule helps fine-tune the protection strategy by having granular control over the types of events generated and requests blocked. These rules apply globally to all the APIs. You can create custom rules for different attributes and perform different supported operations. For more information, see Support Matrix For Custom Signature Rules. Navigate to Protection → Settings → Custom policy and click the Custom signature tab to create a Custom Signature policy. For more information, see Custom Policy.
View the Traceable policy in AWS WAF
When the Traceable policy is propagated to AWS WAF, it is displayed as TraceableRules. To view the IP addresses sent from Traceable, log in to your AWS management console and navigate to WAF & Shield. Click Rule groups inside the AWS WAF menu.
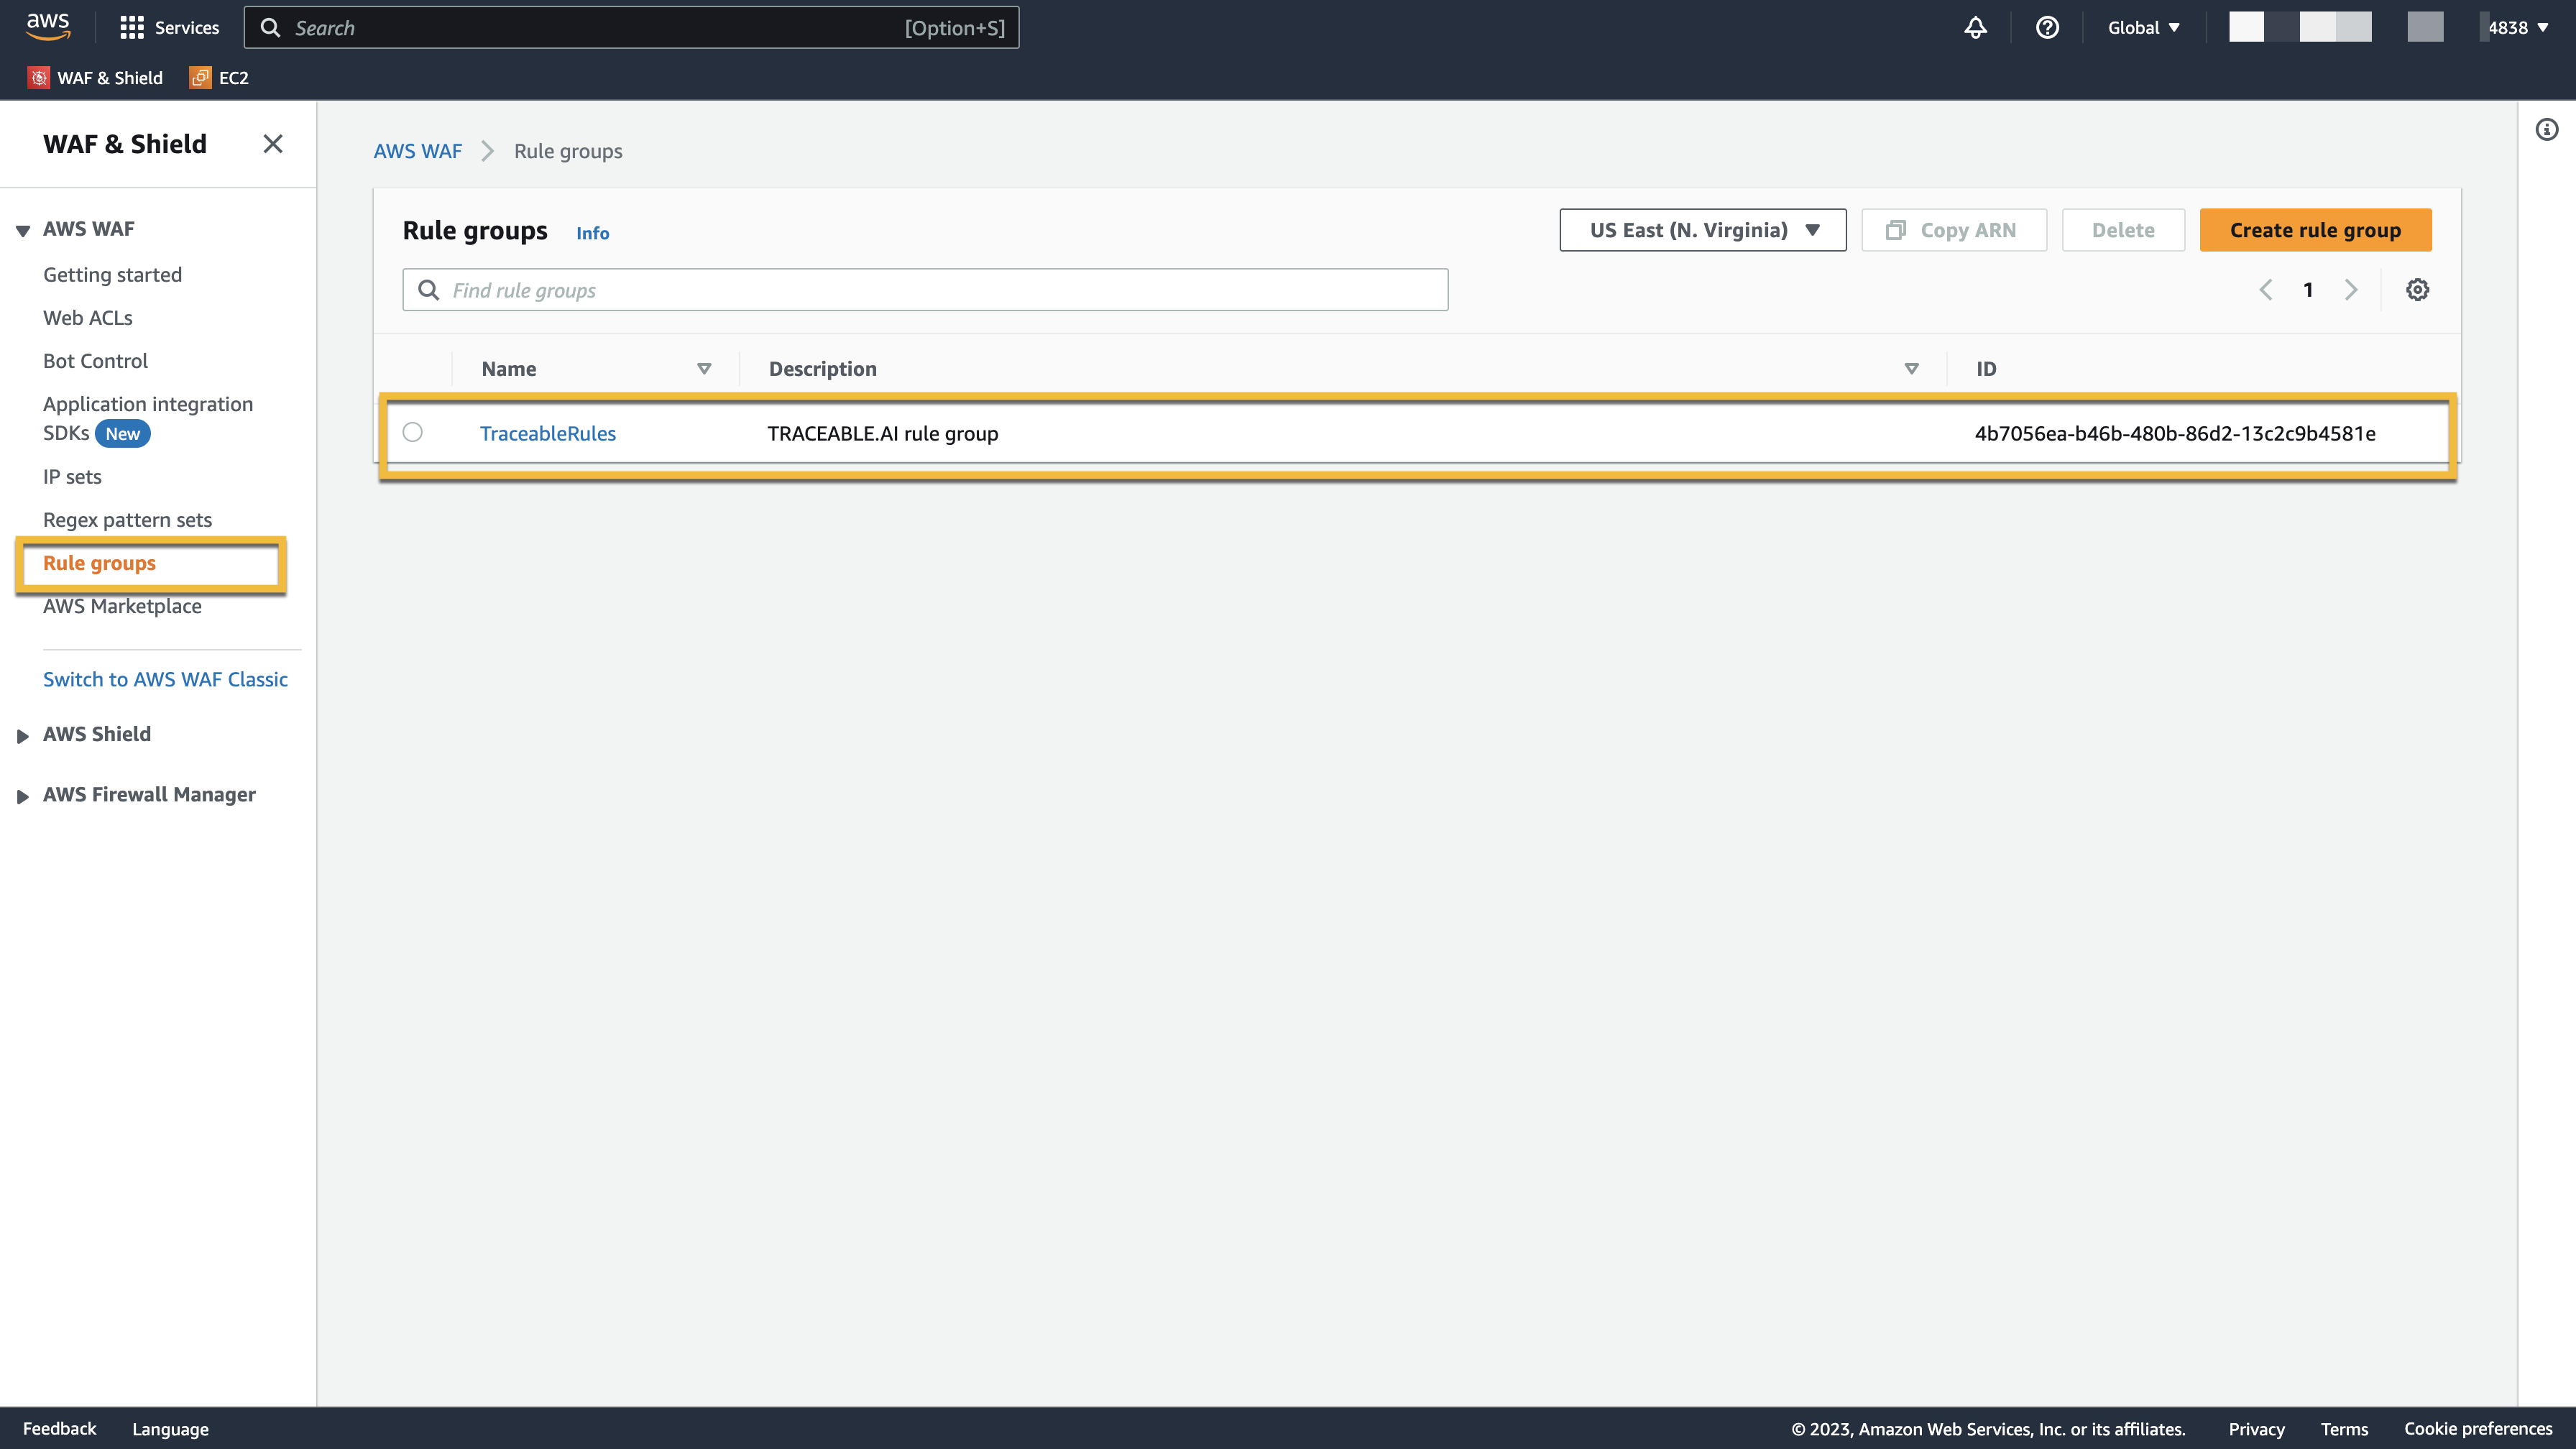
AWS Rule Groups
Navigate to TraceableRules. On the TraceableRules page, click the Rule Name. All the rules that were enabled in Traceable are displayed here. Click the Rule to view the details.
.png)
Rule Details
You can also view IP addresses by clicking Web ACLs or IP sets in AWS WAF.