Bot and Abuse Protection Policies in Traceable provide you with the flexibility to detect, monitor, and block bots interacting with your APIs and web applications. These policies play a key role in preventing abuse and mitigating the risks posed by malicious crawlers, vulnerability scanners, DDoS bots, and other forms of non-human traffic that can disrupt or compromise your services. These policies are rule-based configurations that define how Traceable should respond to bot-driven traffic and enforce abuse prevention across your APIs.
What will you learn in this topic?
By the end of this topic, you will be able to:
Understand how bot and abuse protection policies help detect, monitor, and control automated traffic.
Identify the different types of bot protection rules, including pre-categorized, advanced, and user-defined.
Create and configure bot protection rules based on environments, sources, and endpoints.
Apply appropriate actions, such as monitor, block, or allow, based on risk levels.
Leverage bot activity and event insights to investigate, analyze, and respond to bot-driven threats effectively.
Before you begin
Before you start creating the bot protection rules, make a note of the following:
Make sure you have the Settings RBAC permissions under Module Level Access → API Protection to create the rules. For more information, see Team and roles - RBAC.
If you wish to enforce inline blocking, make sure that Traceable is instrumented at the Edge. For more information, see Edge Cluster Deployment.
Understand bot and abuse protection rules
Before you configure bot abuse and protection rules, it is essential to understand how they help you manage automated traffic interacting with your APIs. These rules use bot insights to drive actions, enabling effective monitoring and control of bot activity. The following table explains when to use bot and abuse policies, why they are needed, and how you can leverage them effectively:
Why use it? | When to use? | How can you leverage it? |
|---|---|---|
Bot and abuse protection rules help detect, monitor, and control automated traffic by leveraging IP reputation, user agent analysis, and behavioral patterns. This helps reduce security risks and prevent abuse. | Use bot and abuse protection rules when APIs are exposed to automated or malicious traffic and require both visibility and enforcement. This is especially important for protecting authentication, account management, payment APIs, and other sensitive endpoints. | Create the bot and abuse protection rules based on observed traffic patterns and bot signals. Filter activity using IP reputation, user agents, and behavior to identify relevant threats and detect coordinated activity. Start in Monitor mode to understand traffic behavior, then apply Block or Allow actions based on risk. Enforce these actions on sensitive endpoints to prevent malicious requests from reaching backend services. |
Types of bot and abuse protection rules
Traceable provides the following rule types for bot and abuse protection, which help you control automated traffic according to your security requirements:
Pre-Categorized Bots — Pre-categorized bot rules enable you to quickly enforce bot protection using predefined bot categories created and maintained by Traceable. While Traceable provides some default policies you can use to protect your applications, you can configure a custom rule by selecting the relevant category. Traceable automatically applies the appropriate detection and enforcement logic. You can use these rules to quickly deploy bot protection with minimal configuration, especially for common bot scenarios.
Advanced Rules — Advanced rules are created for your organization's specific use cases to block bots and prevent abuse that requires custom handling beyond predefined categories. You can define your requirements, and Traceable creates the rule accordingly.
Note
To provide your use case and enable Traceable to create a rule for you, contact your Account Manager or Traceable Support.
User-Defined Rules — User-defined rules provide you with advanced control over rule configuration. You can define the conditions, logic, and enforcement behavior based on your environment and traffic patterns. You can use these rules to customize bot protection according to your internal security policies and application behavior.
Note
The bot and abuse protection policies are environment-scoped, meaning that the rules you create for a specific environment are overridden by those in All Environments.
For information on configuring these rules, see the section below.
Configure and manage bot and abuse protection rules
The following tabs discuss the different types of bot policies in detail:
Traceable creates predefined bot categories, each with associated subcategories, to help you identify and control automated traffic. You can apply protection at the category level or refine it further by selecting specific tools or behaviors. The following table lists the categories and their descriptions:
Bot Category | Description |
|---|---|
Automation Tools | Includes headless browsers and HTTP libraries used for scripted automation, for example, Puppeteer and PhantomJS. |
Crawlers | Includes web crawlers and archiving bots that systematically browse and download content, for example, Googlebot, web archivers, and AI bots. |
E-commerce and Financial Bots | Includes price scrapers, inventory trackers, and transaction-focused automation targeting commerce or financial workflows. |
Malicious Bots | Includes bots designed for abuse, such as DDoS tools, spam bots, spyware, and masking proxies. |
Marketing and SEO Bots | Includes bots used for SEO analysis, campaign tracking, and competitive intelligence gathering. |
Monitoring and Development Bots | Includes site-monitoring tools and service agents for uptime checks, testing, and development workflows. |
Scanners | Includes vulnerability and network scanners, as well as exploitation tools used for security testing or probing, such as Burp Suite and Nessus. |
Search and Indexing Bots | Includes search bots and job aggregators that index and catalog web content, for example, search bots, JobrapidoBot, and Jooblebot. |
Social Media and Content Bots | Includes bots that automate content posting, aggregation, and interaction across digital platforms. |
Create a pre-categorized bot rule
Creating a pre-categorized bot rule consists of the following steps:
Define the criteria — Specify the rule name, select the categories you wish to protect your applications against, and the targets that you wish to protect.
Select the actions — Select the action you wish to take for the rule, for example, Block or Monitor.
Review and save — Validate the configured settings and submit the rule for activation.
To create a custom pre-categorized bot rule in Traceable, navigate to Protection → Policies → Bot and Abuse Protection → Pre Categorized Bots tab, and in the tab’s top right corner, click + Add Rule. In the Create Bot Rule slide-out window, complete the following steps:
Step 1 — Define the criteria
To define the criteria for the rule, complete the following steps:
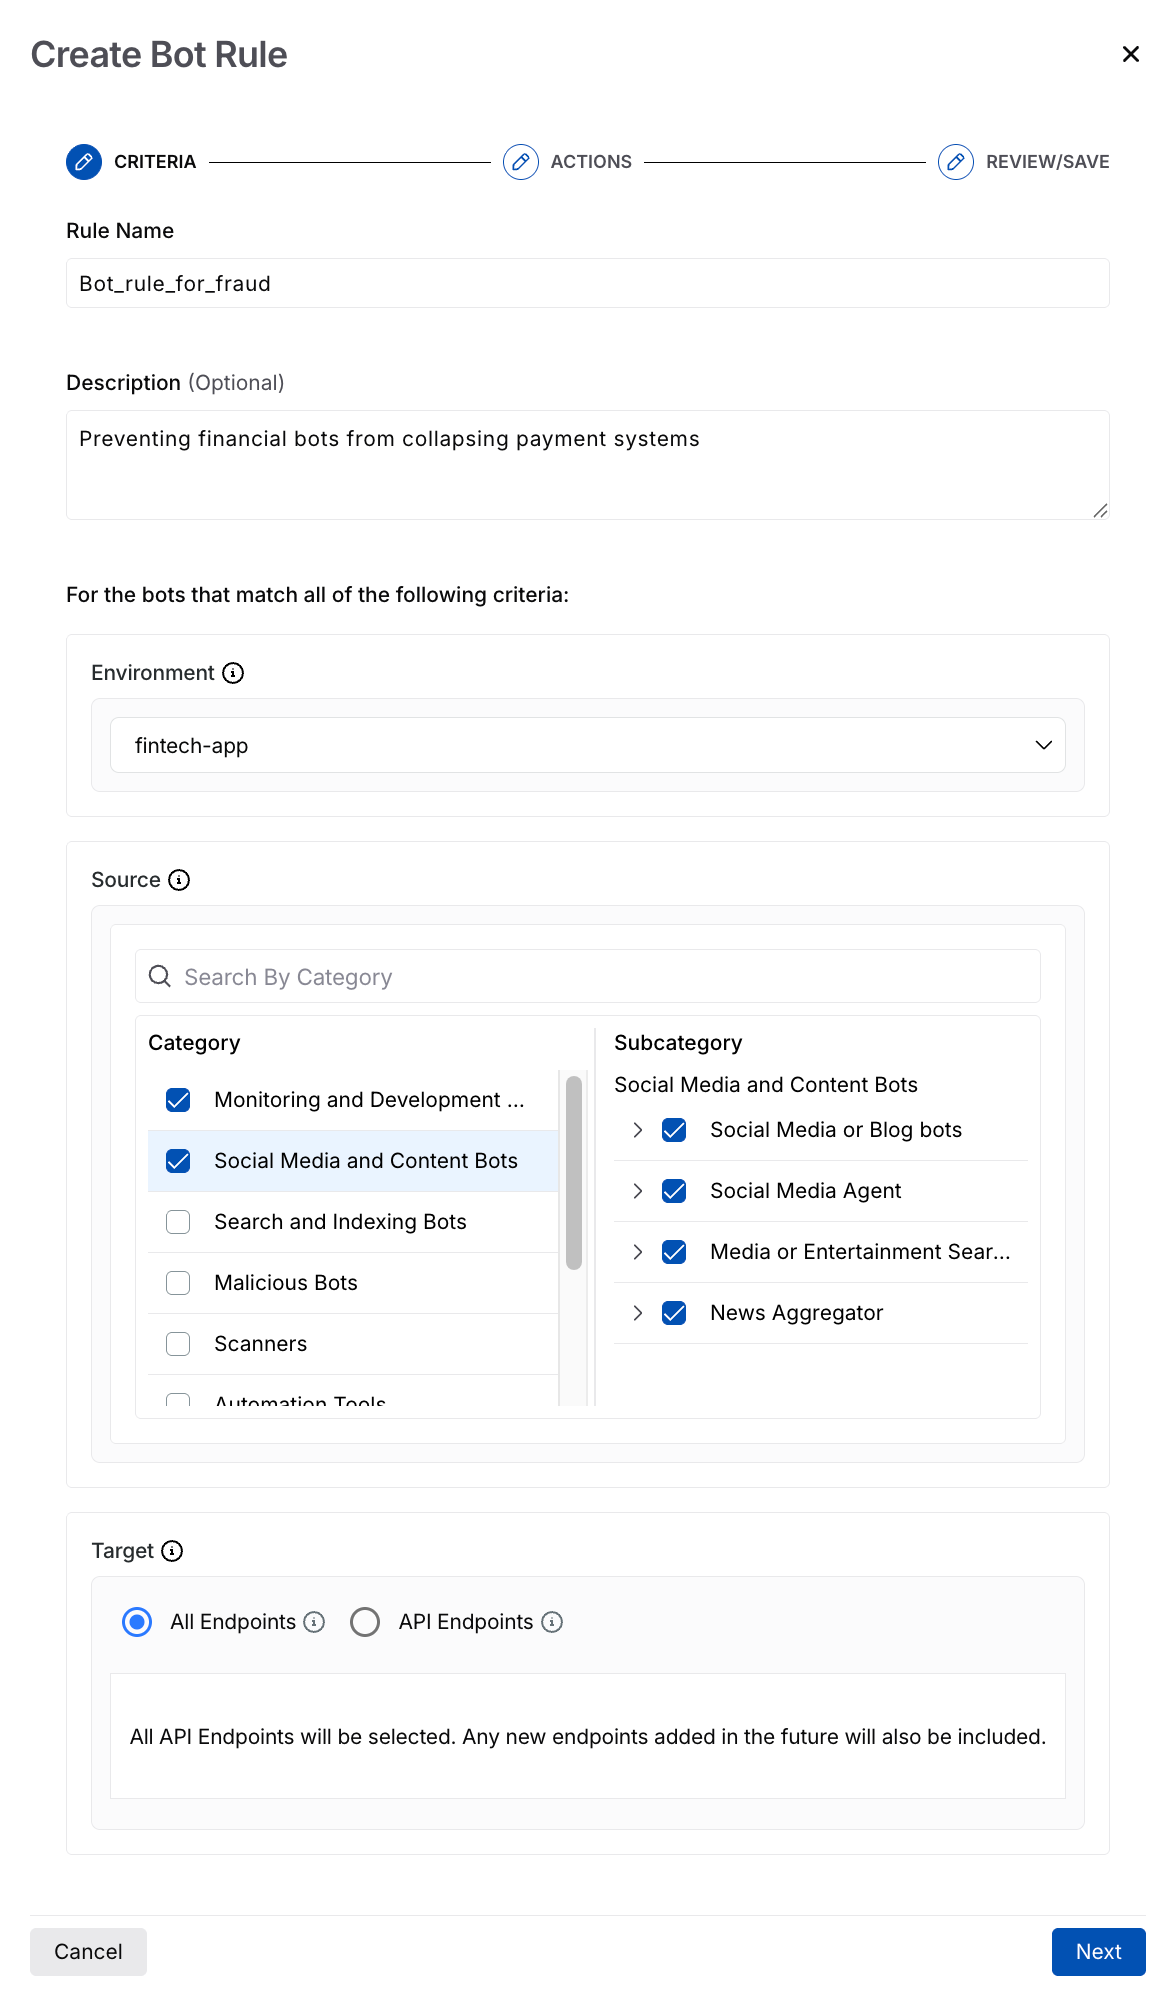
Configuring Criteria for the Pre-Categorized Bot Rule
Rule Name — The name for the rule, for example, Bot_rule_for_fraud.
(Optional) Description — The purpose of the rule, for example, Preventing financial bots from collapsing payment systems.
Environment — The environment(s) where this rule should apply, for example, fintech-app.
Source — The attacks you wish to protect your applications against. You can select one or more categories, their corresponding subcategories, and tools according to your requirements. For information on the available categories, see the table above.
Note
You cannot modify the categories or subcategories in these rules. To create a custom rule without predefined categories, see the User-Defined Rules tab.
Target — The target from your application that you wish to protect. You can select from the following options:
All Endpoints — Apply the rule to all endpoints within your application.
API Endpoints — Apply the rule to specific API endpoints.
Once you have completed the above steps, click Next.
Step 2 — Define the actions
To define how Traceable should handle the relevant bot attacks, you can select the action from the following list:
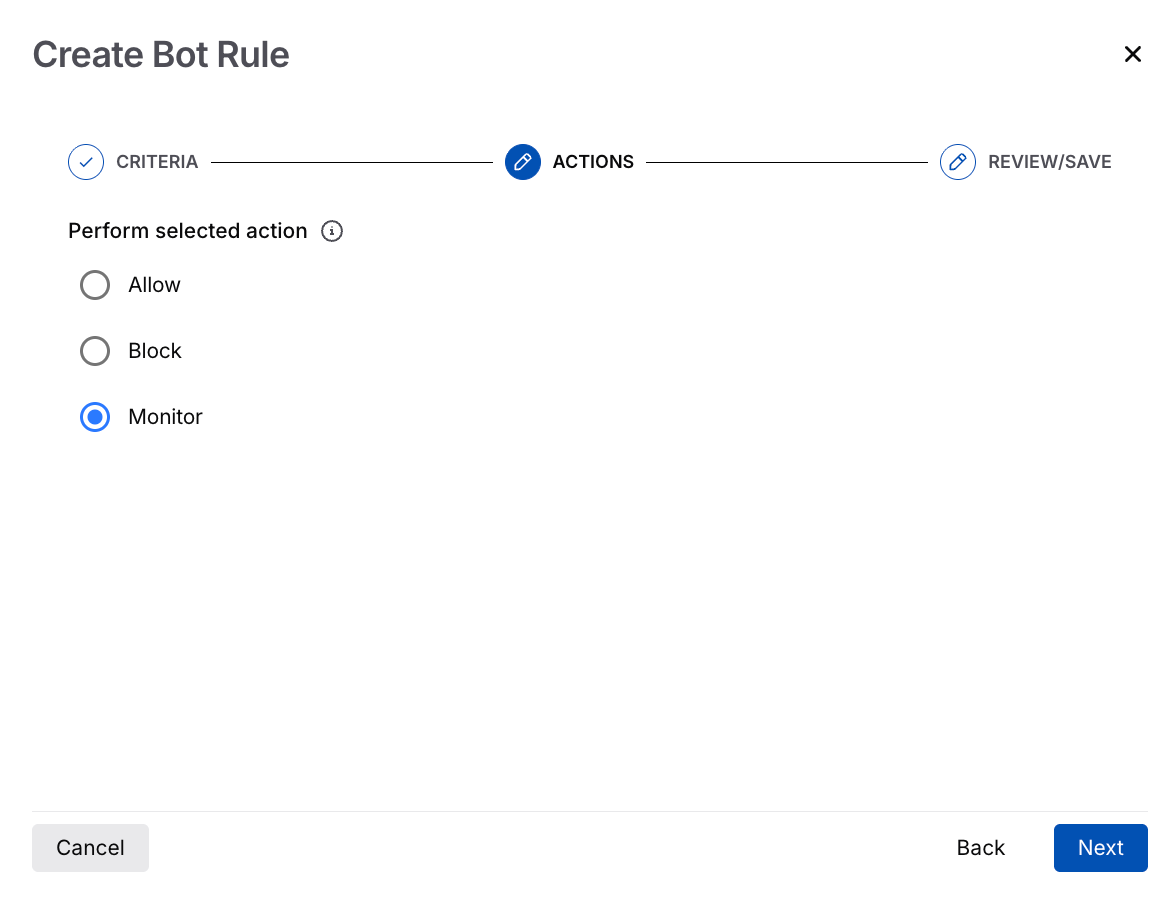
Configuring Action for the Pre-Categorized Bot Rule
Allow — Allows traffic from bots matching the criteria. This is useful when the bot attacks are internal, such as for testing.
Block — Blocks traffic from bots matching the criteria. This is useful when the bot attacks are unknown and are relevant to your application’s security.
Monitor — Monitors the bot activity without blocking it. This is useful when you wish to assess whether the attacks are legitimate.
Once you have selected the necessary action, click Next.
Step 3 — Review and save
After validating the configurations, click Submit to create and activate the rule.
For information on the rule's view and operation, see the section below.
Understand the pre-categorized bots’ view
Once you create the rules, Traceable displays them under the Pre Categorized Bots tab. This tab highlights the following metrics:
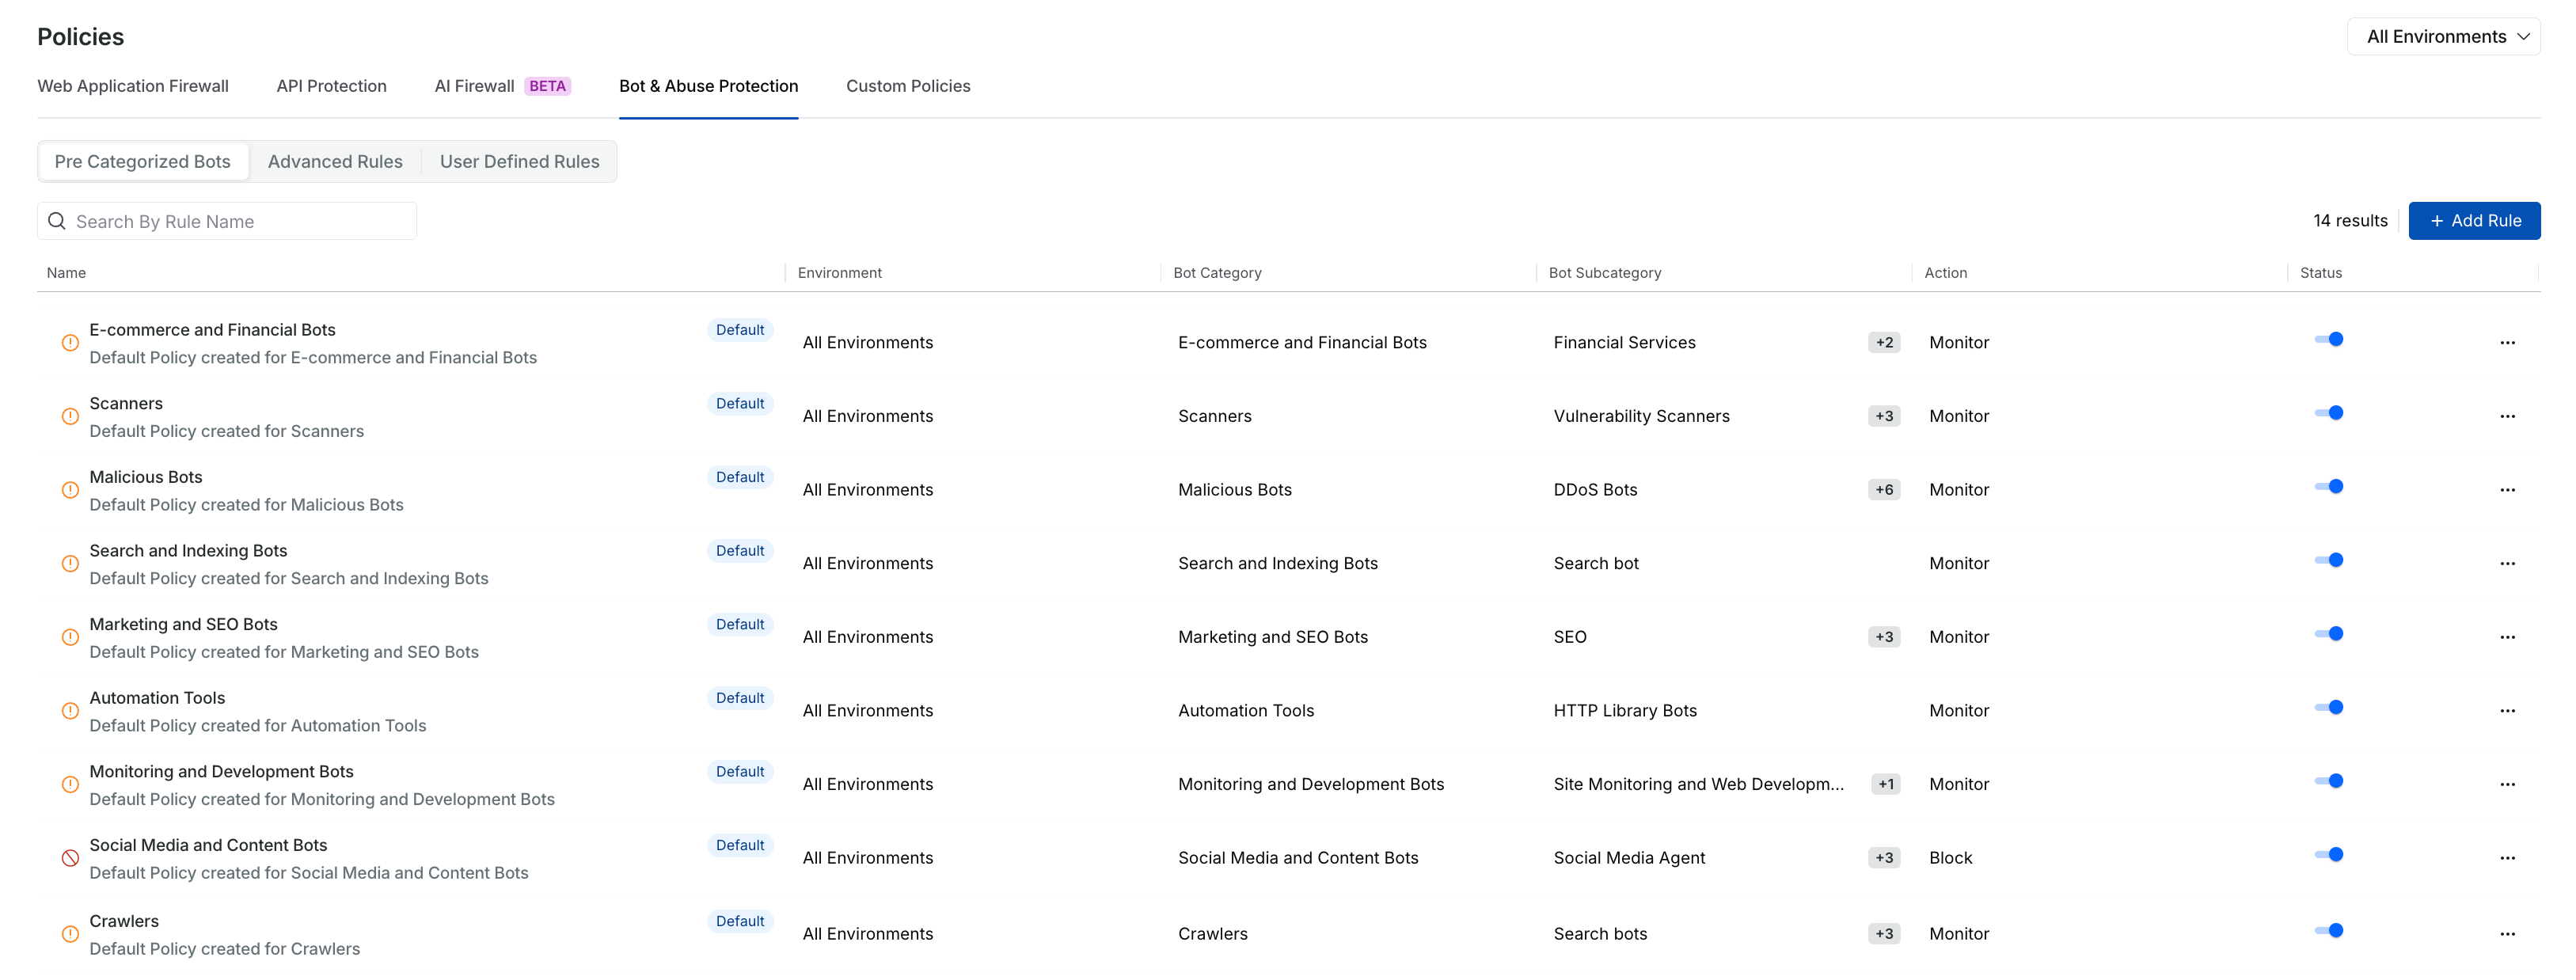
Pre-Categorized Bot Policies Page View
Name — Indicates the name of the defined rule.
Environment — Indicates the environment to which this rule applies.
Bot Category — Indicates the bot category selected during rule configuration.
Bot Subcategory — Indicates the bot subcategory selected during rule configuration.
Action — Indicates the action taken for this rule, for example, monitor or block.
Status — Indicates if the rule is enabled or disabled. You can enable or disable the rule using the toggle (
.png) ).
).
Additionally, you can use the Ellipse (![]() ) icon to View, Edit, or Delete a rule according to your requirements.
) icon to View, Edit, or Delete a rule according to your requirements.
Working of pre-categorized bot rules
Traceable creates default pre-categorized bot rules in Monitor mode, so no enforcement is applied until you enable the rule. You can change the action to Monitor, Block, or Allow, and adjust the Environments and Target endpoints according to your requirements. Rules that you create are enabled by default and enforce the action you specified.
Once a rule is enabled, the configured action applies to traffic that matches its configuration. If the action is set to Block, enforcement may take a few minutes to propagate across backend systems before becoming effective.
You can enable or disable enforcement at any time using the rule toggle (![]() ).
).
Unlike pre-categorized bot rules, user-defined rules enable you to define custom bot detection logic by specifying conditions, traffic attributes, scope, and enforcement actions based on your application’s behavior and security requirements.
Create a user-defined rule
Creating a user-defined rule consists of the following steps:
Define the intent — Specify the rule name and select the action you wish to take for the rule, for example, Block or Monitor.
Define the criteria — Select the environment, select the rule type, and configure the bot-detection logic.
Review and save — Validate the configured settings and submit the rule for activation.
To create a user-defined rule in Traceable, navigate to Settings → Policies → Bot and Abuse Protection → User Defined Rules tab, and click + Add Rule. In the Create Bot Rule slide-out window, complete the following steps:
Step 1 — Define the intent
To define the intent for the rule, complete the following steps:
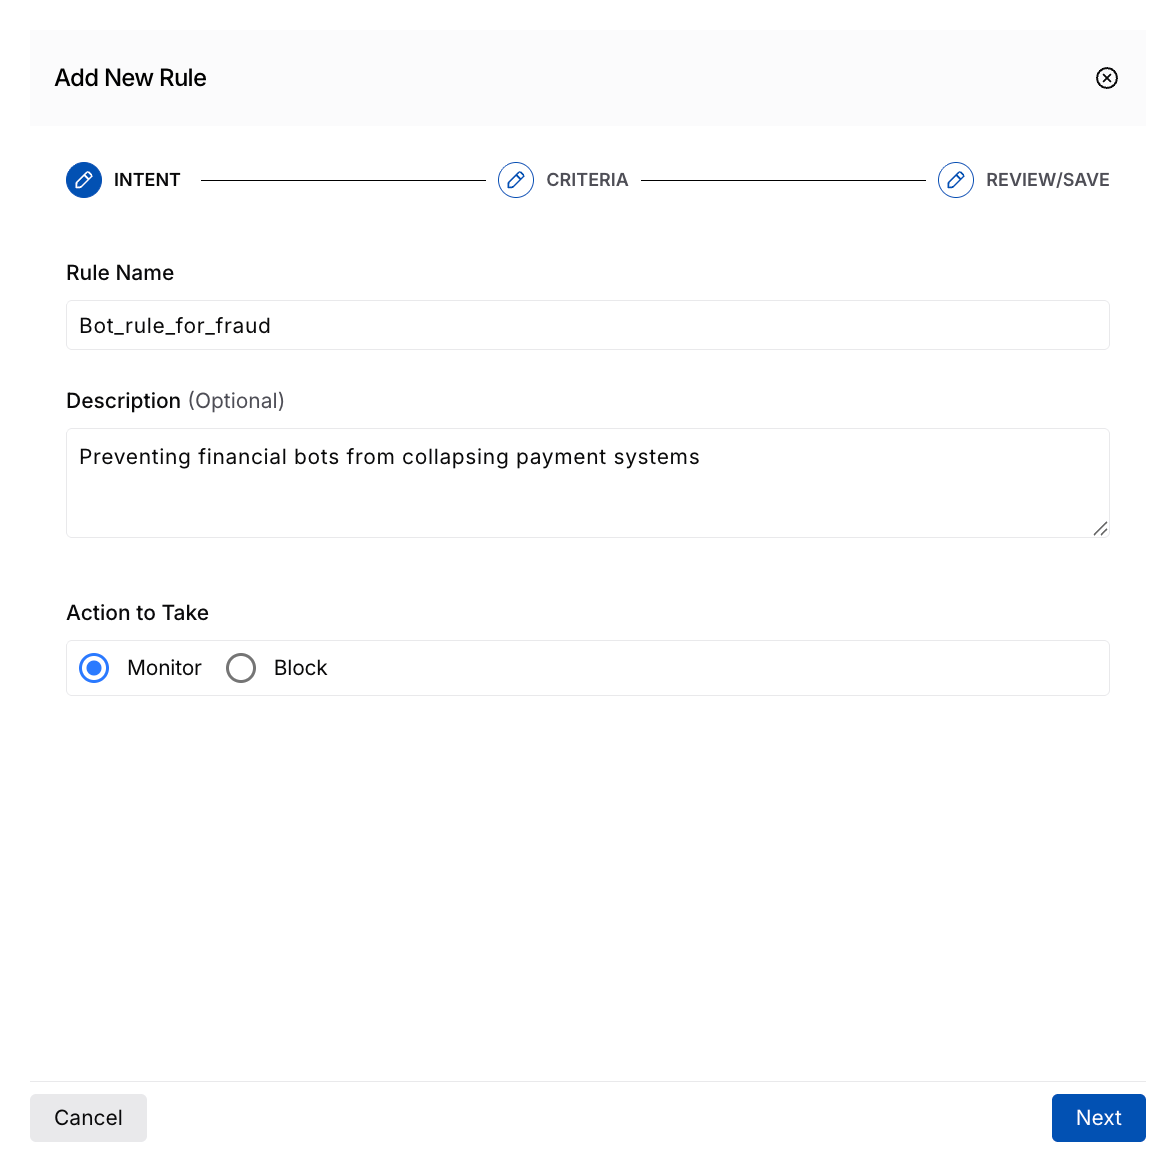
Configuring Intent for the User-Defined Rule
Rule Name — The name for the rule, for example, Bot_rule_for_fraud.
(Optional) Description — The purpose of the rule, for example, Preventing financial bots from collapsing payment systems.
Action to Take — The action that Traceable should take on the relevant bot attacks:
Monitor — Monitors the bot activity without blocking it. This is useful when you wish to assess whether the attacks are legitimate.
Block — Blocks traffic from bots matching the criteria. This is useful when the bot attacks are unknown and are relevant to your application’s security.
Once you have completed the above steps, click Next.
Step 2 — Define the criteria
To define the criteria for the rule, complete the following steps:
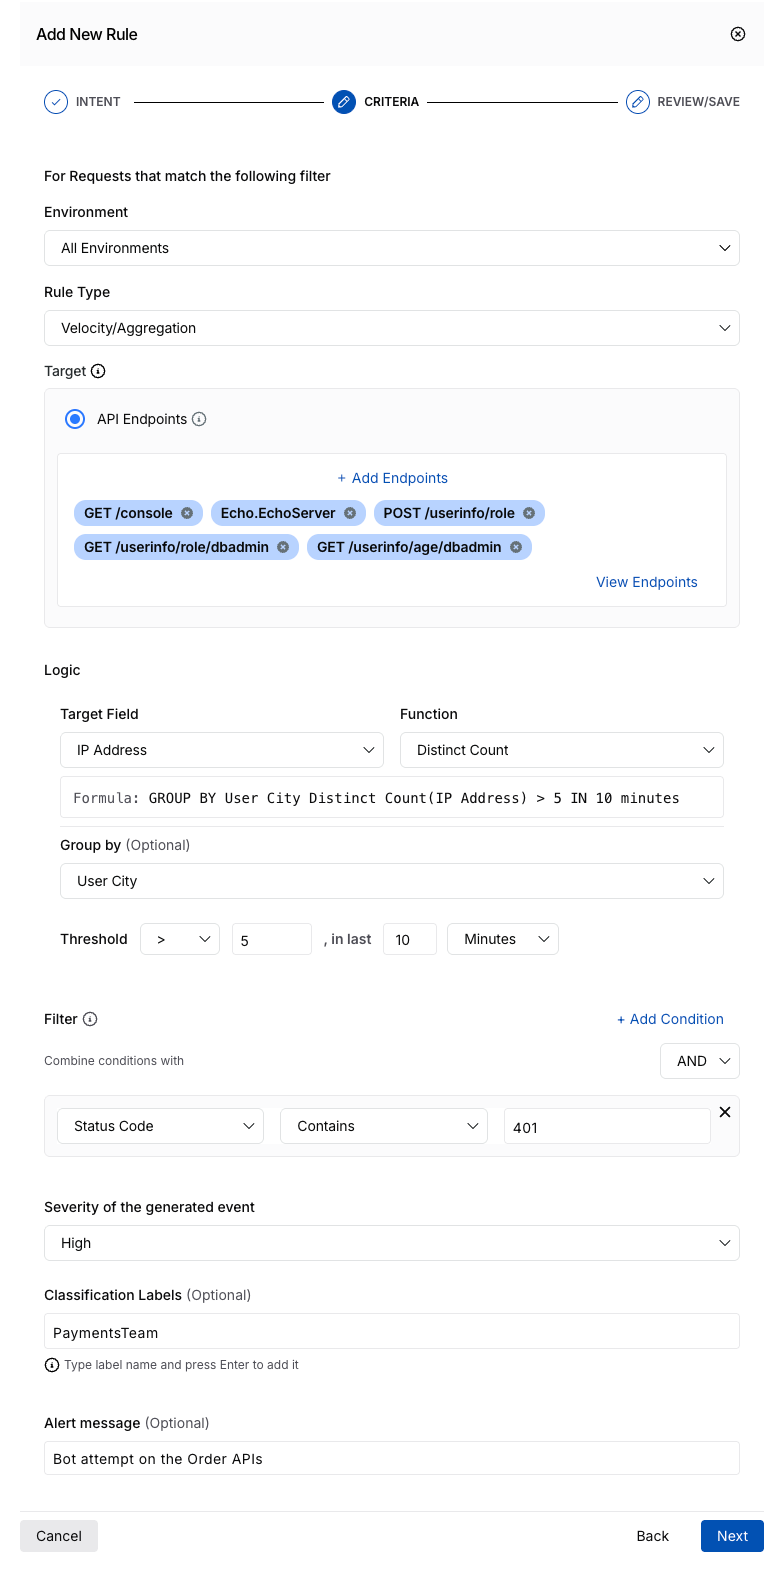
Configuring Criteria for the User-Defined Rule
Environment — The environment(s) where this rule should apply, for example, sandbox.
Rule Type — The bot protection rule category under which you wish to create the rule, for example, Velocity/Aggregation. This determines which fields are available for further rule configuration.
Note
Traceable only supports Velocity/Aggregation as the Rule Type currently.
Target — The specific endpoints from your application that you wish to protect. Click + Add Endpoints to view the Select API Endpoint pop-up window, where you can select the endpoints. Once you have selected the relevant endpoints, click Add.
Logic — The logic based on which Traceable should evaluate bot traffic and take the action you selected in Step 1 above:
Target Field — The attribute in the API endpoint that you wish to use for evaluating it as a threat, for example, IP Address. You can also derive your own custom target fields. For more information, see Custom Entities for Bot Protection.
Function — The function based on which you wish to evaluate the target field, for example, Distinct Count.
(Optional) Group by — The attribute based on which you wish to group the data to evaluate the above fields, for example, User City.
Threshold — The limits based on which Traceable should trigger the rule:
Operator — The operator based on which Traceable should evaluate the logic, for example, > (Greater than).
Value — The value corresponding to the above operator, for example, 5.
Time — The time value based on which Traceable should evaluate the logic, for example, 10.
Time Unit — The time unit corresponding to the above value, for example, Minutes.
Based on the above configurations, Traceable displays a formula below the Target Field configuration. For example, based on the above samples, Traceable displays
GROUP BY User City Distinct Count(IP Address) > 5 IN 10 Minutes. This means that Traceable takes the selected action if it observes more than five different IP addresses from the same city within 10 minutes.Filter — The conditions based on which you wish to refine the data that Traceable retrieves from the endpoints:
Attribute — The attribute based on which you wish to drill down into the request, for example, Status Code.
Operator — The operator to compare the above attribute and its corresponding value, for example, Contains.
Value — The value corresponding to the above attribute that you wish to compare, for example, 401.
You can also click + Add Condition to add one or more filters according to your requirements. Traceable performs an AND operation between the conditions; however, you can use the drop-down above the Value field to select between the AND and OR operations.
Based on the above configurations, Traceable narrows down the traffic and executes the logic on traffic that matches the conditions. For more information, refer to the sample bot scenarios table below.
Severity of the generated event — The severity level you wish to assign to the event generated using the rule, for example, High.
(Optional) Classification Labels — The label you wish to assign to the rule, for identification, for example, PaymentsTeam.
(Optional) Alert message — The message you wish to display when Traceable triggers the rule, for example, Bot attempt on the Order APIs.
Once you have completed the above steps, click Next.
Step 3 — Review and save
After validating the configurations, click Submit to create and activate the rule.
For information on the rule's view and operation, see the section below.
Sample bot scenarios
The following table shows how entity fields, aggregation functions, grouping logic, filters, and thresholds work together to detect common bot abuse and account fraud patterns across API traffic:
Use Case Description | Sample Scenario | Target Field | Function | Group By (Optional) | Filter Condition |
|---|---|---|---|---|---|
Credential Stuffing — Bots cycling stolen email or password pairs at scale to hijack accounts. | One IP tries 200 different emails in 4 minutes, all returning 401. IP blocked, security team alerted. | Email ID | Distinct Count | IP Address | Status Code = 402 |
Account Takeover — The bot fixates on one account, hammering it with password variations until it gets in. | The same User ID receives 15 failed attempts from one IP in 2 minutes. Account locked, user notified. | User ID | Count | IP Address | Status Code = 401 OR 403 |
Card Testing — The fraudster spawns multiple sessions to validate stolen card numbers before large purchases. | One IP opens 8 sessions in 3 minutes, each trying a different stolen card. Sessions terminated, IP flagged. | Session Identifier | Distinct Count | IP Address | Status Code IN 440, 402 |
Password Reset Abuse — A bot floods the reset endpoint with valid email addresses to lock users out or harvest reset tokens. | A single IP triggers 50 reset emails in 3 minutes across real accounts. IP blocked, resets suspended. | Email ID | Count | IP Address | Endpoint = /reset-password OR |
Policy configuration best practices
The following are some of the best practices for configuring the policies:
Threshold Tuning — Defines sensitivity for triggering policy enforcement based on request volume and behavior. Starts with conservative limits to minimize noise and is refined using observed traffic baselines. Separate thresholds for authenticated and anonymous users account for differences in trust level and expected usage patterns.
Time Window Selection — Defines the time range used to evaluate request behavior for anomalies. Short windows (1–5 minutes) detect burst attacks, medium windows (10–30 minutes) capture low-and-slow abuse, and long windows (1–24 hours) identify sustained or distributed attack patterns.
Grouping Strategy — Defines how requests are aggregated for behavioral correlation. IP address grouping detects single-source spikes, user agent grouping identifies automation patterns, device fingerprinting tracks clients across IP changes, email or username grouping detects account-based abuse, and session ID grouping isolates anomalies within a single session.
Understand the user-defined rules’ view
Once you create the rules, Traceable displays them under the User-Defined Rules tab. This tab highlights the following metrics:
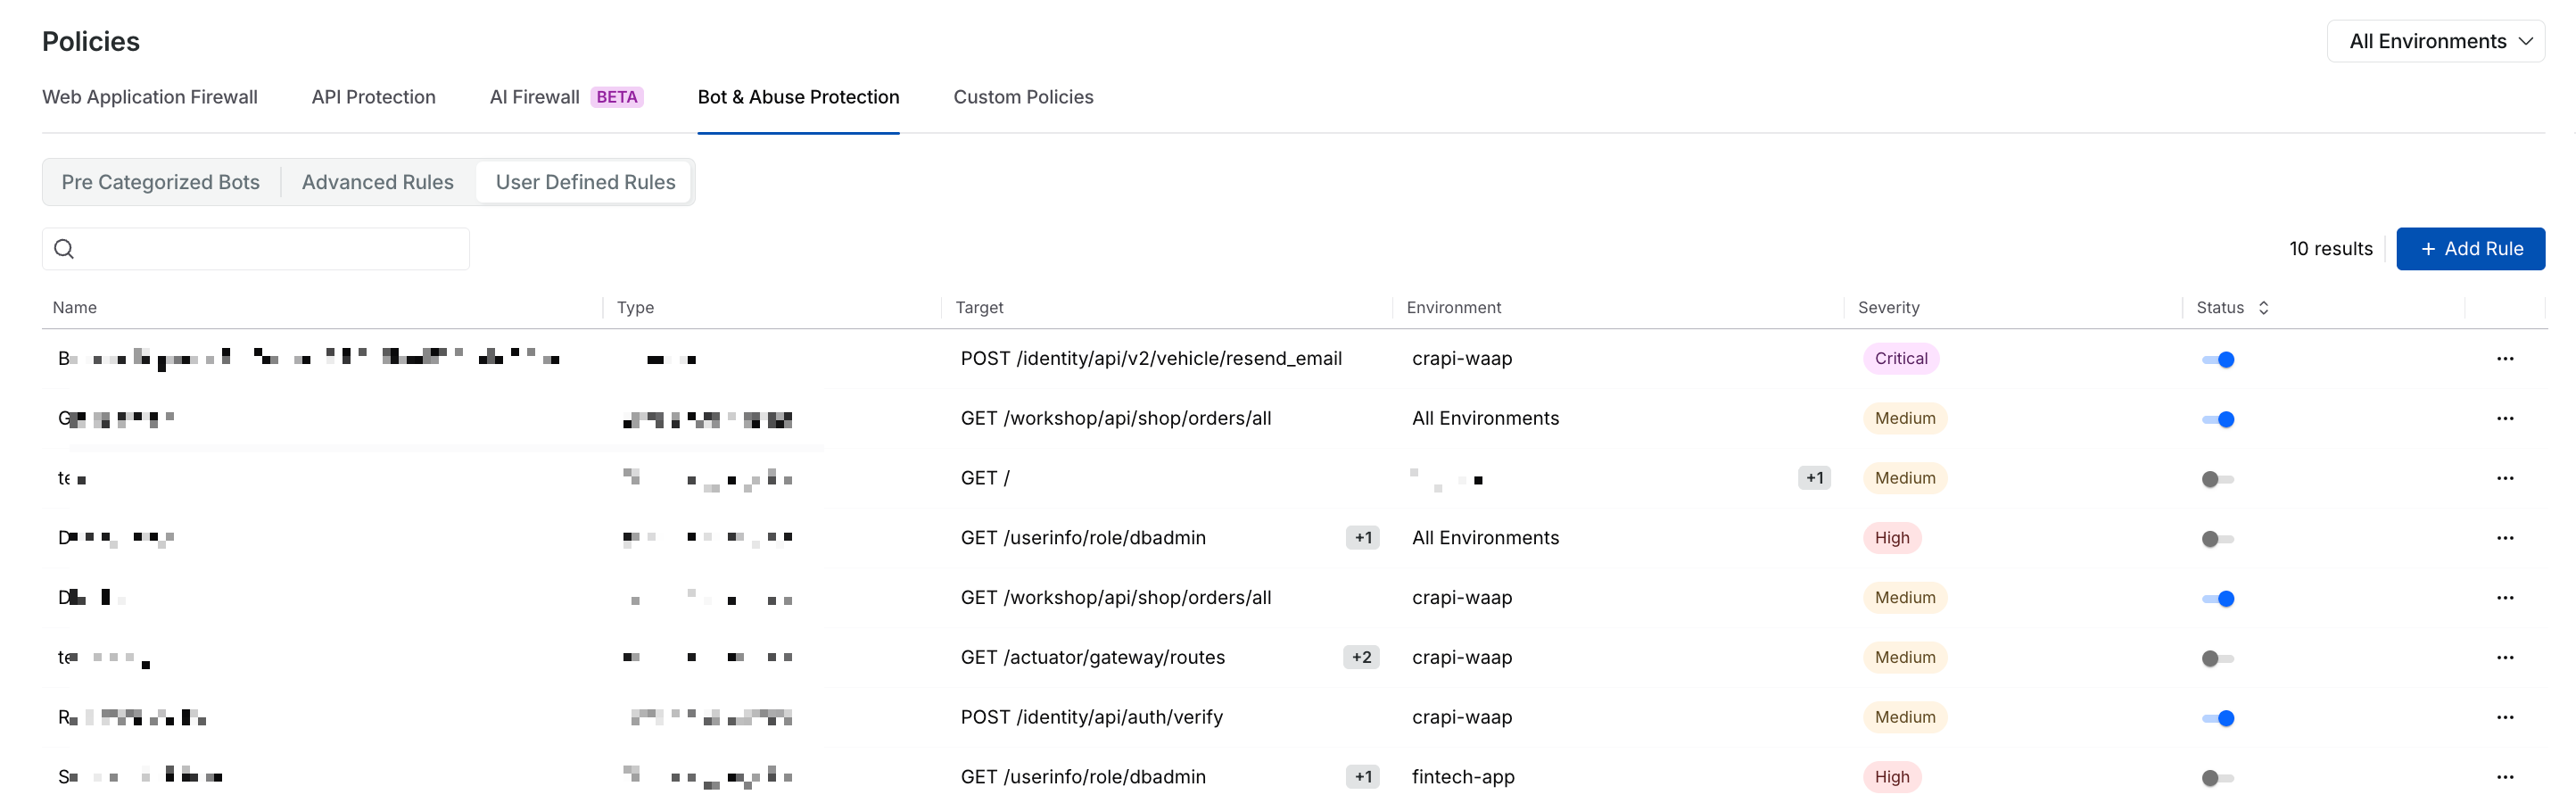
User-Defined Rules View
Name — Indicates the name of the defined rule.
Type — Indicates the rule type selected during configuration.
Target — Indicates the endpoints to which the rule applies.
Environment — Indicates the environment to which the rule applies.
Severity — The severity assigned to the threat that triggers the rule.
Status — Indicates if the rule is enabled or disabled. You can enable or disable the rule using the toggle (
).
Additionally, you can use the Ellipse (![]() ) icon to View, Edit, or Delete a rule according to your requirements.
) icon to View, Edit, or Delete a rule according to your requirements.
Advanced Rules allow you to implement protection for bot traffic scenarios that require targeted detection, which is not available in the Pre-Categorized and User-Defined rules. These rules can be designed around specific use cases, such as protecting sensitive workflows, handling automation unique to your application, or addressing patterns requiring custom logic.
Unlike pre-categorized and user-defined rules, you identify the automation pattern or traffic behavior that needs protection and share the expected criteria with your Account Manager or Traceable Support. Based on the input, Traceable configures the rule logic aligned with your environment, endpoints, and enforcement scope.
Understand the advanced rules’ view
Once Traceable creates the rules, they are displayed under the Advanced Rules tab. This tab highlights the following metrics:
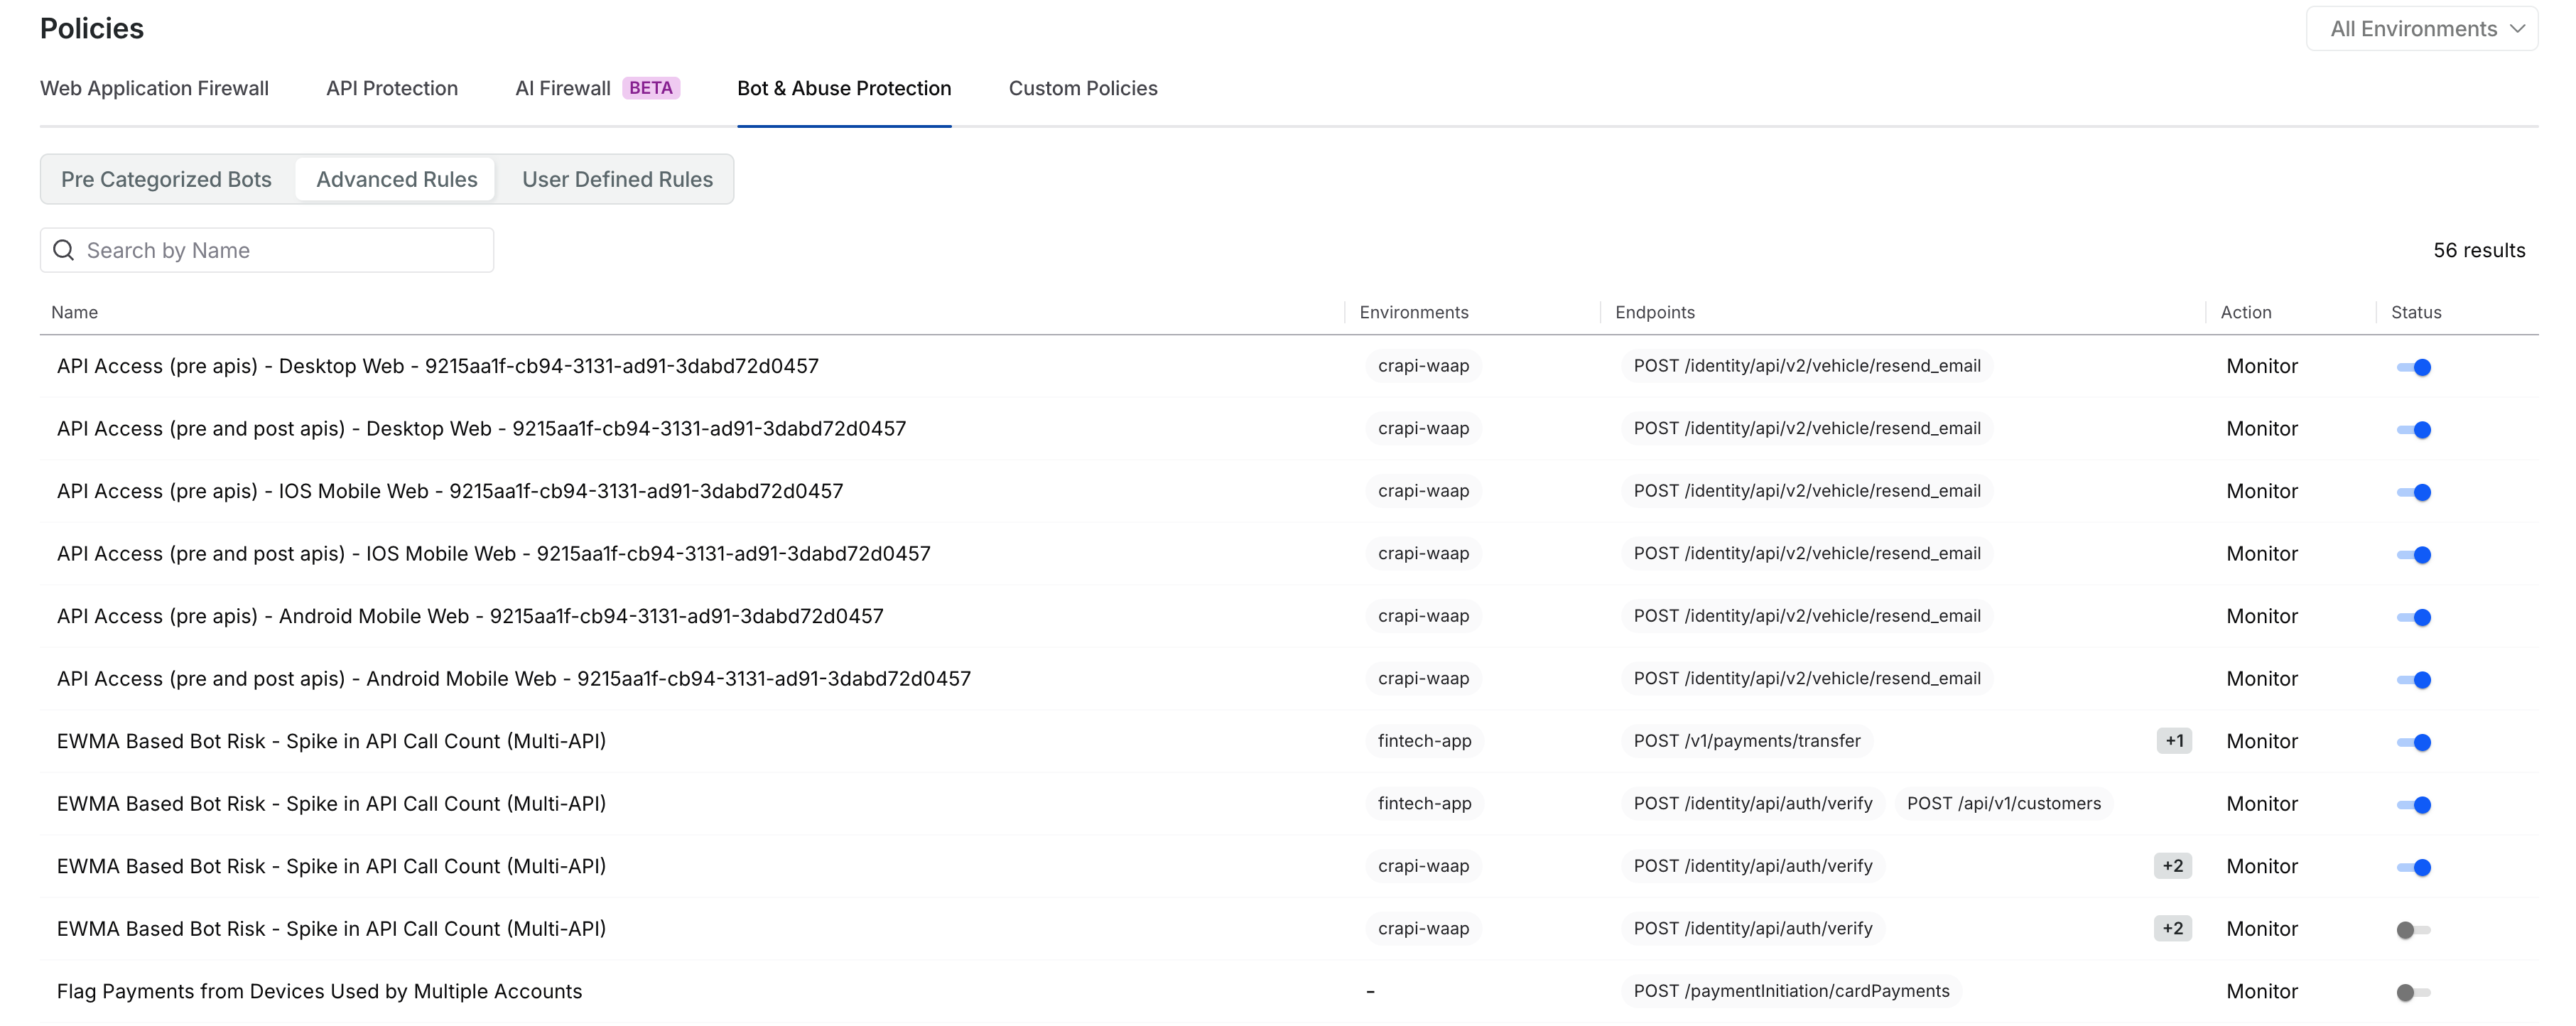
Advanced Rules Page View
Name — Indicates the name of the defined rule.
Environment — Indicates the environment for which this rule applies.
Endpoints — Indicates the endpoints to which the rules apply.
Action — Indicates the action taken for this rule, for example, Monitor or Block.
Status — Indicates if the rule is enabled or disabled. You can choose to enable or disable the rule using the toggle (
).
Monitor bot activity post rule creation
Bot and abuse protection rules in Traceable are closely integrated with the bot activities and bot events, enabling you to monitor, investigate, and remediate malicious automated traffic.
The Bot Activities page provides a behavioral summary of bot traffic, enabling you to identify patterns, trends, and anomalies in how automated attackers interact with your APIs over time. It provides you with visibility into the overall bot landscape and its impact on your application. For more information, see Bot Activities.
On the other hand, the Bot Events page provides detailed request-level insights into every detected threat and interaction. Each row includes details about the triggered rule, the bot category and subcategory, and the action taken on the threat, such as block. For more information, see Bot Events.