API Security Testing (AST) leverages multiple components working together. It enables seamless interaction between these components, ensuring robust and effective security testing and monitoring.
The following illustration highlights the main components of AST and how they work together to test your application:
.png)
Components and Working of AST
Scans
Scans are AST’s main component, meaning all other components lie within it. A scan is an execution profile that applies a selected policy’s plugins to the selected application or API endpoints, either on-demand or scheduled, to identify issues (vulnerabilities). They are environment-specific and include various test cases within the plugins attached to a policy. These test cases enable you to comprehensively test according to your use case.
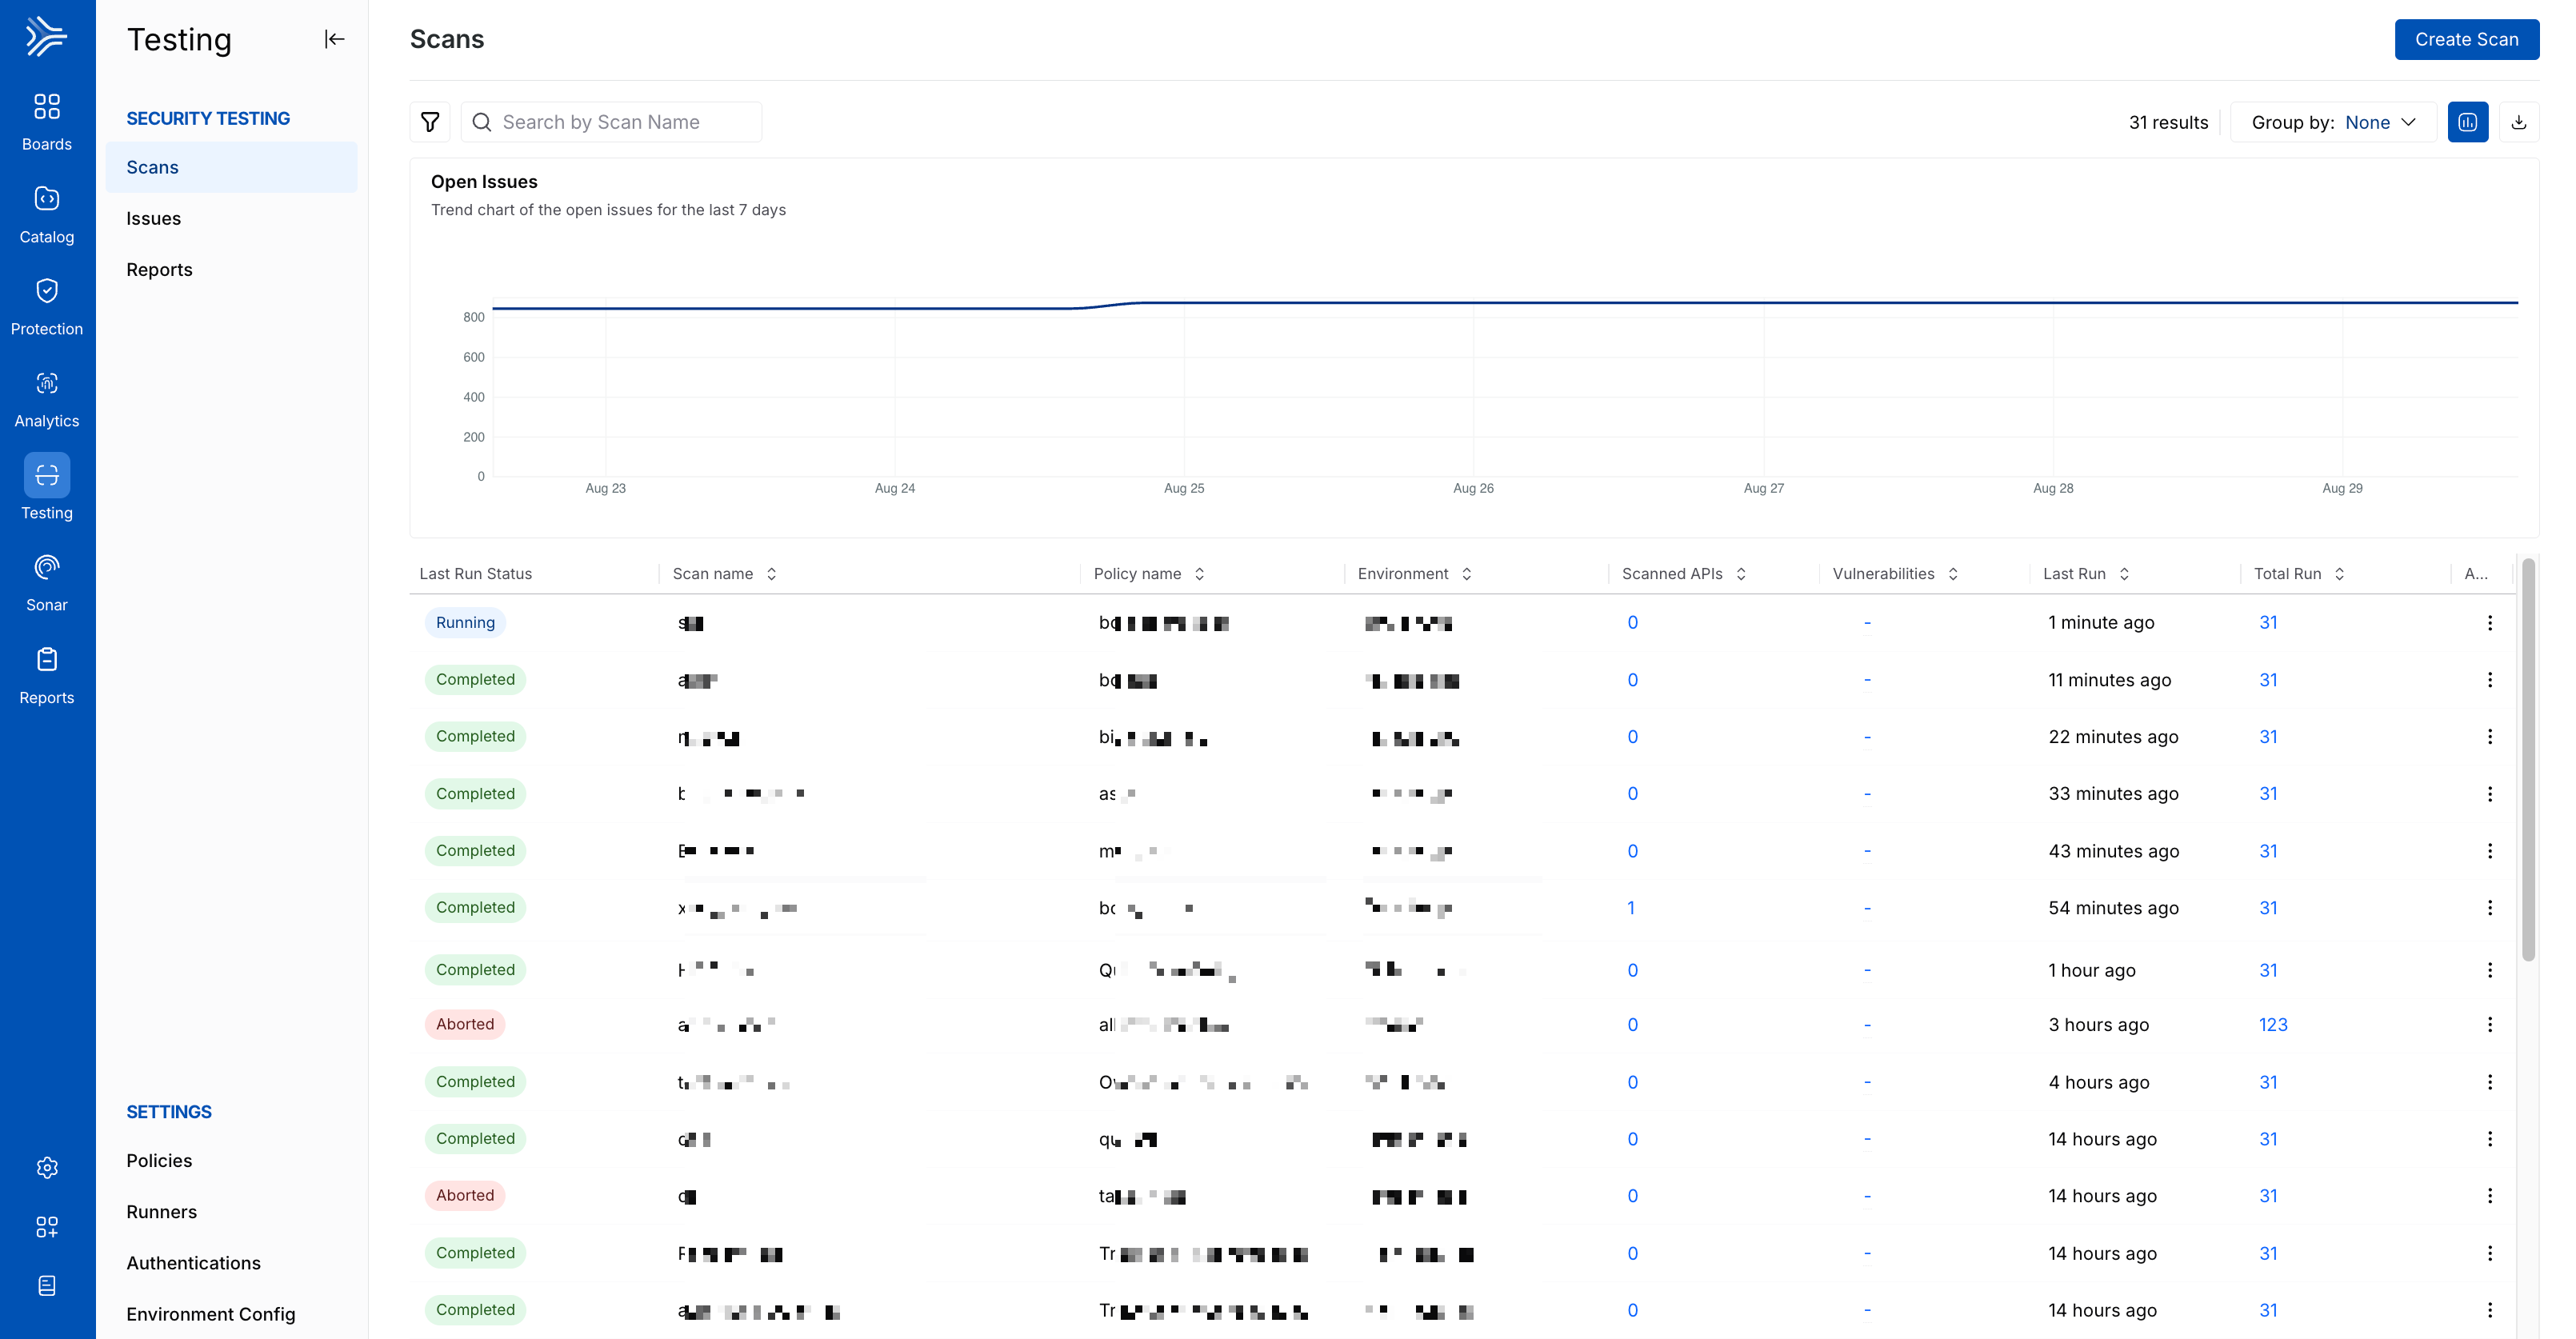
AST Scans
While creating a scan, you must do the following:
Specify the scan name, select the environment, and select the scan frequency.
Specify the scan source details, such as the traffic type and the endpoints you wish to scan.
Select or create a policy based on which Traceable should execute attacks on the above endpoints.
Configure the scan evaluation criteria and select runners for scan execution.
Configure the Snyk integration.
For more information on scans and the steps to create one, see Understanding Scans and Traffic Types and Creating a Scan, respectively.
Traffic Types
The following traffic types are available in Traceable:
XAST live
DAST — OpenAPI spec, WSDL spec, Postman collection, and GraphQL schema.
XAST replay
DAST Web
For more information on these traffic types, see Understanding Scans and Traffic Types.
Policies
Policies are a collection of test (attack) plugins and enforcement configurations on the type of requests to send to your application, based on which Traceable detects vulnerabilities. Multiple scans can share a policy. Traceable provides pre-defined policies created to detect the most common vulnerabilities. For example, the SafeScanPolicy provided by Traceable restricts the plugins from doing only non-state-changing operations on the HTTP GET method.
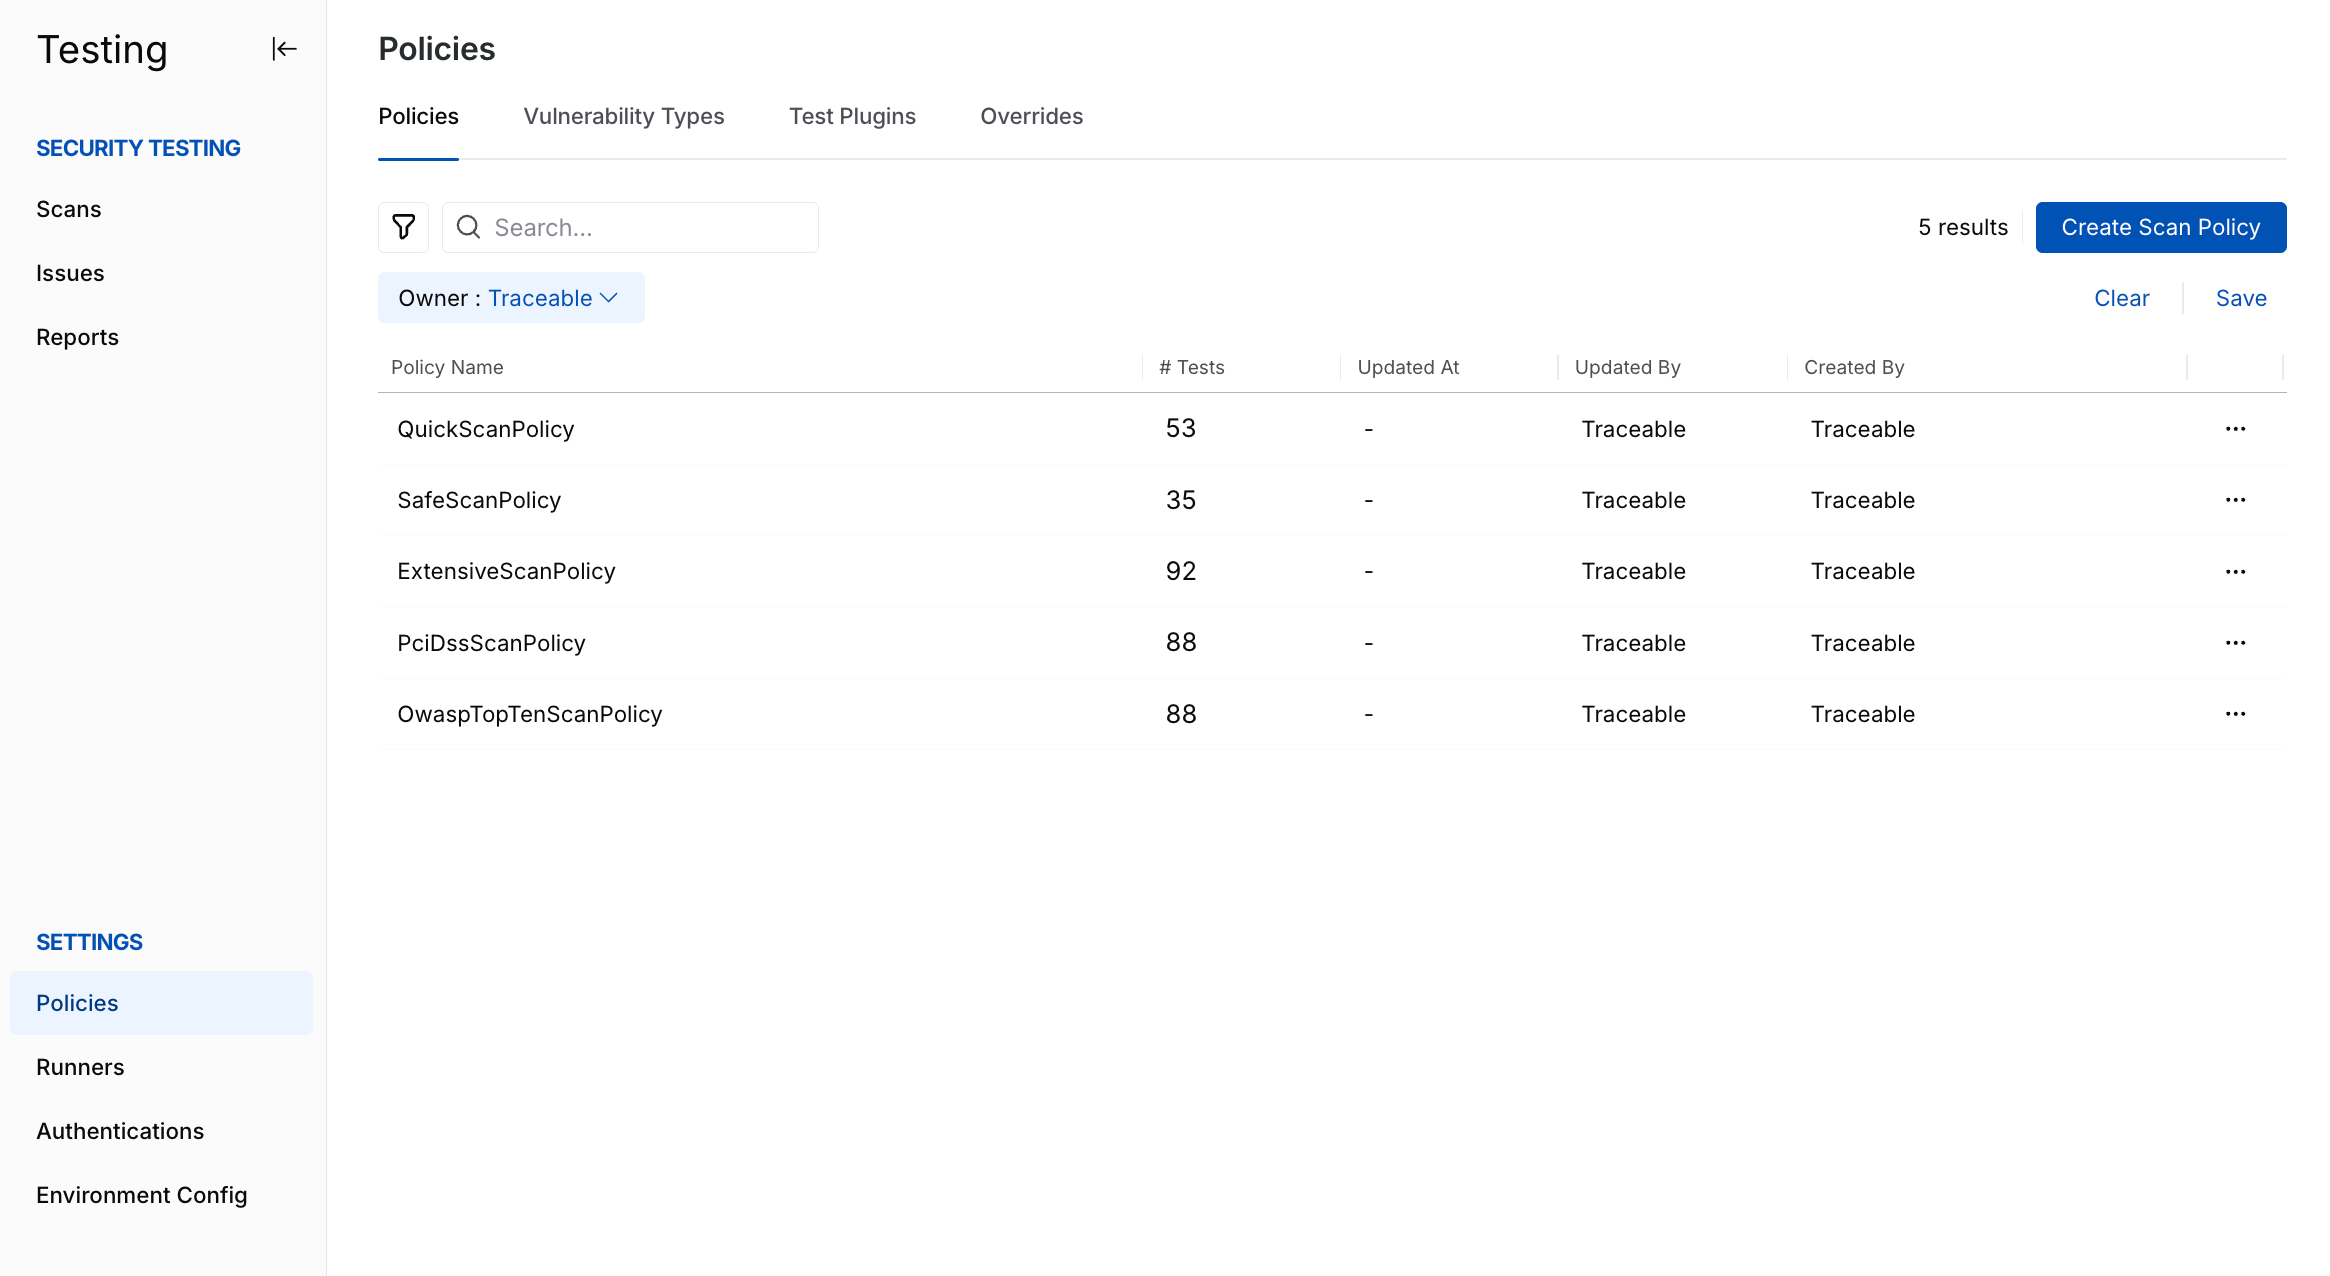
AST Policies
Apart from the pre-defined policies, you can also create custom policies according to your requirements. You can create these policies in either of the following ways:
From the Policies page
While creating a scan
While creating a policy, you must select the attacks you want to execute as part of the scan, along with some advanced configurations. Attacks are nothing but vulnerability types provided by Traceable out of the box or the ones you create.
Vulnerability Types
Vulnerability Types are the security weaknesses that Traceable can detect while running the security tests on your application.
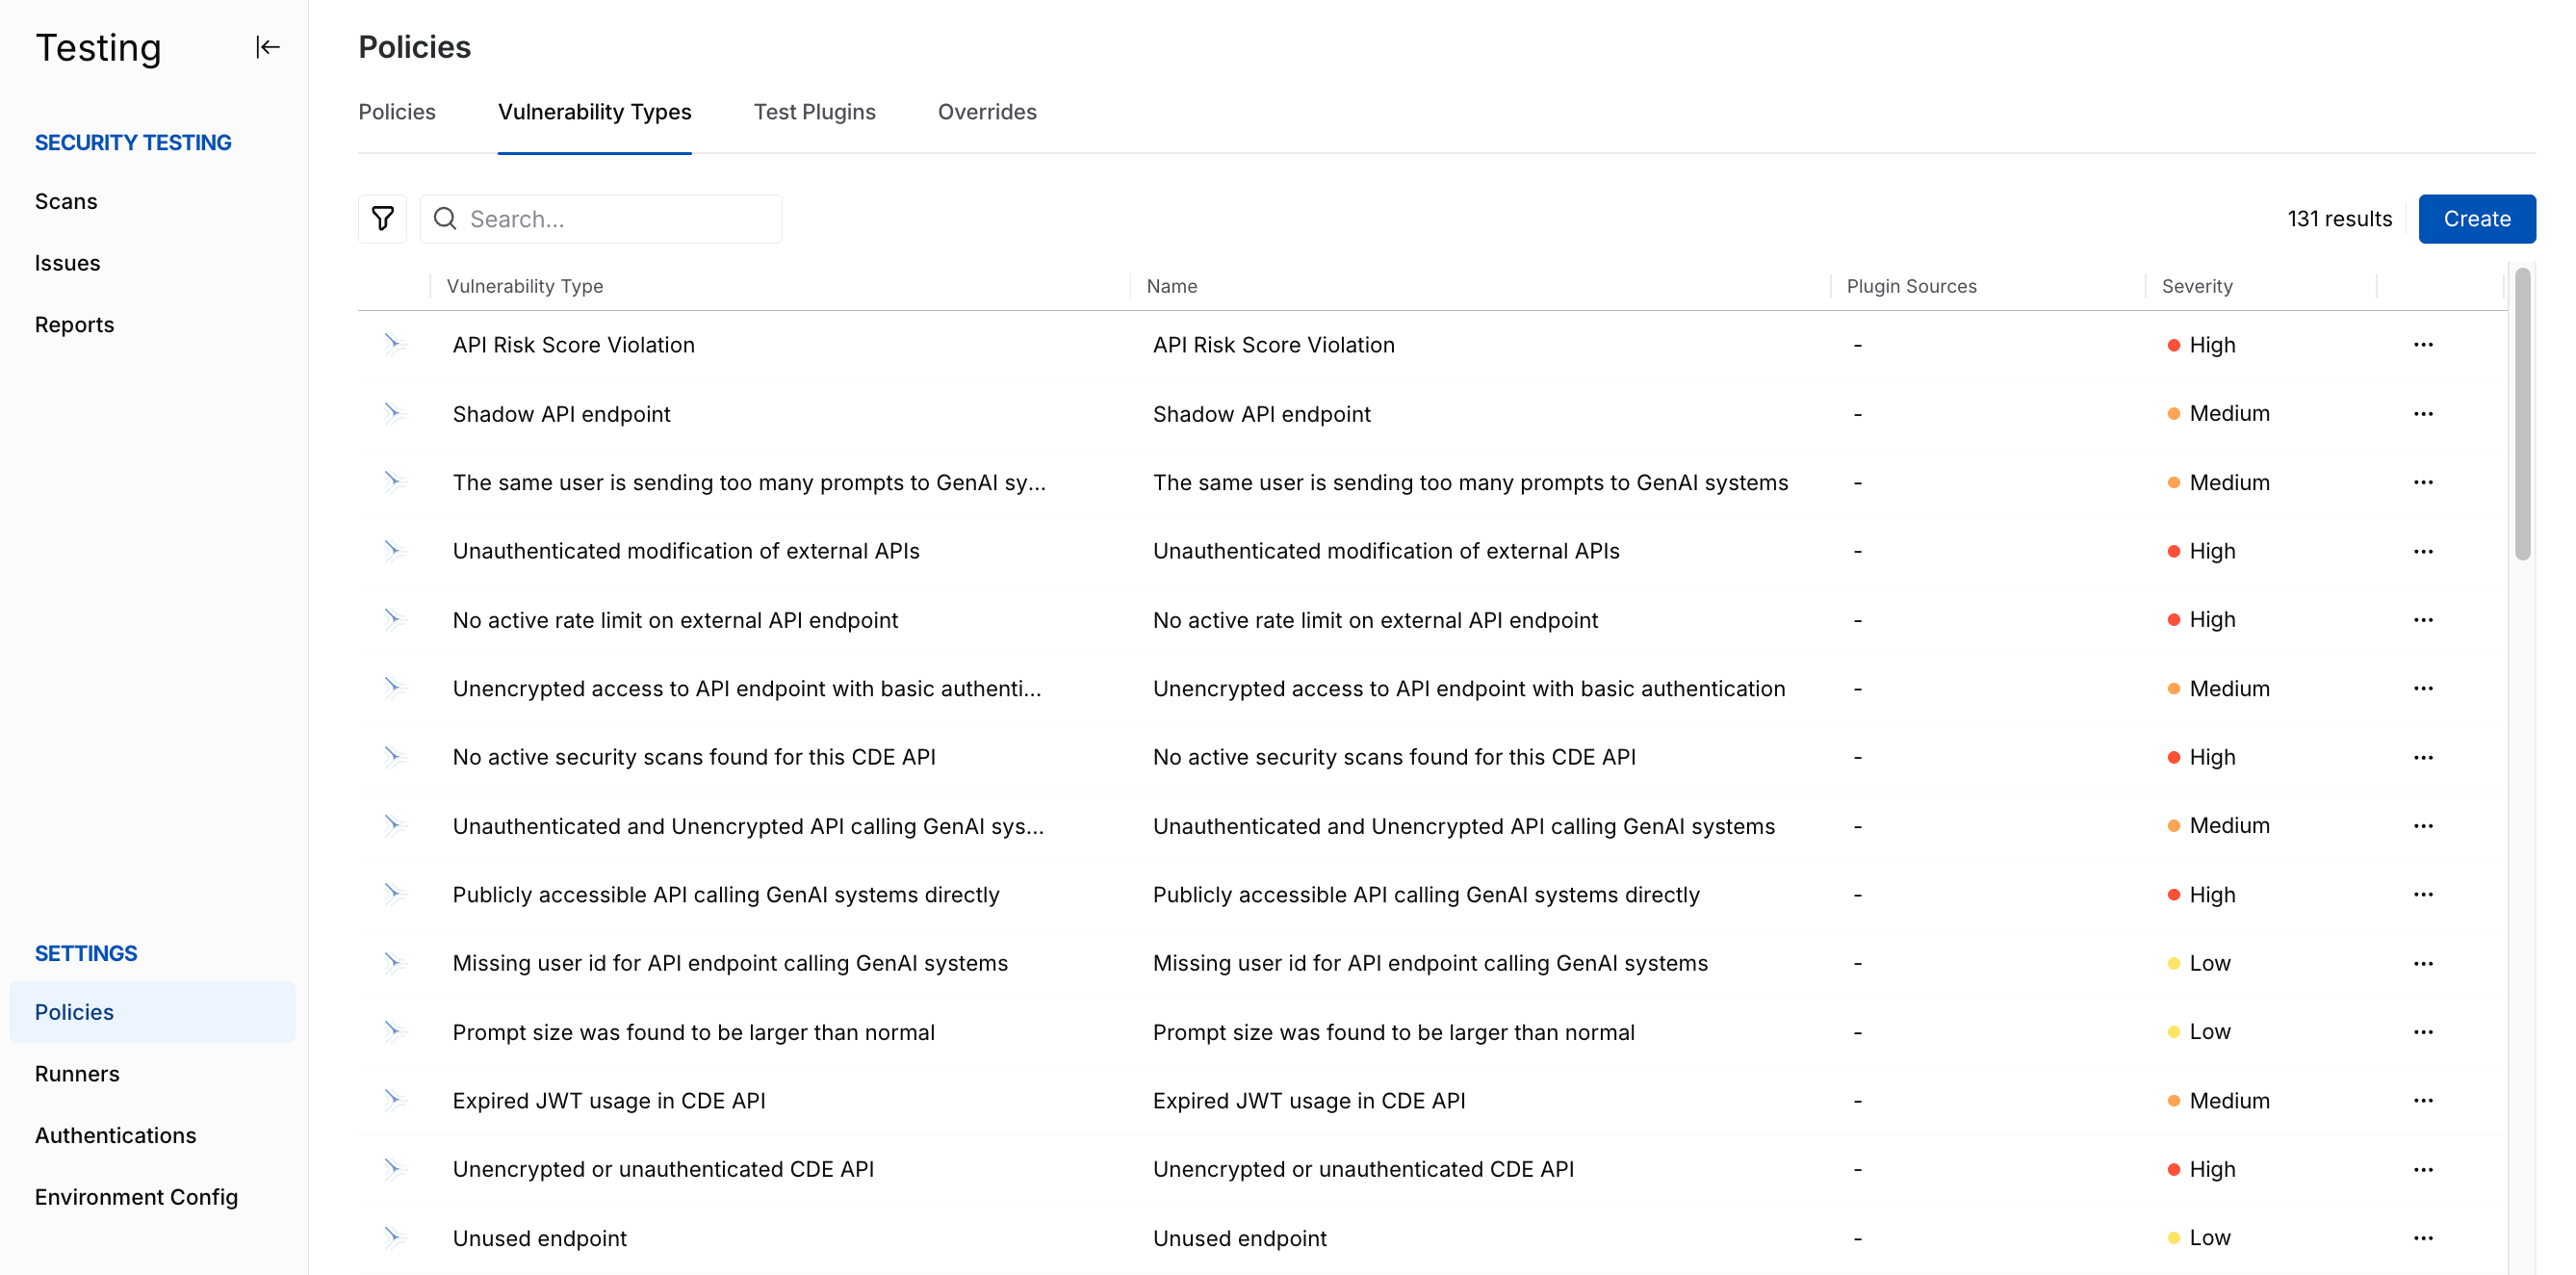
AST Vulnerability Types
Traceable provides some pre-defined vulnerability types that are most commonly found in applications. However, you can also create custom vulnerability types according to your requirements. While the pre-defined vulnerability types are used in the plugins provided by Traceable out of the box, the custom vulnerability types are used in custom plugins. While creating a vulnerability type, you must define the logic for the vulnerability, such as the CVSS score, string, severity, and other attributes. For more information, see Vulnerability Types.
Test Plugins
A plugin is a component that enhances your application's security assessment. While Traceable provides some plugins by default, you can create custom plugins. These custom test plugins extend the security testing of your application with specific checks or techniques, enabling you to tailor testing according to your requirements and improve the security of your application.
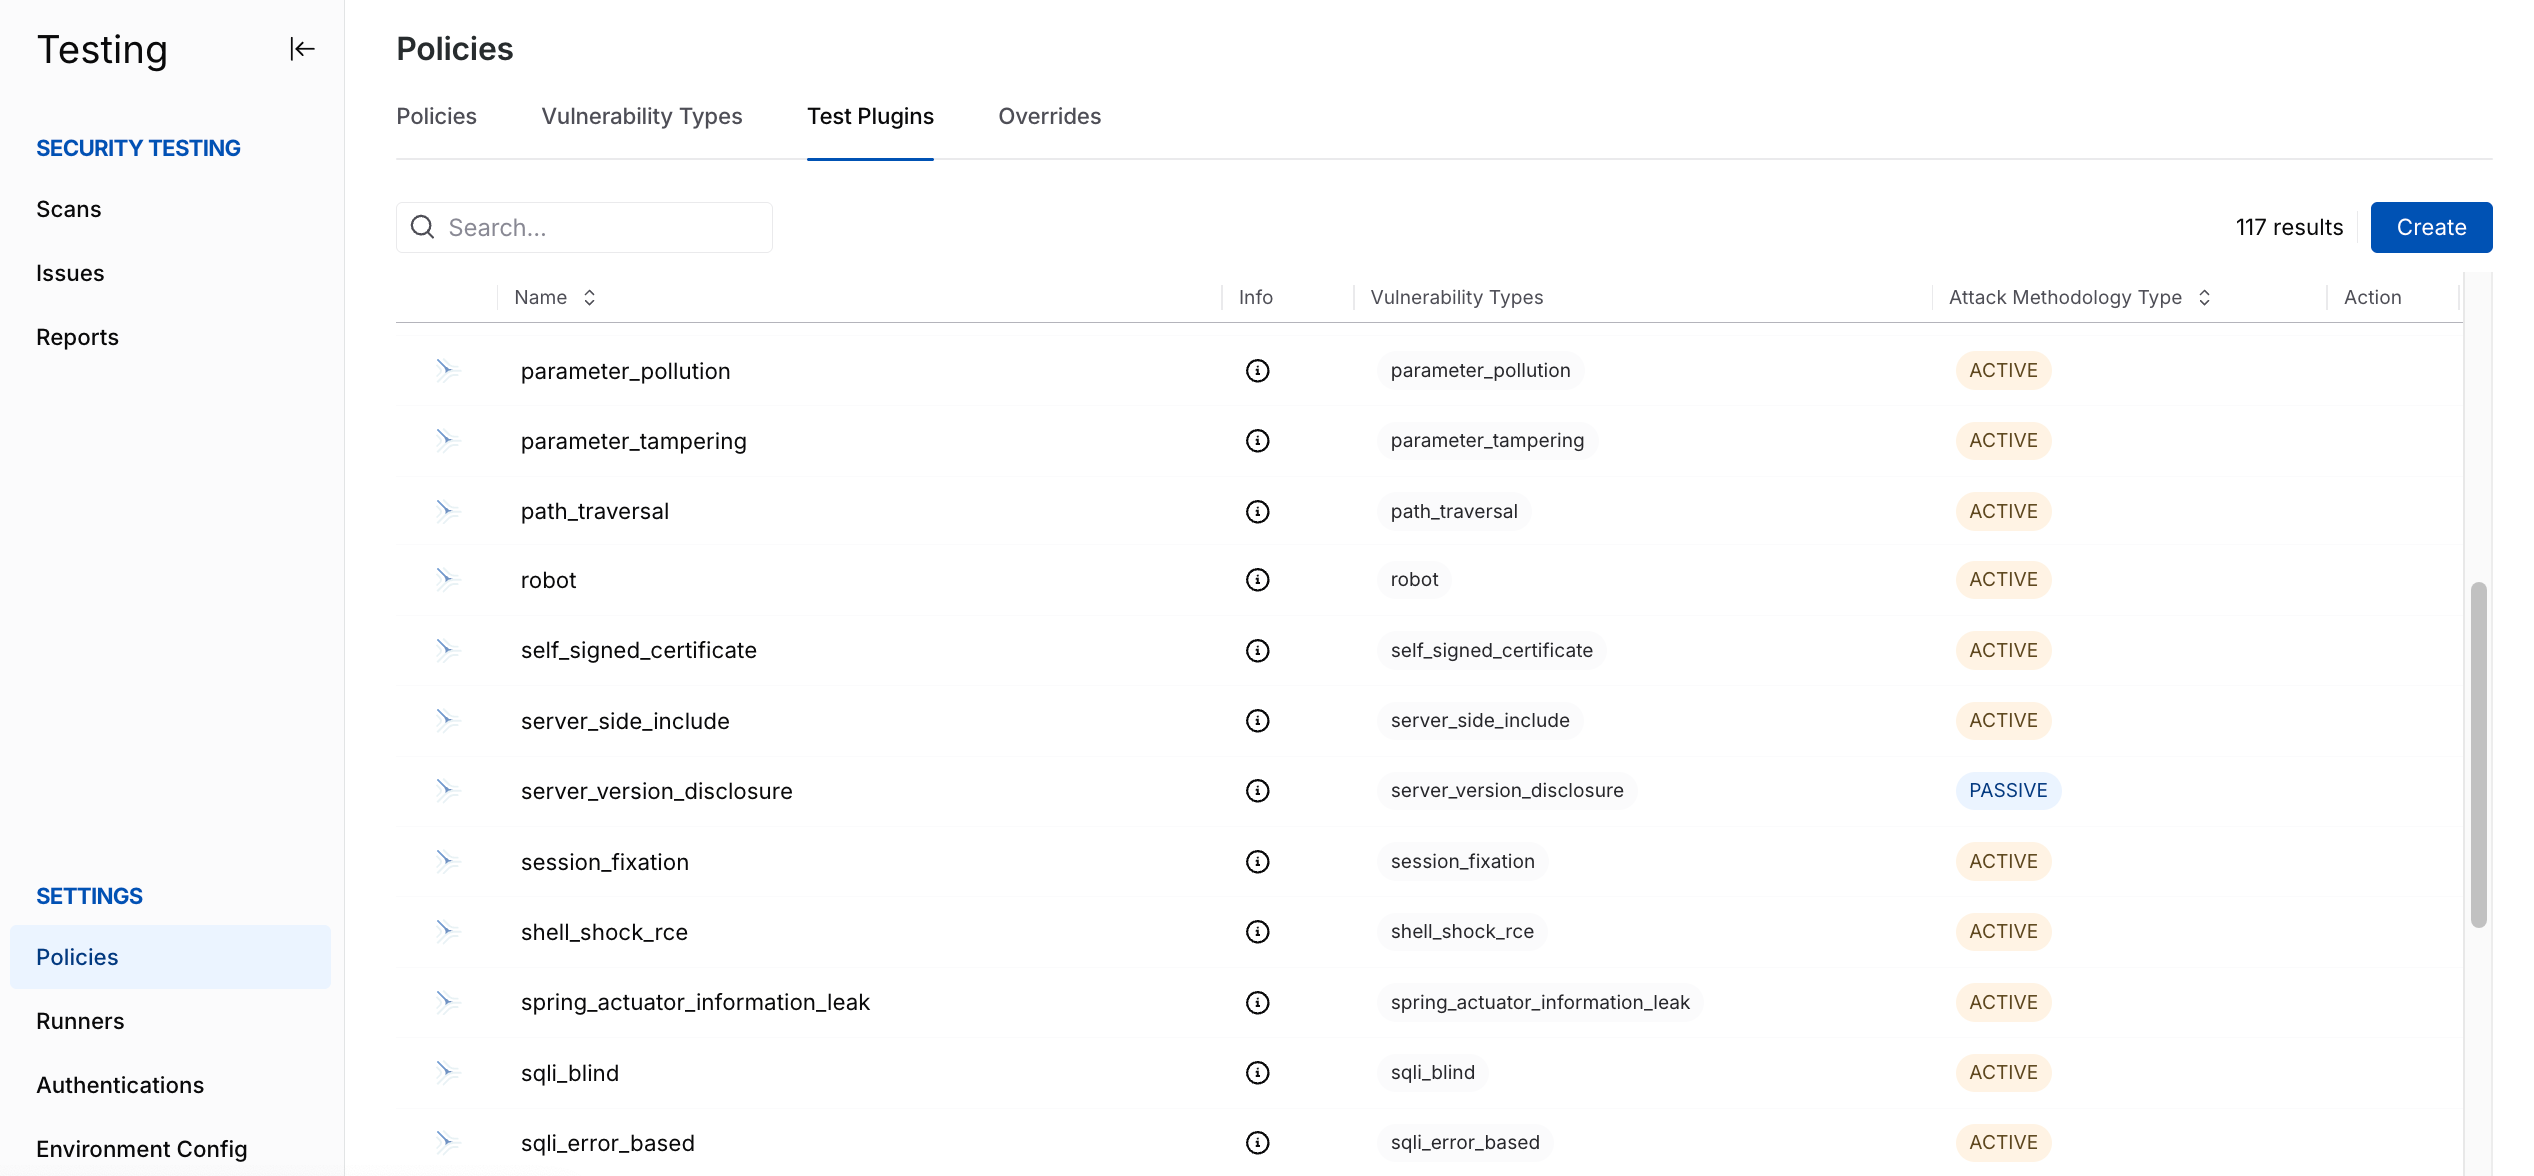
AST Plugins
Traceable provides some pre-defined plugins that are most commonly used in security assessments. These plugins use the vulnerability types that Traceable delivers out of the box. You can also create custom plugins that generate custom vulnerability types. While creating these custom plugins, you must define their logic using mutations, assertions, and other attributes. For more information, see Plugins.
Runners
Runners are proxy environments that operate within your environment and execute scans on applications and APIs. These runners retrieve the configured test scans and plugins from the Traceable platform and execute them against the selected API endpoints. Runners act as the bridge between the Traceable platform and the environment, ensuring reliability at scale while being in accordance with your configurations. Upon execution, these runners build the report for the detected issues (vulnerabilities).
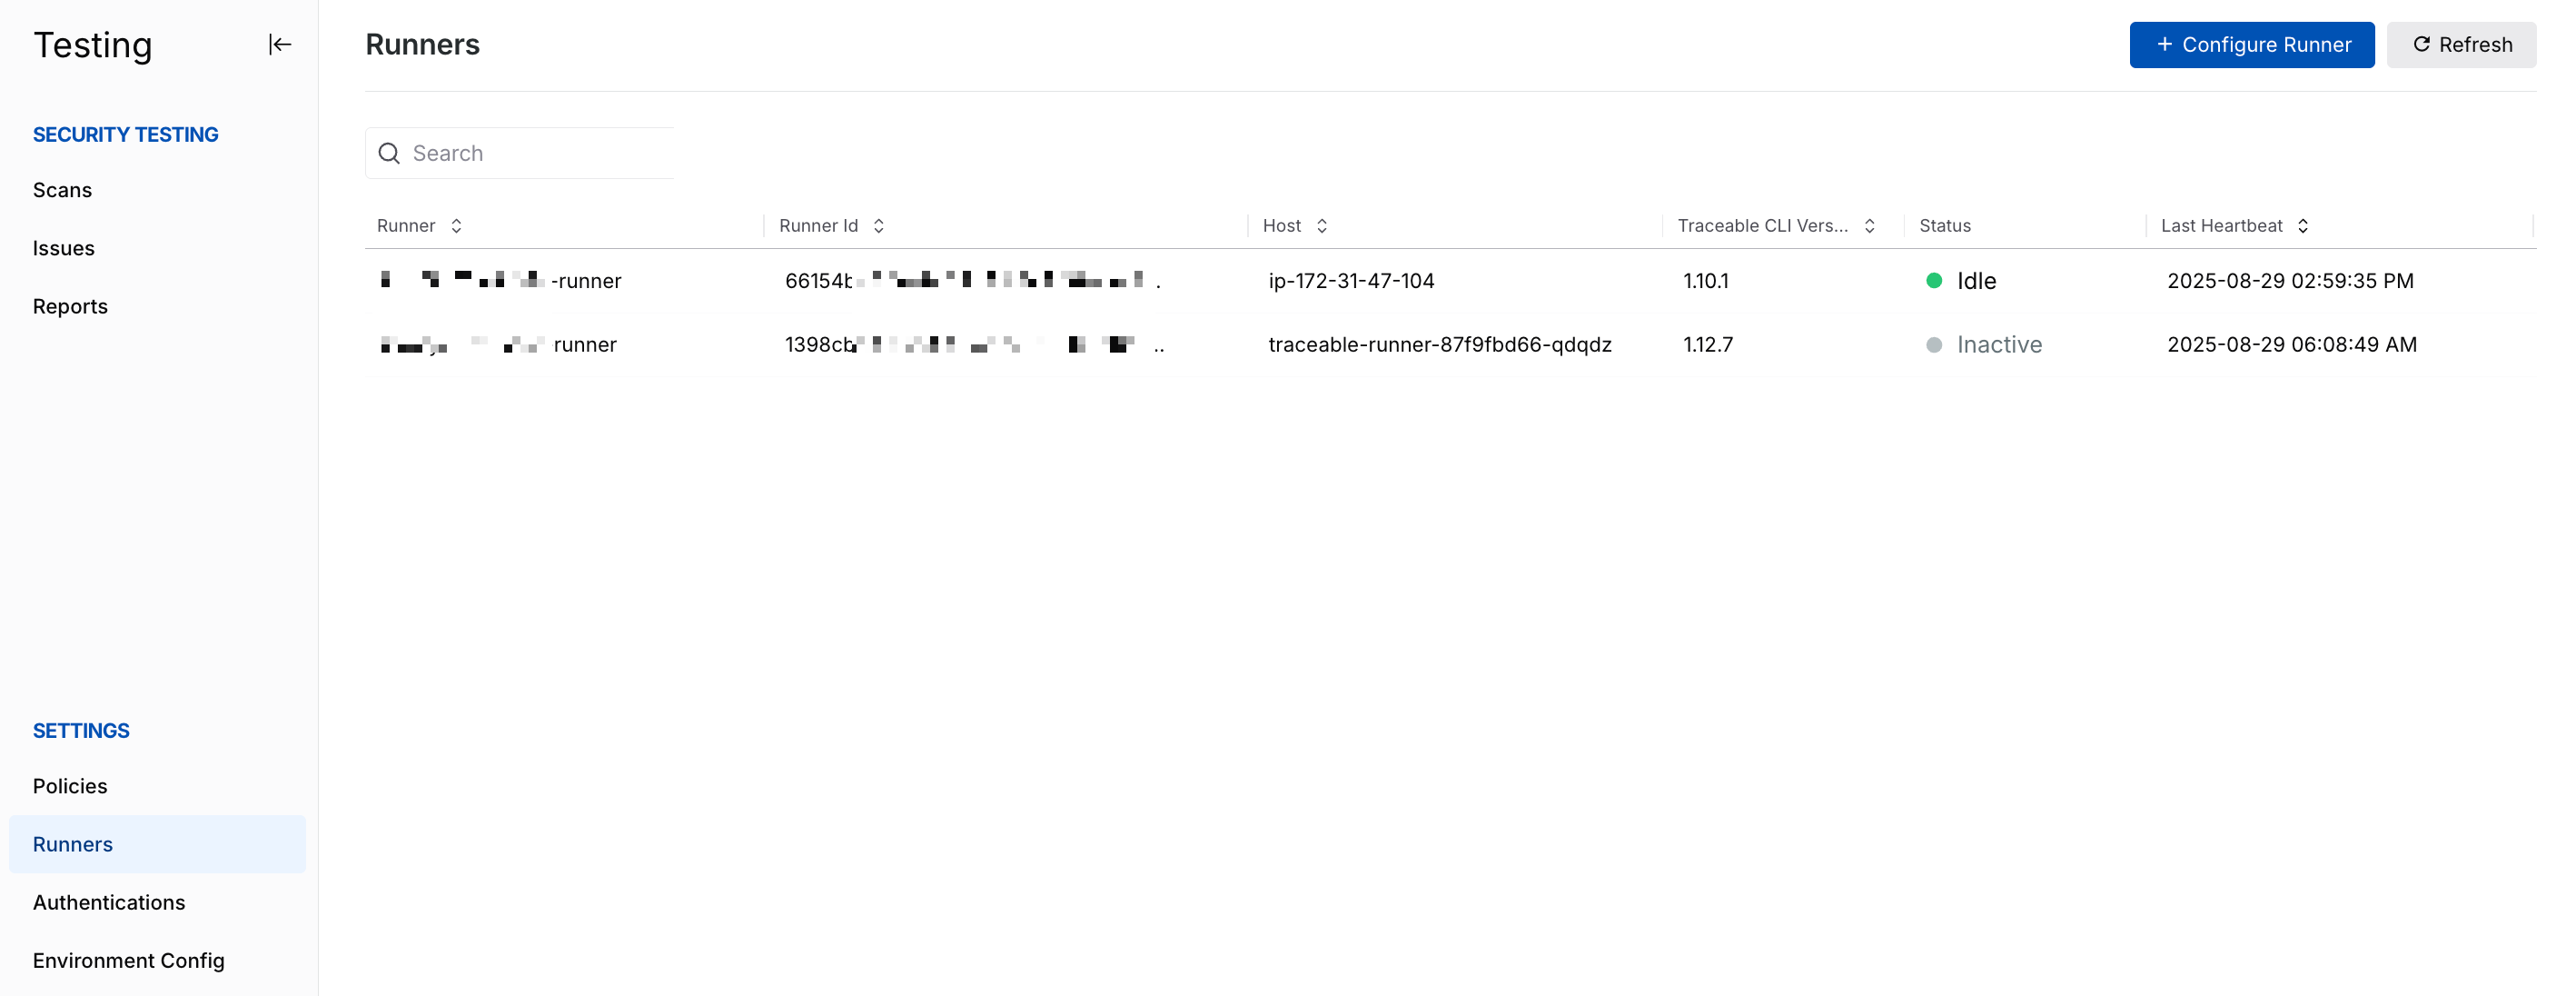
AST Runners
Traceable provides multiple ways of configuring runners: from the UI, as a service, using a Helm chart, and on AWS ECS using either CloudFormation or Terraform. For more information, see Runners.
Reports
This page lists the results or reports sent by the runner and displays them on the Traceable platform. It is useful when you wish to view detailed reports of the scans executed within your selected time duration. For more information, see Reports.
Optional Components
Apart from the above, Traceable also has some components that you can use according to your requirements:
Environment Config (Optional)
This component allows you to do the following on your environments:
Enable or disable API security testing
Enable or disable XAST Replays
This is useful when you want granular control over the creation of suites in certain environments, such as production environments that contain important data. For more information on these configurations, see Environment Config.
Authentications (Optional)
This component lets you define authentication mechanisms for your application security scans, which is helpful when you wish to run long-running scans. Traceable provides standard and advanced modes to define the authentication according to your requirements. For more information on the supported authentication mechanisms, see Authentication.
Next Steps
Now that you have an understanding of the components and how they work together, you can start using AST by doing the following:
Download and install a runner. For the steps to do this, see Runners.
(Optional) Enable AST or replays on environments. For the steps to do this, see Environment Config.
(Optional) Define the authentication mechanism for your tests. For the steps to do this, see Authentication.
(Optional) Create a custom vulnerability type according to your requirements. For the steps to do this, see Vulnerability Types.
(Optional) Create a custom plugin to detect a custom vulnerability. For the steps to do this, see Plugins.
(Optional) Create a custom policy according to your requirements. For the steps to do this, see Policies.
Use the above components, if created, and create a scan. For the steps to do this, see Creating a Scan.
The following section explains how data flows between the above components after you have created a scan.
Data Flow Post-scan Creation
As soon as you create a scan, the above components start interacting with each other to execute the tests on your API endpoints and show the result on the Traceable platform.
The following is a description of the data flow between components and their interaction for providing a result:
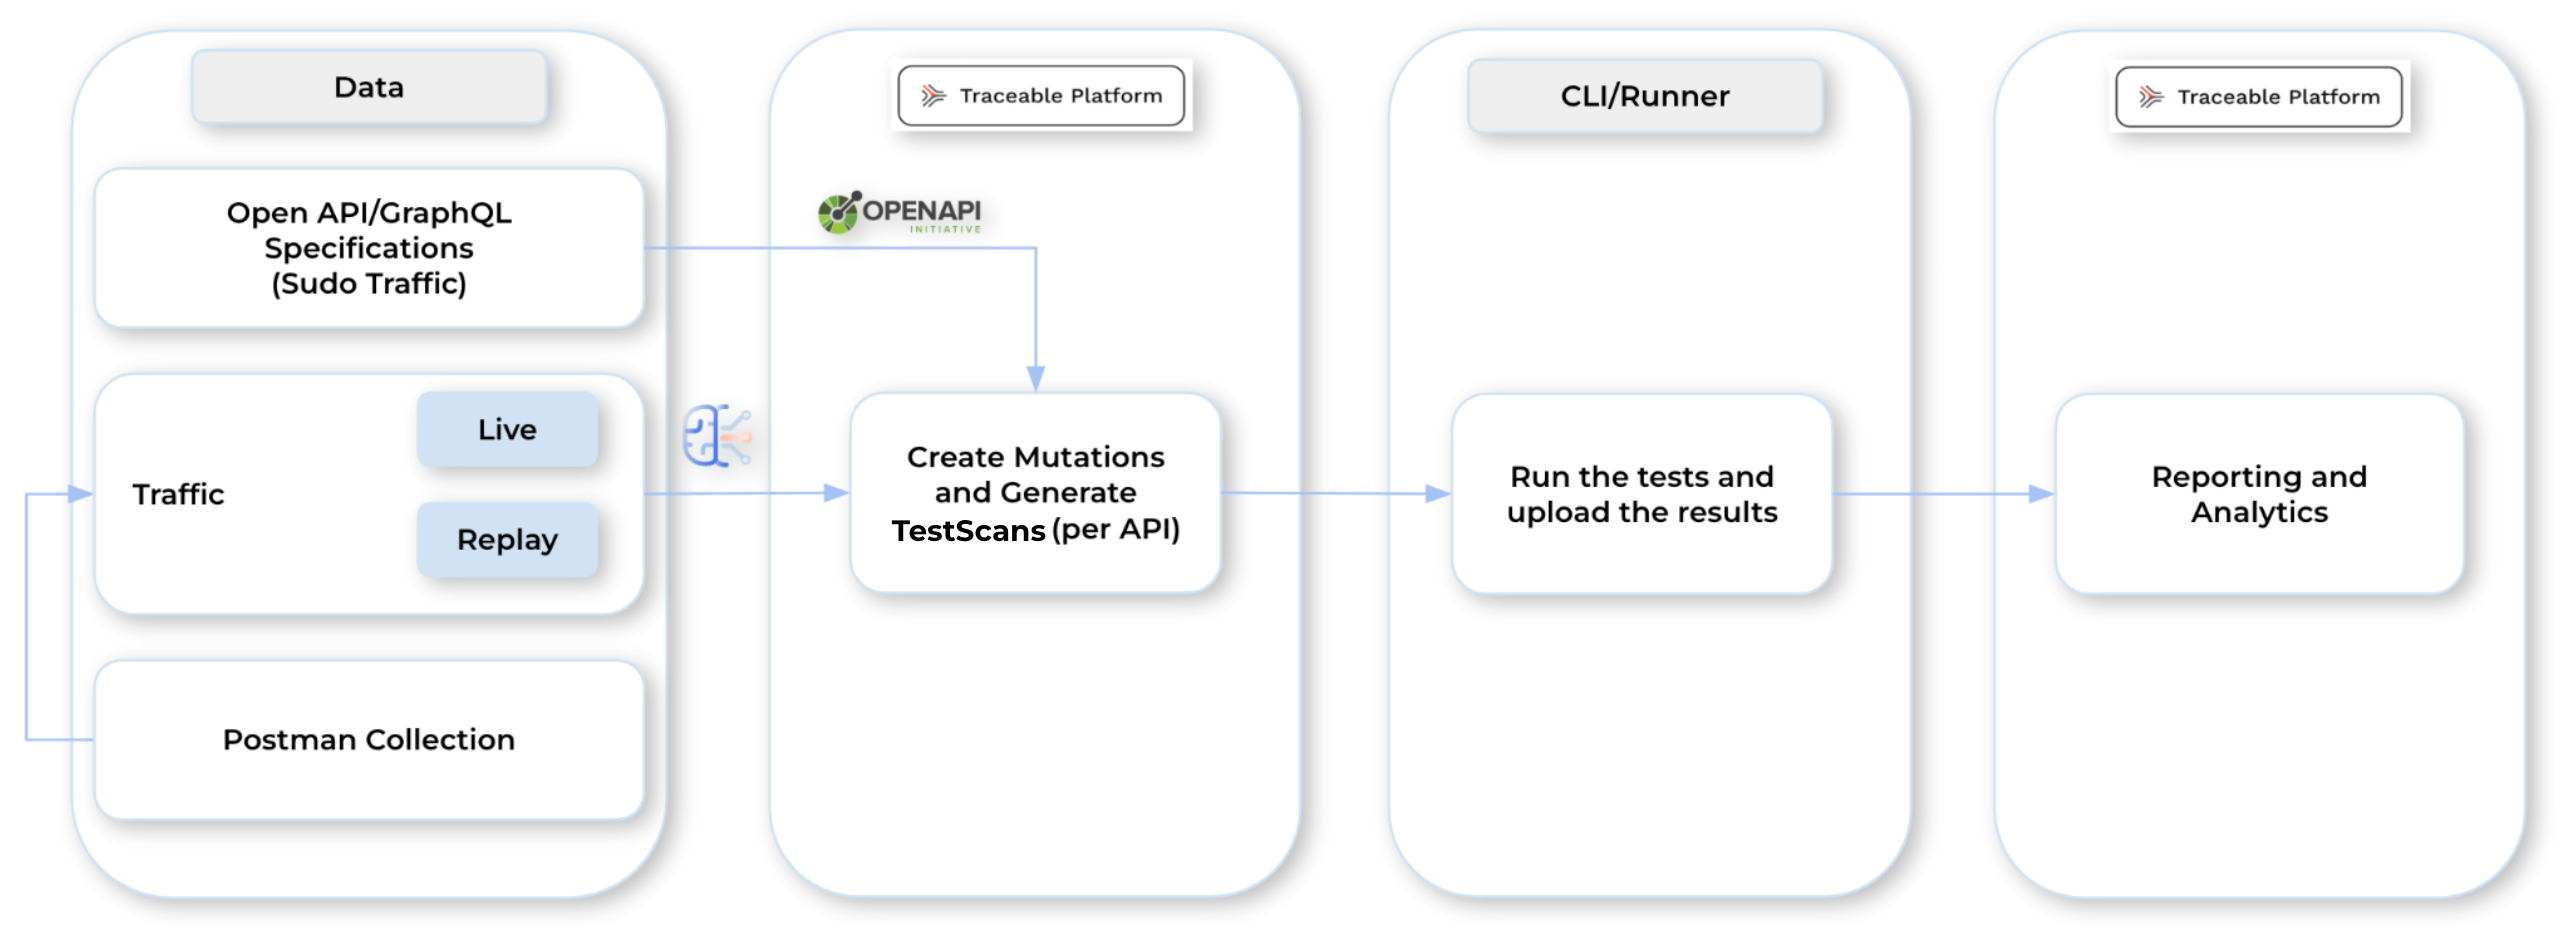
Data Flow Post-scan Creation
Data — This consists of the various ways Traceable can receive traffic. These are the traffic types that you can choose from when creating a scan. For more information on these traffic types, see Traffic Types. Based on the traffic type you select, Traceable generates the following:
Traces for live traffic, replay traffic, and Postman collections as they contain examples of API requests and responses, providing or simulating real traffic.
Sudo Traffic for Open API and GraphQL specifications, as they provide expected API behavior and endpoints rather than real traffic.
After you have created the scan, based on the selected policy, endpoints, and configurations, Traceable sends the data to the Platform for test scan generation.
Platform — Traceable, upon receiving Data from your application, processes it and generates tests for the configured scans. These generated tests contain details about the following:
Traffic metadata — The test scan, original request, and response.
Policy — The vulnerability type to test for, the hooks, mutations, and assertions defined in the test or custom plugin.
Once Traceable generates the test scan, the data is sent to the CLI/Runner for security testing.
CLI/Runner — The CLI/runner, upon receiving the test scans from the Platform, executes the tests on your application. It uses the test scan (containing plugins) to test for vulnerabilities in your application. The CLI/runner works in the following manner:
Runs the test scan and plugin.
Applies any pre-hooks and mutations.
Parses the response and applies any assertions, as well as post-hooks.
Builds the report and sends it to the Platform.
Platform — Traceable displays the report from the CLI/Runner on the platform upon receiving it. You can view the detailed report for each scan and use it according to your requirements by navigating to Testing → Reports. You can also download the report for offline analysis.