- 25 Sep 2024
- 15 Minutes to read
- Print
- PDF
Authentication
- Updated on 25 Sep 2024
- 15 Minutes to read
- Print
- PDF
Traceable's API security testing (AST) allows you to add an authentication mechanism to AST scans. This is helpful in cases where authentication is short-lived or has expired. In such cases, the AST scans are not completed. For example, if you are running a scan on live traffic after a long duration of time, there is a possibility that the authentication would have expired or DAST scans where requests are made using OpenAPI spec. In such a case, the scan would not be complete. It may also be possible that if you run a scan on old or suppressed data, the authentication tokens are also suppressed. AST would need a fresh authentication token to complete the scan in such cases.
Traceable supports multiple authentication mechanisms, such as:
Each authentication method and profile can be associated with one of the following roles.
Standard
Admin
Reader
Writer
In Traceable Platform, click on Testing → Settings → Authentications to set up authentication. The following sections explain each of the authentication mechanisms and their associated configuration.
Note
The topic assumes that you have reasonable knowledge of authentication mechanisms. The following sections give only a brief description of different types of authentication mechanisms.
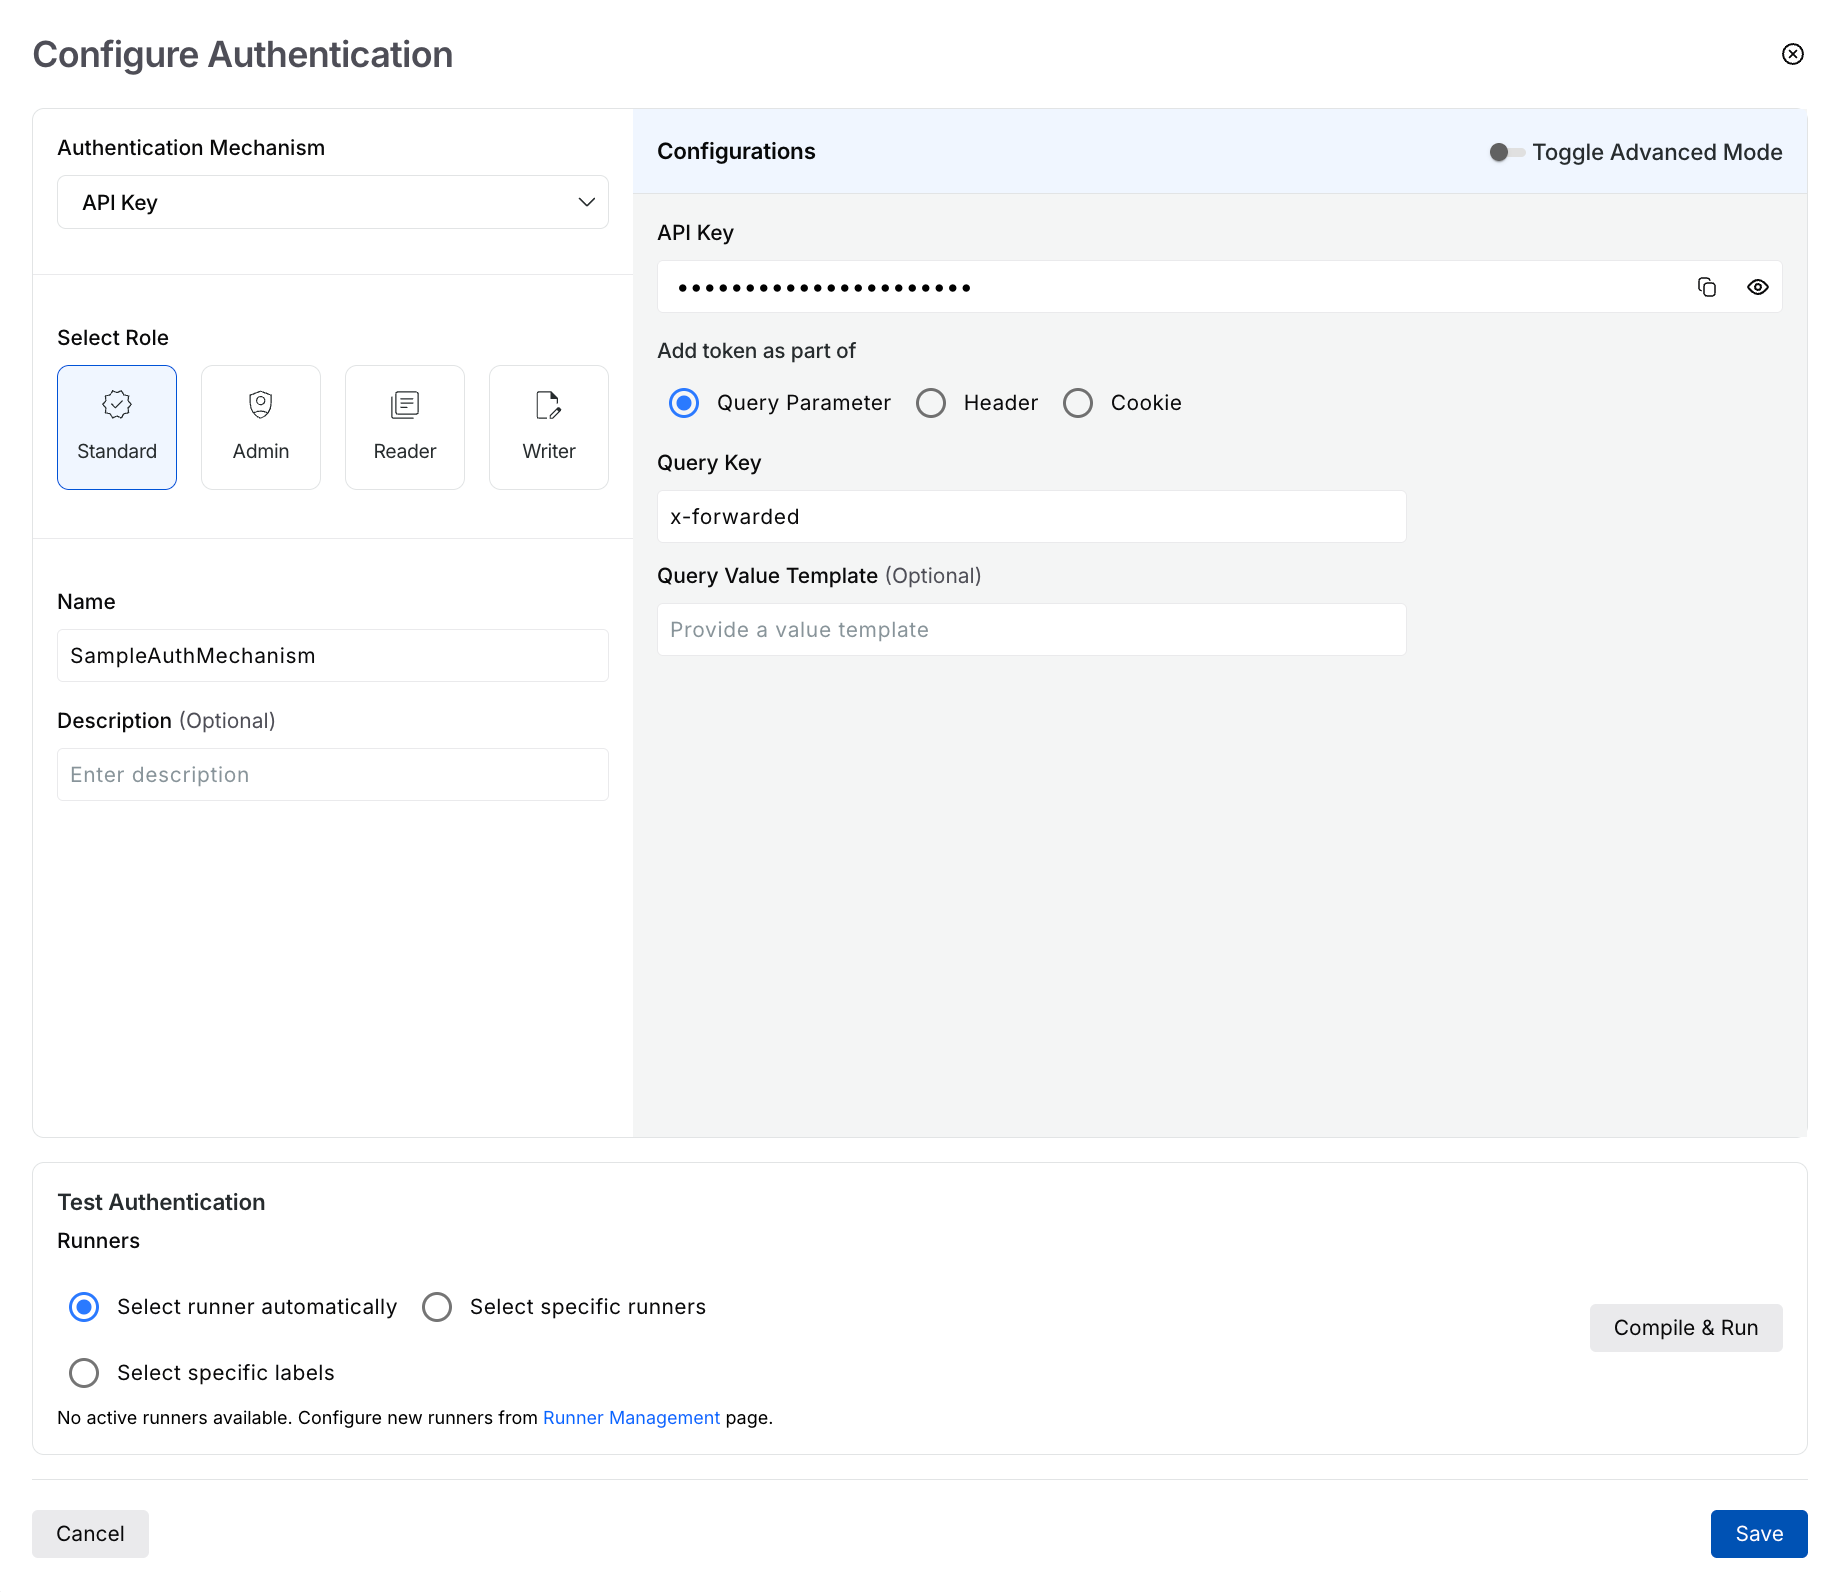
For each of the authentication mechanisms, give a Name and Description (optional). This is the name by which you would identify the authentication mechanism when you generate a scan with authentication. You can also test all the configured authentication mechanisms (except OAuth) to determine whether your hook compiles correctly with the provided inputs. AST provides you with a toggle option to switch to Advance mode, using which you can write your custom script for each authentication mechanism.
The different authentication type forms have an option to provide a value template. This value template should be a bearer: {{value}}.
API Key
An authentication mechanism based on API Key is a security method used in software development and web services. It involves generating and providing a unique alphanumeric key (API Key) to identify and authenticate the user or application accessing an API. The server verifies the key before granting access.
Configurations
API Key authentication mechanism has the following configurations:
Configuration | Description |
---|---|
API Key | The unique key is generated for the user or the applications. |
Add API Key as part of the Query parameter | Query Key — The API key to be passed in the URL or query parameters of the API request. The query key is used for authentication and authorization. When using a Query Key, the API Key is appended to the URL as a parameter, typically in the following format:
In this example, "api_key" is the query parameter name, and "value" is the actual API Key associated with your application or user account. The API server extracts the API Key from the query parameters and uses it to authenticate and authorize the request. |
Query value template (optional) — The template shows how the API key should be formatted in the query parameter of the API request URL. The values are dynamically substituted into a query parameter when making API requests. The query value template inserts an API Key or other authentication credentials into the request. Following is an example of how you can use a template: Let us say you have an API endpoint that requires an API Key, and the API Key is provided using a Query Value Template:
In this template,
Using a Query Value Template, you can keep the actual API Key separate from the code logic and easily update it when necessary. It also allows for better security practices, since the API Key is not exposed in plaintext within the codebase. | |
Add API Key as part of the Header | Header key — The HTTP header used to pass the API key (commonly The header key is used to secure API endpoints by transmitting authentication credentials in the HTTP headers rather than as part of the URL or request body. |
Header value template (optional) — The template shows how the API key should be formatted in the header. The values are dynamically substituted into an HTTP header when making API requests. The header value template enhances security and flexibility when transmitting authentication credentials in HTTP headers. Following is an example of how you can use a template:
Example Request with Header Value Template —
By using a header value template, you can separate the API Key from the code logic and easily update it when necessary without changing the code. It also adds an extra layer of security by preventing the API Key from being exposed in plaintext within the codebase. The specific syntax and conventions for header value templates may vary depending on the API and its documentation. | |
Add API Key as part of Cookie | Cookie key — The Cookie value to be used for authentication. |
Cookie value template (optional) — A template to add cookie value like in templates for Query parameter and Header. |
Basic Auth
Basic Auth, short for Basic Authentication, is a simple and widely used method for securing web resources, APIs, and other online services. It provides a way for clients (typically, web browsers or software applications) to authenticate themselves to a server by sending a username and password as a header in an HTTP request. The username and password are Base64 encoded.
Configurations
Basic Auth mechanism has the following configurations:
Configuration | Description |
---|---|
Username | The username of the user or the application. |
Password | The password for the user or application. |
Header Value Template (optional) | Basic Authentication works by directly encoding the
|
Bearer
In authentication mechanisms, a bearer refers to a type of token used to prove a user's or system's identity. Bearer tokens are a common authentication method in various contexts, including web applications, APIs, and network protocols. The term bearer signifies that whoever possesses the token is considered authenticated without further verification. Bearer tokens are straightforward to implement but come with some security concerns. Since anyone possessing the token is considered authenticated, protecting bearer tokens from unauthorized access or interception is crucial.
Configurations
The bearer mechanism has the following configurations:
Configuration | Description |
---|---|
Bearer Token | The token string represents the user's authentication and authorization claims. |
Add token as part of query parameter | In an HTTP request, you can add a bearer token as part of a query parameter. This practice is generally discouraged because it exposes the token in the URL, making it visible in various logs, browser history, and potentially to other users or attackers. Instead, using the Authorization header to transmit bearer tokens is much more secure. If, for some reason, you still need to pass the token as a query parameter, you can do so by appending it to the URL like this:
|
Add token as part of header | Adding a bearer token as part of the header is the recommended and standard practice for bearer token authentication in HTTP requests. Bearer tokens are typically included in the request’s Authorization header. Here's how you can do it:
|
Add token as part of cookie | Bearer tokens are typically not stored in cookies for security reasons. Storing sensitive authentication tokens like bearer tokens in cookies can introduce various security risks, such as cross-site scripting (XSS) attacks and cross-site request forgery (CSRF) attacks. Using the Authorization header for transmitting bearer tokens is typically recommended, as it is a more secure and standard approach. However, if you still want to store a bearer token in a cookie, you can set a cookie using server-side code. |
HMAC
HMAC (Hash-based Message Authentication Code) is a mechanism used to verify the authenticity and integrity of a message or piece of data. It is commonly used in various authentication and security protocols, including web application security, API authentication, and more. HMAC relies on a cryptographic hash function, and a secret key to generate a unique code that can be used to verify the data has not been tampered with.
Configurations
Bearer mechanism has the following configurations:
Configuration | Description |
---|---|
Access Key | The unique identifier for the user or application. |
Secret Key | The secret key, also known as the HMAC key, is a confidential cryptographic key used to generate and verify HMAC values. This key is shared between the sender and receiver. |
Algorithm | Choose from one of the following:
|
Signature header | The signature header is often implemented as part of an Authorization header in HTTP requests. This is a common practice for securing API endpoints using HMAC for authentication and data integrity verification. |
Timestamp Header (optional) | Including a timestamp header in HMAC authentication is a common practice to enhance security and prevent replay attacks. When a timestamp is included in HMAC-based authentication, it ensures that requests are only considered valid for a limited period of time. |
Canonical Request Format (optional) | {HTTP_METHOD}, {RESOURCE}, {QUERY_PARAMETERS}, {HEADERS}, {PAYLOAD} A canonical request format is a standardized representation of an HTTP request used as the input for generating the HMAC signature. It ensures consistency in how the request data is prepared for HMAC calculation, which is essential for both the sender and receiver to compute and verify the HMAC accurately. |
JSON Web Tokens (JWT)
JWT is a compact, URL-safe, self-contained method for securely transmitting information between parties. JWTs contain claims, which are statements about an entity and are signed by the server. The client sends the JWT in the Authorization header with each API request, allowing the server to verify the token's authenticity and grant access based on the encoded claims.
Configurations
JWT authentication mechanism has the following configurations:
Explicit Token
An explicit token typically refers to a specific type of token that carries clear and explicit information about the user or entity it represents. It is a way to make JWTs more self-contained by including detailed user information in the token's payload rather than relying on the server to look up user data based on the token's subject (sub) claim.
Configuration | Description |
---|---|
Token | The JSON Web Token string containing the signed claims. |
Add token as part of Query Parameter | You can technically include a token as a query parameter if needed. However, it's essential to use this approach cautiously and follow best practices to mitigate security risks. |
Add token as part of Header | JWT is commonly used as part of the HTTP header, specifically the |
Add token as part of Cookie | Cookie key — JWT authentication mechanisms that involve cookies, the cookie key refers to the name or identifier used for the cookie that stores the JWT token. When the server sends a JWT to the client to be stored as a cookie, it must specify the cookie's name so that both the client and server can access and manipulate it correctly. |
Dynamic Token
A dynamic token in JWT authentication typically refers to a token generated or modified dynamically based on certain conditions, user actions, or specific requirements. Dynamic tokens can be a powerful tool in authentication and authorization systems, as they allow for flexibility and adaptability to various scenarios.
Configuration | Description |
---|---|
Secret Key | The secret key plays a crucial role in securing the tokens, including dynamic tokens. The secret key is used for signing and verifying the integrity of the tokens, ensuring that they have not been tampered with by malicious parties. |
Algorithm | Choose from SHA 256 or SHA 1 |
Add Claim | In JWT, a claim is a piece of information or a statement about an entity (typically, the user) encoded in the token. Claims are used to convey information about the token, such as the identity of the user, the token's expiration time, or additional user-related data like roles and permissions. Claims are included in the token's payload and help define the token's purpose and its permissions. Claims are represented as key-value pairs within the JWT's payload, which is a JSON object. Here's an example of a JWT payload containing claims:
In this example:
|
For Adding token as Query parameter, Header, or Cookie, see explanation in Explicit Token section.
Mutual TLS
Mutual Transport Layer Security (mTLS) is a method that involves client and server authentication using SSL/TLS certificates. Both parties verify each other's certificates, ensuring secure communication and establishing a trusted relationship.
Configurations
You can set up the mTLS authentication using either of the following methods:
Using Traceable Platform
For setting up mTLS authentication from the Traceable platform, you must have the following configurations:
Configuration | Description |
---|---|
Client Certificate | A client certificate in Mutual TLS authentication is a digital certificate presented by the client during the TLS handshake to prove its identity to the server. This certificate is used with the server's certificate to establish a secure and authenticated communication channel. The certificate should always be in PEM format. |
Client Key | A client key in mTLS refers to the private key associated with the client's digital certificate. |
Client Key Passphrase | The client key passphrase in mTLS is a passphrase or password used to protect the private key associated with the client's digital certificate. |
Client Authority Certificate | A bundle of trusted CA certificates for validating the server's certificate. |
Using CLI
You can set up mTLS authentication directly from the CLI using a JSON file and environment variables. To do so, use the following syntax:
{
"host:port" : {
"client_cert": <Path to the Client Certificate>,
"client_key": <Path to the Client Key>,
"root_ca": <Path to the Client Authority Certificate>,
"passphrase": <(Optional) Path to the Client Key Passphrase>
}
"host:port" : {
"client_cert": <Path to the Client Certificate>,
"client_key": <Path to the Client Key>,
"root_ca": <Path to the Client Authority Certificate>,
},
"default" : {
"client_cert": "/certs/client_default.crt",
"client_key": "/certs/client_default.key",
"root_ca": "/certs/CA_default.pem"
}
}
Note
The default section in the above JSON acts as a fallback mechanism when Traceable does not find any matching host.
For example, the JSON file would look like the following:
{
"mysite.local:8443" : {
"client_cert": "/home/work/traceable/ast/pov_tools/mtls/certs/cas.client.crt",
"client_key": "/home/work/traceable/ast/pov_tools/mtls/certs/cas.client.key",
"root_ca": "/home/work/traceable/ast/pov_tools/mtls/certs/CA.pem",
"passphrase": "" # This represents an empty passphrase
}
"anotherhost.com:443" : {
"client_cert": "/certs/client.crt",
"client_key": "/certs/client.key",
"root_ca": "/certs/CA.pem",
},
"default" : {
"client_cert": "/certs/client_default.crt",
"client_key": "/certs/client_default.key",
"root_ca": "/certs/CA_default.pem"
}
}
After defining the JSON file, export one of the following environment variables in the shell, invoking the CLI:
Use one environment variable, for example:
export TARGET_TLS_CONFIG_FILE = /path/mtls_config.json
You can define the JSON file (
mtls_config.json
) like the one above.Note
This method authenticates all hosts mentioned in the JSON file.
Use multiple environment variables, for example:
export ROOT_CA_FILE = /path/CA.pem export TARGET_CLIENT_CERT_FILE = /path/client.crt export TARGET_CLIENT_KEY_FILE = /path/client.key export TARGET_CLIENT_KEY_PASSPHRASE = "<passphrase>"
OAuth
OAuth is a popular open standard for access delegation. It allows users to grant third-party applications limited access to their resources without sharing their credentials. OAuth 2.0, the latest version, uses access tokens to authenticate API requests.
Configurations
OAuth's authentication mechanism has the following configurations:
Configuration | Description |
---|---|
Token Endpoint | It is a URL or endpoint provided by the Authorization Server (the server responsible for issuing access tokens in OAuth) where authorized clients can exchange authorization codes, refresh tokens, or other credentials for access tokens. |
Authorization Endpoint | The Authorization Endpoint in OAuth 2.0 is where the user's authentication and consent process begins, allowing clients to request access to protected resources while ensuring that users have control over which resources they share with third-party applications. |
Callback URL | The Callback URL (Redirect URI) in OAuth 2.0 is the endpoint where the client receives the response from the Authorization Server after the user has authenticated and authorized the client's access to resources. |
Client Auth Method | Choose from Basic Auth or Request body |
Scope (optional) | The permissions requested by the client. |
Generate the token after you have filled the configurations listed above. You can then add the token as part of a Query Parameter, Header, or Cookie.
Note
OAuth authentication mechanism does not support testing.
POP Token Signature
PoP (Proof of Possession) tokens are a type of security token that contains a cryptographic key, which the client uses to sign each API request. The server validates the signature to ensure that the client is in possession of the corresponding private key.
Configurations
PoP's authentication mechanism has the following configurations:
Configuration | Description |
---|---|
Private Key | A private key is a confidential cryptographic key used to prove ownership and possession of a specific key when creating digital signatures. |
Header Key | A header key refers to a name used to identify and convey information about the token or the request in which it is included. It typically refers to a key or value included in the header of an HTTP request or a token that is used to provide information about the request or token itself. The header key can be a part of the metadata or header information that accompanies the token to convey additional details or instructions. |
Header Value Template | {{value}} |
Content Signature
Content Signature is a method of authentication where the body of the request (the content) is hashed and signed using a private key. The signature is then included in the request, typically as a header. The server verifies the signature using the corresponding public key. If the signature is valid, the server processes the request; otherwise, it rejects it.
Configurations
Content signature authentication mechanism has the following configurations:
Configuration | Description |
---|---|
Header Key | The hashed content signature. |
Private Key | The key to generating the digital signature. |
Custom
If you have an authentication that is not among the one's mentioned above, you can write your mechanism by choosing Custom from the drop-down list.