Jira is a software development tool used for issue tracking and project management. It is designed to help teams plan, track, and discuss work across multiple projects. Jira is widely used in the software industry and can be customized to fit the needs of various teams and organizations.
Traceable provides an option to integrate your Cloud-based Jira project or Jira Data Center. The Jira integration allows you to file a Jira ticket directly from the Traceable platform. Note that once you choose a deployment type from the Cloud or Data Center, you cannot change it.
Note
You can have one or more than one Jira integration. You can select one Jira integration for all the environments, or choose to select individual Jira integrations for each environment.
Jira cloud
The integration process consists of operations in your JIRA project and Traceable platform. Make sure that you have the JIRA administrator rights to integrate JIRA with Traceable.
.png)
The integration process requires switching between Traceable Platform and your JIRA project.
Steps in Traceable Platform
Steps in the JIRA project
Steps in Traceable Platform – part 2
Steps in Traceable Platform
Complete the following steps in Traceable UI
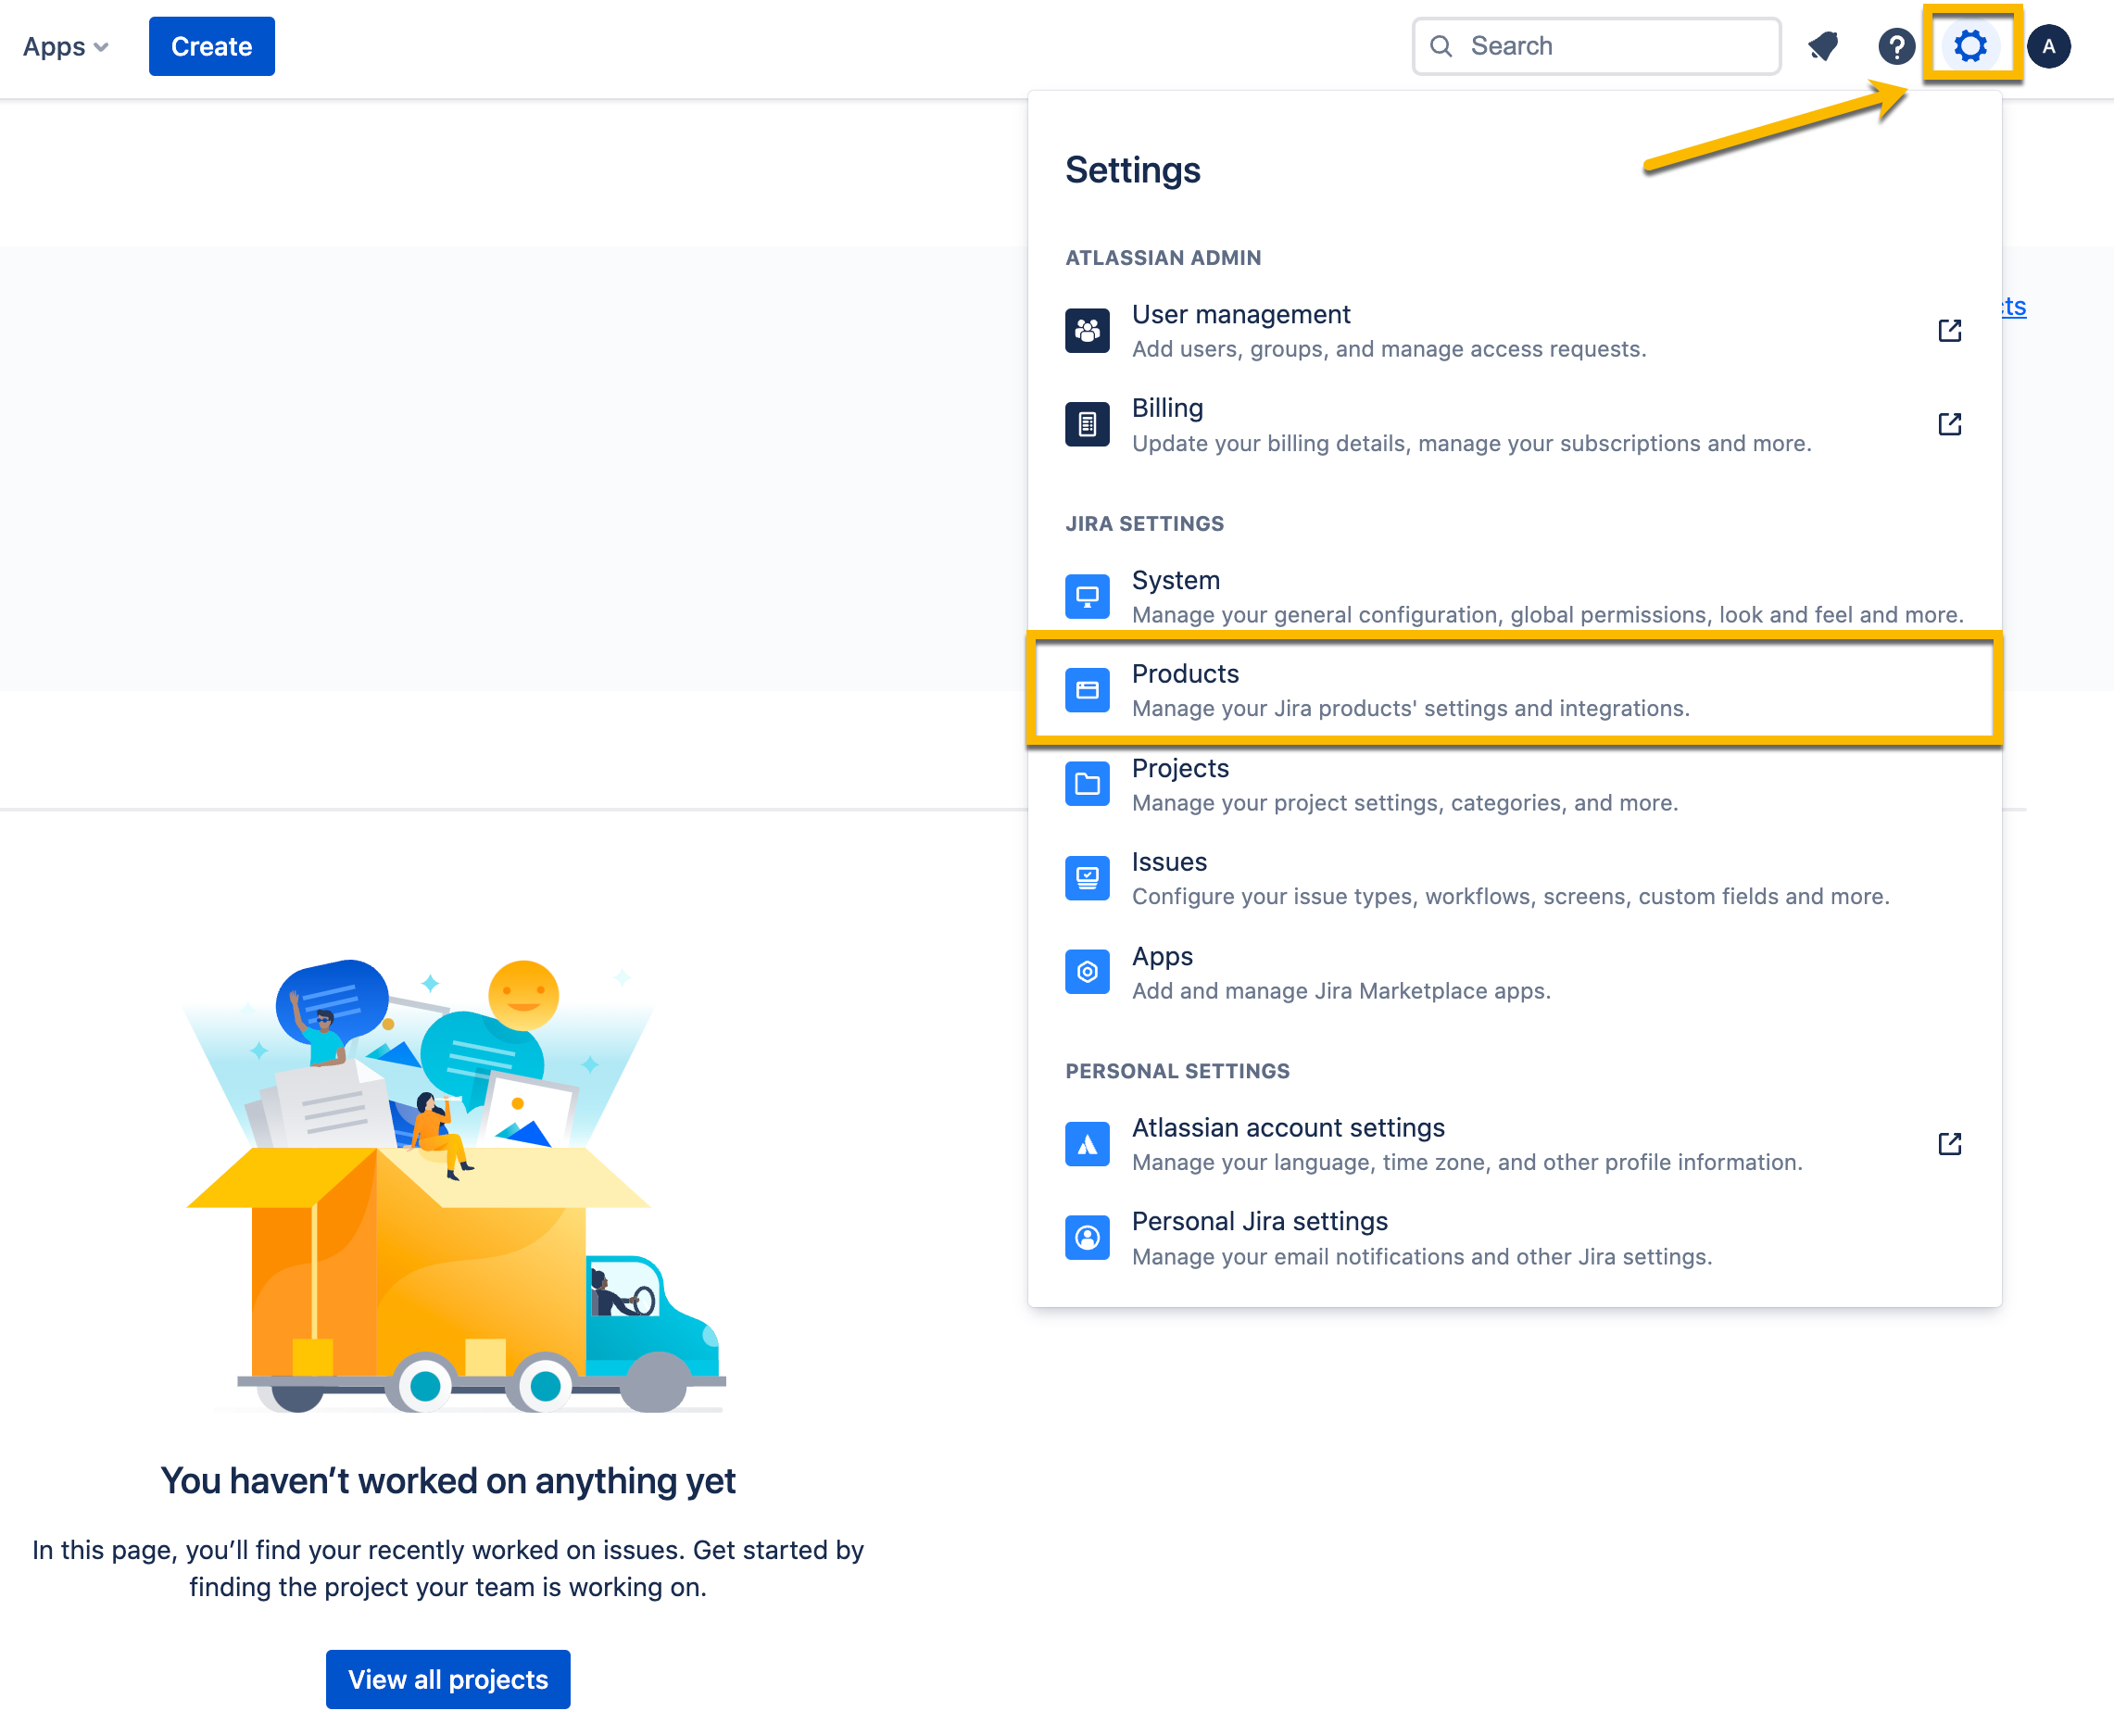
Log in to your Traceable account, Navigate to Integrations → Project Management, and click Configure on the Jira card.
Select the Environment for which you wish to integrate Jira.
Select Cloud from the Jira Deployment drop-down list.
Add the Jira Integration Public key in the Add New Integration window. Make sure to keep this window open, as we will return to it after completing the steps in the Jira project.
.png "traceable_jira_integration_public_key_copy(4).png")
Steps in the JIRA project
Navigate to your JIRA project and complete the following steps. Make sure that you have the administrator rights.
In your JIRA project, navigate to Settings > Products.
Click on Application links under Integrations from the left-hand side menu.
Click on the Create link button on the Application links page.
In the Create link pop-up window, select the Direct application link radio button. In the Application URL field, add https://app.traceable.ai/ and click on Continue.

Click on Use this URL checkbox in the Configure Application URL pop-up window and Continue.
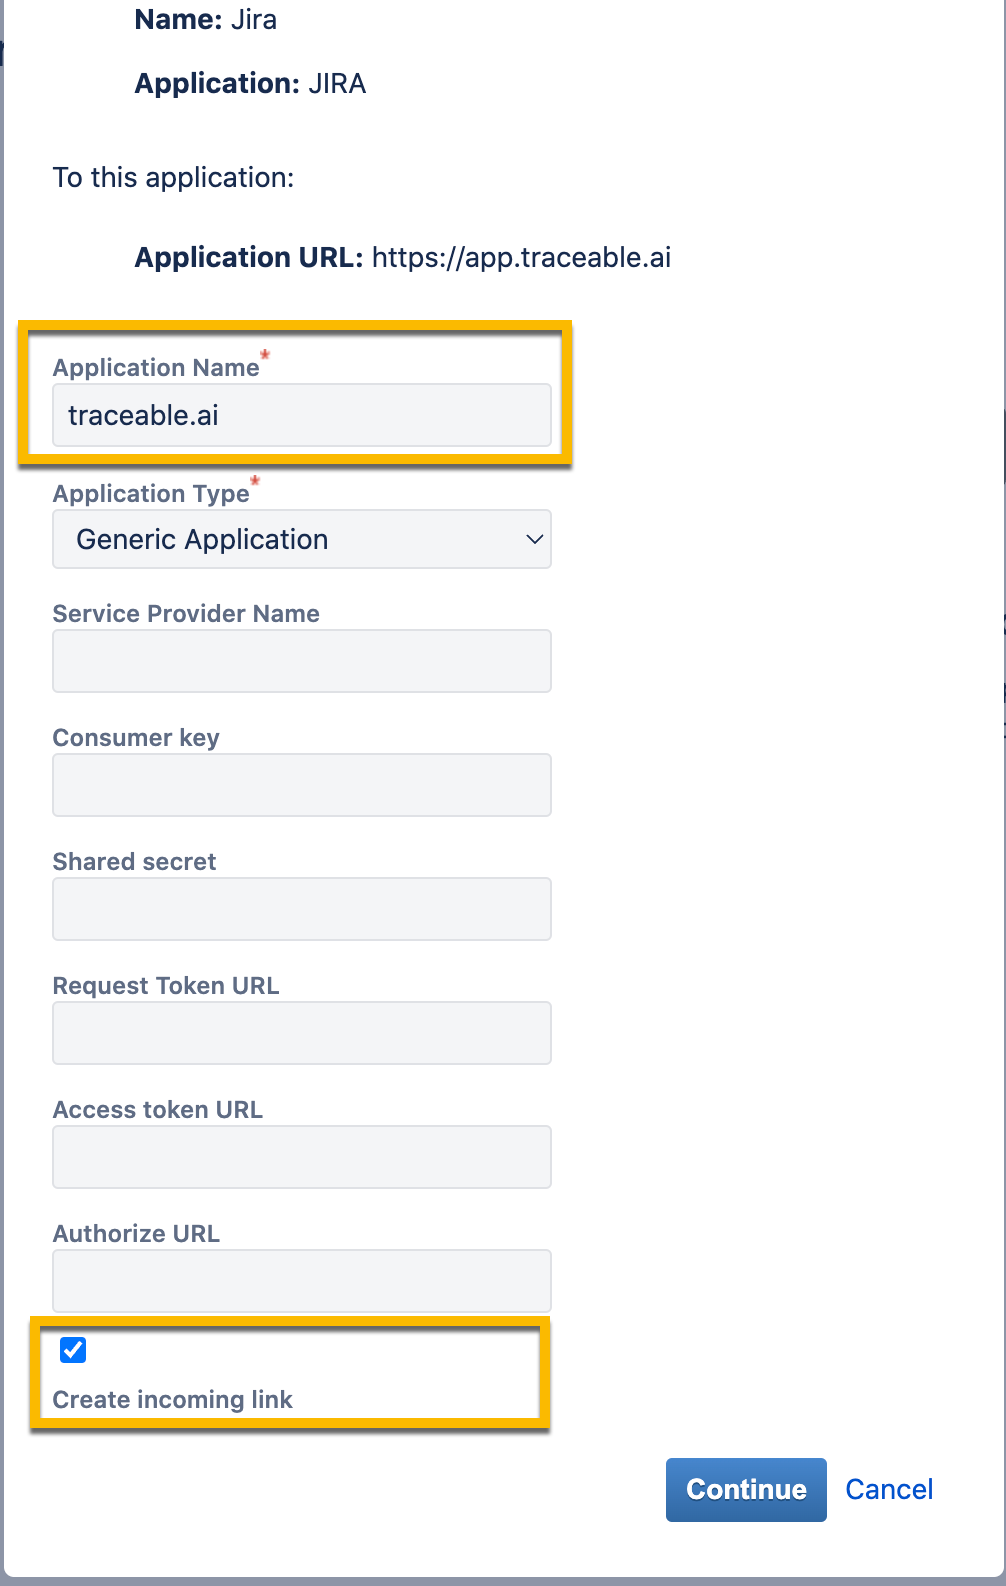
In the Review link pop-up window, enter the Application Name as traceable.ai, select the Create incoming link checkbox, and click Continue.
Enter a Consumer Key and the Consumer Name in the following Review link pop-up window. Enter the Public Key you copied from Traceable UI in the previous section. Note the Consumer Key to be used in the Traceable Platform.
.png)
Steps in Traceable Platform – part 2
Return to the JIRA integration window that you have kept open. Complete the following steps:
Navigate to the Settings (
 ) → Configuration → Integrations from the previous section.
Fill in the remaining details as shown below. Enter the consumer key you copied in step 7 of the Steps in the Jira section.
.png "traceable_fill_jira_integration_fields(1).png")
Choose the Environment in which you wish to integrate the Jira.
Note
If you choose All Environments, you cannot have another Jira integration. Multiple Jira integrations are only possible if you select a specific environment.
Click Generate Secret Key. This generates a link to fetch the Secret key.
Add the Secret Key generated in Step 4.
Click on Create & Next to complete the steps.
This will integrate your JIRA project with Traceable. In the next window, you can optionally configure Bi-directional Sync.
Jira Data Center
You can integrate Traceable with your Jira Data Center deployment. Jira Data Center is a deployment option for Atlassian's Jira software designed for large enterprises or organizations requiring high availability, scalability, and performance. It provides a clustered architecture that allows multiple Jira nodes to work together, enabling more robust and scalable environments compared to the standard Jira Server deployment.
To integrate Traceable with Jira Data Center, navigate to Integrations → Project Management and click on Configure on the Jira card.
In the Add New Jira Integration window, complete the following:
Log in to your Traceable account, Navigate to Integrations → Project Management, and click Configure on the Jira card
Select the Environment for which you wish to integrate Jira.
Select Data Center from the Jira Deployment drop-down list.
Provide the Access Token. For more information on fetching the access token, see Using Personal Access Token.
.png "traceable_jira_integration_data_center.png")
mTLS Support for Jira Data Center
For Jira Data Center integrations, mTLS (Mutual TLS) authentication provides secure communication between Traceable and Jira instances.
Users with self-signed certificates must manually upload their certificates in Traceable.
Users with publicly signed certificates can leave the certificate field empty.
Traceable provides a client CA certificate, which must be uploaded to the Jira server for mutual TLS verification.
Once the certificates are exchanged, a mutual TLS handshake is established before syncing data.
Bi-directional sync (optional)
Bidirectional sync in Jira integration enables automatic status updates between Traceable and Jira. When enabled, any status change in Traceable is reflected in Jira and vice versa. This functionality allows seamless issue tracking synchronization, ensuring that security findings and development tasks remain aligned across both platforms. The Bi-directional sync is available for both Cloud and On-prem configurations.
How Bidirectional Sync Works
Status Synchronization – Any changes made to the status of a ticket in Traceable or Jira are automatically updated on the other platform.
Automated Sync – Synchronization runs every hour as a background process. Users can also manually trigger a sync.
Project and Issue Type Mapping – Users must configure mappings between Traceable statuses and corresponding Jira statuses for each issue type.
Configuring Bidirectional Sync
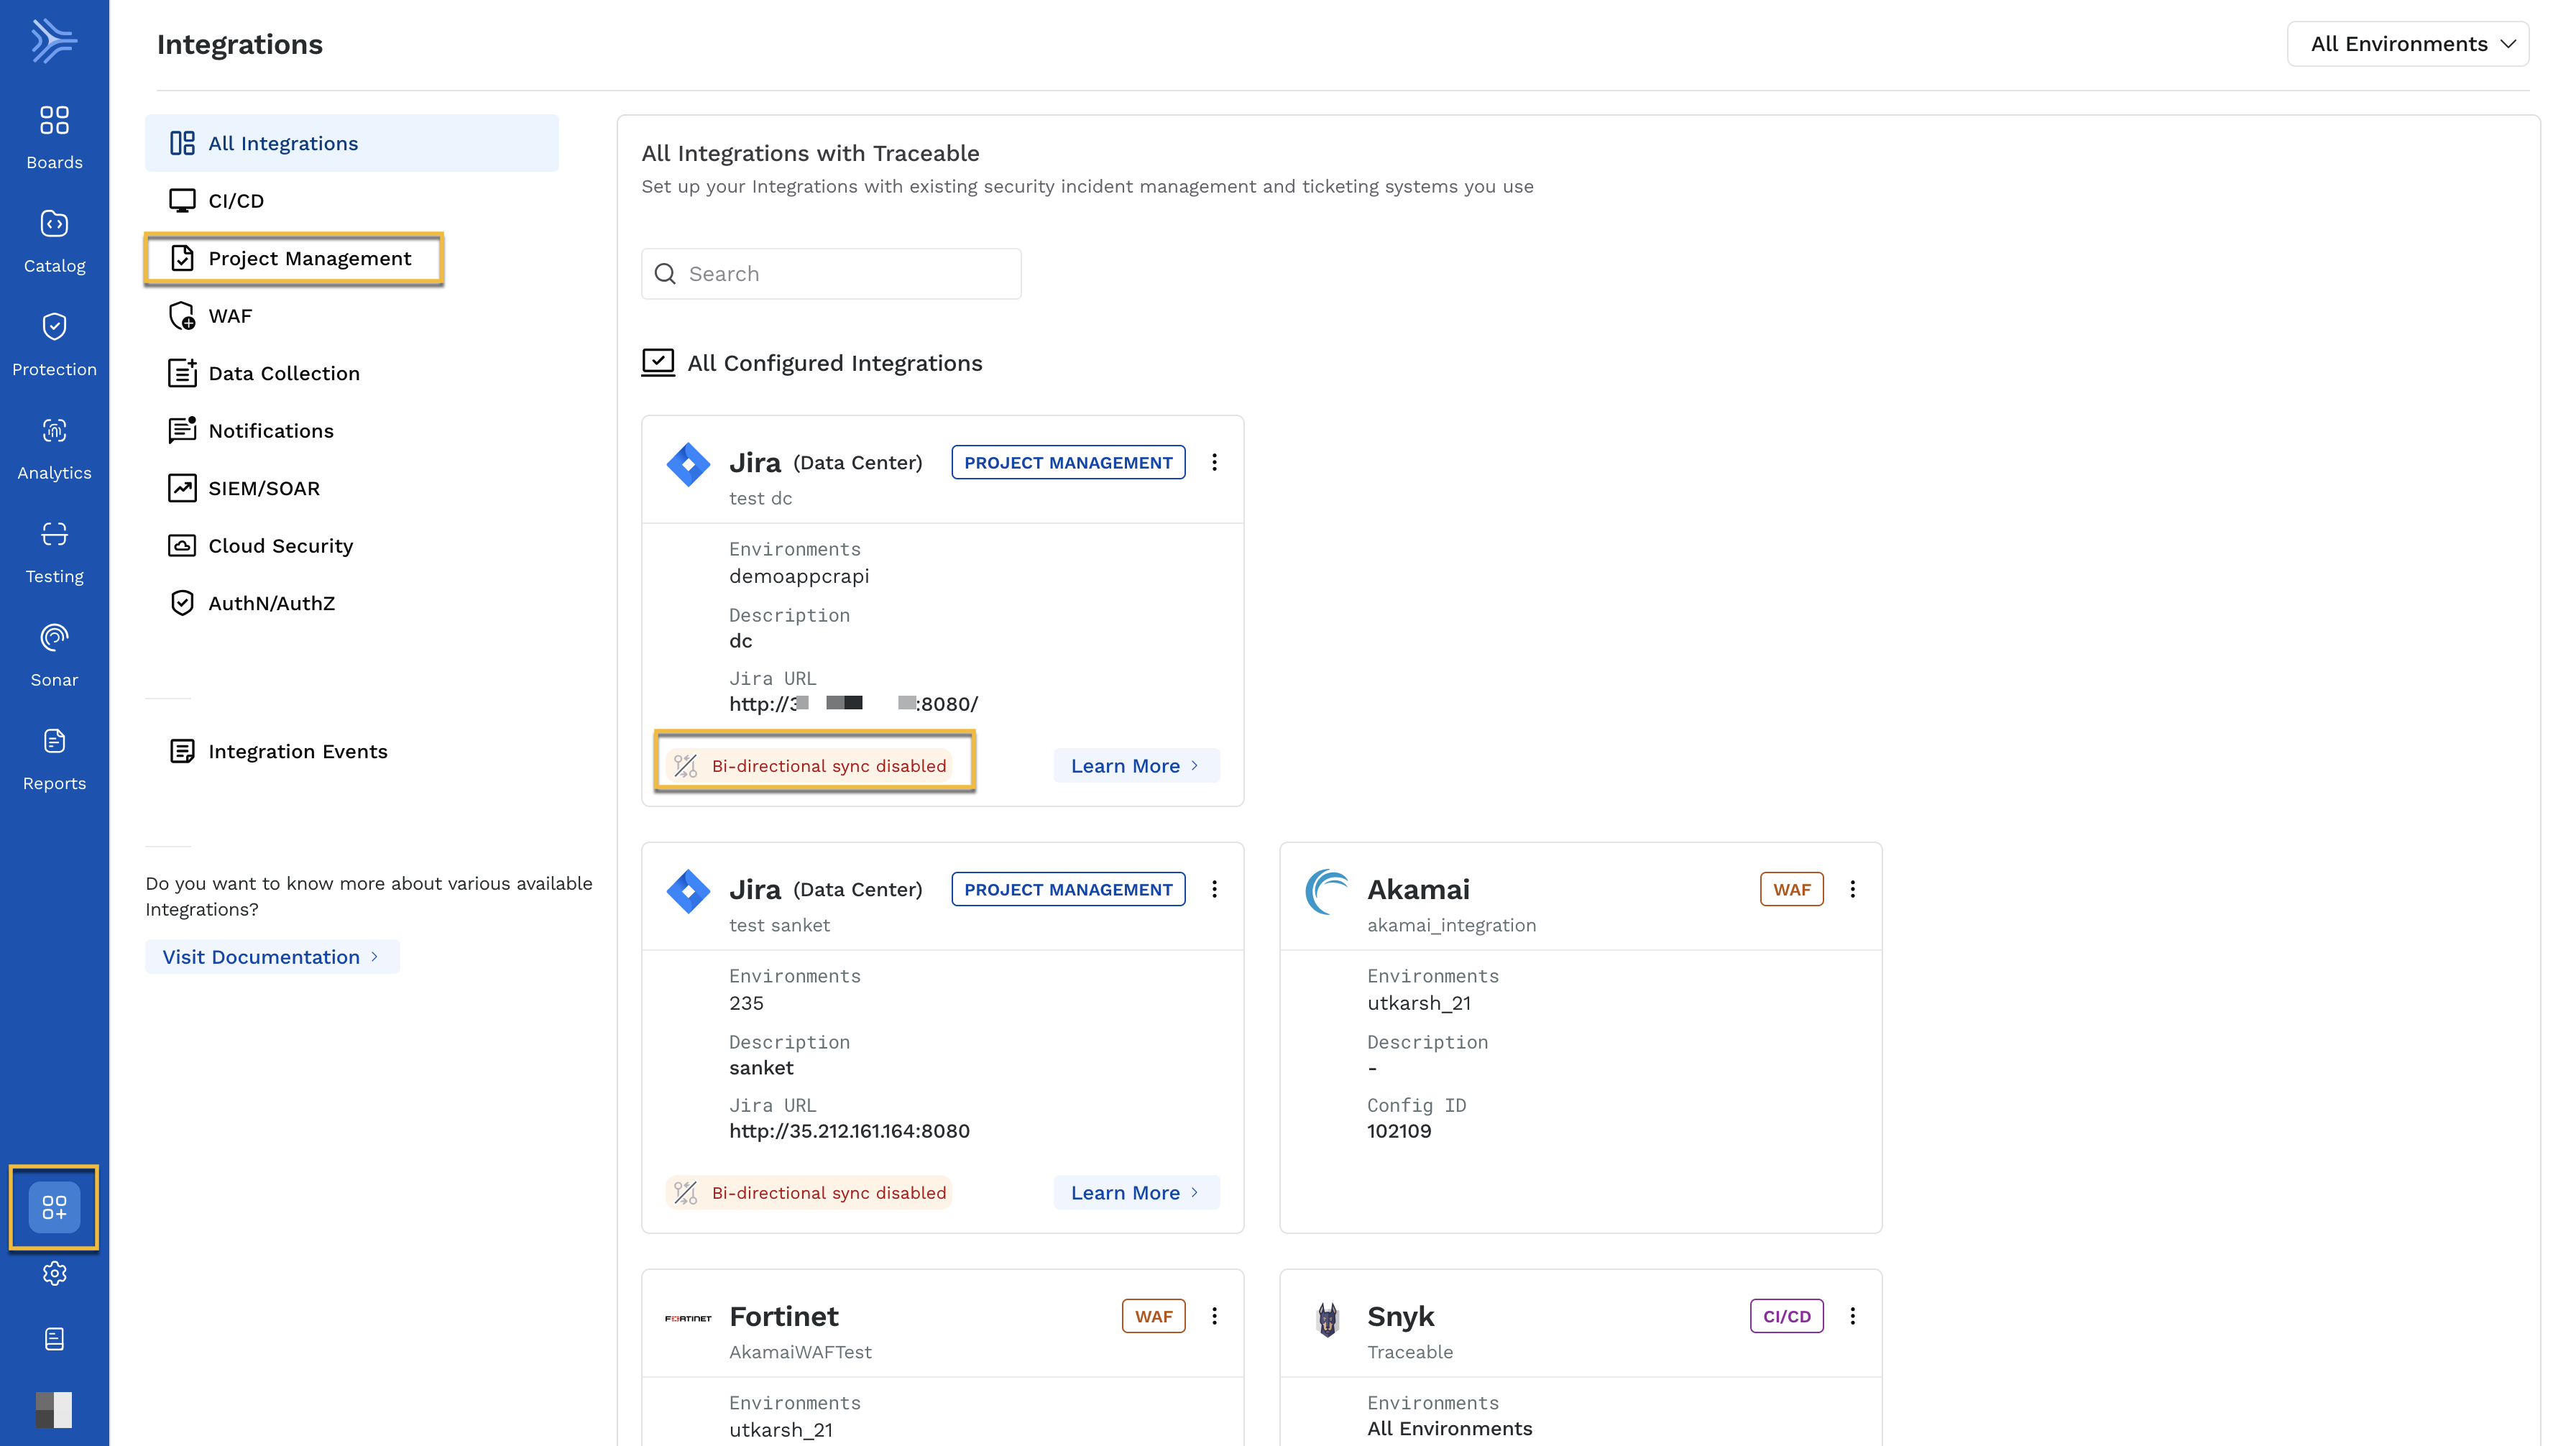
You can configure Bidirectional Sync in continuation of the previous step or or you can configure it later. If you choose to configure it later, navigate to Integrations → Project Management and choose the Jira card. Note that in this case, the card will show Bidirectional sync disabled, as shown below.
Click on the card to configure Bi-directional sync.
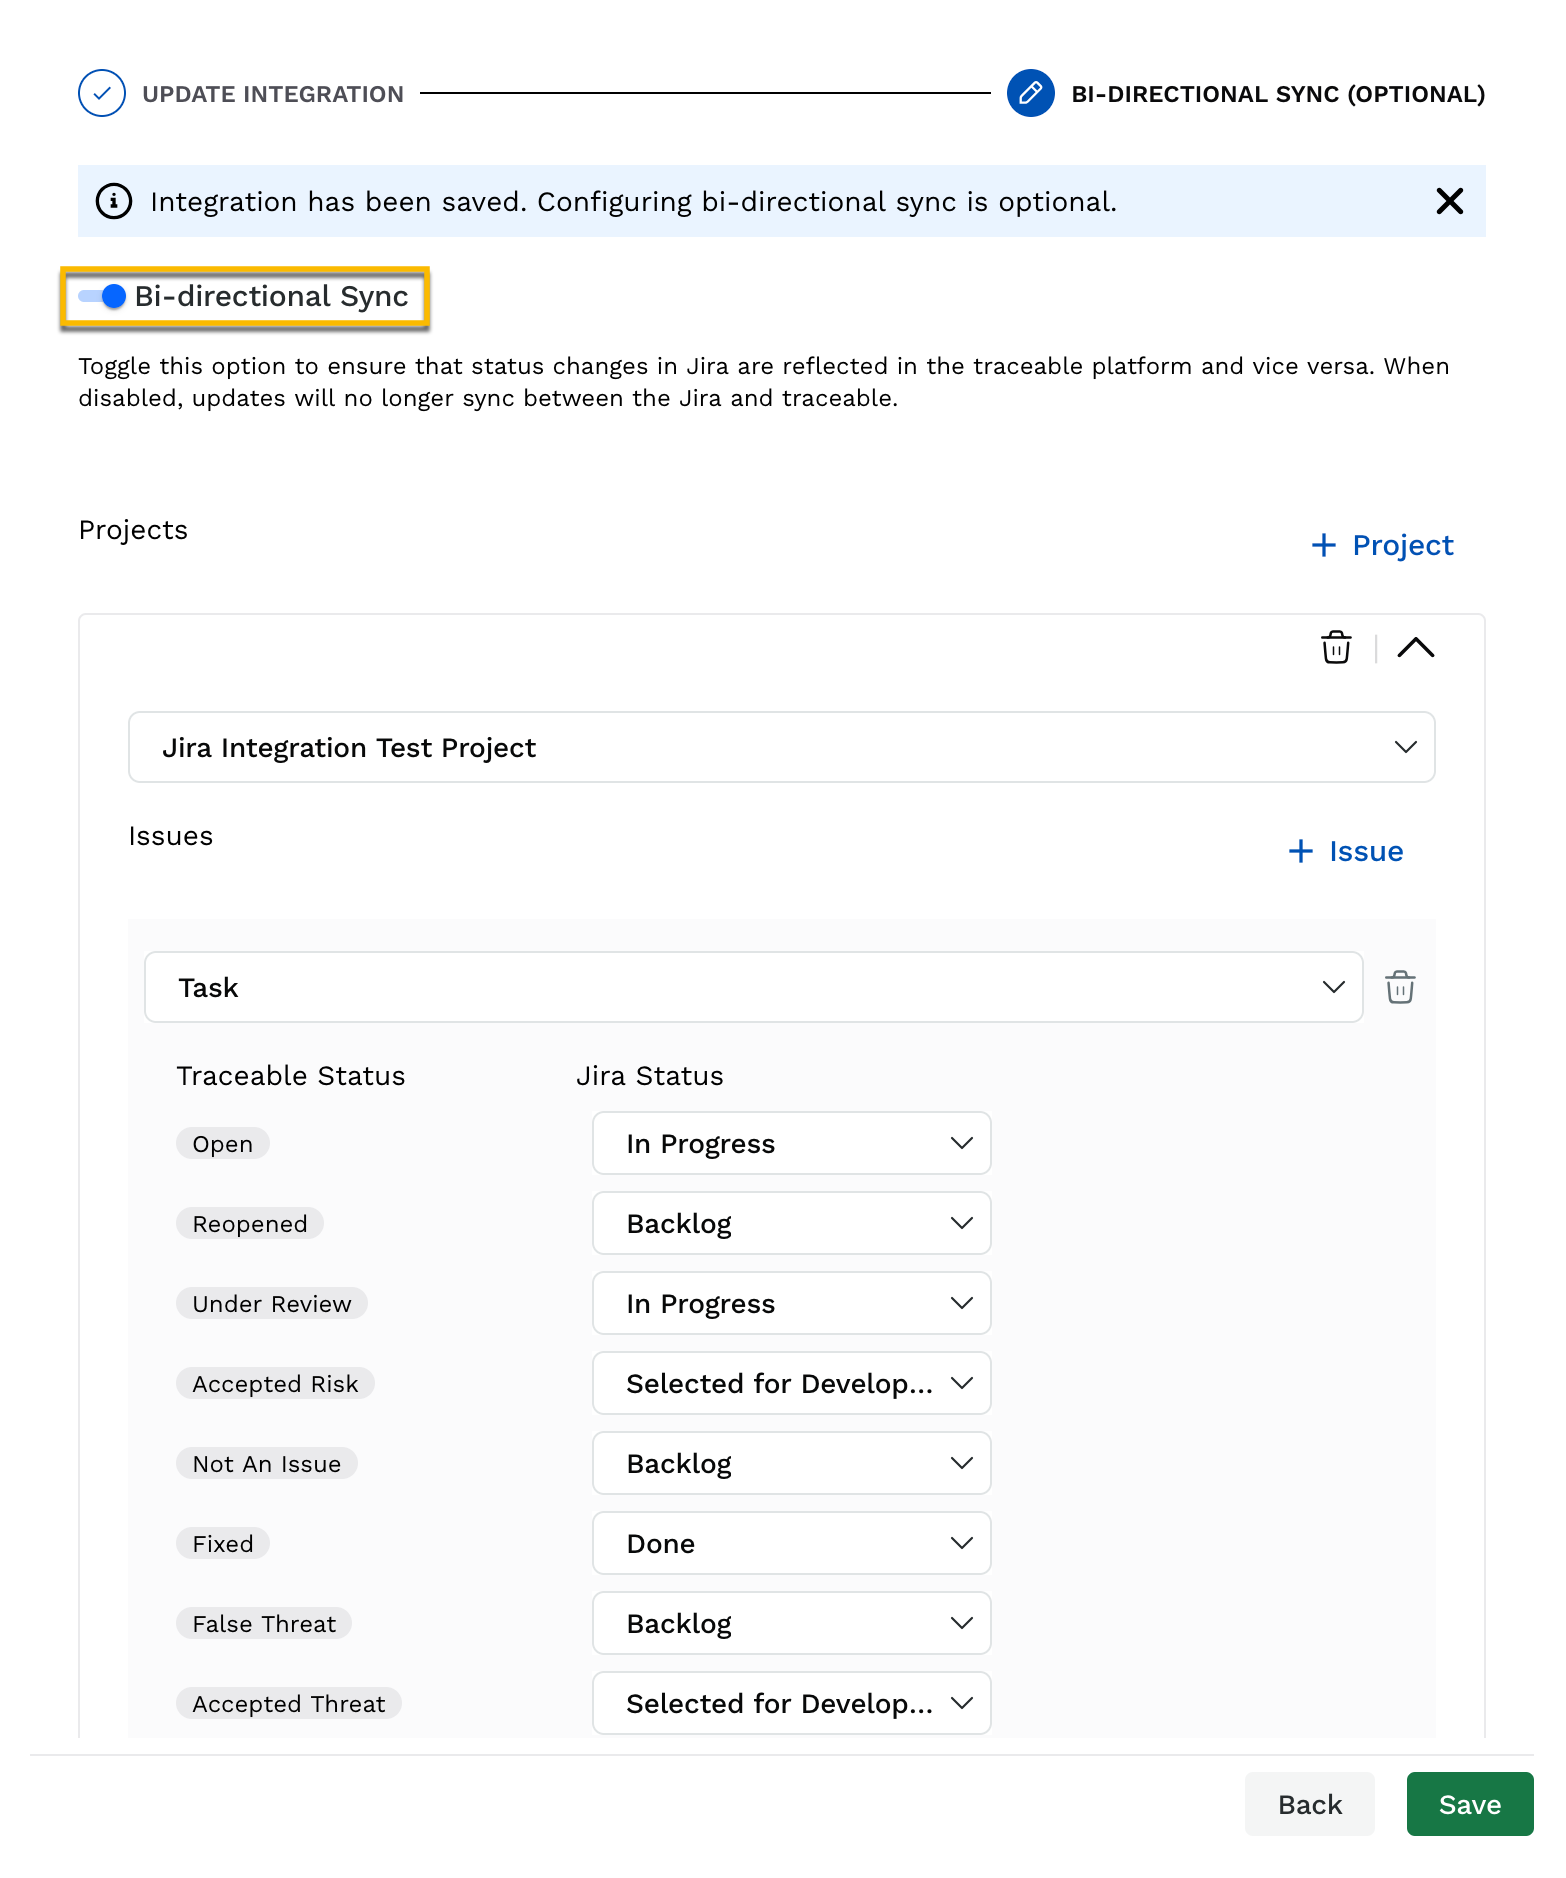
Enable Bidirectional Sync:
Navigate to Integrations > Project Management in Traceable.
Select Jira and go to the Update Integration page.
Toggle Bidirectional Sync to enable it.
Map Traceable Statuses to Jira:
Select a Jira project from the dropdown.
Choose an Issue Type (e.g., Task, Bug, Story).
Map each Traceable status to its corresponding Jira status.
All statuses must be mapped.
Click Save to finalize the configuration.
Key Considerations
Only mapped issues will sync. If a ticket is created in Jira but its issue type is not mapped in Traceable, it will not sync.
Sync applies only to tickets created in Jira through Traceable.
Disabling sync stops automatic updates. The integration remains, but statuses will not update until sync is re-enabled.