Updates (April 2026 to June 2026)
April 2026 — Updated the topic to add information as per the latest Traceable user interface.
April 2026 — Updated the topic to add information about the status log in the detailed threat actor investigation. For more information, see Investigate a Threat Actor.
The Threat Actors page in Traceable enables you to identify, investigate, and respond to threats that affect your APIs and applications. It provides a comprehensive view of users (both authenticated and anonymous) and highlights malicious behavior.
What will you learn in this topic?
By the end of this topic, you will be able to understand:
The use of threat actors and how you can leverage them.
The steps to navigate the threat actor workflow.
The key components of the Threat Actors page.
How to investigate and take action on suspicious actors.
Understand threat actors
Threat Actors in Traceable provide a unified, behavioral view of users interacting with your APIs. It helps you quickly identify, prioritize, and act on potential threats based on who is involved, what they are doing, and where the activity is occurring. Traceable continuously monitors your application and API traffic to learn normal behavior patterns. Based on this learning, it creates a baseline for your application. If and when the behavior deviates from the baseline, Traceable flags such interactions as anomalies. As the number of anomalies raised by a specific source increases, Traceable labels the source as a Threat Actor. This classification is done for the following sources:
Anonymous sources, identified through IP addresses.
Authenticated users, identified through a user ID.
Each threat actor is assigned a threat score based on its severity and frequency of anomalies. For more information, see Threat Scoring.
The following table summarizes when to use threat actors, why they are important, and how you can leverage them to detect, prioritize, and respond to API threats effectively.
When use it? | Why use it? | How can you leverage it? |
|---|---|---|
Identify actors behind API traffic using IP addresses and user IDs to analyze behavior, anomalies, and rule violations. | Connects activity to individual actors, aggregates isolated anomalies into a unified risk signal, surfaces attack patterns and targeted APIs, and enables teams to consistently prioritize responses by severity and impact. | Use threat actors to quickly distinguish normal users from suspicious or compromised users. Analyze behavioral patterns to validate malicious intent, and drill down into affected endpoints to identify and remediate potential weaknesses. Track activity over time to understand escalations, prioritize high-risk actors by severity, and take appropriate actions, such as Deny, Suspend, Allow, Snooze, or Monitor. |
Navigate the threat actor workflow
On the Threat Actors page, you see a consolidated list of detected actors along with key attributes, such as Threat Type, Targeted APIs, and Severity. The following is a list of metrics visible on the Threat Actors dashboard. To view the Threat Actors page, navigate to Protection → Threat Actors.
.png)
Threat Actor View Dashboard
Key components
The Threat Actors page provides a consolidated view of individual actors and their associated activity details, as shown below:
Visualization
It highlights new and existing actors based on the last activity time, along with their distribution by threat level. The following table explains the different attributes available and their corresponding descriptions:
Attribute | Description |
|---|---|
New Actors | Shows newly detected actors based on their latest activity, helping you identify new sources entering your system. |
Existing Actors | Shows known actors with ongoing or past activity, giving you visibility into established sources. |
Actors by Threat Level | Shows the distribution of actors by severity, helping you quickly assess overall risk and prioritize investigation. |
Additionally, you can choose to download the relevant data according to your requirements using the download ( ![]() ) icon.
) icon.
Threat list
It highlights the actor’s details, including user ID or IP address, threat level, associated environment, reputation, and activity time. The following table explains the key attributes associated with each actor and how they help you assess and respond to potential threats:
Attribute | Description |
|---|---|
Actor | Indicates the source of activity, identified by attributes such as an IP address or a user identifier. |
Threat Level | Indicates the severity assigned to the actor based on detected behavior. |
Status | Indicates the current enforcement state applied to the actor. |
IP Address | Indicates the originating IP address associated with the actor. |
IP Reputation Level | Indicates the risk associated with the IP based on reputation intelligence. |
Environment | Indicates the environment in which the actor's activity is observed. |
Total Events | Indicates the number of events generated by the actor, reflecting activity volume. |
Last Activity Time | Indicates the most recent interaction observed from the actor. |
Created Time | Indicates the time when the actor was first identified. |
Note
While the page displays details for All Environments by default, you can use the Environments drop-down in the page’s top right corner and view the information according to your requirements.
Investigate a threat actor
After you have filtered threat actors according to your requirements, you can drill down into a specific threat actor to view its behavior in detail. To drill down into a threat actor, you can click the corresponding row. Traceable displays some key details about the threat actor in the following tabs:
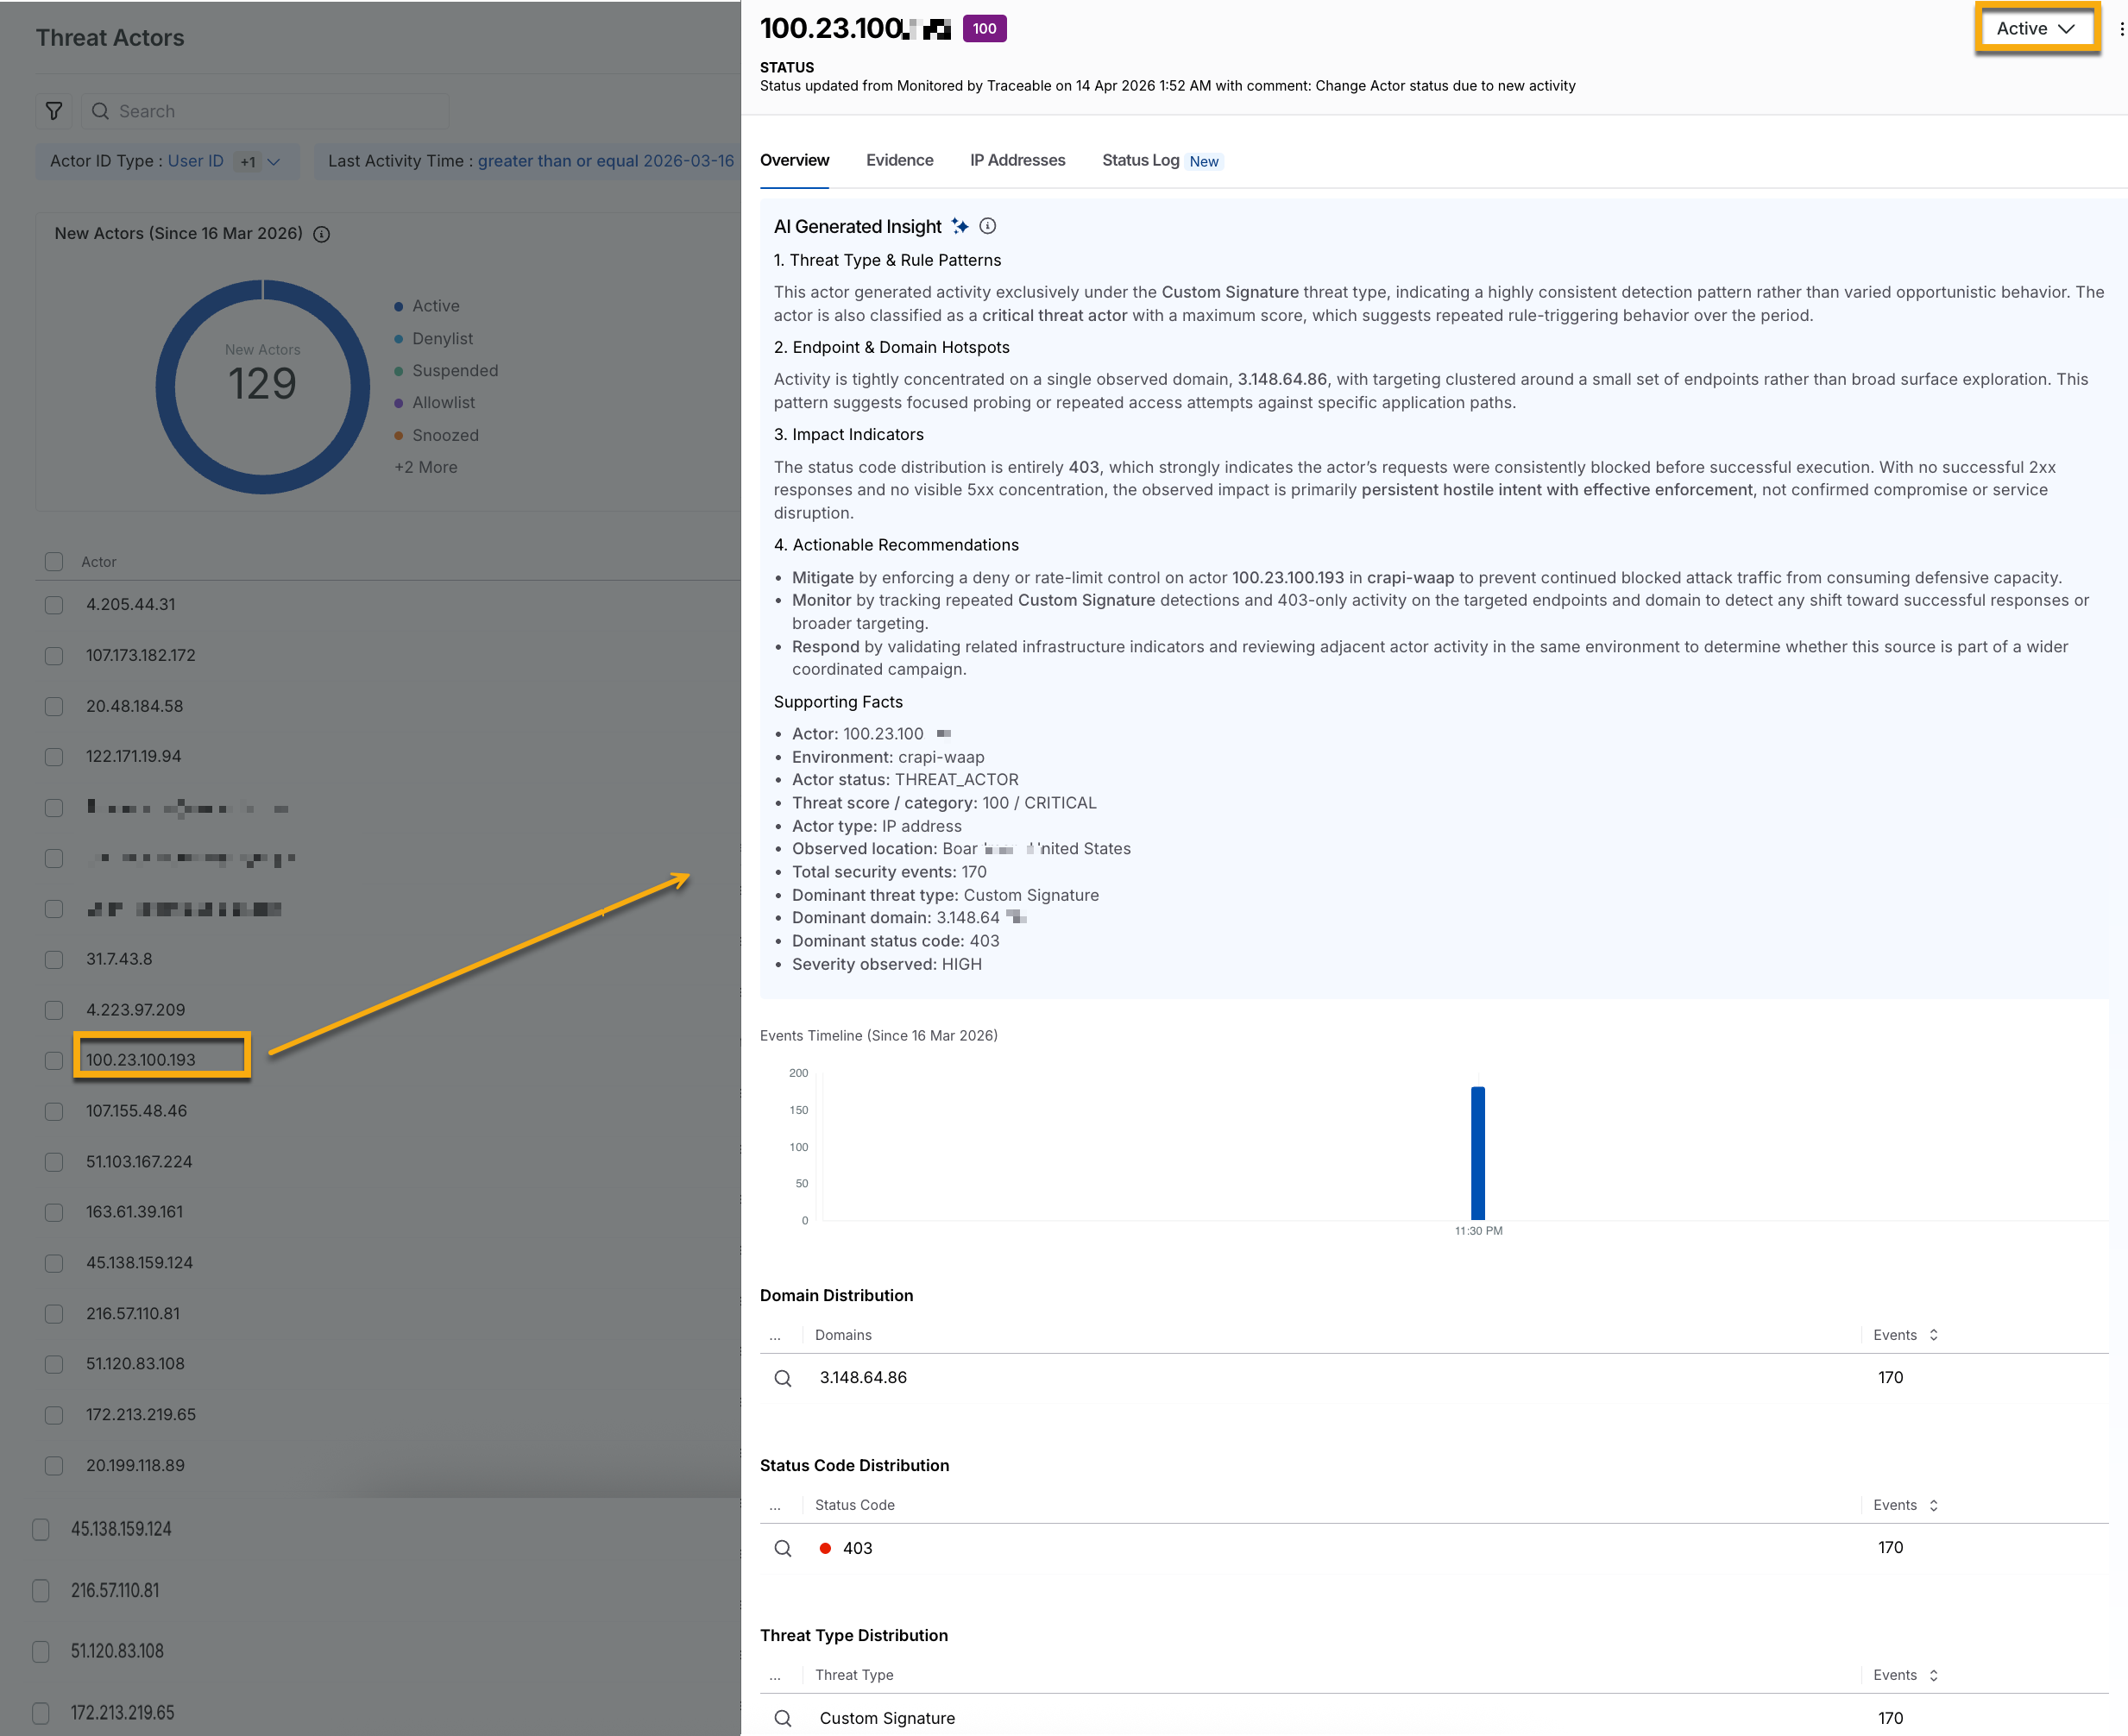
The Overview tab provides a summary of the threat actor’s activity.
.png)
Threat Actor Overview
The following table helps you understand the threat actor’s focus:
Widget | Description |
|---|---|
AI Generated Insight | Displays a summary of the threat type and rule patterns, including impact indicators, recommended actions, and supporting context for the threat actor.
|
Events Timeline | Shows the number of events generated by the threat actor over the past 90 days to help identify activity trends and relevance. |
Domain Distribution | Provides a breakdown of affected domains along with the number of events associated with each domain. |
Status Code Distribution | Displays the distribution of response status codes and the corresponding number of events for each. |
Threat Type Distribution | Shows the distribution of threat types triggered by the actor, along with the number of events for each type. |
The Evidence tab provides granular details for every detection event. The Events Timeline widget displays the events generated by the actor in the last 24 hours. It helps you identify whether the activity followed a recurring pattern, such as a scheduled automation, or appeared randomly across the time range.
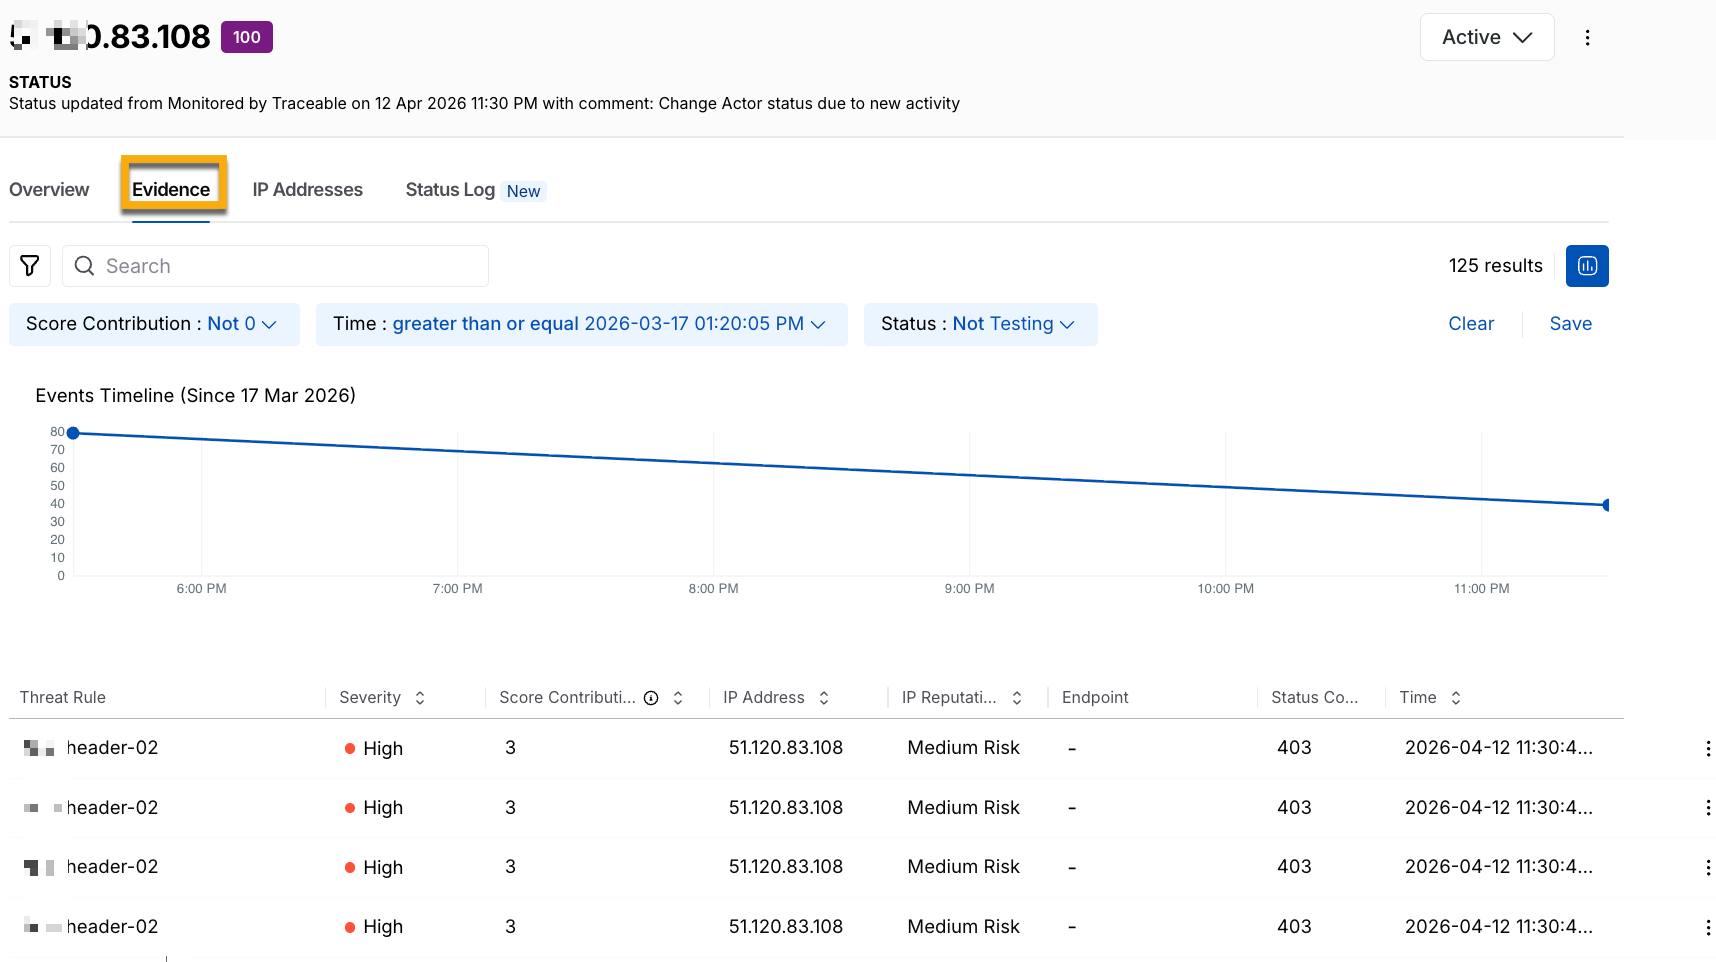
Threat Actor Evidence
The following table helps you understand the actor’s behavior and how and where it affected your application:
Widget | Description |
|---|---|
Threat Rule | Displays the rule that was triggered for the event. |
Severity | Displays the risk level of the event, for example, High. |
Score Contribution | Displays how much the event contributes to the overall threat score. |
IP Address | Displays the source IP address of the request. |
IP Reputation | Displays the risk classification of the source IP. |
Endpoint | Displays the targeted API endpoint. |
Status Code | Displays the response status code, for example, 403. |
Time | Displays when the event occurred. |
The IP Addresses tab lists all IPs used by the threat actor.
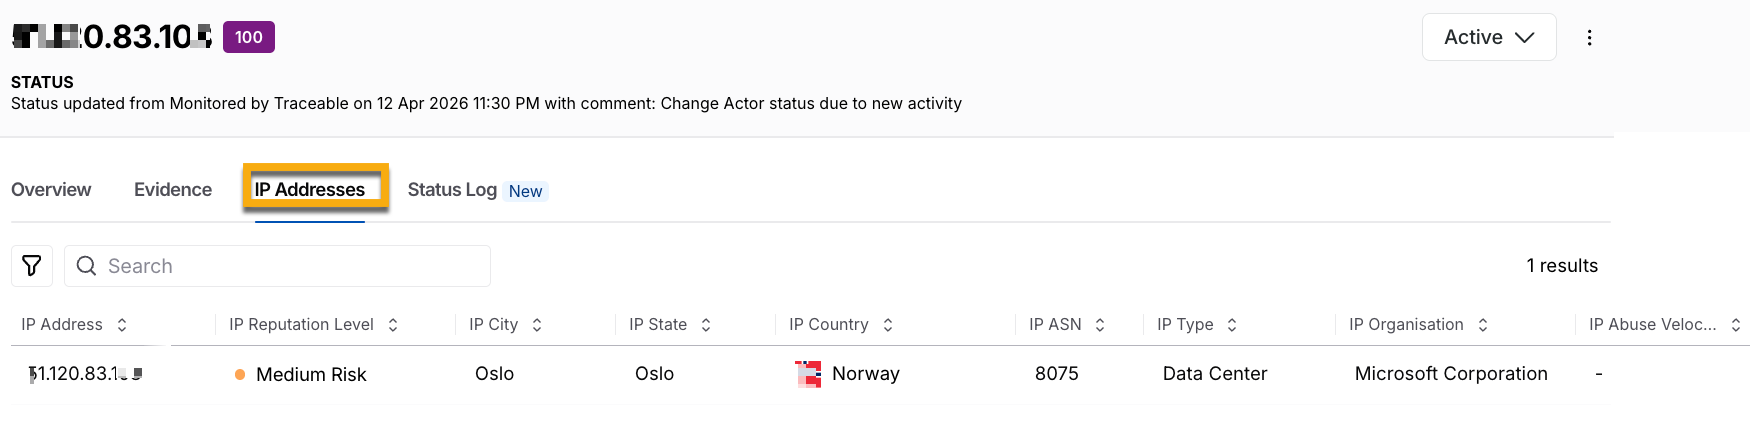
IP Addresses
The following table helps you determine whether the actor is operating from a static or dynamic IP address:
Widget | Description |
|---|---|
IP Address | Displays the source IP address of the request. |
IP Reputation | Displays the risk classification of the source IP. |
IP City | Displays the city associated with the source IP. |
IP State | Displays the state or region associated with the source IP. |
IP Country | Displays the country associated with the source IP. |
IP Type | Displays the IP type, such as data center, VPN, or proxy. |
IP Organization | Displays the organization or network provider associated with the source IP. |
The Status Log tab helps you track updates directly within each item, with detailed change logs, without having to search through extensive action logs. The log displays changes in order, so you can easily see when something was created, updated, reopened, or resolved. It includes key details for each change, such as the timestamp, which records the exact time of the modification, and Comments, which describe the change. It also includes Status, which reflects the threat actor's current or updated state, for example, updated to Suspended, and attribution, which identifies the specific user or system that performed the action.
.png)
Status Log for Threat Actors
Note
The status change logs are retained for a period of 90 days.
Threat actor mitigation
While Traceable dynamically updates a threat actor’s status based on its activity, you can modify its status according to your requirements. The status you select applies to the threat immediately.
Available statuses
The following table describes the different threat actor status and their purpose:
Threat Actor Status | Description |
|---|---|
Active | This is the default status assigned to a threat actor when Traceable identifies it. This means that the actor has been active recently. |
Monitored | This is the status assigned to an actor in either of the following scenarios:
|
Resolve | This is the status assigned to an actor when it is no longer a threat. Moving a threat actor to this state resets its severity to 0. Even after you update an actor to this state, Traceable continues to monitor traffic and reports the threat again if it detects any malicious activity associated with it. Additionally, Traceable moves it to the Active status. |
Allow | This is the status assigned to an actor when you want it to access your application ecosystem, even if it engages in malicious activities. |
Snooze | This is the status assigned to an actor when you wish to temporarily allow it to access your application. When selecting this status, you can specify the duration (1 hour to 1 week) for which you wish to allow the actor. |
Suspend | This is the status assigned to an actor when you wish to temporarily block it from accessing your application. When selecting this status, you can specify the duration (1 hour to 1 week) for which you wish to block the actor. |
Deny | This is the status assigned to an actor when you wish to permanently block it from accessing your application. |
Note
If an actor in the Suspend or Deny status uses additional IP addresses, Traceable blocks them as well. Further, Traceable maintains a list of such IP addresses and blocks its future access unless you move the actor to a different status.
Update the status
You can update the status of a threat actor using either of the following methods:
Individual Update — Update the status of each threat actor individually.
Bulk Update — Update the status of multiple actors at once.
The following tabs highlight the steps for the above methods:
To update the status of an actor, complete the following steps:
Individual Status Update
In the Threat Actors page, click the actor you wish to update the status for.
In the slide-out panel page’s top right corner, click the Status drop-down and update the status according to your requirements.
To update the status of one or more actors, complete the following steps:
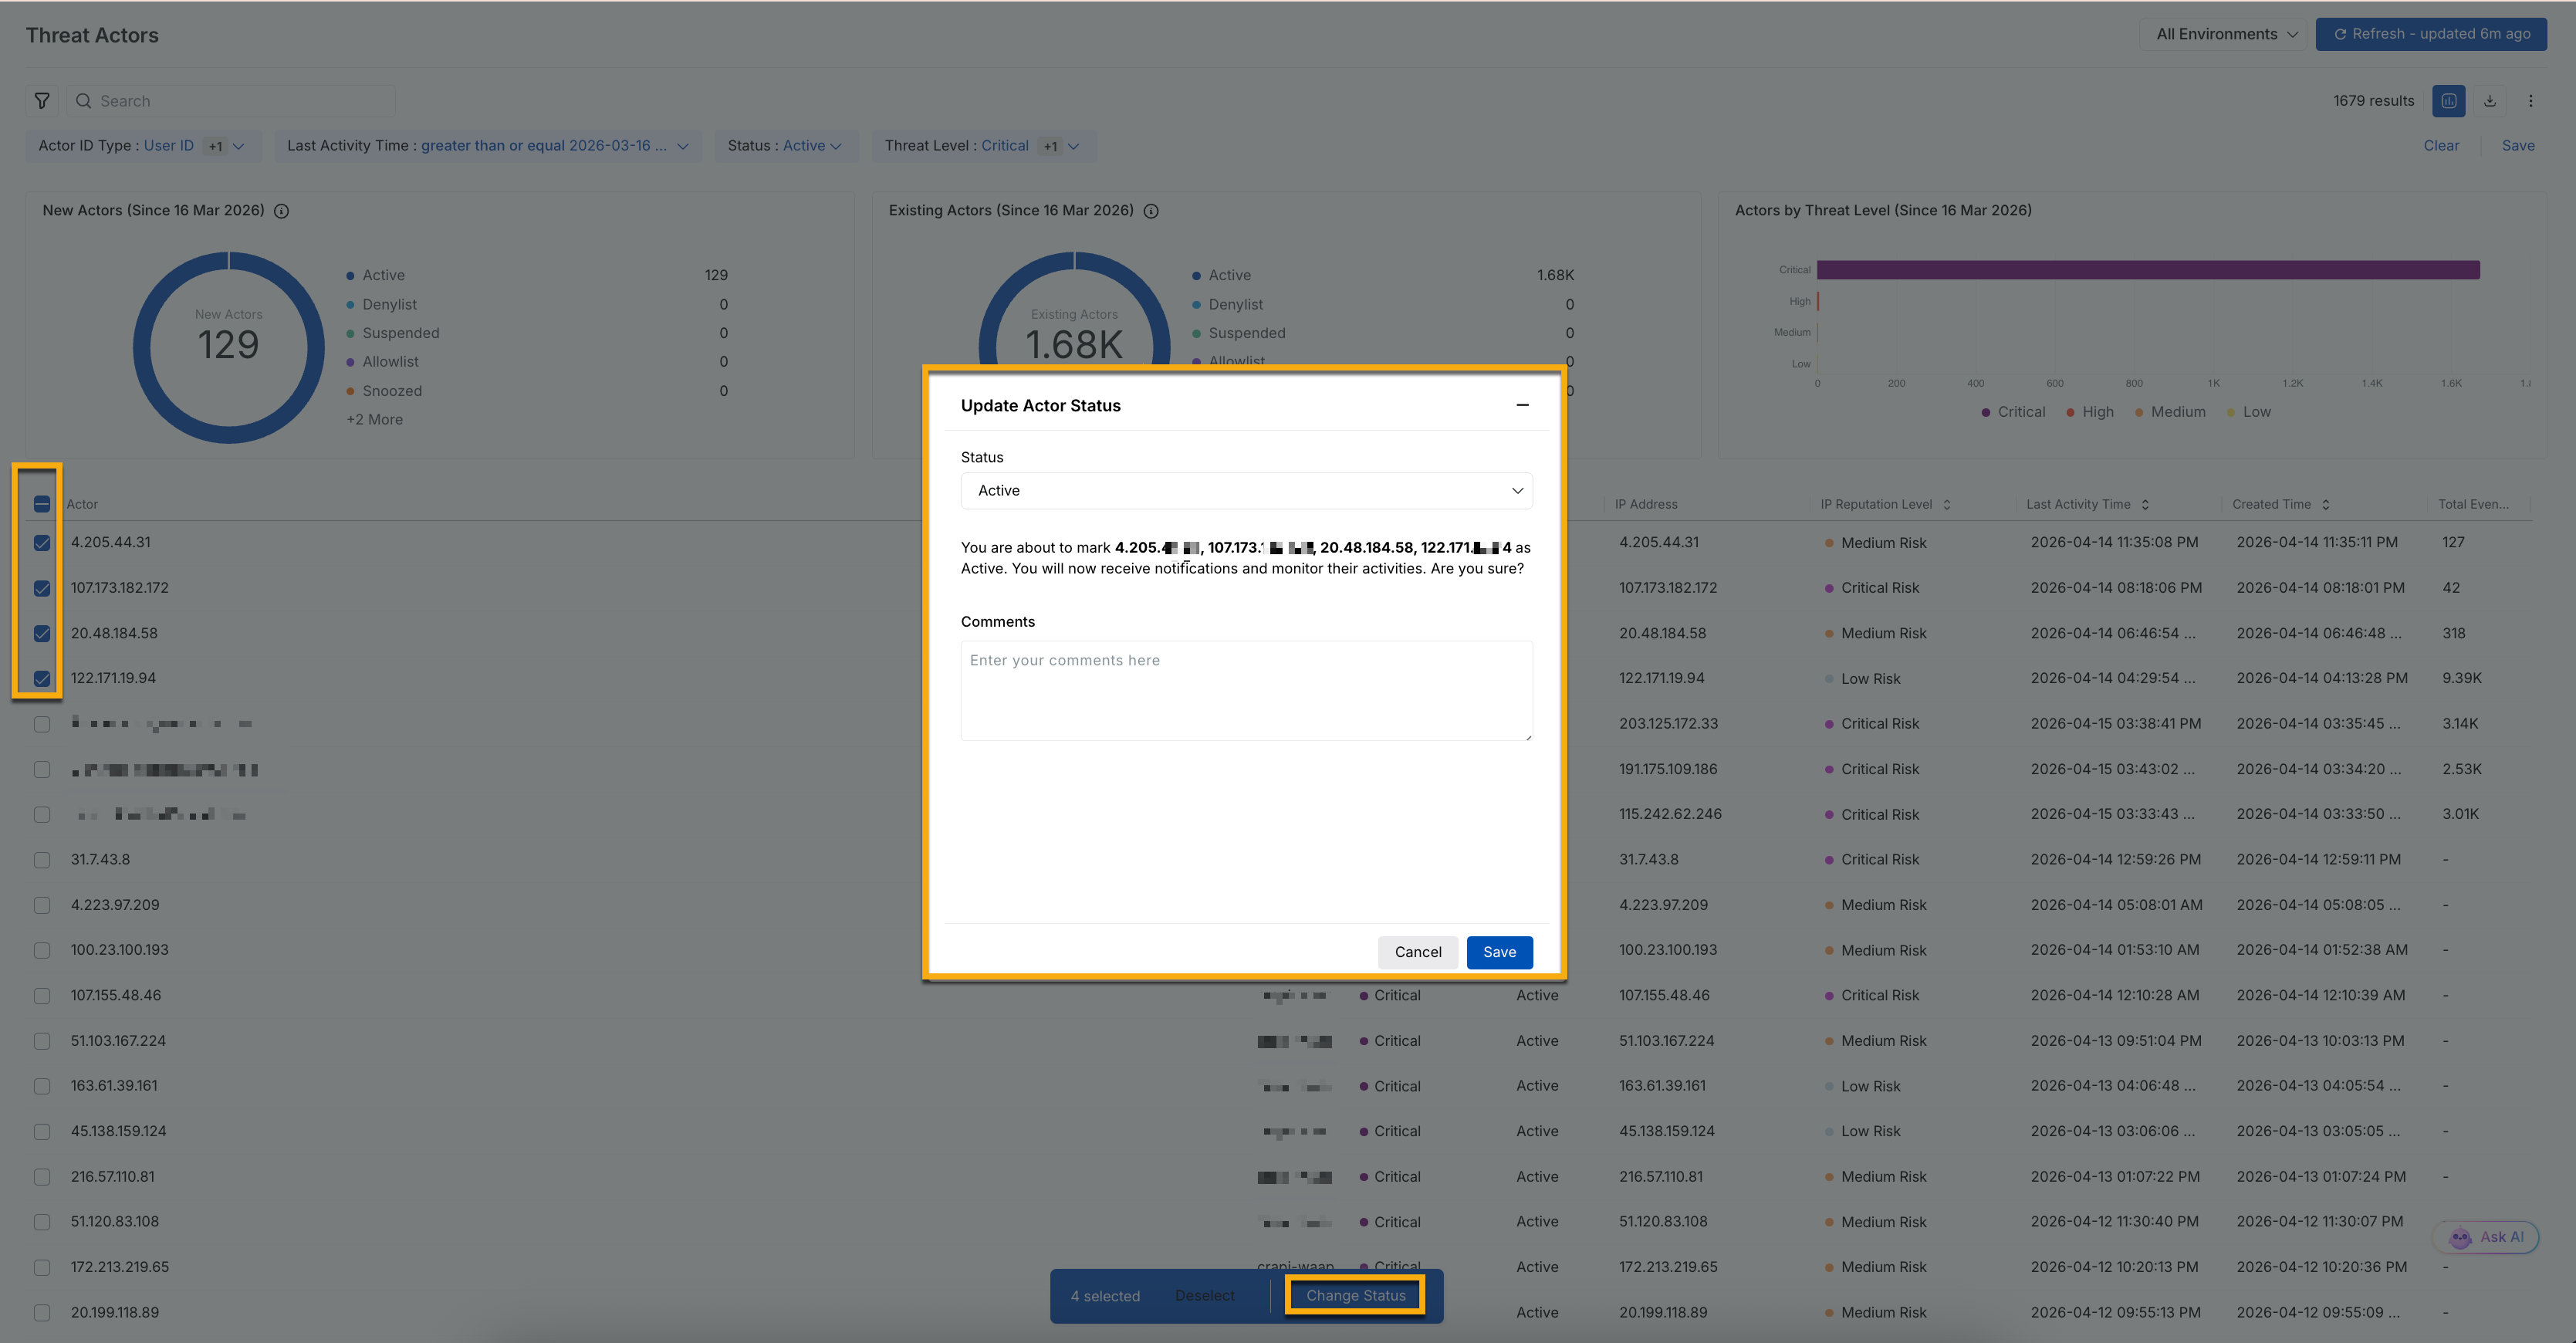
Threat Actor Bulk Update
In the Threat Actors page, select the checkboxes next to the issues that you wish to update the status for.
At the bottom of the page, click Change Status.
In the Update Actor Status pop-up window, select a status from the drop-down list and add comments as needed.
Click Save.
Example — Investigate and block a critical threat actor
Suppose you notice a sudden increase in the number of actors classified as Critical. To investigate further, you filter the actor list and identify a newly observed actor with a threat score of 100, who has triggered multiple Enumeration and Data Loss Prevention (DLP) rules within the last 10 hours.
Select the threat actor and open a slide-out panel that contains the following:
Overview — You observe repeated interactions with authentication endpoints, along with inconsistent and abnormal status codes, indicating potential probing or misuse of login workflows.
Evidence — A clear pattern emerges, such as multiple failed login attempts followed by requests containing unusually large payloads. This behavior is commonly associated with credential-stuffing attempts and potential data exfiltration.
IP Addresses — The actor is operating through a VPN-based infrastructure, suggesting deliberate attempts to mask origin and evade detection.
Based on these signals, you determine that the actor poses a credible threat to your application. You can update the actor’s status to Deny and add a comment summarizing your findings. Now, Traceable blocks this actor and associated IP addresses from accessing your APIs, and logs it for future reference.