Traceable offers a seamless tracing solution for Python-based AWS Lambda functions, enabling you to effectively monitor and secure serverless environments. The integration process involves deploying the Traceable Python and Traceable Collector layers within your Lambda function. These layers work together to capture telemetry data, process it, and send it to the Traceable SaaS platform for advanced observability insights via the Traceable platform agent.
This documentation provides a step-by-step guide to deploying, configuring, verifying, and managing the Traceable layers for Python Lambda functions. It also includes troubleshooting, upgrading, and uninstalling instructions to support your deployment lifecycle.
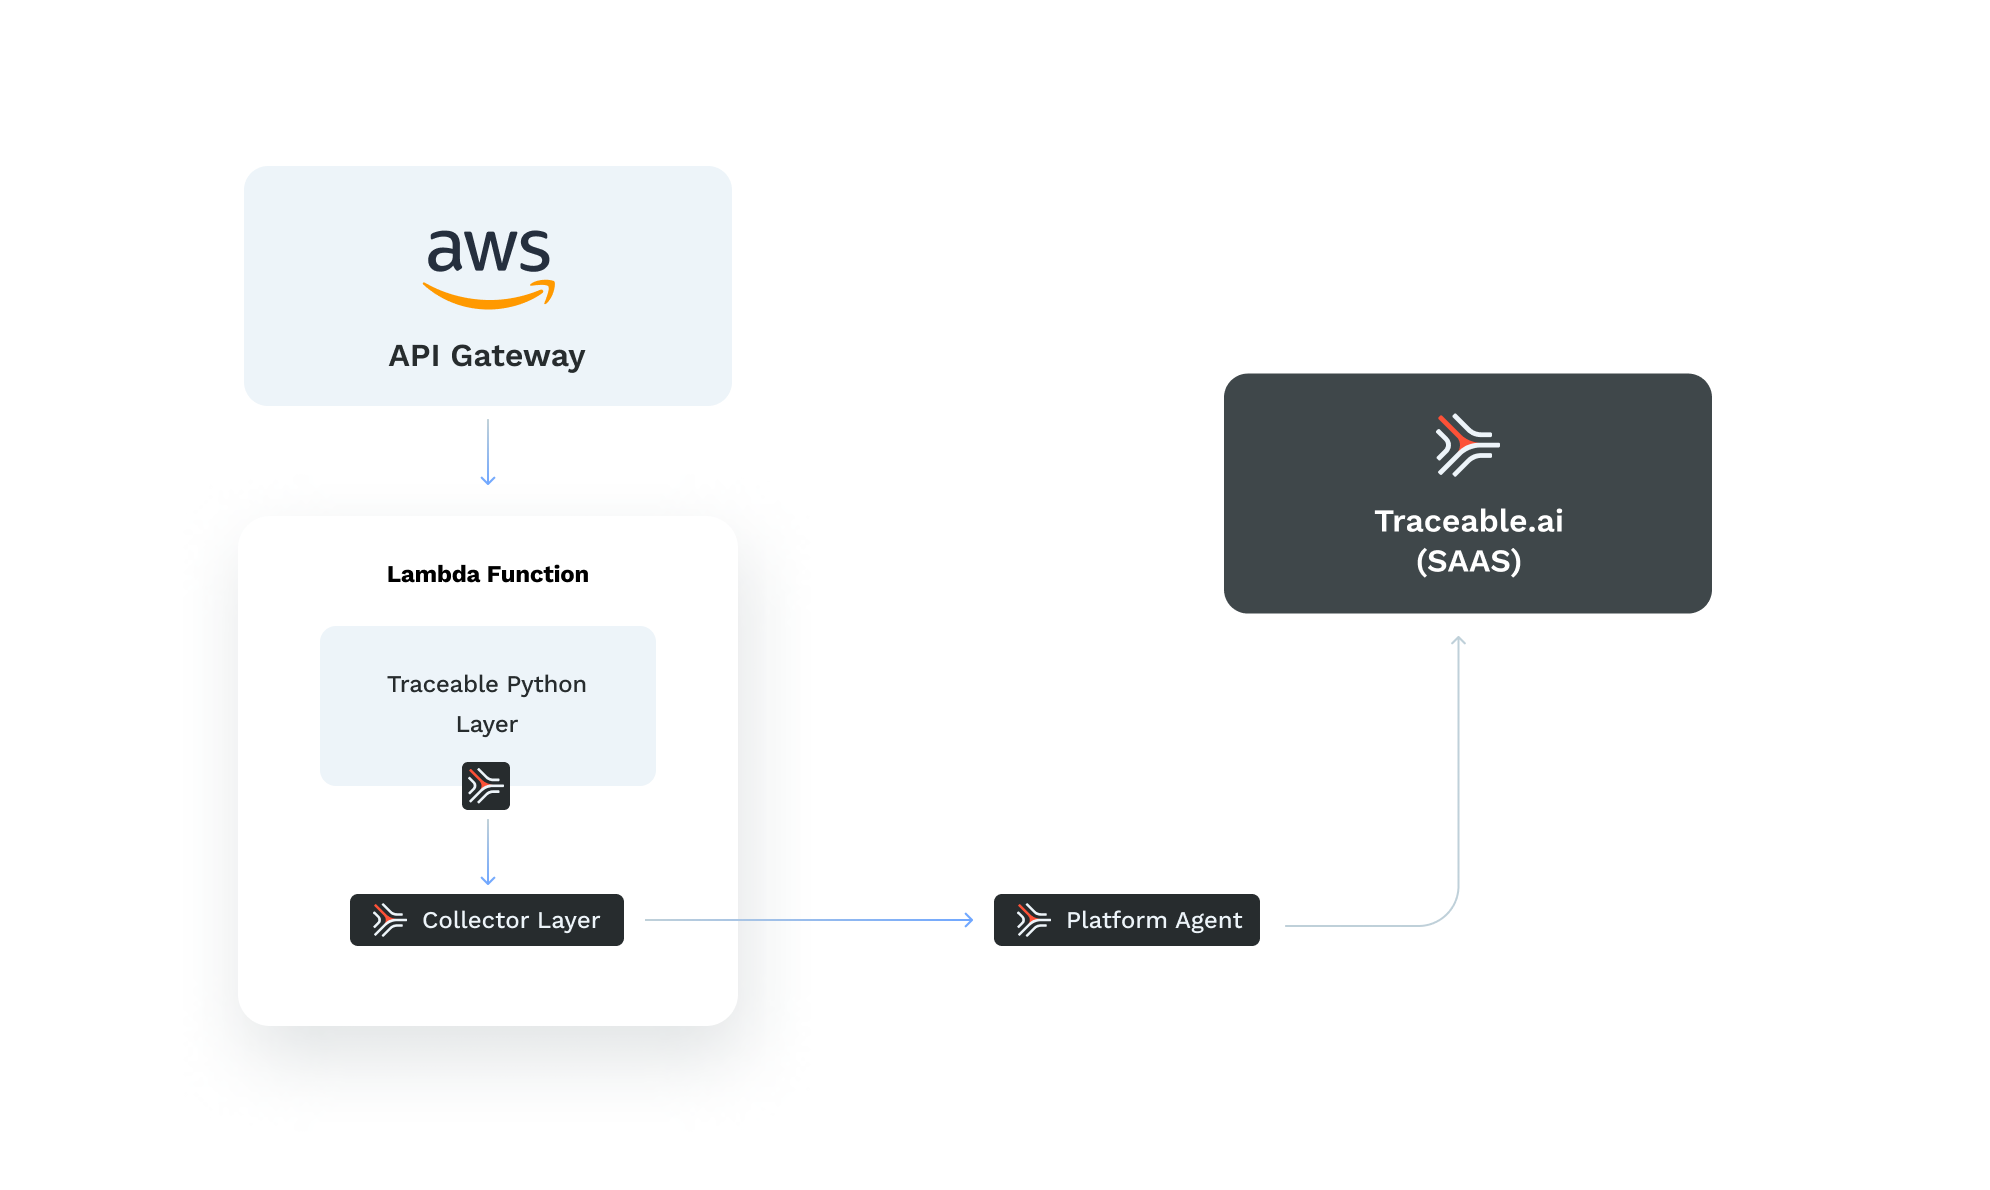
Flow Overview:
Requests flow through AWS API Gateway to the Lambda Function.
Within the Lambda function, the Traceable Python Layer captures telemetry data, which the Traceable Collector Layer processes.
Data is forwarded to the Platform Agent, which sends it to Traceable (SaaS) for actionable observability insights.
Note:
Traceable's Python lambda currently supports only the observability features.
Before you begin
Make a note of the following points before you begin installation and configuration:
Make sure that you have installed and configured the Traceable Platform agent. For more information, see Platform agent.
Note the Traceable Platform agent IP address. It will be used in step 3 during layer configuration.
Make sure that the port number 4318 is available.
The supported Python versions are 3.9, 3.10, 3.11, 3.12
Make sure that you have an AWS account.
Step 1 – Deploy a lambda
To deploy a lambda, you should first find or create a python 3.9, 3.10, 3.11, 3.12 lambda. Make sure that you increase your lambda timeout settings. The default timeout value is 3 seconds. Make a note of the following points:
An API gateway must be on the frontend of the lambda.
The lambda must be using x86_64 architecture. Arm64 is currently not supported.
Step 2 – Add the layers
In step 2, you must add two layers of Traceable python and Traceable collector. Complete the following steps to add the layers:
Log into your AWS account.
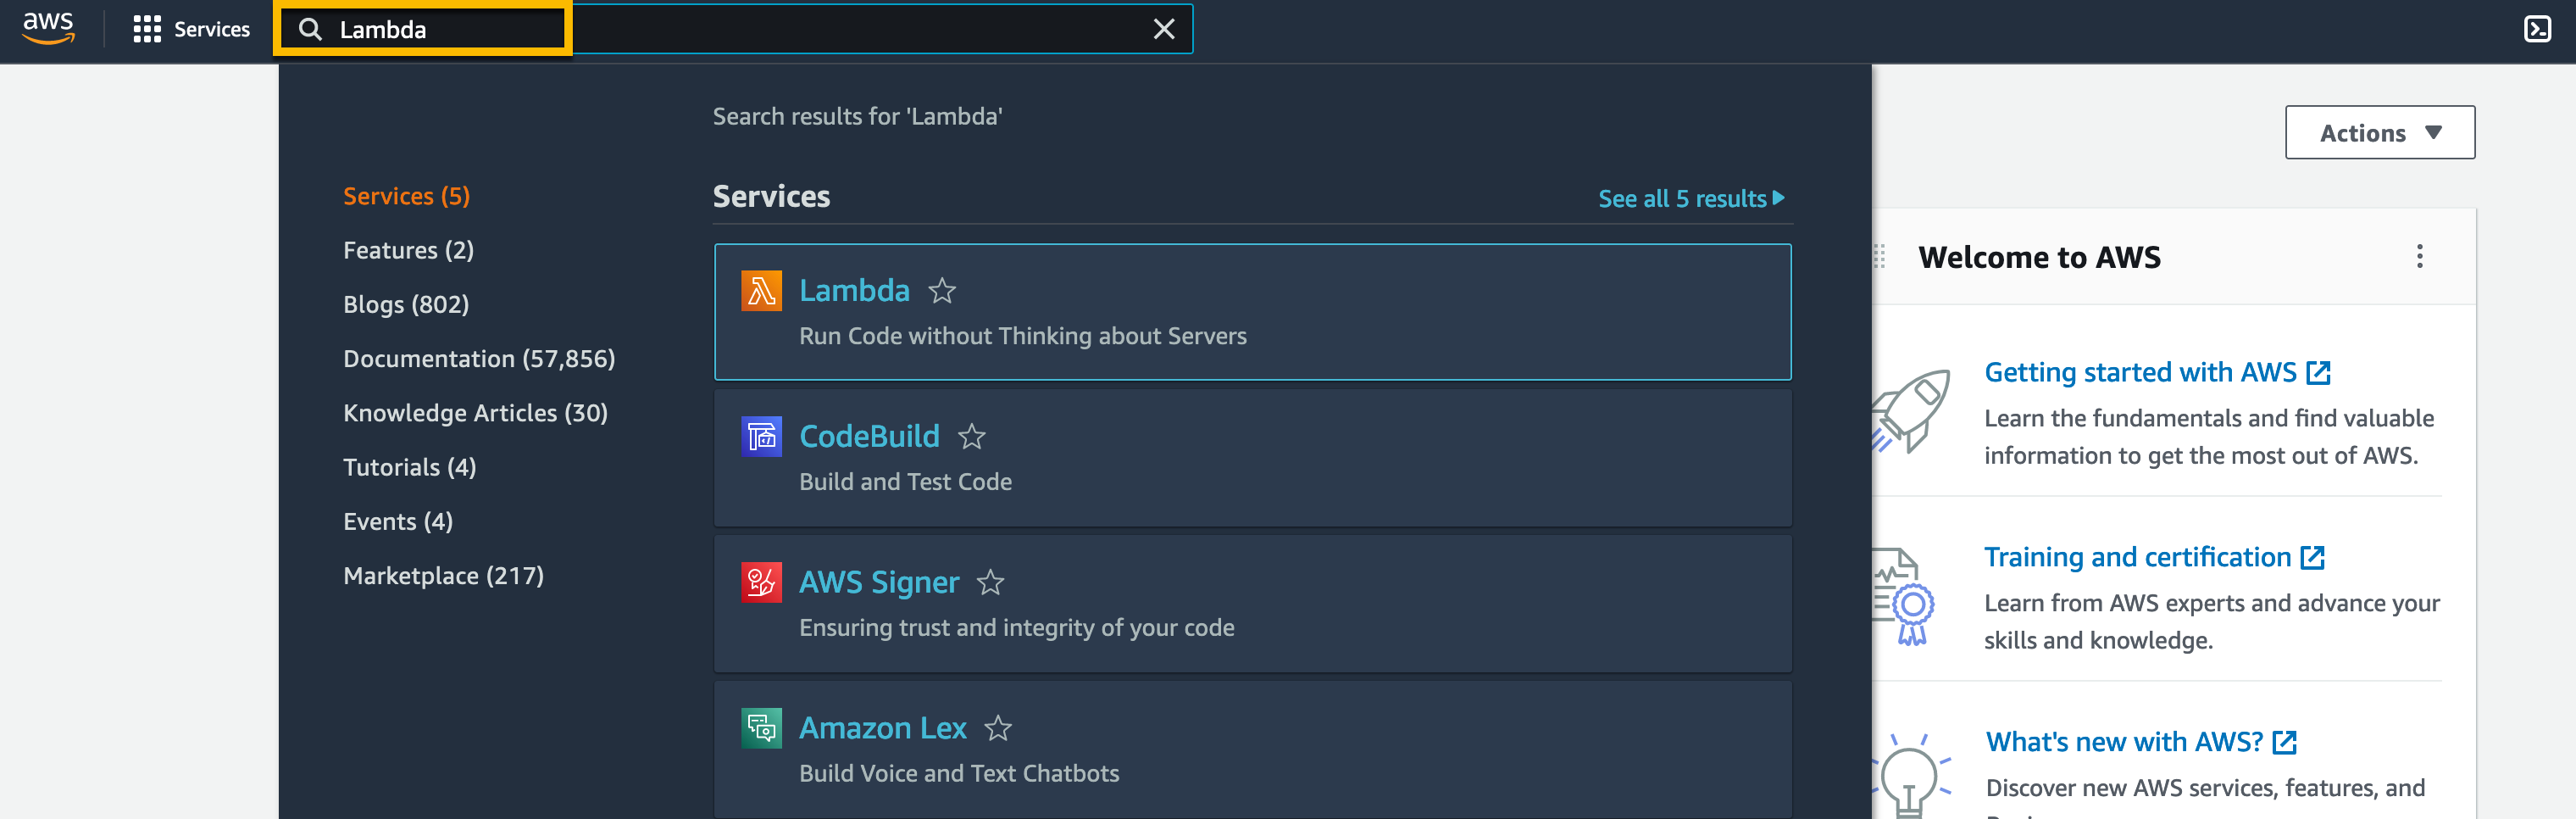
Search for Lambda from the search bar.
Navigate to Functions from the Lambda page and click on the function name that you want to choose.
.png)
Click on the function name. The function page is displayed.
Click on Layers from the function page.
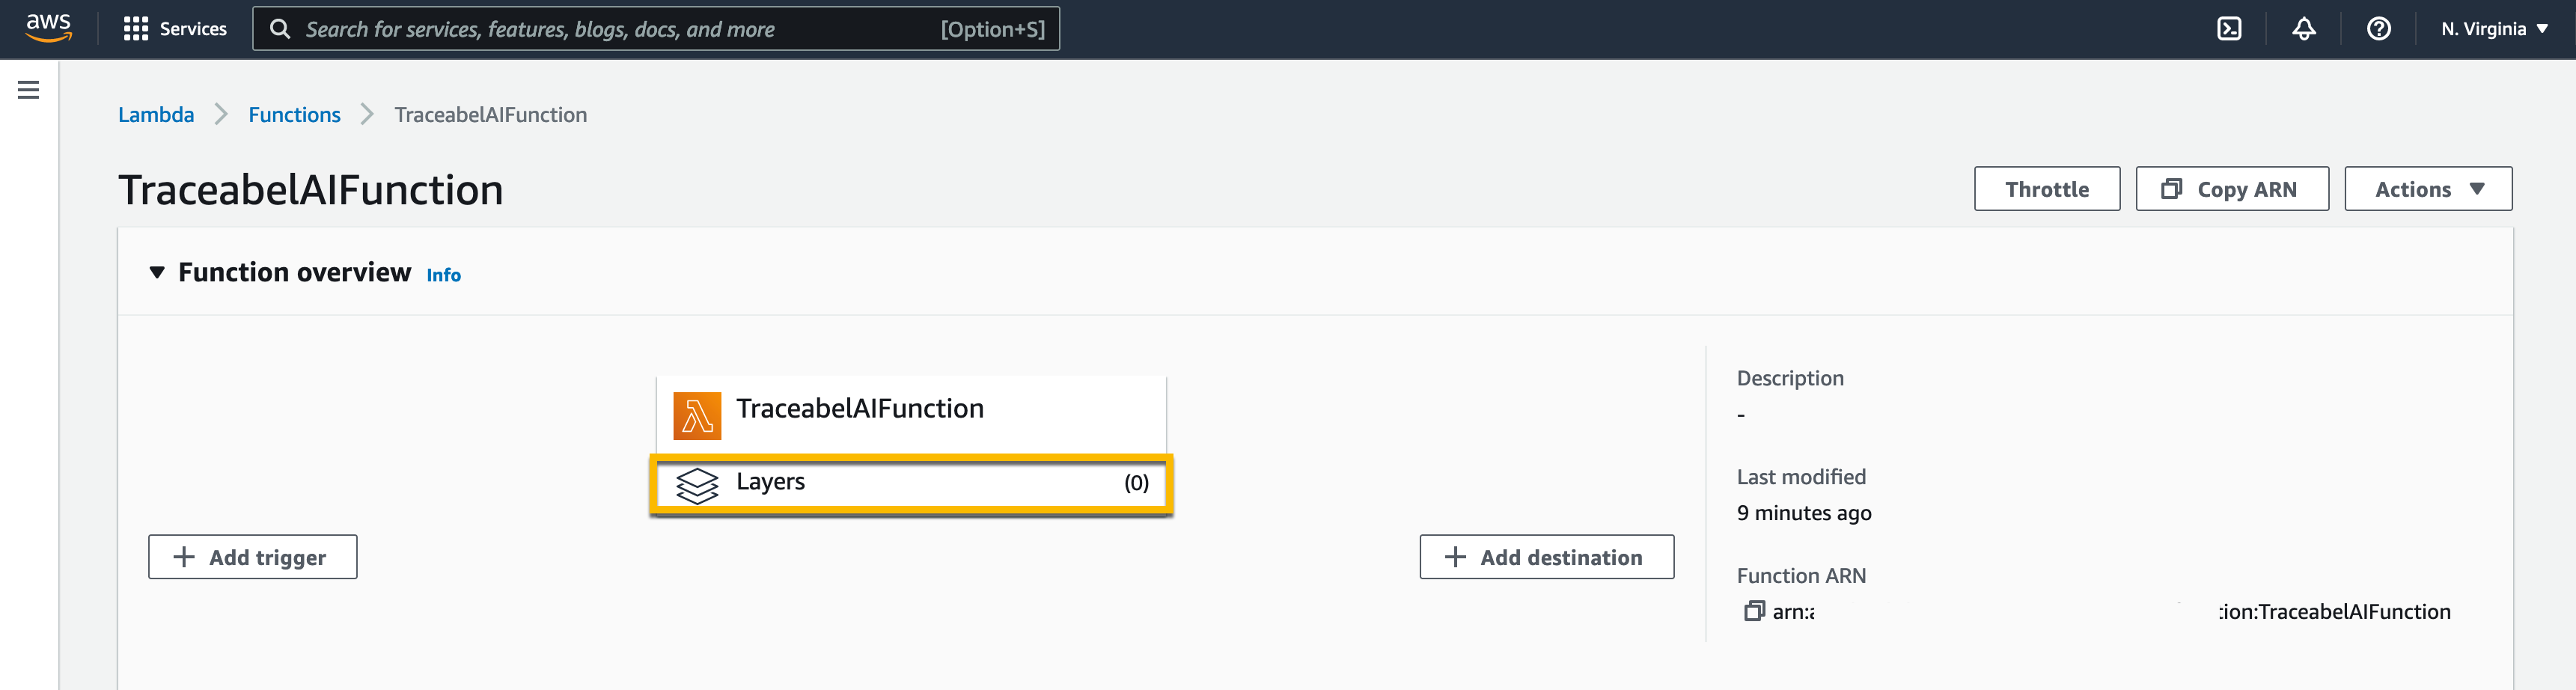
Click on Add a layer from the Layers section.

Click on the Specify an ARN radio button. Enter the ARNs mentioned below for Python and Traceable collector layers.
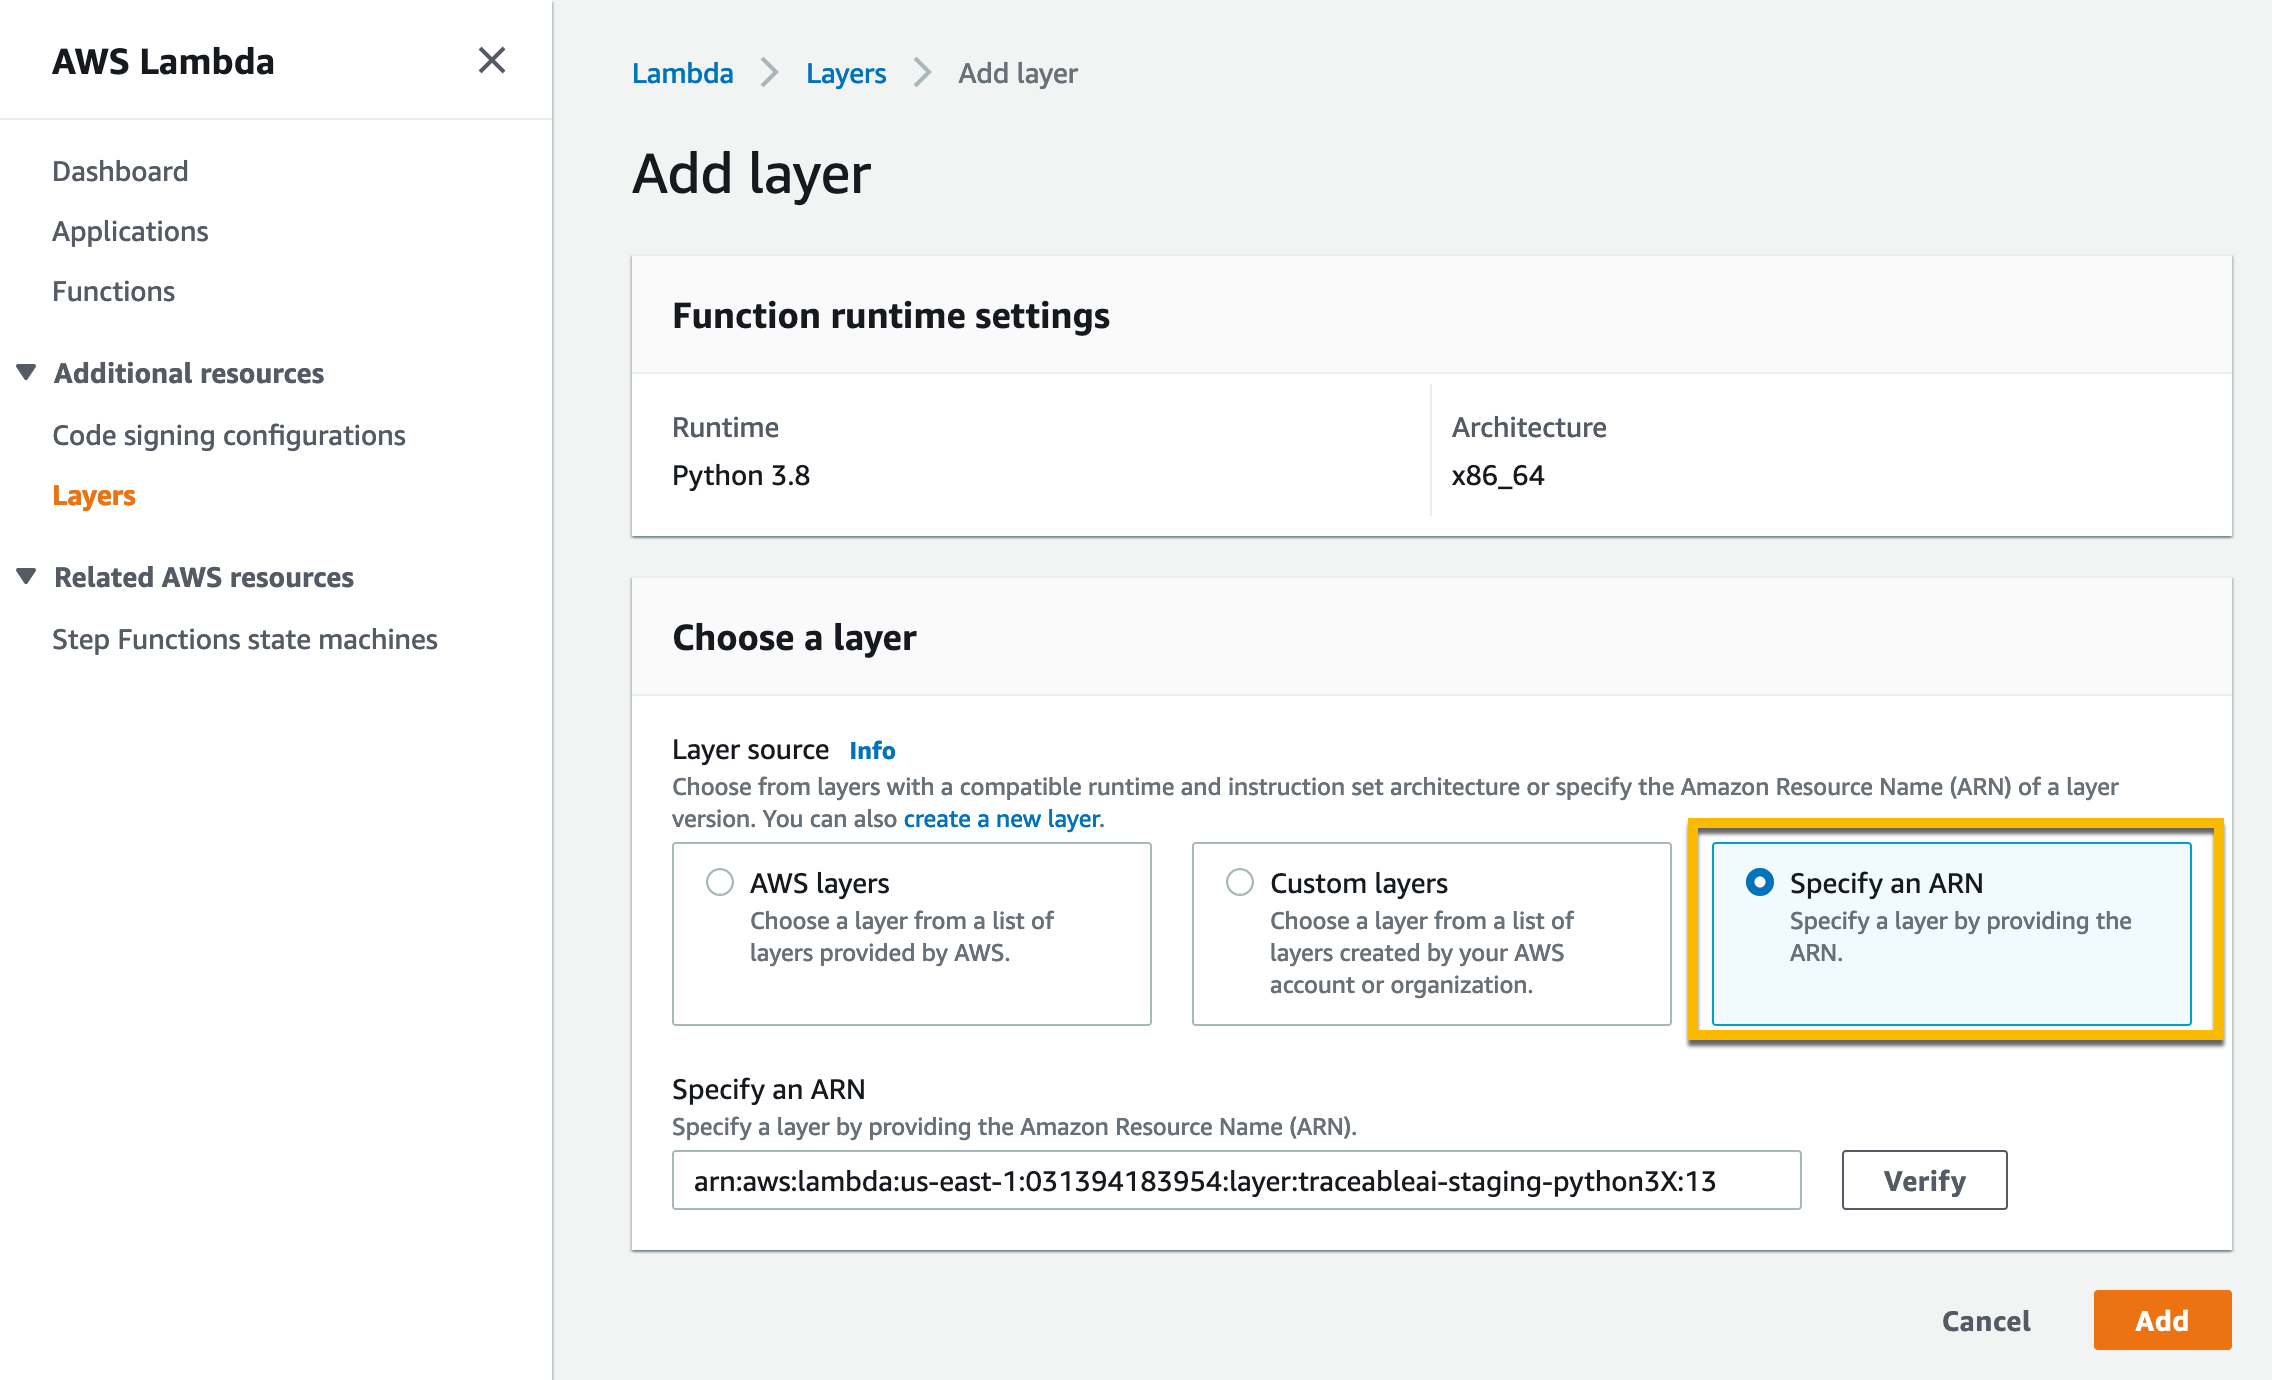
Python ARN –
arn:aws:lambda:<aws-region>:031394183954:layer:traceableai-python3X:1. Replace X in the ARN with your python version.Collector ARN –
arn:aws:lambda:<aws-region>:031394183954:layer:traceableai-collector:5
Before proceeding to configuring layers, make sure that Lambda has the following:
traceableai-python3X
traceableai-collector
Also, based on the following table, make a note of the mapping of the Python version and lambda layer:
Python version | Latest layer version |
|---|---|
3.9 | 11 |
3.10 | 3 |
3.11 | 1 |
3.12 | 1 |
Supported AWS regions
The following is a list of supported AWS regions:
us-east-1 and us-east-2
us-west-1 and us-west-2
ap-northeast-1, ap-northeast-2, and ap-northeast-3"
ap-south-1
ap-southeast-1 and ap-southeast-2
ca-central-1
eu-central-1
eu-north-1
eu-west-1, eu-west-2, and eu-west-3
sa-east-1
Python Lambda based on a container image
If you have a Python Lambda based on a container image, you can add layers to it by modifying the docker file. You can add the layers to the docker image as shown below:
ARG AWS_DEFAULT_REGION=${AWS_DEFAULT_REGION:-"..."}
ARG AWS_ACCESS_KEY_ID=${AWS_ACCESS_KEY_ID:-"...}
ARG AWS_SECRET_ACCESS_KEY=${AWS_SECRET_ACCESS_KEY:-"..."}
ARG AWS_SESSION_TOKEN=${AWS_SESSION_TOKEN:-"..."}

ENV AWS_DEFAULT_REGION=${AWS_DEFAULT_REGION}
ENV AWS_ACCESS_KEY_ID=${AWS_ACCESS_KEY_ID}
ENV AWS_SECRET_ACCESS_KEY=${AWS_SECRET_ACCESS_KEY}
ENV AWS_SESSION_TOKEN=${AWS_SESSION_TOKEN}
ENV AWS_LAMBDA_EXEC_WRAPPER=/opt/traceableai-instrument

RUN yum install aws-cli curl unzip -y
RUN mkdir -p /opt

RUN curl $(aws lambda get-layer-version-by-arn --arn arn:aws:lambda:us-east-1:031394183954:layer:traceableai-python39:1 --region us-east-1 --query 'Content.Location' --output text) --output layer.zip

RUN unzip layer.zip -d /opt

RUN rm layer.zip


RUN curl $(aws lambda get-layer-version-by-arn --arn arn:aws:lambda:us-east-1:031394183954:layer:traceableai-collector:1 --region us-east-1 --query 'Content.Location' --output text) --output layer.zip

RUN unzip layer.zip -d /opt

RUN rm layer.zip

RUN chmod 755 -fR /opt/extensions
In the above snippet:
The
ARGcommand is used to set build-time variables in a Dockerfile. These variables can be passed as arguments to thedocker buildcommand, allowing the values to be changed without modifying the Dockerfile. So, theARGlines in the code are defining the following environment variables, with default values:AWS_DEFAULT_REGIONAWS_ACCESS_KEY_IDAWS_SECRET_ACCESS_KEYAWS_SESSION_TOKEN
The
ENVcommand is used to set environment variables in the environment of a running Docker containerThe command –
RUN curl $(aws lambda get-layer-version-by-arn --arn arn:aws:lambda:us-east-1:031394183954:layer:traceableai-python39:1 --region us-east-1 --query 'Content.Location' --output text) --output layer.zipdoes the following:aws lambda get-layer-version-by-arnis a command from the AWS CLI, which retrieves information about a specific version of an AWS Lambda layer.--arn arn:aws:lambda:us-east-1:031394183954:layer:traceableai-python39:1specifies the ARN (Amazon Resource Name) of the layer version to retrieve.--region us-east-1specifies the AWS region where the layer version is located.--query 'Content.Location'specifies which piece of information to retrieve from the layer version. In this case, theContent.Locationfield is the URL where the layer can be downloaded from.--output textspecifies that the output should be in plain text format.curlis used to download the layer from the URL retrieved by theaws lambda get-layer-version-by-arncommand.--output layer.zipspecifies that the downloaded layer should be saved to a file namedlayer.zip.
So, this line of code downloads the specified AWS Lambda layer to a file namedlayer.zip.
The description of the next command is similar to the one mentioned above.
Step 3 – Configure layers
Make a note of the following points before configuring layers:
Configure
TPA_ENDPOINT: http://<insert_your_tpa_ip>:4318as an environment variable;tpais the Traceable Platform agent IP address that you noted in the Before you begin section.Make sure that the port number is 4318. This is important to connect to the Traceable Platform agent OTLP HTTP endpoint.
Configure 3.9+ layers
To configure Python 3.9+ layers, set AWS_LAMBDA_EXEC_WRAPPER: /opt/traceableai-instrument the environment variable on the lambda. This instructs the lambda to invoke Traceable's wrapper script instead of the default lambda handler. Traceable, in turn, invokes your original handler.
Verification
To verify a successful configuration of Python lambda, invoke the lambda function by sending traffic through the API gateway endpoint. Then, log in to the Traceable platform and check whether the service and associated traces and spans are displayed. 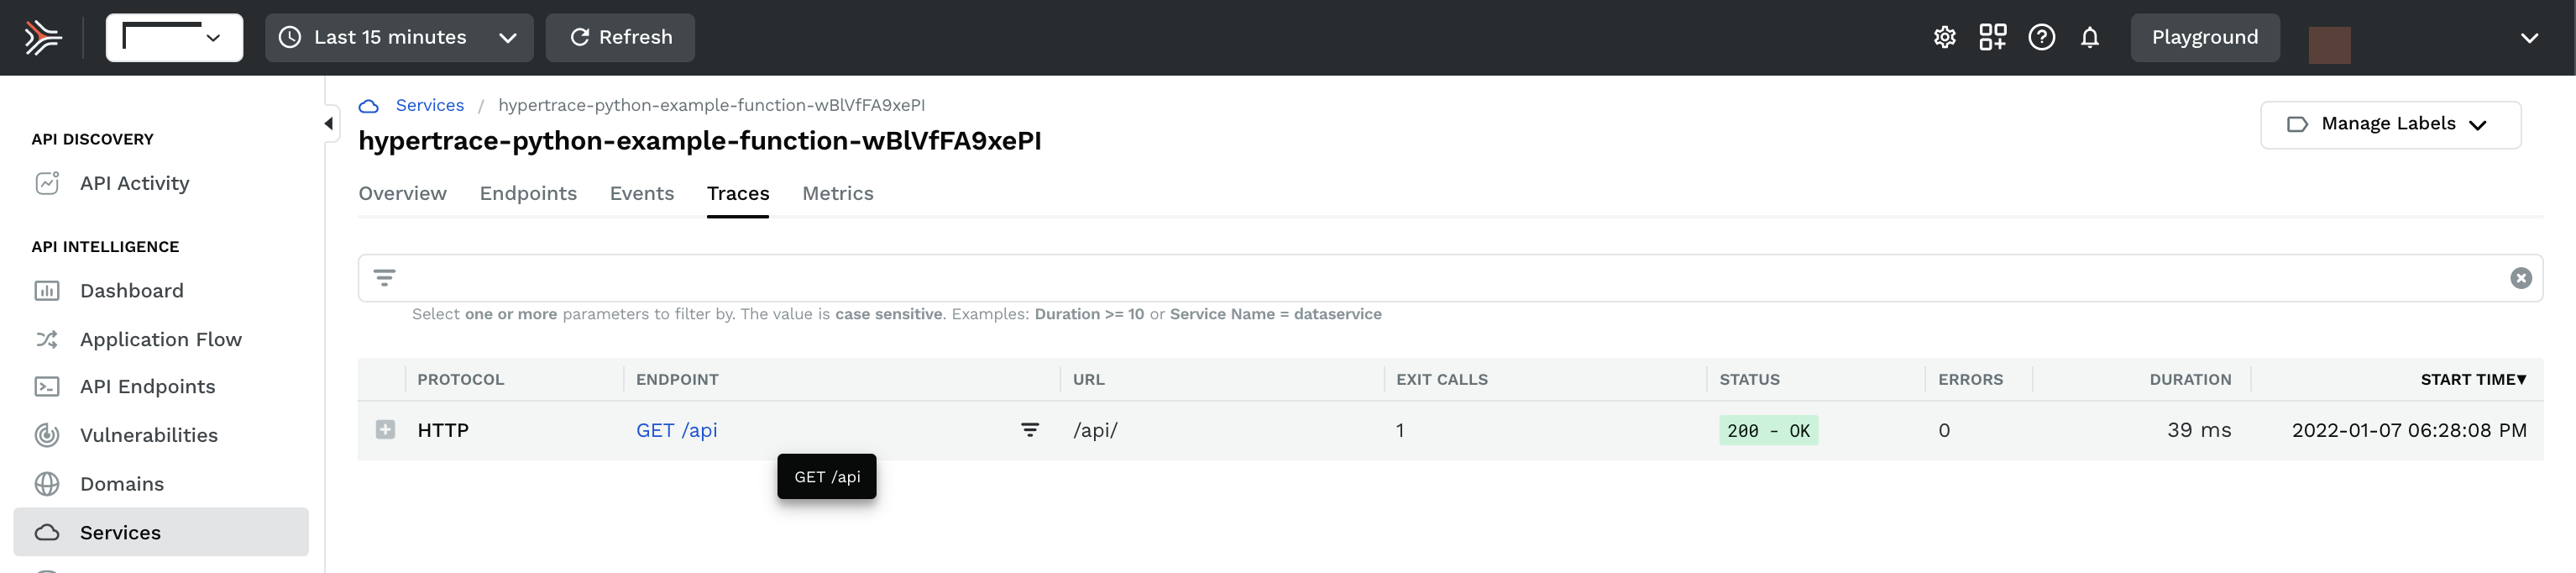
Troubleshooting
Following are a few troubleshooting tips for the Python lambda deployment:
Problem | Troubleshooting tip |
|---|---|
No data is reported | Set the |
The response body is not captured | Check if the lambda returns a “Content-Type” header, that is set to a value including: |
The request body is not captured | Check if the incoming request is sending a “Content-Type” header, that is set to a value including: |
The status code is not reported | Check whether the lambda returns a If not, then update the lambda to return a |