IBM API Connect is a full-featured API management platform that allows organizations to design, manage, secure, and monitor APIs at scale. At runtime, API traffic is processed through IBM DataPower Gateway, which enforces API policies and provides advanced security, integration, and acceleration features.
Traceable integrates with IBM API Connect by offering a non-blocking policy that enables API traffic to be observed and analyzed for threats without interrupting normal API flows. This non-blocking policy can be applied globally or to individual APIs and operates through the DataPower Gateway as part of the API Connect runtime infrastructure.
The integration supports modern API formats like REST, JSON, SOAP, and XML and helps you gain deep visibility into API behavior across your environment.
The configuration is divided into two parts:
Configuring TLS client profile
Configuring API protection at the global level or for individual APIs
Before you begin
Make a note of the following points before proceeding with the set-up:
The document assumes that you have reasonable knowledge of IBM DataPower.
Reasonable knowledge of generating root CA, TLS, and encryption in general.
Download the Traceable policies from Traceable's download site. Navigate to agent → ibm-datapower. Navigate to the latest numbered folder and click api-connect → apic-policies.
Note the IP address of the Traceable Platform agent. You will need this if you wish to instrument the Traceable policy globally.
The steps to integrate Traceable with IBM DataPower involves configuring TLS certificate. If you already have a TLS certificate, you can use that. Alternatively, you can follow the steps mentioned in the Generate self-signed certificate topic.
Generate p12 certificate
Once you have generated the certificate, create the p12 certificate required for IBM DataPower. Enter the following command:
openssl pkcs12 -inkey root_ca.key -in root_ca.crt -export -out certificate.p12The openssl pkcs12 command is used to create a PKCS#12 file that contains both the private key and the corresponding certificate for a particular entity (for example, a server or a client). The PKCS#12 file format is commonly used for importing and exporting private keys and certificates between different systems.
Following are the details of each option in the command:
pkcs12: specifies the PKCS#12 format for the output file.-inkey root_ca.key: specifies the input file containing the private key for the entity.-in root_ca.crt: specifies the input file containing the certificate for the entity.-export: specifies that the output file should be an export of the private key and certificate, rather than just a listing of them.-out certificate.p12: specifies the name of the output file to be created.
So, the command is taking the root_ca.key private key and root_ca.crt certificate and exporting them together as a PKCS#12 file named certificate.p12. This file can be used to import the private key and certificate into another system, such as a web server or client, or to store them securely for backup purposes.
Configure TLS in Traceable Platform agent
Make sure that you configure the Traceable Platform agent's Helm chart to enable TLS, whether you use your existing certificate or generate a new certificate. Following is a snippet of the Helm chart for enabling TLS:
# TLS enabled for all endpoints. false by default. set to true to enable tls.
# When this is set, no other ports are exposed
tlsEnabled: true

# We allow you to bring your own certificates when deploying TA. You can bring them in as a
# secret in the same namespace as the TA deployment or as files somehow injected into the container.
#
# Make sure that all the fields are populated so they can take effect. Otherwise we will switch to
# self generated certificates which is also the default.
#
# tlsPrivateCertificatesAsFiles has the highest priority, followed by tlsPrivateCertificatesAsSecret.
#
# If you need to do injection with your own certificates, please set injector.caBundle with the
# base64 encoded value of your root CA cert that you used to sign your certs. Otherwise we will assume
# that you signed your certificates using the k8s api server root certs.
#
# External private certificates as a secret. Note that the secret should be in the same namespace
# as your TA deployment.
tlsPrivateCertificatesAsSecret:
  secretName: ""
  # These filenames should be the keys in the secret.
  rootCAFileName: ""
  certFileName: ""
  keyFileName: ""

# External private certificates as files somehow injected into the TA container
tlsPrivateCertificatesAsFiles:
  # These filenames should be absolute file paths
  rootCAFileName: ""
  certFileName: ""
  keyFileName: ""

# injector.caBundle may need to be specified when using tlsPrivateCertificatesAsSecret or
# tlsPrivateCertificatesAsFiles. It's not needed for self generated mode i.e where internal
# helm generated certificates are used.(the default)
injector:
  # caBundle is a base64 encoded root cert file contents string that is used to verify the cert file that the injector presents
  # to the mutating webhook configuration. It's usually empty if we are in self_gen certs mode, but if you want to
  # bring your own certs, then you need to pass in the base64 encoded root cert file contents. If you do not, and you are not
  # in self_gen mode, then the mutating webhook configuration uses the k8s api server system root certs for verification.
  caBundle: ""
Configure TLS in IBM DataPower
Complete the following steps to configure Truststore and Keystore in IBM DataPower Cloud Manager:
Login to IBM DataPower Cloud Manager and click on Manage Resources.
On the Resources page, click on TLS.
On the TLS page, create a Keystore by uploading the
certificate.p12generated in the Before you being section.On the TLS page, create a Truststore by uploading
root_ca.crt.
Create TLS client profile
Complete the following steps to create a TLS client profile. As above, Login to IBM DataPower Cloud Manager and click on Topology → Manage Resources.
On the Resources page, click on TLS.
Click on Client Profile.
Select all the TLS versions.
In the Keystore/truststore section, select the keystore and truststore that you created in the previous section.
Select all the Ciphers.

This will complete the process of creating the necessary TLS client profile.
Apply Client Profile to Catalog
Once you have created a TLS client profile, you need to apply the TLS client profile to the catalog. In IBM API Connect, a catalog is a collection of APIs and related assets that can be published and managed as a group. A catalog can be thought of as a container that organizes a set of APIs and provides a unified view of these APIs to developers, administrators, and consumers.
Log in to IBM API Connect and API Manager to apply the TLS client profile to a catalog. You can attach one or more than one TLS client profile to a catalog. To apply a TLS client profile to a catalog, navigate to API Manger → Manage Catalog → <Catalog Name> → Catalog Settings → TLS client profiles. Select the TLS client profile that you wish to enable for the catalog from the Edit TLS client profile page.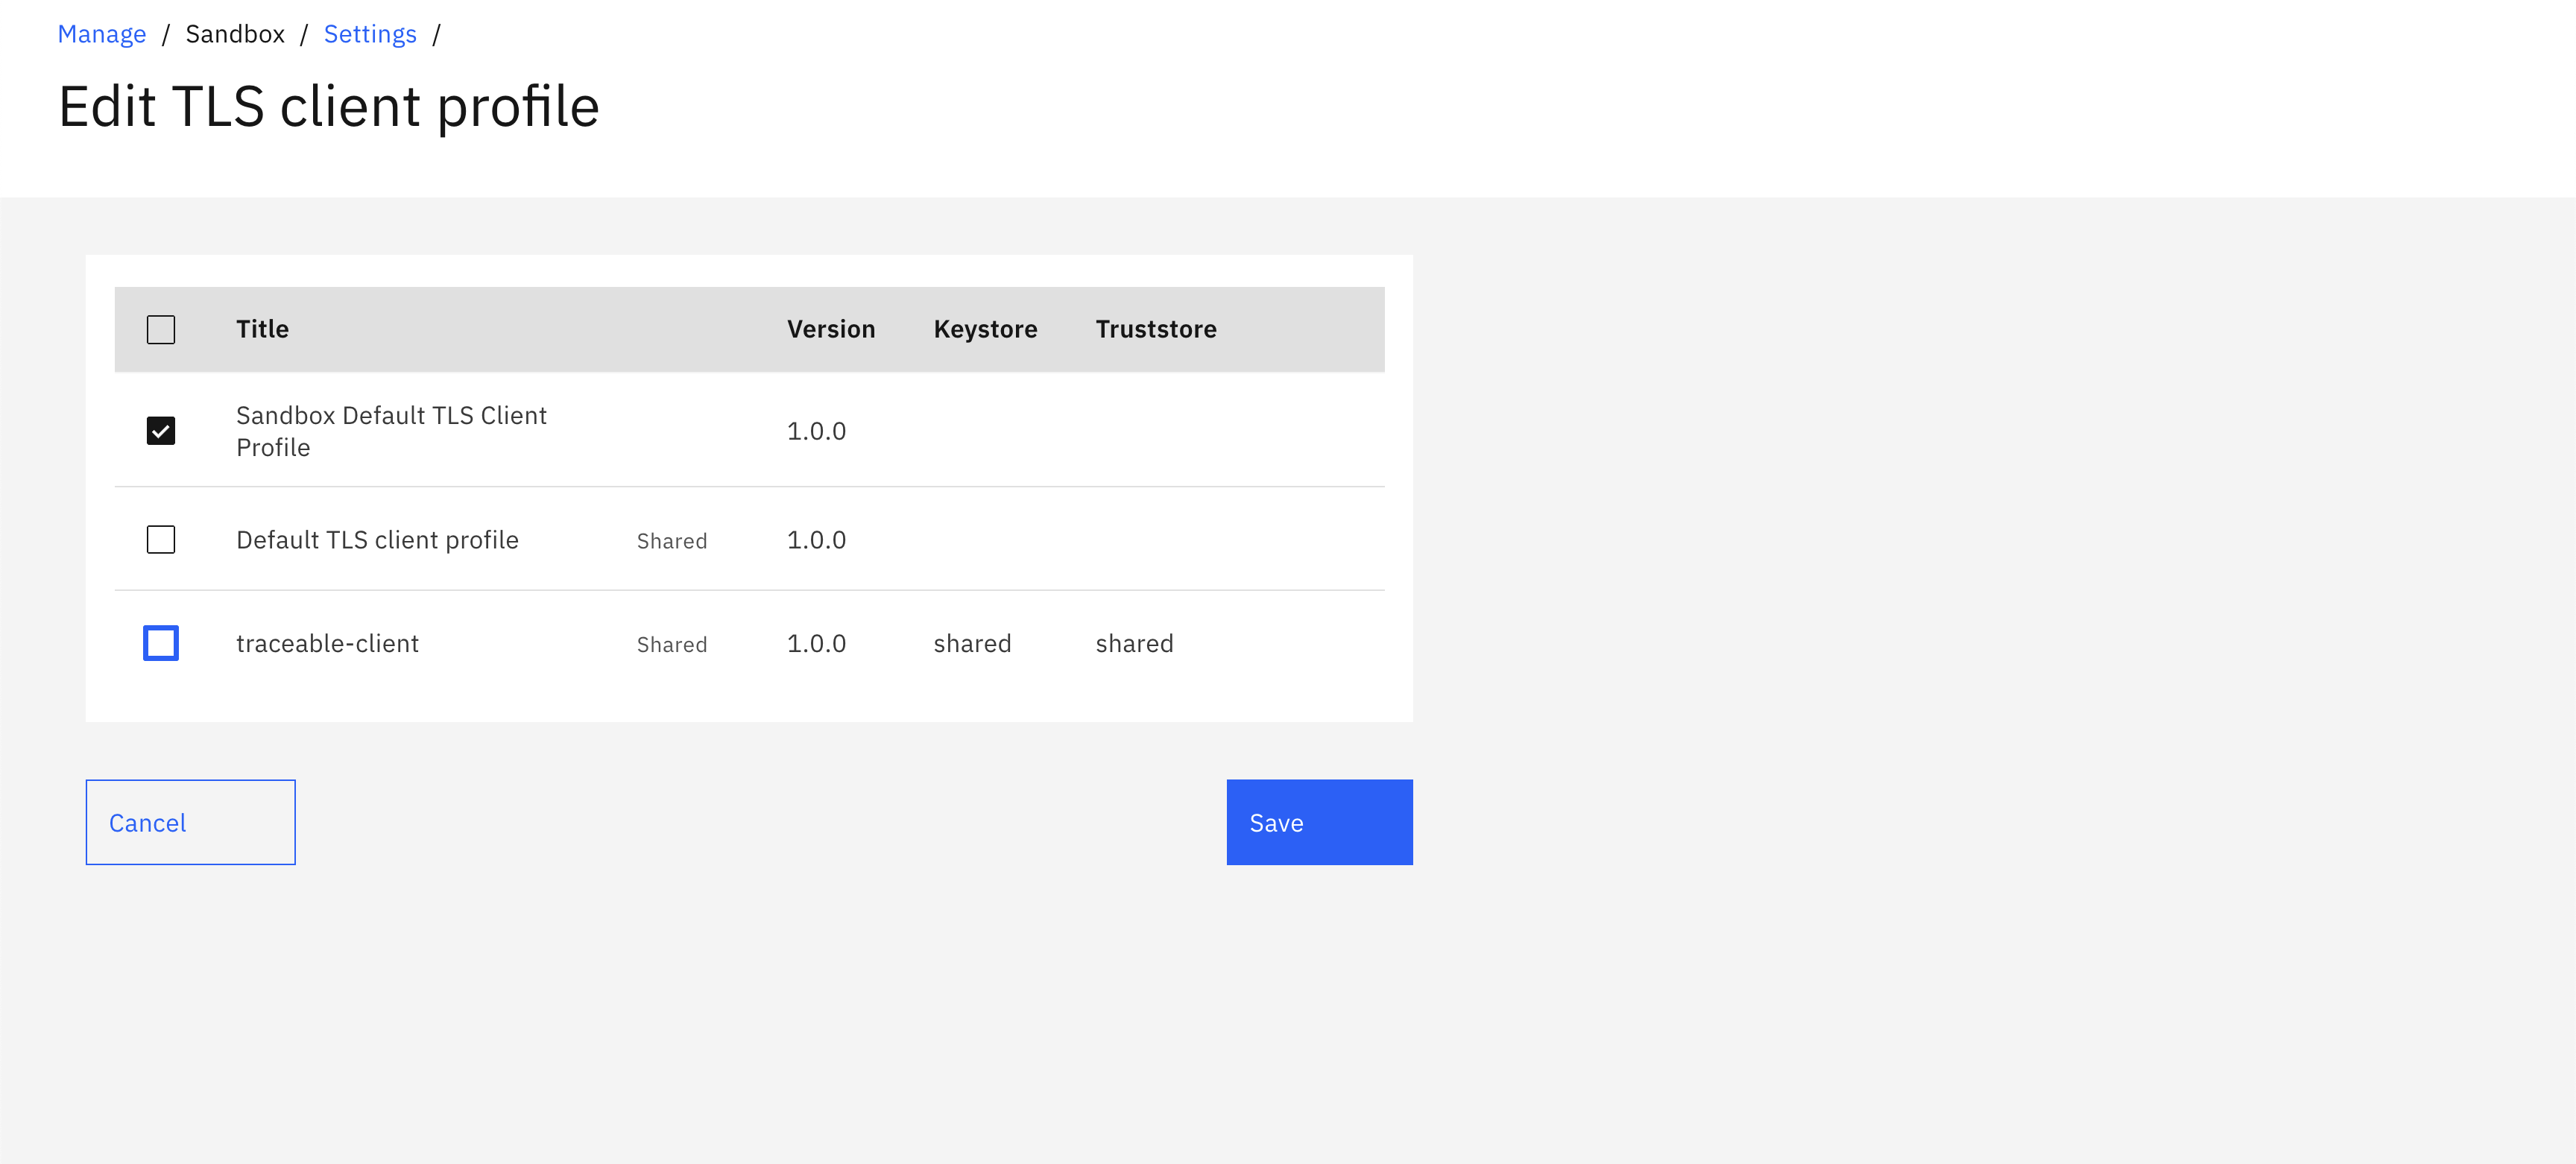
Enable the TLS client profile for all the catalogs that you wish to instrument.
Instrument Traceable policy
You can instrument the Traceable policy in IBM DataPower, either at the global level or for an individual API.
Instrument policy for an API
Traceable provides pre-request and post-request policy. To instrument the Traceable policy for an API, you need to upload both these policies. Navigate to API Manger → Manage Catalogs → <Catalog Name> → Catalog Settings → Gateway Services and complete the following steps: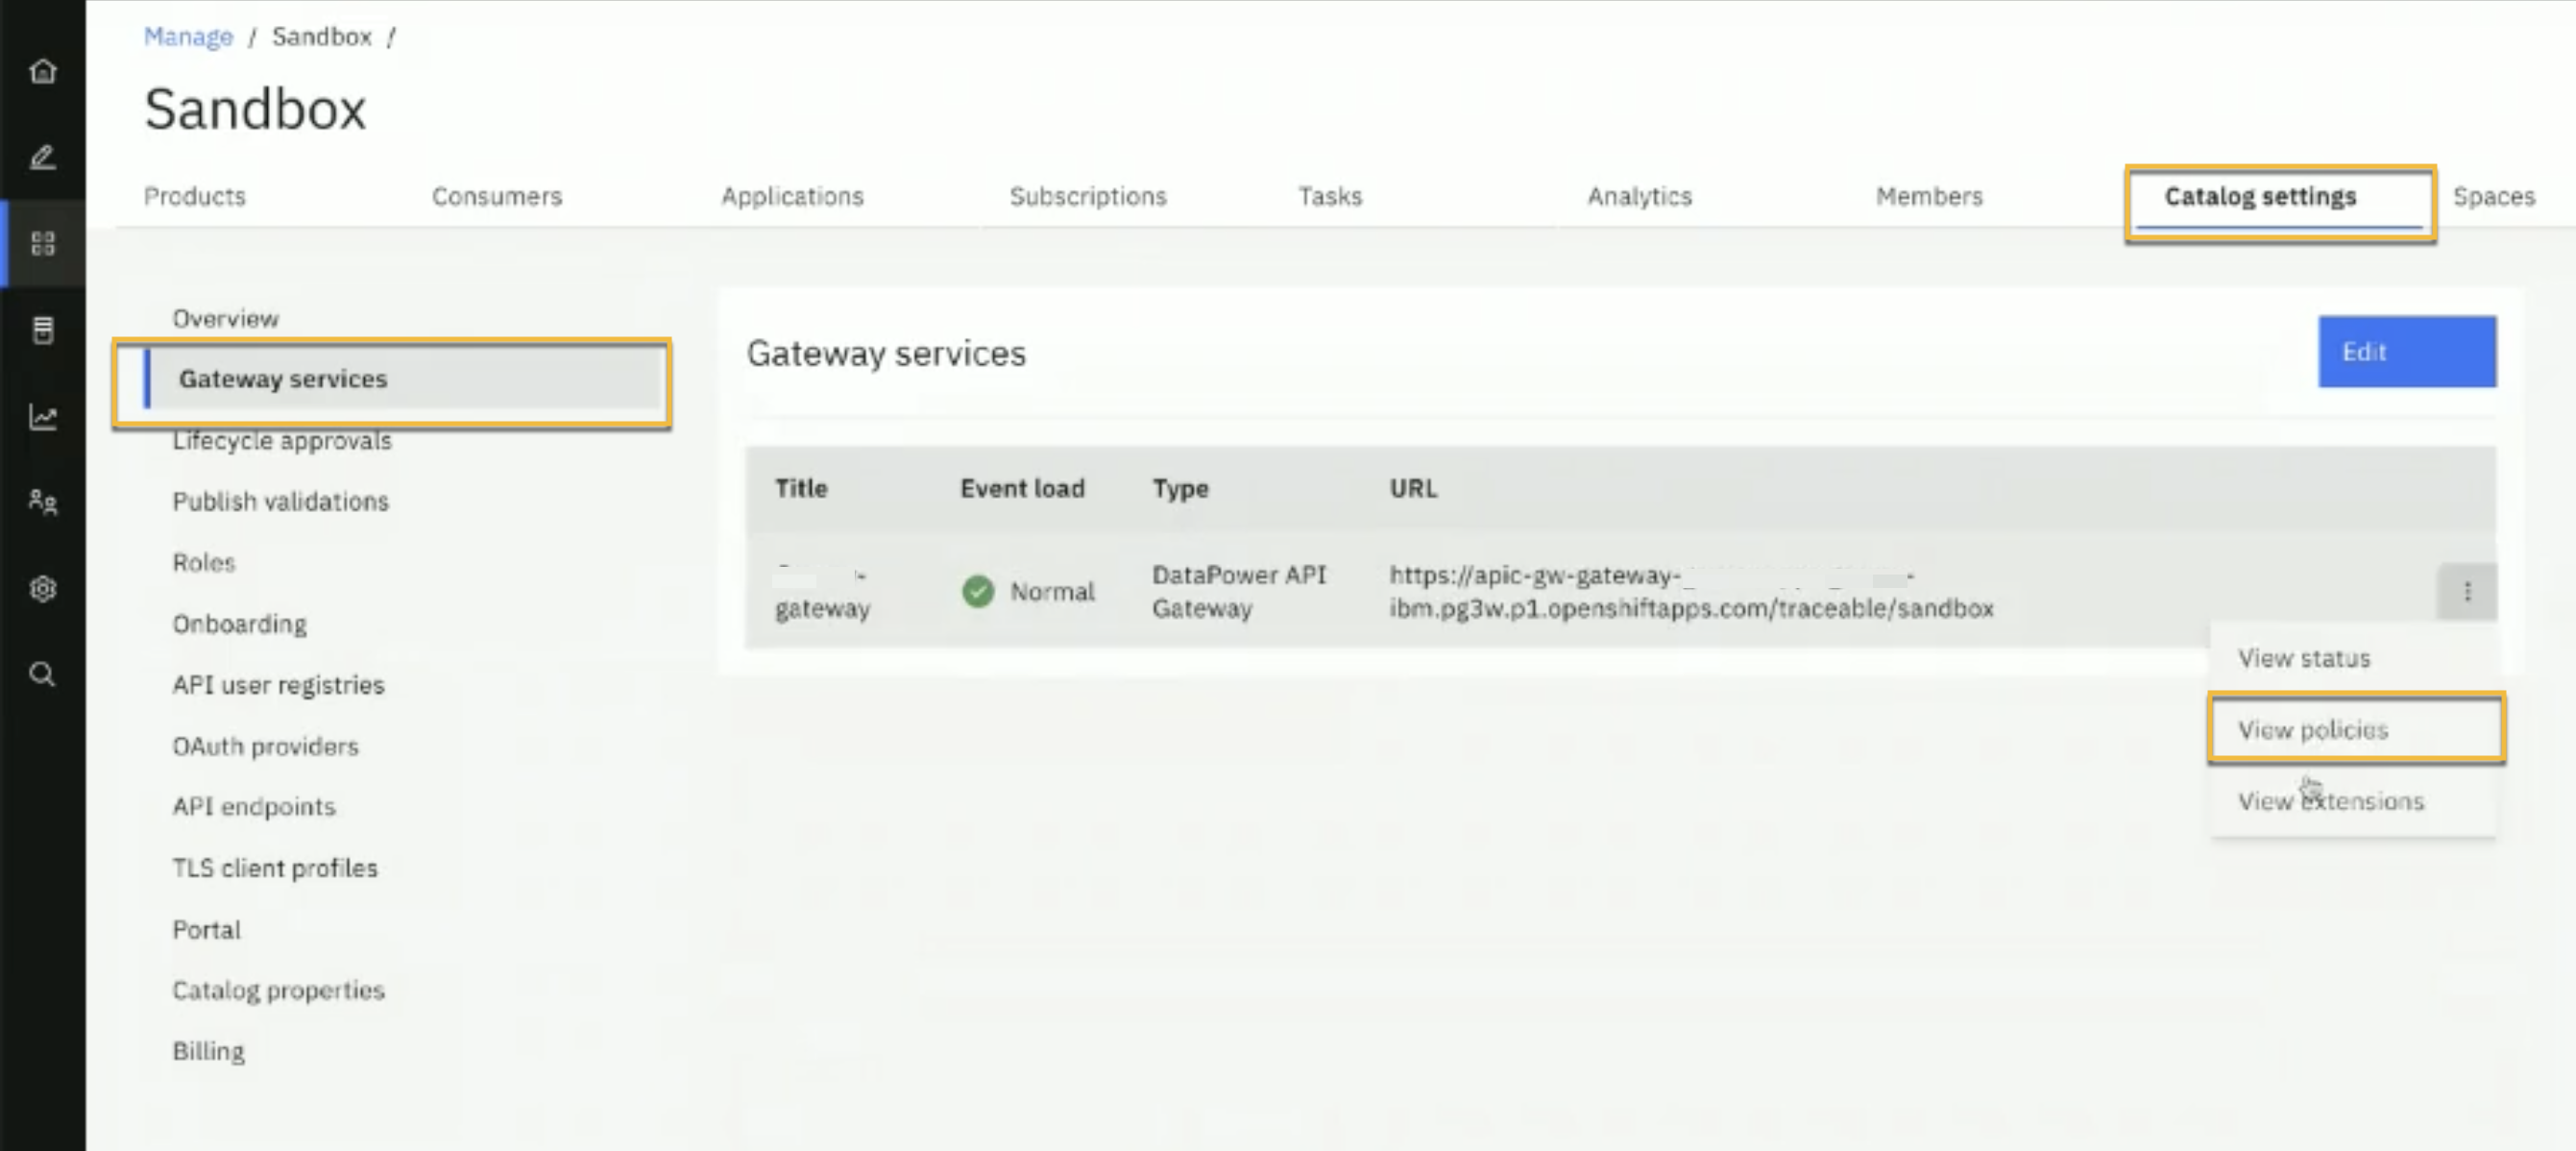
Click on View policies as shown above. On the Policies page, click on the Upload button.
On the Upload Policy page, click on the zip option to upload the pre-request and post-request policy one after the other. Once the policies are uploaded, you would be able to see them on the Policies page.
Login to IBM API Connect's API Designer and click on Develop APIs and Products.

Click on the API that you wish to instrument.
On the API's page, click on the Gateway tab → Policies.
Modify the API assembly by dragging and dropping Traceable's pre-request and post-request policies from the User Defined section. The Traceable policy that you uploaded in step 2, would be listed in the User Defined section.

Instrument policy globally
To instrument the policy globally, you would require access to APIC CLI. APIC CLI stands for API Connect Command Line Interface. It is a tool provided by IBM API Connect that allows users to interact with and manage API Connect from the command line. You can download the APIC Connect Toolkit and credentials by navigating to API Manager → Download Toolkit. 
Enter the following command to register the toolkit credential:
ActionScript
apic client-creds:set <path to your downloads>/credentials.jsonEnter the following command to authenticate with an API Connect instance:
ActionScript
apic login --server https://apic-mgmt-api-manager-abc.apps.abc- --username 'XXXXX' --password 'XXXXXX' --realm 'provider/default-idp-1'The above command does the following:
apic login – This is the command to log in to an API Connect instance from the CLI.
--server https://apic-mgmt-api-manager-abc.apps.abc – This parameter specifies the URL of the API Manager API of the API Connect instance that you want to authenticate with.
--username 'XXXXX' – This parameter specifies the username of the user that you wish to log in as.
--password 'XXXXXX' – This parameter specifies the password of the user that you wish to log in as.
--realm 'provider/default-idp-1' – This parameter specifies the authentication realm that is used to authenticate the user. In this example,
default-idp-1realm is the default identity provider realm that is created when the API Connect instance is set up.
To instrument the policy globally, you need to run the instrument.sh script. The script is available on Traceable's download site under the global policy zip file. The script takes the following parameters:
-s – Server URL of the API Manager-o – Organization under API Manager-g – DataPower Gateway Name-a – Traceable Platform agent endpoint-t – TLS Client Profile name as created in the above step-c – Catalog name which needs to be instrumented
Enter the following command to instrument the policy globally. Customize the command to suit your environment :
./instrument.sh -s apic-mgmt-api-manager-abc.apps.abc-ibm.jjbc.p1.openshiftapps.com -o traceable -g my-gateway -a 'https://3.86.232.5:5443' -t 'traceable-client' -c sandboxEnter the following command to uninstrument the policy. Customize the command to suit your environment:
./uninstrument.sh -s apic-mgmt-api-manager-abc.apps.abc-ibm.jjbc.p1.openshiftapps.com -o traceable -g my-gateway -a 'https://3.86.232.5:5443' -t 'traceable-client' -c sandbox