IBM API Connect is a comprehensive API management platform that enables organizations to create, secure, manage, and monitor APIs. It uses IBM DataPower Gateway to enforce policies and route traffic at runtime.
Traceable integrates with IBM API Connect by providing a blocking policy that helps prevent malicious API requests before they reach backend services. This blocking policy can be applied globally or to individual APIs, and is enforced through the DataPower Gateway as part of the API Connect runtime.
Note
Most setup steps for blocking and non-blocking modes are identical. However, blocking mode only uses pre-request policies and introduces new configuration fields.
Before You Begin
Ensure the following before proceeding:
You have working knowledge of IBM DataPower and IBM API Connect.
You understand TLS concepts and certificate creation.
Note the IP address of the Traceable Platform Agent (TPA). This is required if you wish to implement the Traceable policy globally.
You have downloaded the appropriate Traceable blocking policy files from downloads.traceable.ai. Navigate to agent → ibm-datapower. Navigate to the latest numbered folder and click api-connect → apic-policies.
Download Tip:
If you prefer downloading all required ZIP files upfront, use the table below to understand which ones are needed for each step. This will save time and help avoid confusion later in the process.
Choosing the Right ZIP File
Use the following table to identify which ZIP file to use based on your instrumentation method:
File Name | When to Use |
|---|---|
| Option A (Per API). Used for pre-request blocking policy. |
| Option A (Per API). Required for post-request stage instrumentation. Upload and attach this policy at the post stage in your API assembly. |
| Used in health check setup. For configuring health check policy. |
| Option B (Global). Contains |
Step 1: Generate a .p12 Certificate
Once you have generated the certificate, create the p12 certificate required for IBM DataPower. Enter the following command:
ActionScript
openssl pkcs12 -inkey root_ca.key -in root_ca.crt -export -out certificate.p12The openssl pkcs12 command is used to create a PKCS#12 file that contains both the private key and the corresponding certificate for a particular entity (for example, a server or a client). The PKCS#12 file format is commonly used for importing and exporting private keys and certificates between different systems.
Following are the details of each option in the command:
pkcs12: specifies the PKCS#12 format for the output file.-inkey root_ca.key: specifies the input file containing the private key for the entity.-in root_ca.crt: specifies the input file containing the certificate for the entity.-export: specifies that the output file should be an export of the private key and certificate, rather than just a listing of them.-out certificate.p12: specifies the name of the output file to be created.
So, the command is taking the root_ca.key private key and root_ca.crt certificate and exporting them together as a PKCS#12 file named certificate.p12. This file can be used to import the private key and certificate into another system, such as a web server or client, or to store them securely for backup purposes.
Step 2: Configure TLS in the Traceable Platform Agent
Enable TLS in the Traceable Agent by updating your Helm values:
tlsEnabled: true

tlsPrivateCertificatesAsSecret:
  secretName: "my-cert-secret"
  rootCAFileName: "root_ca.crt"
  certFileName: "cert.crt"
  keyFileName: "cert.key"
Refer to Generate Self-Signed Certificate if needed.
Step 3: Configure TLS in IBM DataPower
Log in to IBM DataPower Cloud Manager.
Go to Manage Resources → TLS.
Create a Keystore by uploading the
certificate.p12file generated in Step 1.Create a Truststore by uploading
root_ca.crt.
Step 4: Create TLS Client Profile
Navigate to Topology → Manage Resources → TLS → Client Profile.
Select all TLS versions.
Choose the keystore and truststore created earlier.
Select all supported ciphers.
Step 5: Apply TLS Client Profile to Catalog
In IBM API Connect, go to API Manager.
Navigate to Manage Catalogs → Catalog Settings → TLS client profiles.
Select the TLS client profile created above.
Apply it to each catalog you plan to instrument.
Step 6: Configure Health Check
Traceable provides a health check policy to verify whether the Traceable Platform agent is available or offline. Configuring the health check is a mandatory step. The health check is configured using healthcheck.js, a file that is part of the policy zip (ibm-dp-apic-blocking-healthcheck-<version>.zip) you downloaded from Traceable’s download site. Open the healthcheck.js file and configure the following two before proceeding with setting the health check in MPGW:
Traceable agent endpoint point
SSL client profile that you configured in the previous section.
.png)
Complete the following steps to configure the health check:
Upload the healthcheck.js file that you configured above.
Search for File management in the search.
Click Local and upload the file.
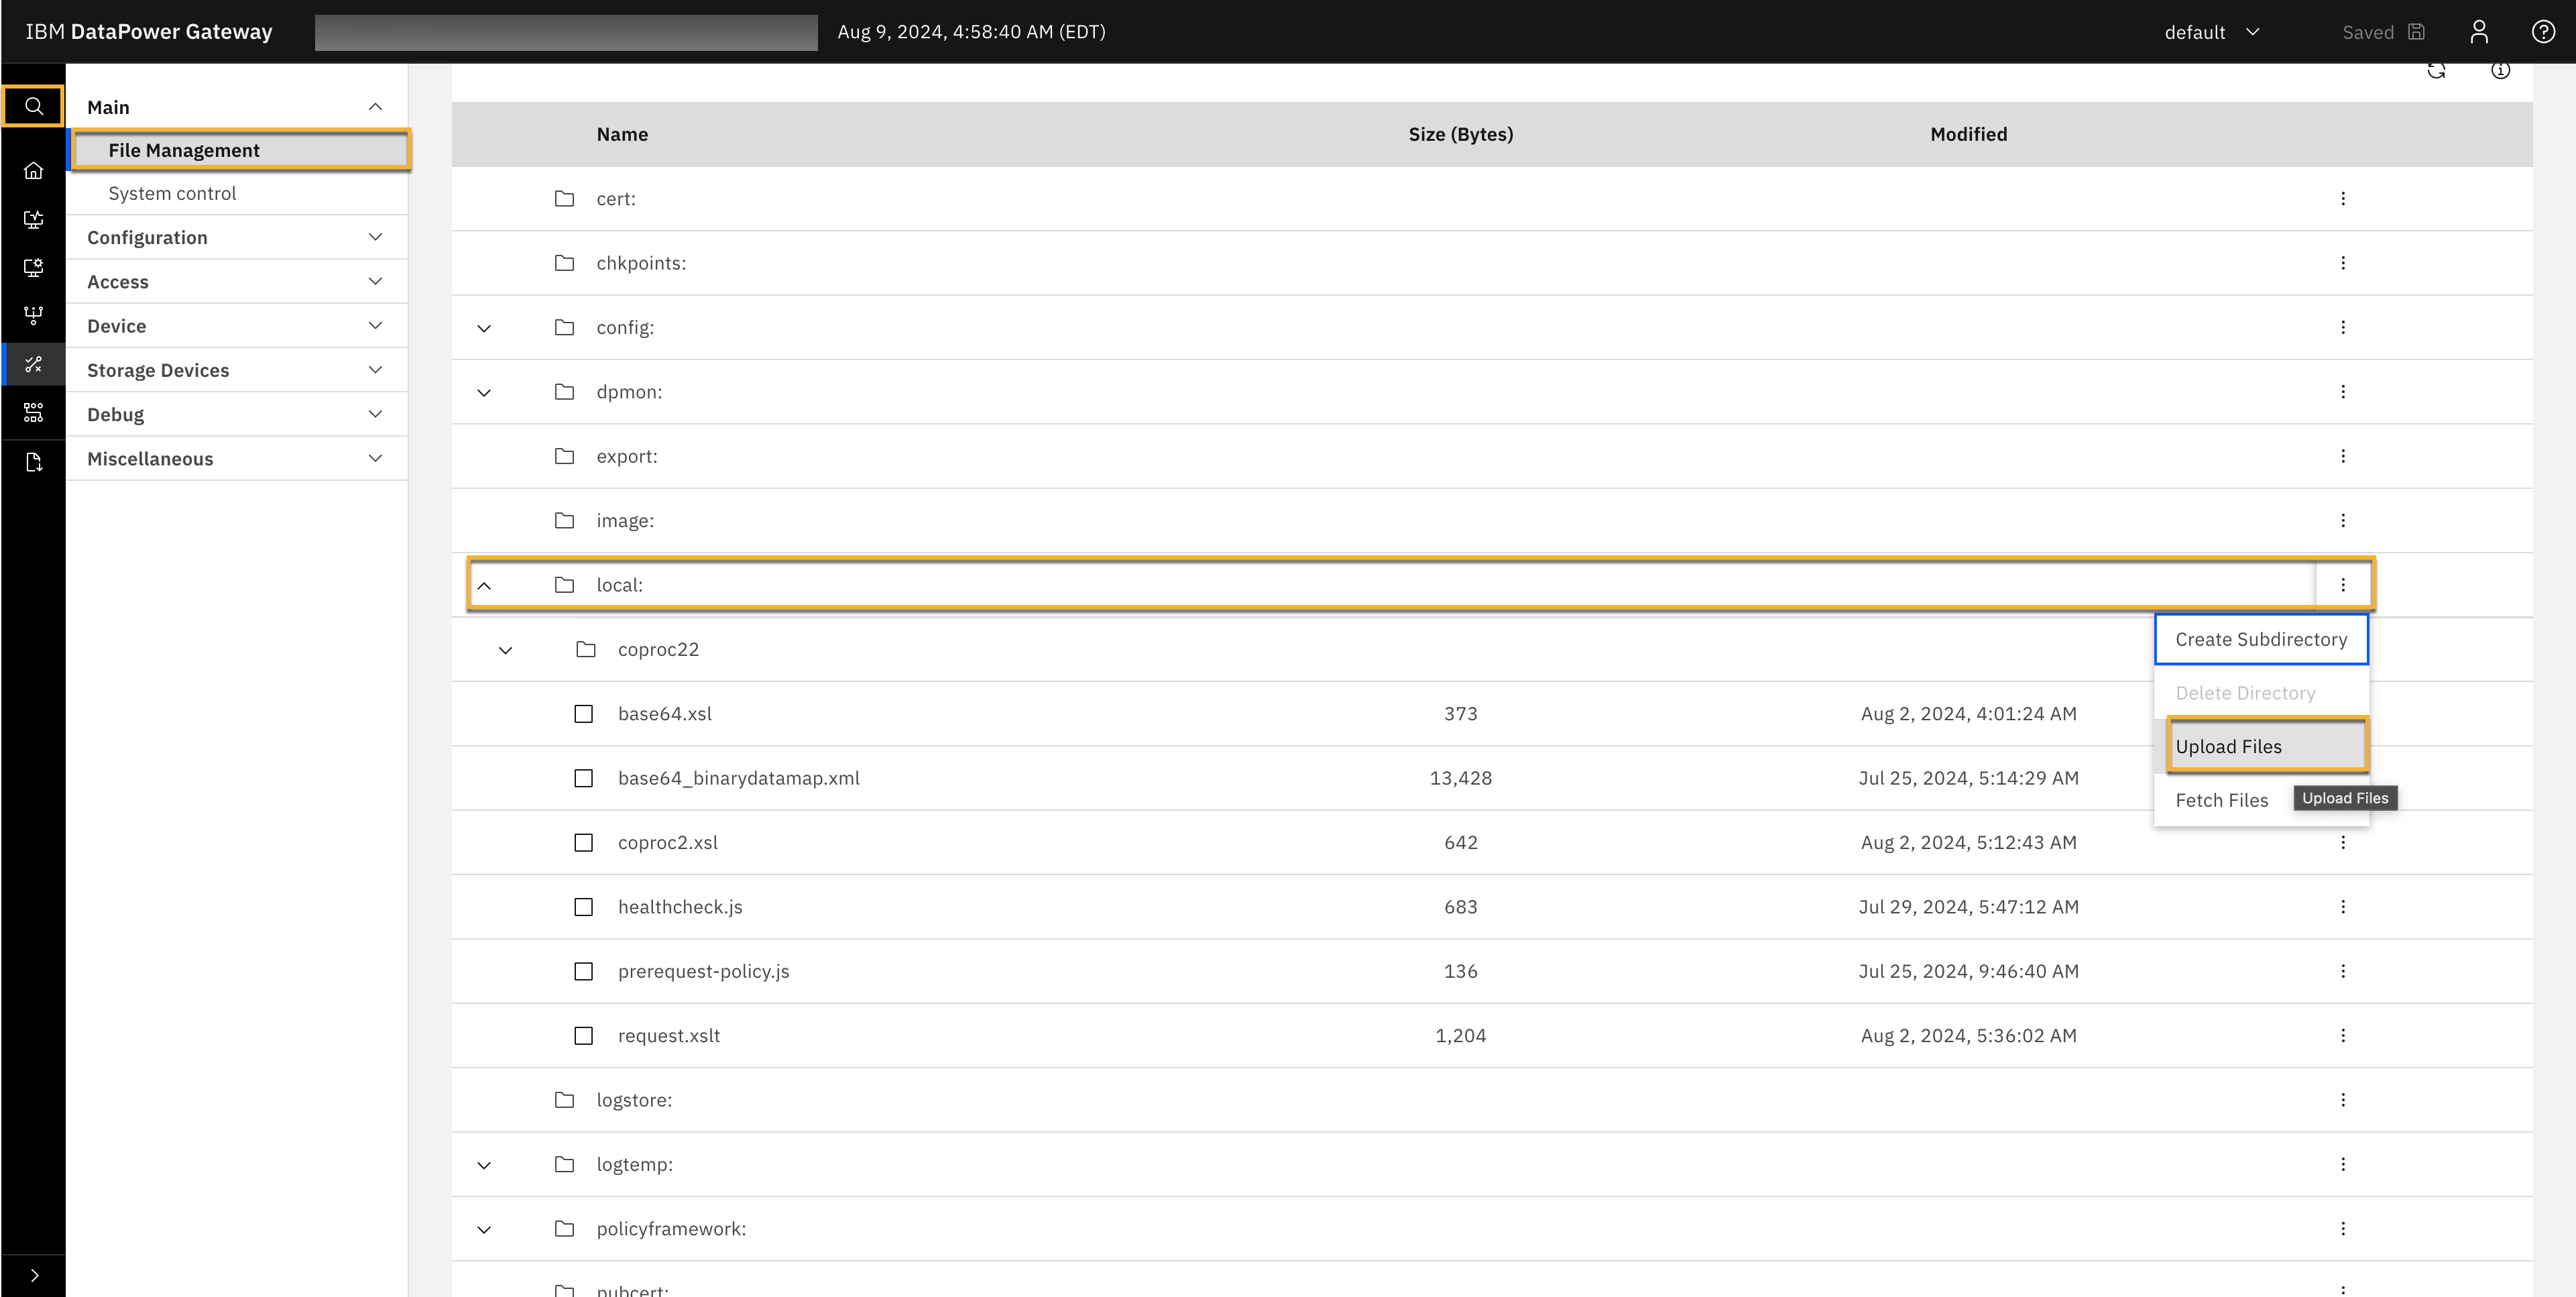
Create a processing action.
Search for Processing action in search and click Add.
Configure the following values:
Provide a name.
Action type —
GatewayScriptInput —
INPUTGatewayScript file —
local:///healthcheck.jsOutput —
NULL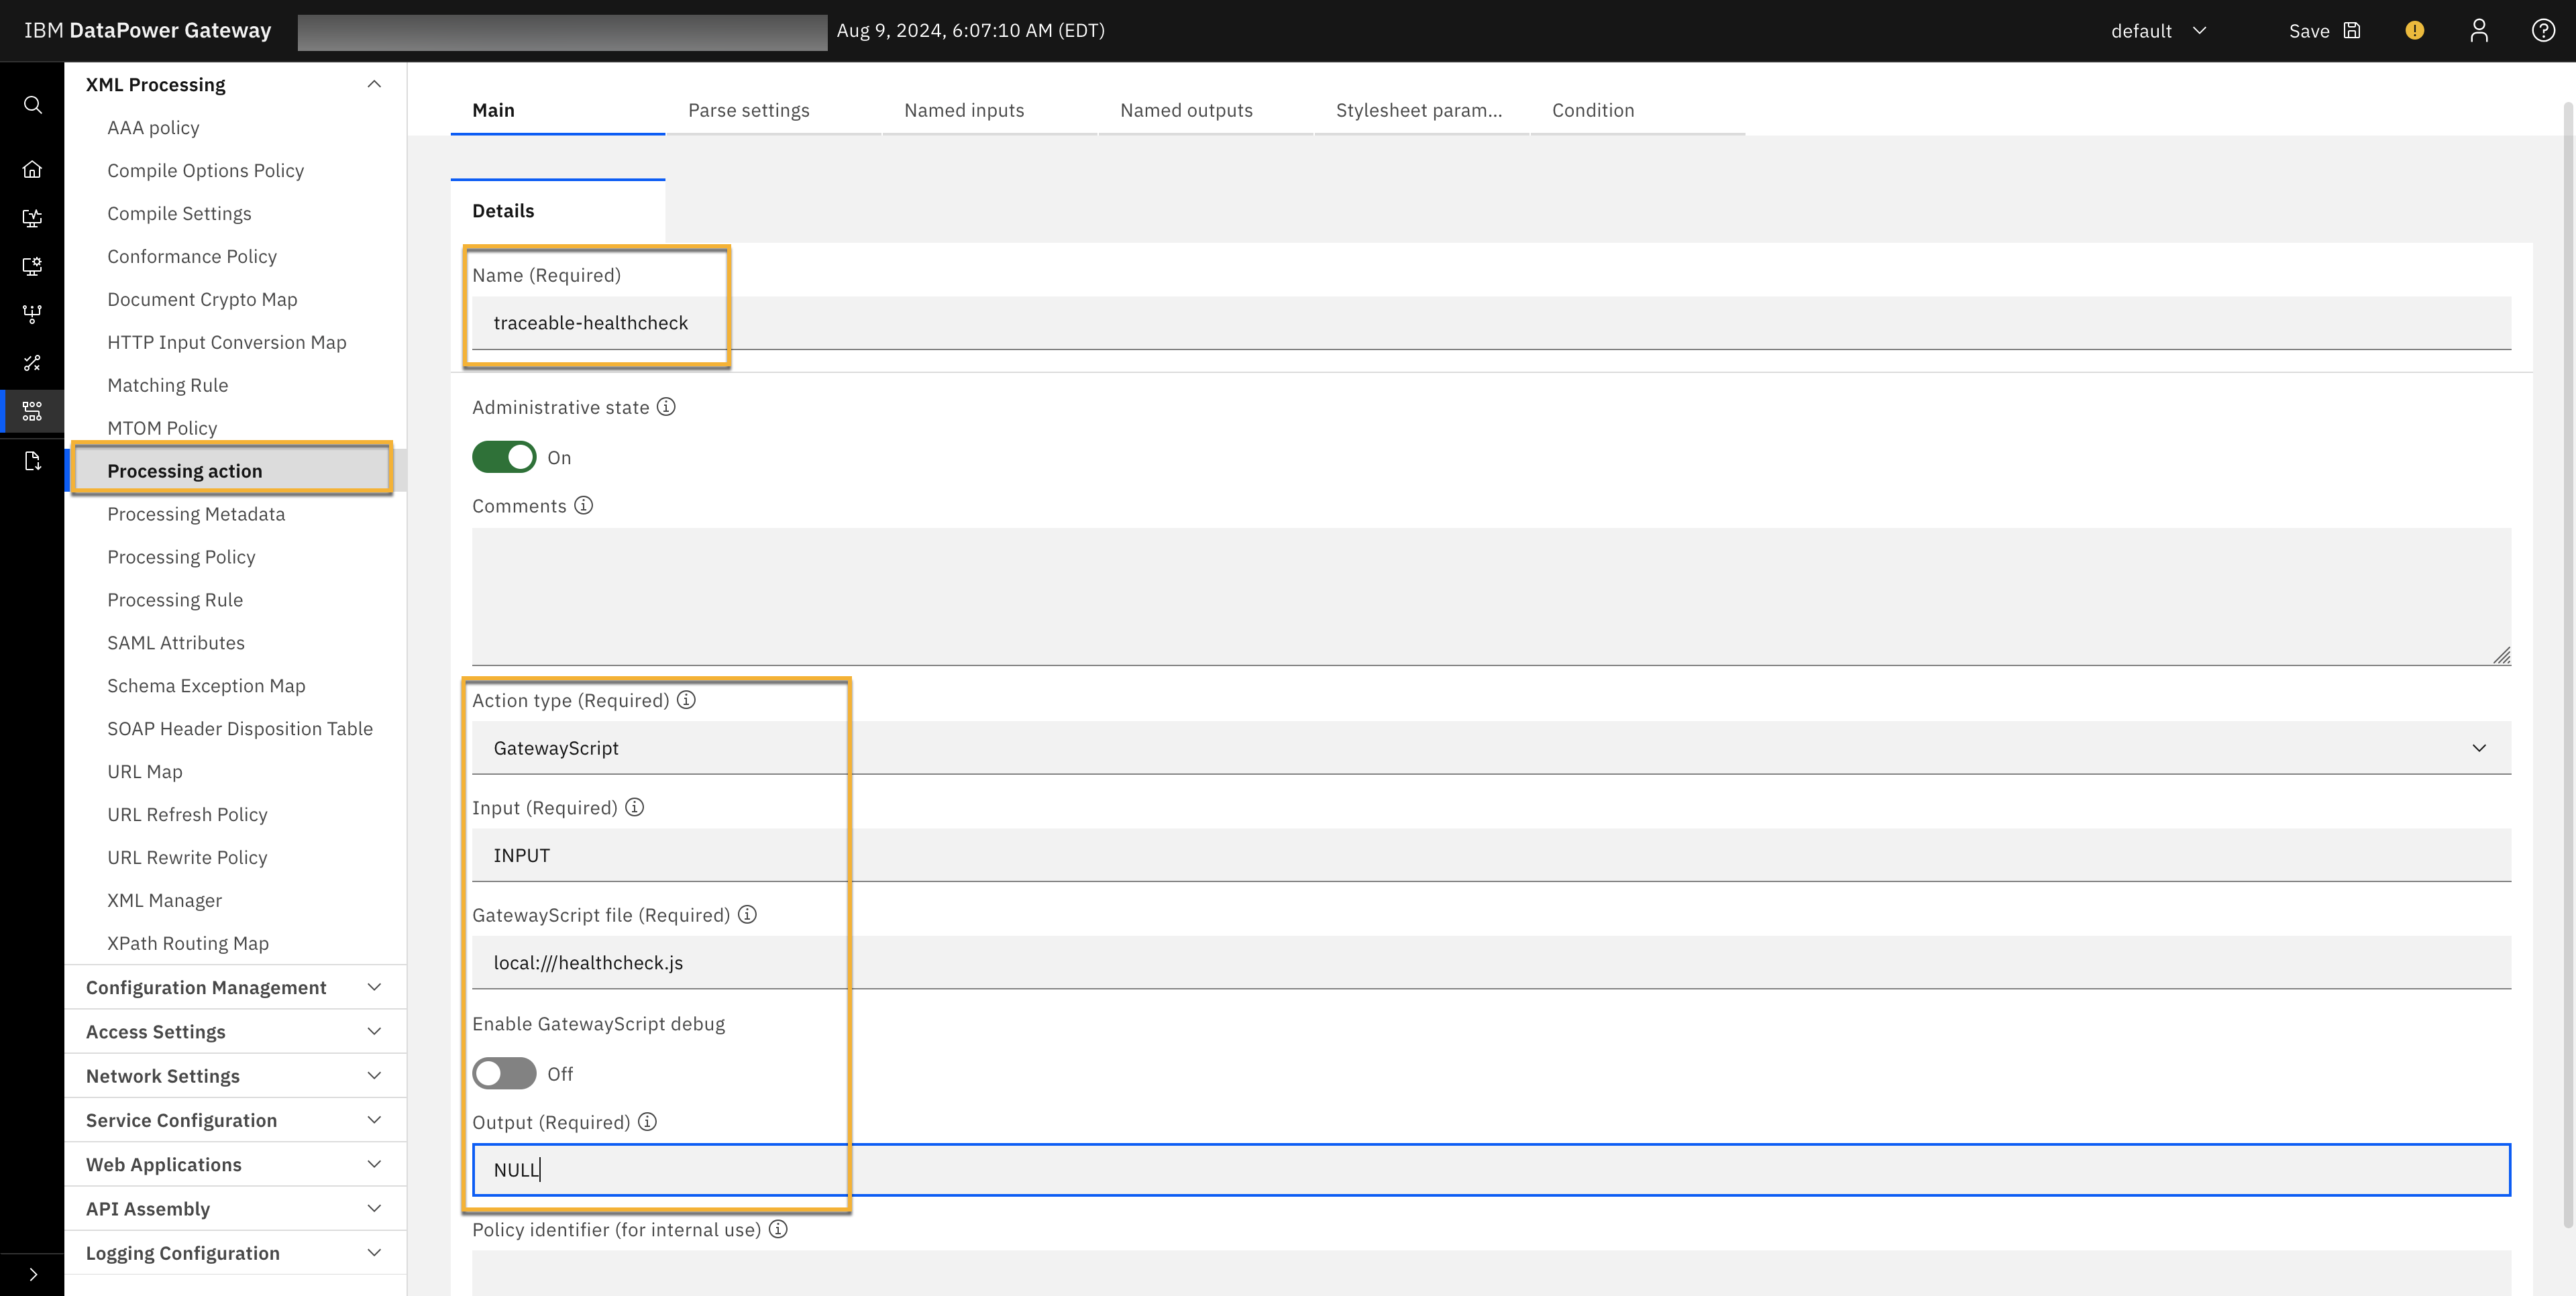
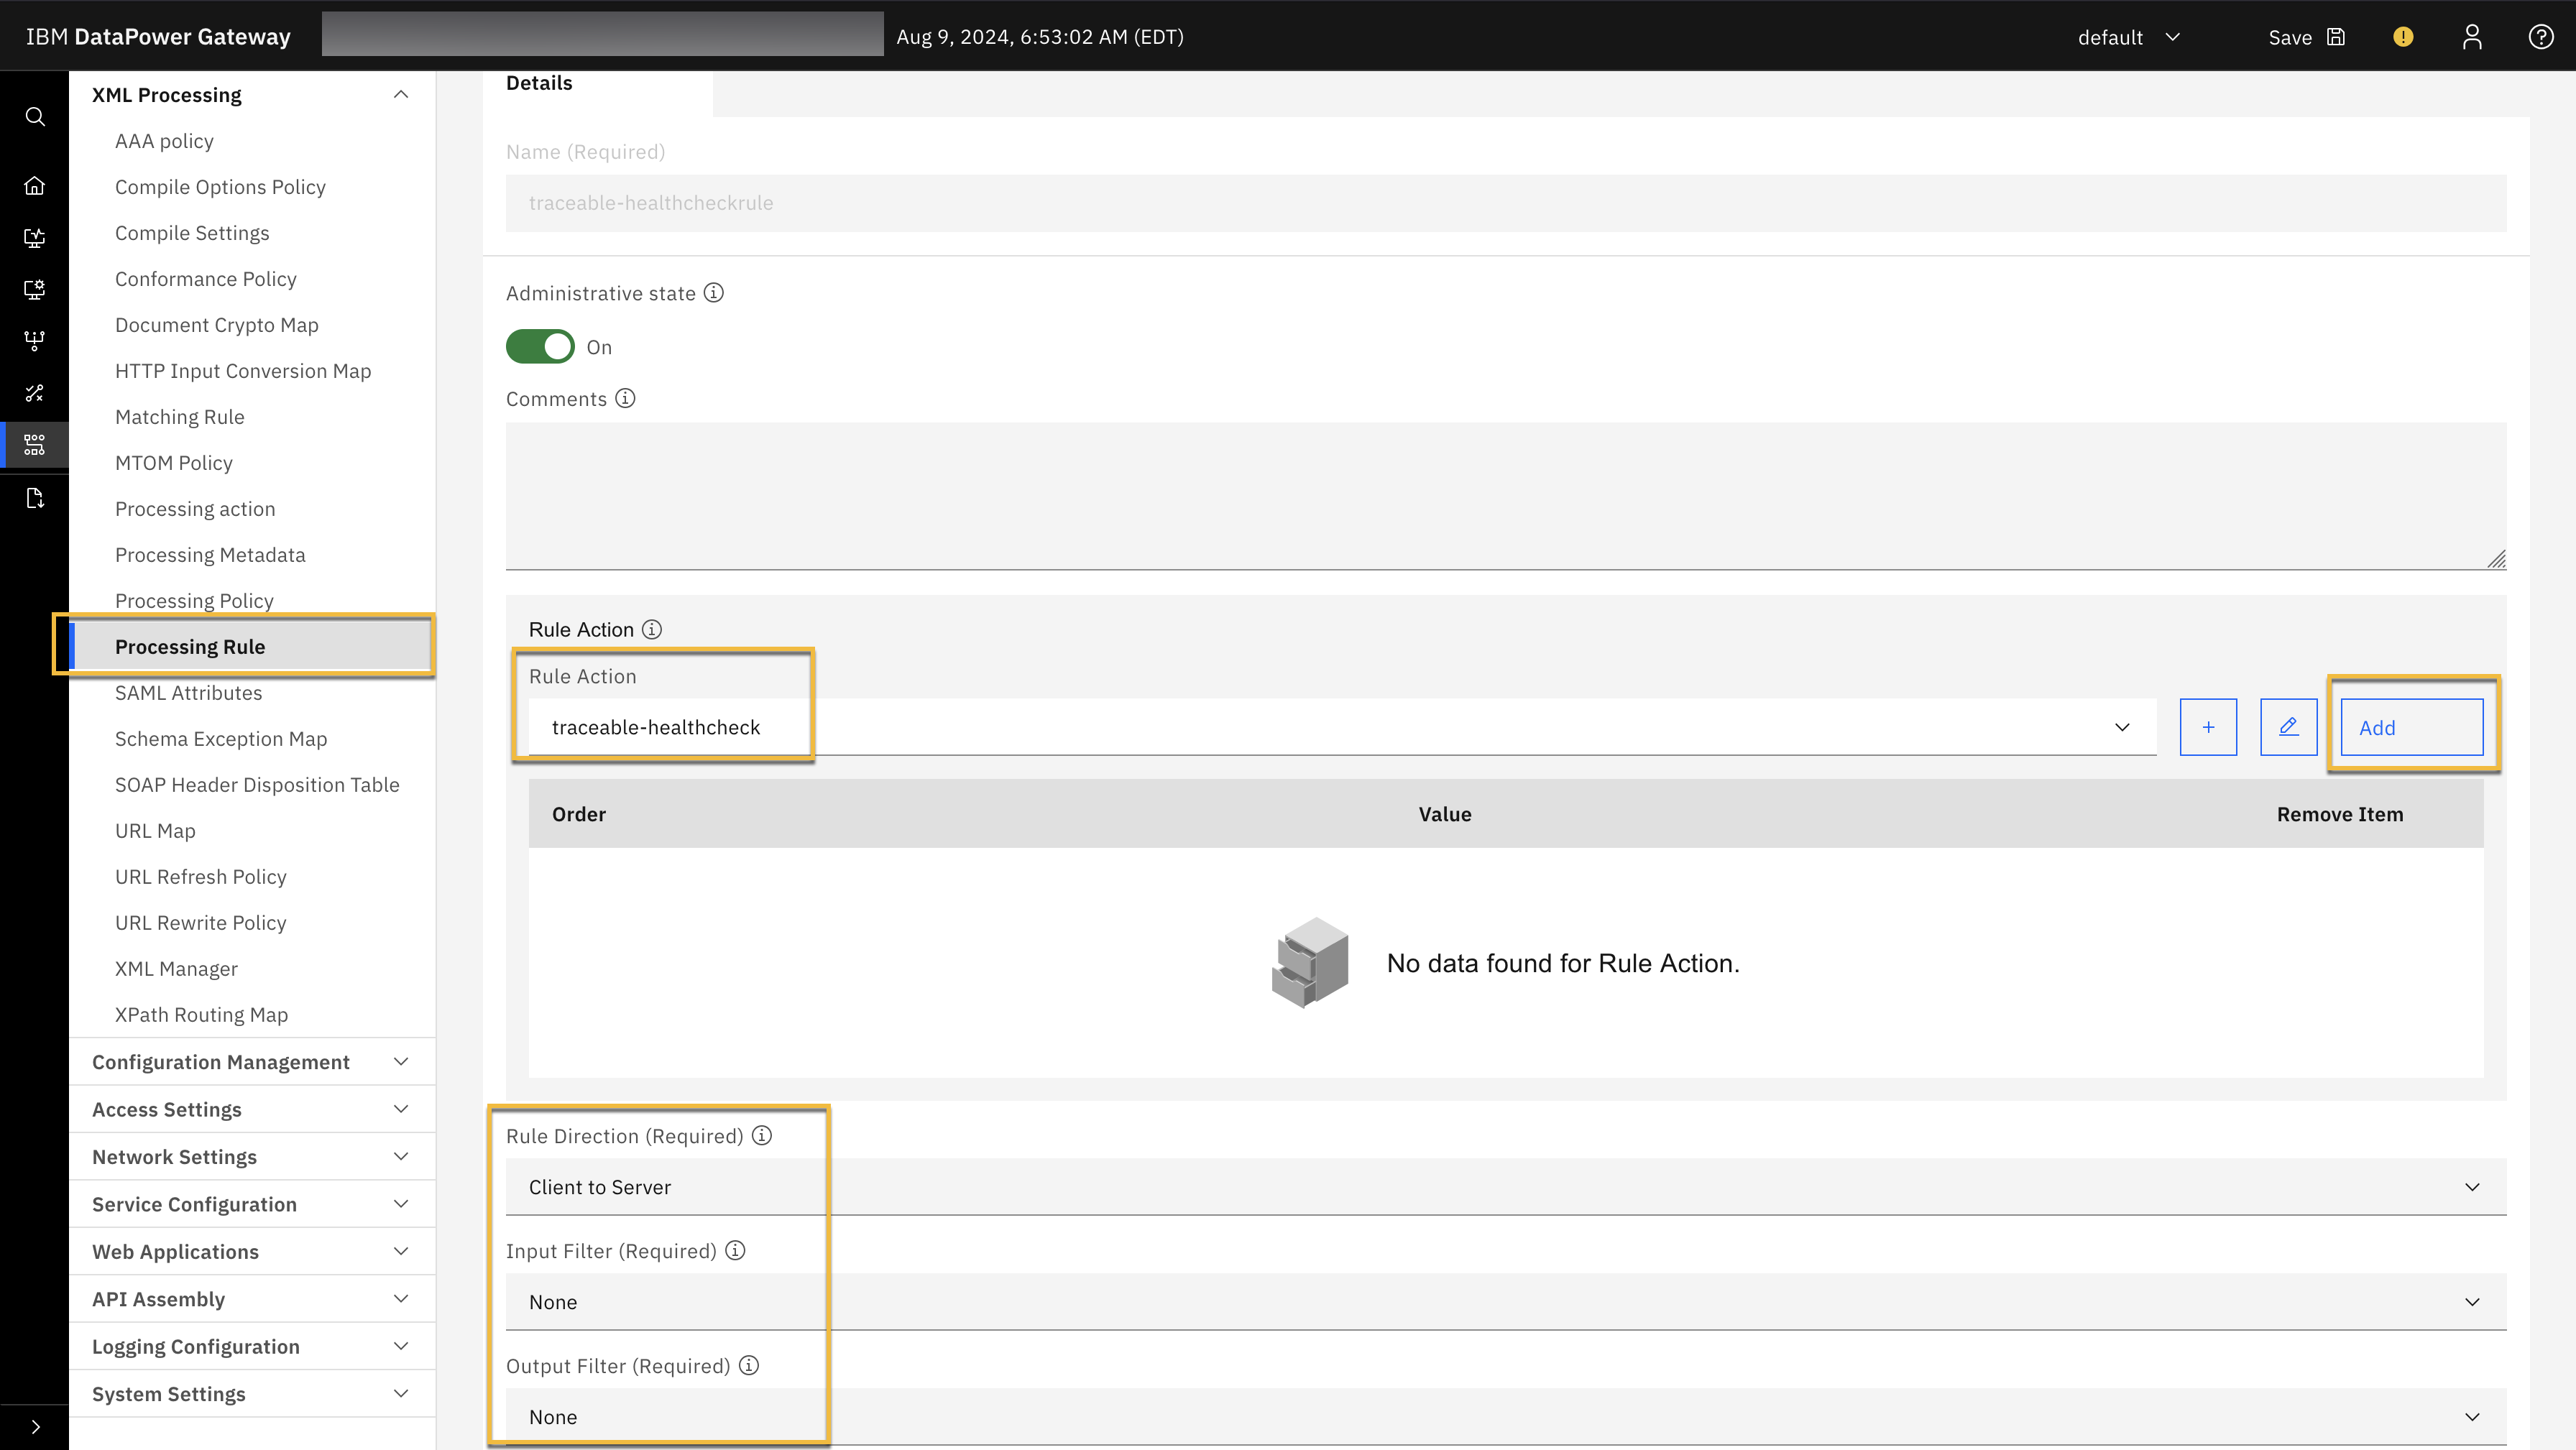
Create a processing rule.
Search for the Processing rule in search and click Add.
Configure the following values:
Name
Rule direction — Client to server
Rule action — traceable-healthcheck. Make sure to click on the Add button to add the Rule action.
Input filter — None
Output filter — None
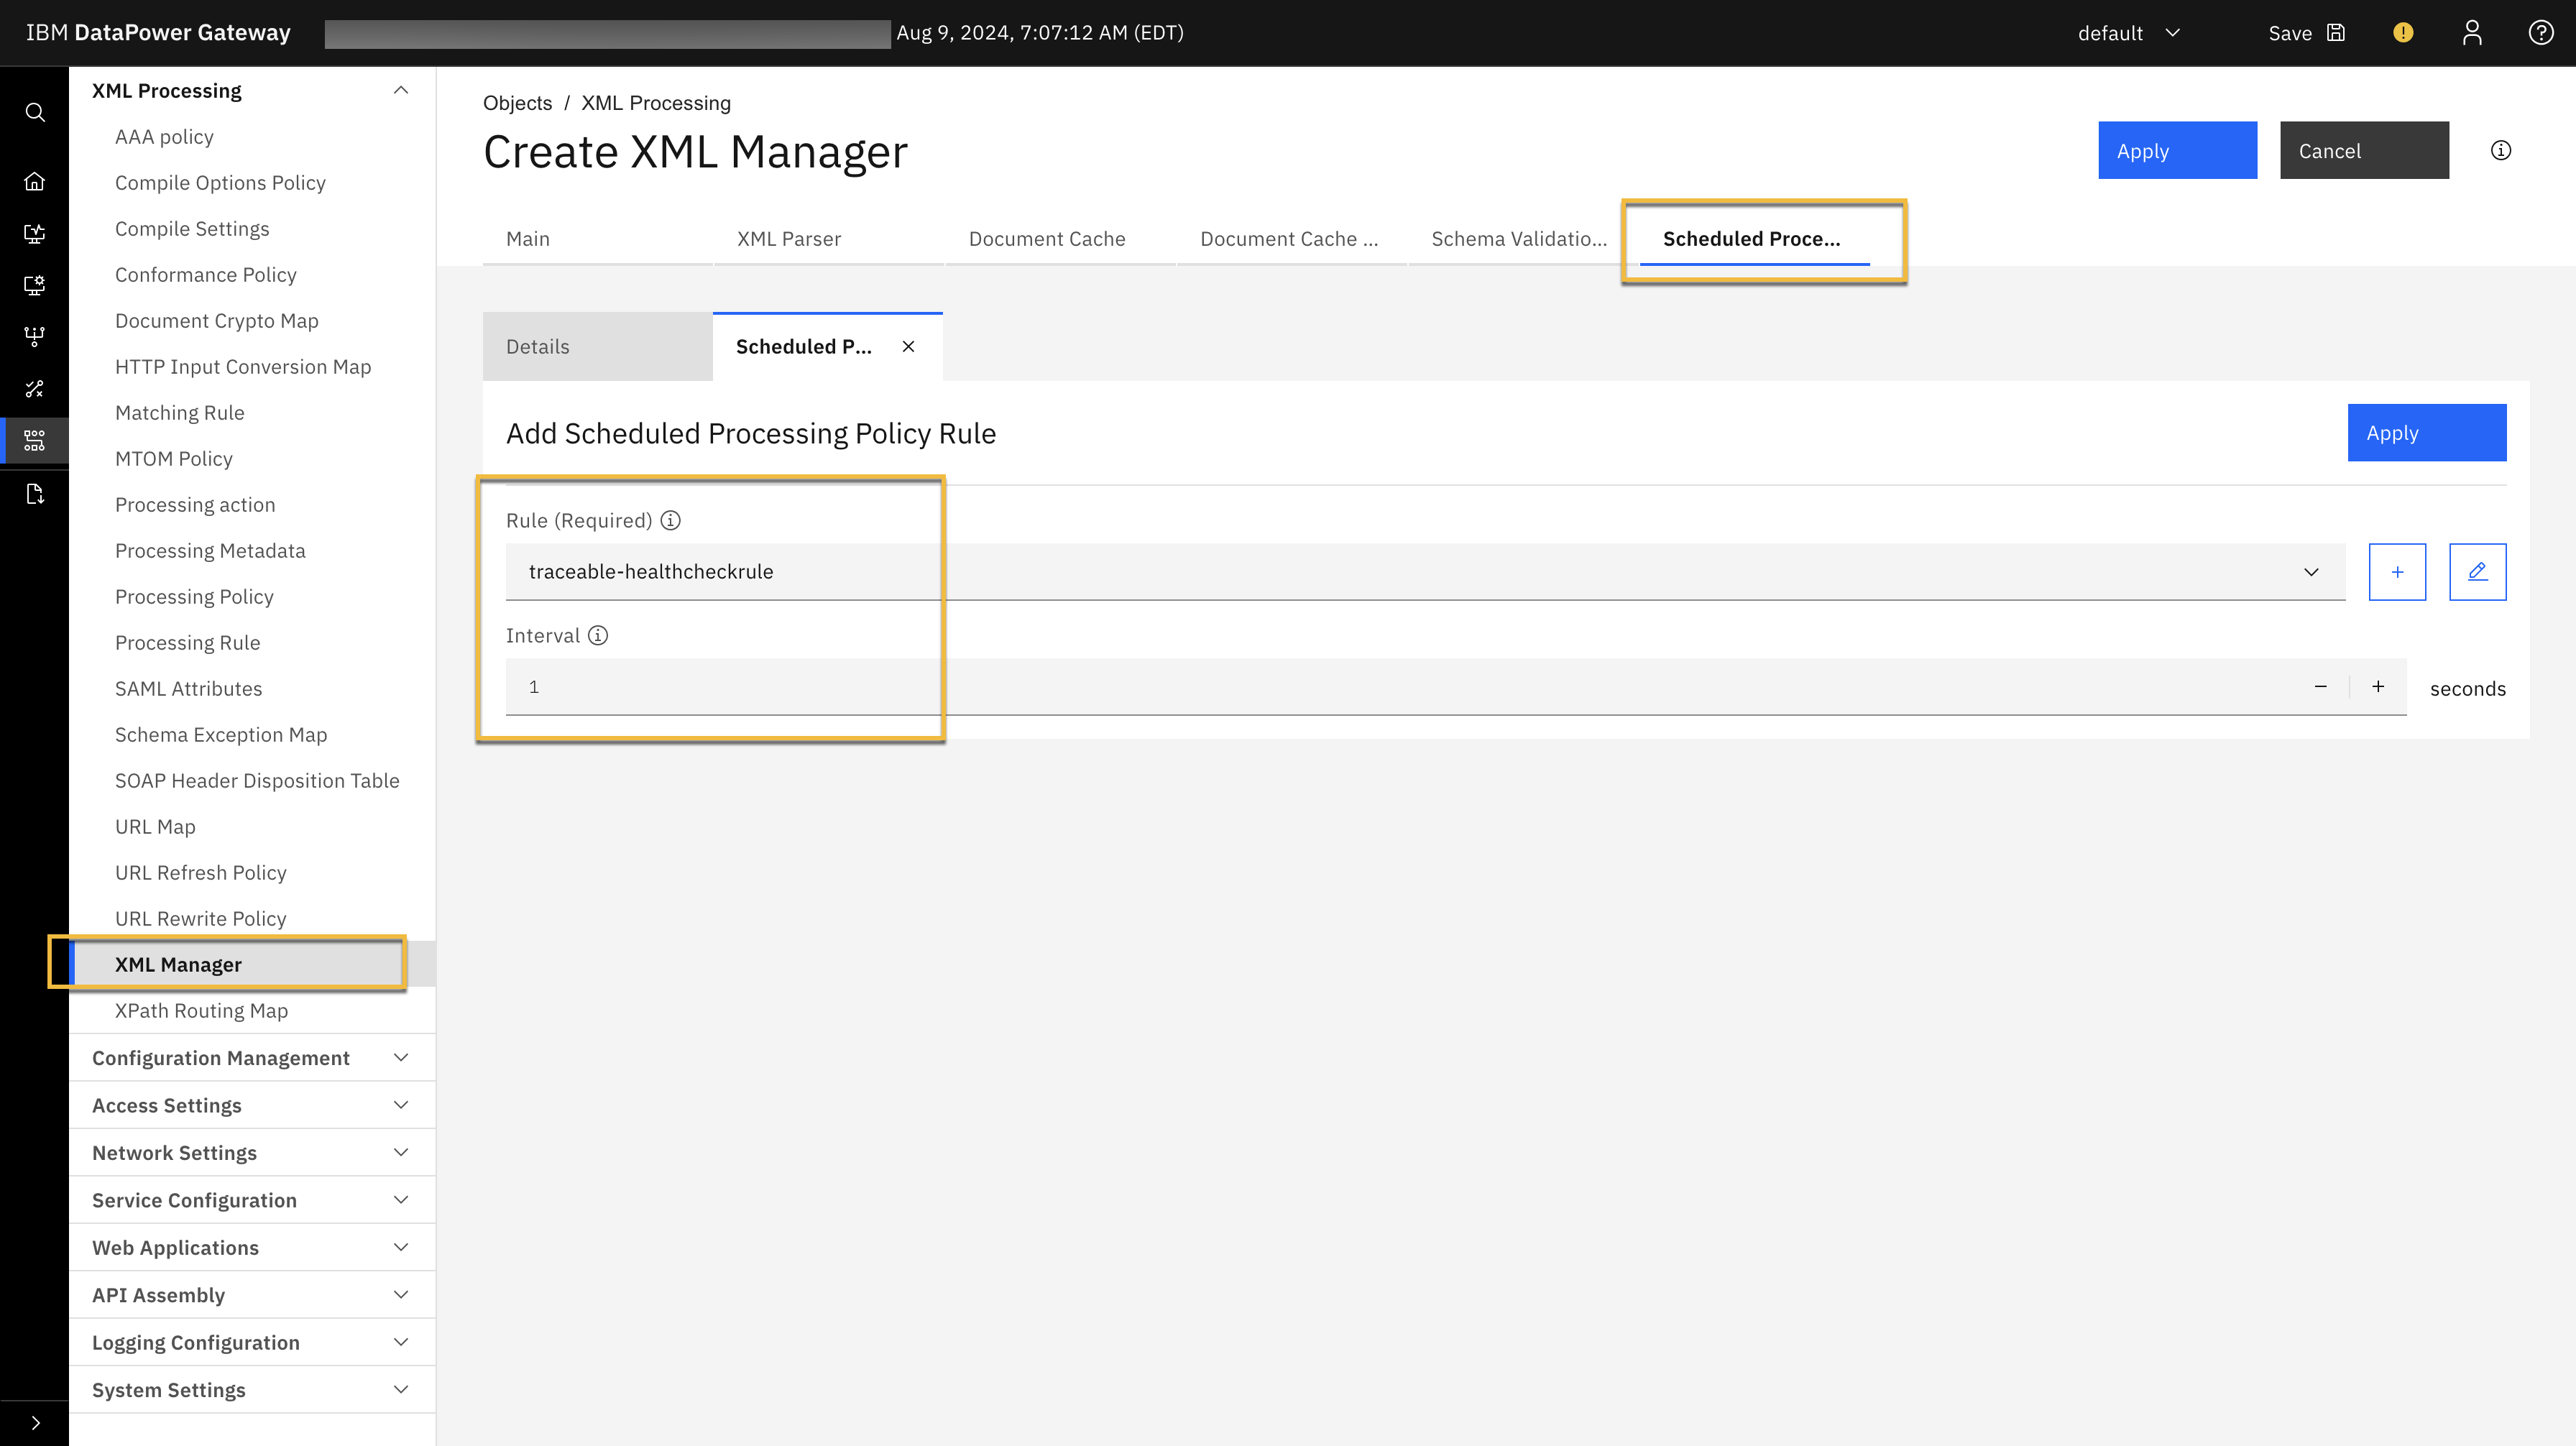
Configure the XML manager.
Search for XML manager in search and click Add
Navigate to the Schedule processing policy rule tab
Add a name
Choose the Rule from the drop-down list. Select the rule that you created in the previous step.
Configure the Interval as 1 second.
Step 7: Instrument Traceable Blocking Policy
You can instrument the blocking policy either per API or globally.
Option A: Per API Instrumentation
Use the previously downloaded
ibm-datapower-pre-blocking-1.3.0.zipfileGo to API Manager → Manage Catalogs → Catalog Settings → Gateway Services.
Click View policies → Upload.
Upload the pre-request blocking policy ZIP file. The post-request policy ZIP must also be uploaded and attached at the post stage in the API assembly. Unlike non-blocking mode where configurations are placed in the post-request policy, blocking mode requires the configurations to be done in the pre-request policy.
Open API Designer → Develop APIs and Products.
Select the API you want to instrument.
Under the Gateway tab, go to Policies.
Drag and drop the Traceable pre-request policy from the User Defined section into your API assembly.
Additional Configuration Fields
In addition to the mandatory Traceable Platform Agent (TPA) endpoint and TLS client profile (which are configured globally and referenced during policy execution), the following additional configuration fields can be set directly within the pre-request policy:
Field | Description | Type | Default |
|---|---|---|---|
| Name to identify the service on the Traceable platform | String |
|
| Target environment name (e.g., dev, staging, prod) | String | None |
| Enable health check validation with the Traceable agent | Boolean |
|
Note
To uninstall, click the delete icon next to the policy in the UI.
Option B: Global Instrumentation
Step 1: Set Up APIC CLI Toolkit
You need the CLI toolkit to authenticate using the apic command and run Traceable's automation script. The script depends on CLI-based access to IBM API Connect.
In API Manager, go to Download Toolkit and download:
IBM API Connect CLI tool
Your CLI credentials JSON file (this file contains authentication details required for CLI login. It is generated by your organization when setting up IBM API Connect. If you do not have it, contact your API Connect administrator.)
Register the credentials:
apic client-creds:set <path-to>/credentials.jsonSample credentials.json
{
  "client_id": "toolkit-client",
  "client_secret": "some-secret-string",
  "realm": "provider/default-idp-1",
  "username": "your-username@example.com",
  "password": "your-password",
  "server": "https://apic-mgmt-api-manager.example.com"
}
This file is typically generated when you download the CLI toolkit from the API Manager UI. If you do not have it, contact your API Connect administrator.
Log in to the API Connect instance:
apic login \
  --server https://<API_MANAGER_HOST> \
  --username '<USERNAME>' \
  --password '<PASSWORD>' \
  --realm 'provider/default-idp-1'
Step 2: Run the Global Instrumentation Script
Use the previously downloaded
ibm-datapower-global-blocking-1.3.0.zipfileExtract the ZIP and locate the
instrument.shscript.
Run the script from your terminal or shell on a machine that has the API Connect CLI toolkit installed. Use the following parameters:
Parameter
Description
-sServer URL of the API Manager
-oOrganization under API Manager
-gDataPower Gateway Name
-aTraceable Platform Agent endpoint
-tTLS Client Profile name (as created in Step 4)
-cCatalog name to instrument
-nService name for the agent
-eTarget environment name
-hFlag to enable health check validation. Use
trueto enable orfalseto disable.
./instrument.sh \
  -s <API_MANAGER_SERVER> \
  -o <ORGANIZATION_NAME> \
  -g <DATAPOWER_GATEWAY_NAME> \
  -a 'https://<TPA_IP>:<TPA_PORT>' \
  -t <TLS_CLIENT_PROFILE_NAME> \
  -c <CATALOG_NAME> \
  -n <SERVICE_NAME> \
  -e <ENVIRONMENT_NAME> \
  -h <true|false>
Example
./instrument.sh \
  -s apic-mgmt-api-manager.example.com \
  -o traceable \
  -g my-gateway \
  -a 'https://10.0.0.1:5443' \
  -t 'traceable-client' \
  -c sandbox \
  -n "ibm-apic-blocking" \
  -e "prod" \
  -h true
Uninstrumentation
To remove the blocking policy globally, use the uninstrument.sh script provided inside the ibm-datapower-global-blocking-1.3.0.zip file. Run the script from your terminal or shell on a machine that has the API Connect CLI toolkit installed:
./uninstrument.sh \
  -s <API_MANAGER_SERVER> \
  -o <ORGANIZATION_NAME> \
  -g <DATAPOWER_GATEWAY_NAME> \
  -a 'https://<TPA_IP>:<TPA_PORT>' \
  -t <TLS_CLIENT_PROFILE_NAME> \
  -c <CATALOG_NAME>