Google Cloud Platform (GCP) Load Balancer is a robust and highly scalable networking service designed to distribute incoming network traffic across multiple backend instances, ensuring optimal resource utilization, high availability, and improved application performance. The GCP Load Balancer supports various load balancing schemes, including HTTP(S), TCP/SSL, and UDP. Moreover, it seamlessly integrates with other GCP services, such as Google Kubernetes Engine (GKE) and Google Compute Engine (GCE).
Google’s Application Load Balancer supports service extensions. Traffic Callout Extension is a type of service extension supported by GCP. It can capture requests and responses and block them according to rules configured in the Traceable Platform.
Following is a high-level deployment diagram for capturing traffic from GCP and sending it to Traceable SaaS.

The load balancer establishes a gRPC stream for each request, sequentially sending the request headers, request body, request trailers, response headers, response body, and response trailers to the Traceable Platform agent within the same stream.
Before you begin
Make a note of the following points before you proceed with the integration:
Firewall rules — Configure the firewall rules on the instance or the cluster for health checks and connection to the Traceable Platform agent. You can preconfigure these or configure them later.
Service extensions — The deployment uses service extensions. Service extensions support only HTTPS connections to the backend. Make sure to set up a TLS certificate that can be used to connect to the Traceable Platform agent.
Roles — Make sure that you have either a project owner or editor role or the following compute engine IAM roles:
compute.instanceAdmin.v1- To create an instance.compute.networkAdmin- To create cloud load balancing components.
Enable APIs — Make sure to enable Compute Engine API and Network Services API. Enter the following command:
gcloud services enable compute.googleapis.com networkservices.googleapis.comMake sure that port 5443 is available.
Traceable’s integration with GCP supports request blocking.
Make sure that you have reasonable knowledge of GCP.
Setup
A service extension forwards the request to a backend application; in this case, the Traceable Platform agent is the backend application. In addition to deploying the Platform agent, a Traffic Callout Extension must be configured.
You can choose to deploy the backend application (Platform agent) from one of the following two options:
Option 1 - GKE based setup
The GKE-based setup uses NEG. NEG is a Kubernetes service. This Kubernetes service is hosted on a cluster. Make sure this cluster is on the network as the load balancer. Complete the following steps to set up the GKE-based backend application.
Firewall rule — Create a firewall rule allowing the proxy-only subnet of the load balancer to access port 5443 of the VM where the Traceable Platform agent will be deployed. Enter the following command:
gcloud compute firewall-rules create fw-allow-proxy-tpa \
  --network=<network-of-lb> \
  --action=allow \
  --direction=ingress \
  --source-ranges=source-range \
  --target-tags=allow-proxy-lb \
  --rules=tcp:5443
Create a GKE cluster — Enter the following command:
gcloud container clusters create neg-demo-cluster \
 --subnetwork=<subnet-of-lb> \
 --network=<network-of-lb> \
 --tags=allow-proxy-lb
 --zone=<zone>
Replace the placeholders (
<subnet-of-lb>,<network-of-lb>,<zone>) with your actual values. After running this command, a GKE cluster with the specified configuration will be created.Create Kubernetes secret for certificate. Enter the following command:
kubectl -n traceableai create secret generic tpa-certs --from-file=/Path/to/root_ca.crt --from-file=/Path/to/domain.crt --from-file=/Path/to/domain.keyFor example:
kubectl -n traceableai create secret generic tpa-certs --from-file=/Users/traceableai/Projects/traceable-agent/certs/root_ca.crt --from-file=/Users/traceableai/Projects/traceable-agent/certs/domain.crt --from-file=/Users/traceableai/Projects/traceable-agent/certs/domain.keyFollowing is an explanation for the above command:
kubectl: This is the command-line tool for interacting with Kubernetes clusters.-n traceable: Specifies the namespace for the Kubernetes resource. In this case, it's creating the secret in thetraceablenamespace.create secret generic tpa-certs: This part of the command instructs Kubernetes to create a generic secret namedtpa-certs.--from-file=/Users/traceableai/Projects/traceable-agent/certs/root_ca.crt: This option indicates that the content of the file is located at the specified path (root_ca.crt) should be included in the secret under the keyroot_ca.crt. This is typically a root CA certificate.--from-file=/Users/traceableai/Projects/traceable-agent/certs/domain.crt: Similar to the previous option, this includes the content of the file at the specified path (domain.crt) in the secret under the keydomain.crt. This is typically the domain or server certificate.--from-file=/Users/traceableai/Projects/traceable-agent/certs/domain.key: Again, this includes the content of the file at the specified path (domain.key) in the secret under the keydomain.key. This is typically the private key associated with the domain or server certificate.
Deploy the Traceable Platform agent with the TLS configuration using the secret created in the previous setup. For more information on deploying Platform agents, see Kubernetes.
Create and apply a service. Create a YAML file as shown below:
apiVersion: v1
kind: Service
metadata:
  name: traceable-agent
  annotations:
    cloud.google.com/neg: '{"exposed_ports": {"5443":{"name": "traceable-agent"}}}'
spec:
  type: ClusterIP
  selector:
    app.kubernetes.io/name: traceable-agent # Selects traceable agent pods
  ports:
  - port: 5443
    protocol: TCP
    targetPort: 5443
Apply the YAML. Enter the following command:
kubectl apply -f traceable-agent-svc.yaml -n traceableaiConfigure the firewall rules on GCP so that the Platform agent can connect to the Traceable Platform.
Health check — Create a health check. Enter the following command:
gcloud compute health-checks create https l7-callout-gke-check \
   --region=<region> \
   --request-path='/health' \
   --use-serving-port
This
gcloudcommand is creating an HTTP(S) health check namedl7-callout-gke-checkfor Google Kubernetes Engine (GKE) load balancing. The health check is designed to check the health of backend instances by making an HTTP request to a specific path.gcloud compute health-checks create https l7-callout-gke-check: This part of the command indicates that you want to create an HTTPS health check namedl7-callout-gke-check. This health check is designed for load balancing Layer 7 (application layer).--region=<region>: Specifies the region where the health check will be created. Replace<region>with the desired GCP region.--request-path='/health': Specifies the path that will be used for the health check. In this case, the health check will send an HTTP request to the path/healthon the backend instances to determine their health.--use-serving-port: Indicates that the health check should use the serving port of the backend instances. The serving port is the port on which the backend instances are configured to receive traffic.
Note
Make sure that the firewall rules on the instances allow health checks. For more information, see Firewall rules for health checks.
Create the backend service on this network with the backend as the zonal NEG created above and the health check configured above. Also, use the network as HTTP/2 as callout extensions only support HTTP/2.
gcloud compute backend-services create l7-ilb-callout-service \
    --load-balancing-scheme=<SAME_AS_THE_LB> \
    --protocol=HTTP2 \
    --health-checks=<health-check-name> \
    --health-checks-region=<health-check-region> \
    --region=<region>
Following is a breakdown of the above command:
gcloud compute backend-services create l7-ilb-callout-service:gcloud compute backend-services create: This is the command to create a new backend service in Google Cloud.l7-ilb-callout-service: This is the name you assign to the backend service being created.
--load-balancing-scheme=<SAME_AS_THE_LB>:--load-balancing-scheme: Specifies the load balancing scheme for the backend service. Common schemes includeINTERNAL_MANAGED,INTERNAL_SELF_MANAGED, andEXTERNAL.<SAME_AS_THE_LB>: Replace this placeholder with the load balancing scheme you use for your load balancer. This should match the load balancing scheme of your existing load balancer configuration.
--protocol=HTTP2:--protocol: Specifies the protocol to be used by the backend service.HTTP2: This sets the protocol to HTTP/2, which is required for callout extensions, as mentioned.
--health-checks=<health-check-name>:--health-checks: Specifies the name of the health check to be used by the backend service.<health-check-name>: Replace this placeholder with the actual name of the health check you have configured. Health checks ensure that traffic is only directed to healthy instances.
--health-checks-region=<health-check-region>:--health-checks-region: Specifies the region where the health check is located.<health-check-region>: Replace this placeholder with the actual region of the health check.
--region=<region>:--region: Specifies the region where the backend service is being created.<region>: Replace this placeholder with the region where you want to deploy the backend service.
Add network endpoint — Add the network endpoint group created as part of the Kubernetes service to the backend service created above:
gcloud compute backend-services add-backend l7-ilb-callout-service \
    --balancing-mode=UTILIZATION \
    --network-endpoint-group=traceable-agent \ # Coming from the k8s service configuration above
    --network-endpoint-group-region=<neg-region> \
    --region=<region>
The command
gcloud compute backend-services add-backendis used to add a backend to a backend service in Google Cloud. Here is a detailed breakdown of the command:gcloud compute backend-services add-backend l7-ilb-callout-service:gcloud compute backend-services add-backend: This is the command to add a backend to an existing service.l7-ilb-callout-service: This is the name of the backend service to which you add the backend.
--balancing-mode=UTILIZATION:--balancing-mode: Specifies the balancing mode for the backend service.UTILIZATION: This balancing mode distributes traffic based on backend instance or endpoint utilization. It aims to keep the utilization across the backends balanced. This is suitable for scenarios where instances or endpoints have varying capacities.
--network-endpoint-group=traceable-agent:--network-endpoint-group: Specifies the network endpoint group (NEG) name to be used as a backend.traceable-agent: This is the NEG's name configured in the Kubernetes service configuration. NEGs enable granular traffic control for containerized applications running in GKE.
--network-endpoint-group-region=<neg-region>:--network-endpoint-group-region: Specifies the region of the NEG.<neg-region>: Replace this placeholder with the actual region where the NEG is located.
--region=<region>:--region: Specifies the region for the backend service.<region>: Replace this placeholder with the region where the backend service is deployed.
Option 2 - VM-based setup
Complete the following steps to complete the VM-based setup:
Create an instance group. Enter the following command:
gcloud compute instance-groups unmanaged create callouts-ig \
 --zone=<zone>
gcloud compute instance-groups unmanaged create callouts-ig: This command part indicates that you are creating an unmanaged instance group namedcallouts-ig.--zone=<zone>: Specifies the zone in which the unmanaged instance group will be created. Replace<zone>with the desired GCP zone.
Set a named port for the instance group. This same port will be used for both health checks and backend connections. Enter the following command:
gcloud compute instance-groups unmanaged set-named-ports callouts-ig \
--named-ports=grpc:5443 \
--zone=<zone>
gcloud compute instance-groups unmanaged set-named-ports callouts-ig: This part of the command specifies that you want to set named ports for the unmanaged instance group namedcallouts-ig.--named-ports=grpc:5443: This option sets a named port. In this case, it sets a named port namedgrpcwith the associated port number5443. Named ports provide a way to assign friendly names to specific port numbers, making it easier to manage and refer to ports in your configurations.--zone=<zone>: Specifies the GCP zone where the unmanaged instance group is located. Replace<zone>with the desired GCP zone.
Firewall rule - The firewall rule allows traffic from the load balancer's proxy-only subnet to access a specific port (port 5443) on the Virtual Machine (VM) where the Traceable Platform Agent (TPA) will be deployed. This ensures that the load balancer can communicate with the TPA running on the VM.
gcloud compute firewall-rules create fw-allow-proxy-tpa \
  --network=<network-of-lb> \
  --action=allow \
  --direction=ingress \
  --source-ranges=source-range \
  --target-tags=allow-proxy-lb \
  --rules=tcp:5443
Following is a breakdown of the command:
gcloud compute firewall-rules create fw-allow-proxy-tpa:gcloud compute firewall-rules create: This command is used to create a new firewall rule in GCP.fw-allow-proxy-tpa: This is the name of the firewall rule being created. It’s good practice to name your firewall rules descriptively to indicate their purpose.
--network=<network-of-lb>:--network: Specifies the network to which the firewall rule will be applied.<network-of-lb>Replace this placeholder with the network name the load balancer uses.
--action=allow:--action: Specifies the action to take when traffic matches the rule.allow: This action allows traffic that matches the rule.
--direction=ingress:--direction: Specifies the direction of traffic to which the rule applies.ingress: This direction means the rule applies to incoming traffic to the VM.
--source-ranges=<source-range>:--source-ranges: Specifies the IP ranges that are allowed to connect.<source-range>: Replace this placeholder with the actual IP range(s) of the proxy-only subnet of the load balancer. This defines which IP addresses can send traffic to the VM on the specified port.
--target-tags=allow-proxy-lb:--target-tags: Specifies the target tags to which this firewall rule will apply.allow-proxy-lb: Replace or use this tag to identify the VMs that should be affected by this rule. The VMs where the Traceable Platform Agent will be deployed should have this network tag.
--rules=tcp:5443:--rules: Specifies the protocols and ports to which the rule applies.tcp:5443: This rule allows TCP traffic on port 5443. This is the port where the TPA will be listening for traffic.
Launch a VM in the same network and subnet as the load balancer with the network tag created above and the Traceable Platform Agent running with the TLS configuration. The Traceable Platform agent is installed on this VM using the TLS configuration. See the Install on VM topic to install the Traceable Platform agent on a VM. Enter the following command:
gcloud compute instances create traceable-platform-agent-instance \
--image-family=rhel-8 \
--image-project=rhel-cloud \
--network=<network-of-lb> \
--subnet=<subnet-of-lb> \
--tags=allow-proxy-lb \
--zone=<zone>
Following is the breakdown of the command:
gcloud compute instances create traceable-platform-agent-instance:gcloud compute instances create: This is the command to create a new VM instance in GCP.traceable-platform-agent-instance: This is the name assigned to the new VM instance. Naming it descriptively helps identify its purpose.
--image-family=rhel-8:--image-family: Specifies the family of the image to use for the VM.rhel-8: This indicates that the VM will be created using the Red Hat Enterprise Linux 8 image family.
--image-project=rhel-cloud:--image-project: Specifies the project that contains the image family.rhel-cloud: This indicates that the image project isrhel-cloud, which includes the official Red Hat Enterprise Linux images.
--network=<network-of-lb>:--network: Specifies the network to which the VM will be connected.<network-of-lb>: Replace this placeholder with the actual network name of the load balancer. This ensures the VM is in the same network as the load balancer.
--subnet=<subnet-of-lb>:--subnet: Specifies the subnet within the network to which the VM will be connected.<subnet-of-lb>: Replace this placeholder with the load balancer's actual subnet name. This ensures the VM is in the same subnet as the load balancer.
--tags=allow-proxy-lb:--tags: Specifies network tags to apply to the VM.allow-proxy-lb: This tag is used for the firewall rules created earlier. It ensures that the firewall rule allowing traffic from the load balancer to the VM on port 5443 is applied to this VM.
--zone=<zone>:--zone: Specifies the zone where the VM will be created.<zone>: Replace this placeholder with the actual zone in which you want to create the VM (e.g.,us-central1-a).
Add the VM you created in the previous step to the instance group you created in Step 1. Enter the following command:
gcloud compute instance-groups unmanaged add-instances callouts-ig \
    --zone=<zone> \
    --instances=<vm_name>
Health check — Create a health check. Enter the following command:
gcloud compute health-checks create https l7-callout-gke-check \
   --region=<region> \
   --request-path='/health' \
   --use-serving-port
Following is a breakdown of the command:
gcloud compute health-checks create https l7-callout-gke-check: This part of the command specifies that you want to create an HTTPS health check namedl7-callout-gke-check. This health check is designed for load balancing Layer 7 (application layer).--region=<region>: Specifies the region where the health check will be created. Replace<region>with the desired GCP region.--request-path='/health': Specifies the path that will be used for the health check. In this case, the health check will send an HTTP request to the path/healthon the backend instances to determine their health.--use-serving-port: Indicates that the health check should use the serving port of the backend instances. The serving port is where the backend instances are configured to receive traffic. This option is often used with GKE, where the serving port is typically port 80 for HTTP traffic and port 443 for HTTPS traffic.Note
Make sure that firewall rules on the instance allows health checks. For more information, see Firewall rules for health checks.
Backend — Create a backend. Enter the following command:
gcloud compute backend-services create l7-ilb-callout-service \
    --load-balancing-scheme=<SAME_AS_THE_LB> \
    --protocol=HTTP2 \
    --port-name=grpc \ --> #configured named port of the instance group
    --health-checks=<health-check-name> \
    --health-checks-region=us-west1 \
    --region=<zone>
Add the instance group — Add the instance group to the backend you created in the previous step. Enter the following command:
gcloud compute backend-services add-backend l7-ilb-callout-service \
    --balancing-mode=UTILIZATION \
    --instance-group=callouts-ig \
    --instance-group-zone=<zone> \
    --region=<region>
Traffic callout extension setup
As a last setup, you must set up a Traffic callout extension. For more information on Callout Extension, see Configure Callout Extension.
Note
Make sure the
failOpenconfiguration is set totrueso that even if the Traceable Platform agent is unavailable, GCP will continue with the routing.
Following is a sample YAML for creating a traffic callout extension:
name: traffic-ext
loadBalancingScheme: EXTERNAL_MANAGED # Configure according to the load balancer
forwardingRules:
- https://www.googleapis.com/compute/v1/projects/<project-id>/regions/<region>/forwardingRules/<frontend-name>
- https://www.googleapis.com/compute/v1/projects/<project-id>/regions/<region>/forwardingRules/<frontend-name>
extensionChains:
- name: "chain1"
  matchCondition:
    celExpression: 'true'
  extensions:
  - name: traceable-callout-backend
    authority: traceable.ai
    service: https://www.googleapis.com/compute/v1/projects/<project-id>/regions/<region>/backendServices/<traceable-agent-backend>
    failOpen: true
    timeout: 1s
    supportedEvents:
    - REQUEST_HEADERS
    - REQUEST_BODY
    - REQUEST_TRAILERS
    - RESPONSE_HEADERS
    - RESPONSE_BODY
    - RESPONSE_TRAILERS
After you have created the YAML file, enter the following command:
gcloud service-extensions lb-traffic-extensions import <extension-name> \
--source=<path/to/yaml/file> \
--location=<region>
The gcloud service-extensions lb-traffic-extensions import command imports a traffic extension configuration into the Google Cloud Platform (GCP).
gcloud service-extensions lb-traffic-extensions import: This part of the command is using thegcloudtool withservice-extensionscommand group to manage load balancer traffic extensions.<extension-name>: This placeholder should be replaced with the name you want to assign to the traffic extension. This name is used to identify and manage the extension.--source=<path/to/yaml/file>: Specifies the source path to the YAML file that you created above.--location=<region>: Specifies the GCP region where the traffic extension should be applied. The traffic extension will be associated with load balancers in this region.
Once you create the traffic callout extension, send the traffic through the load balancer. You will see the traffic reported in the Traceable Platform.
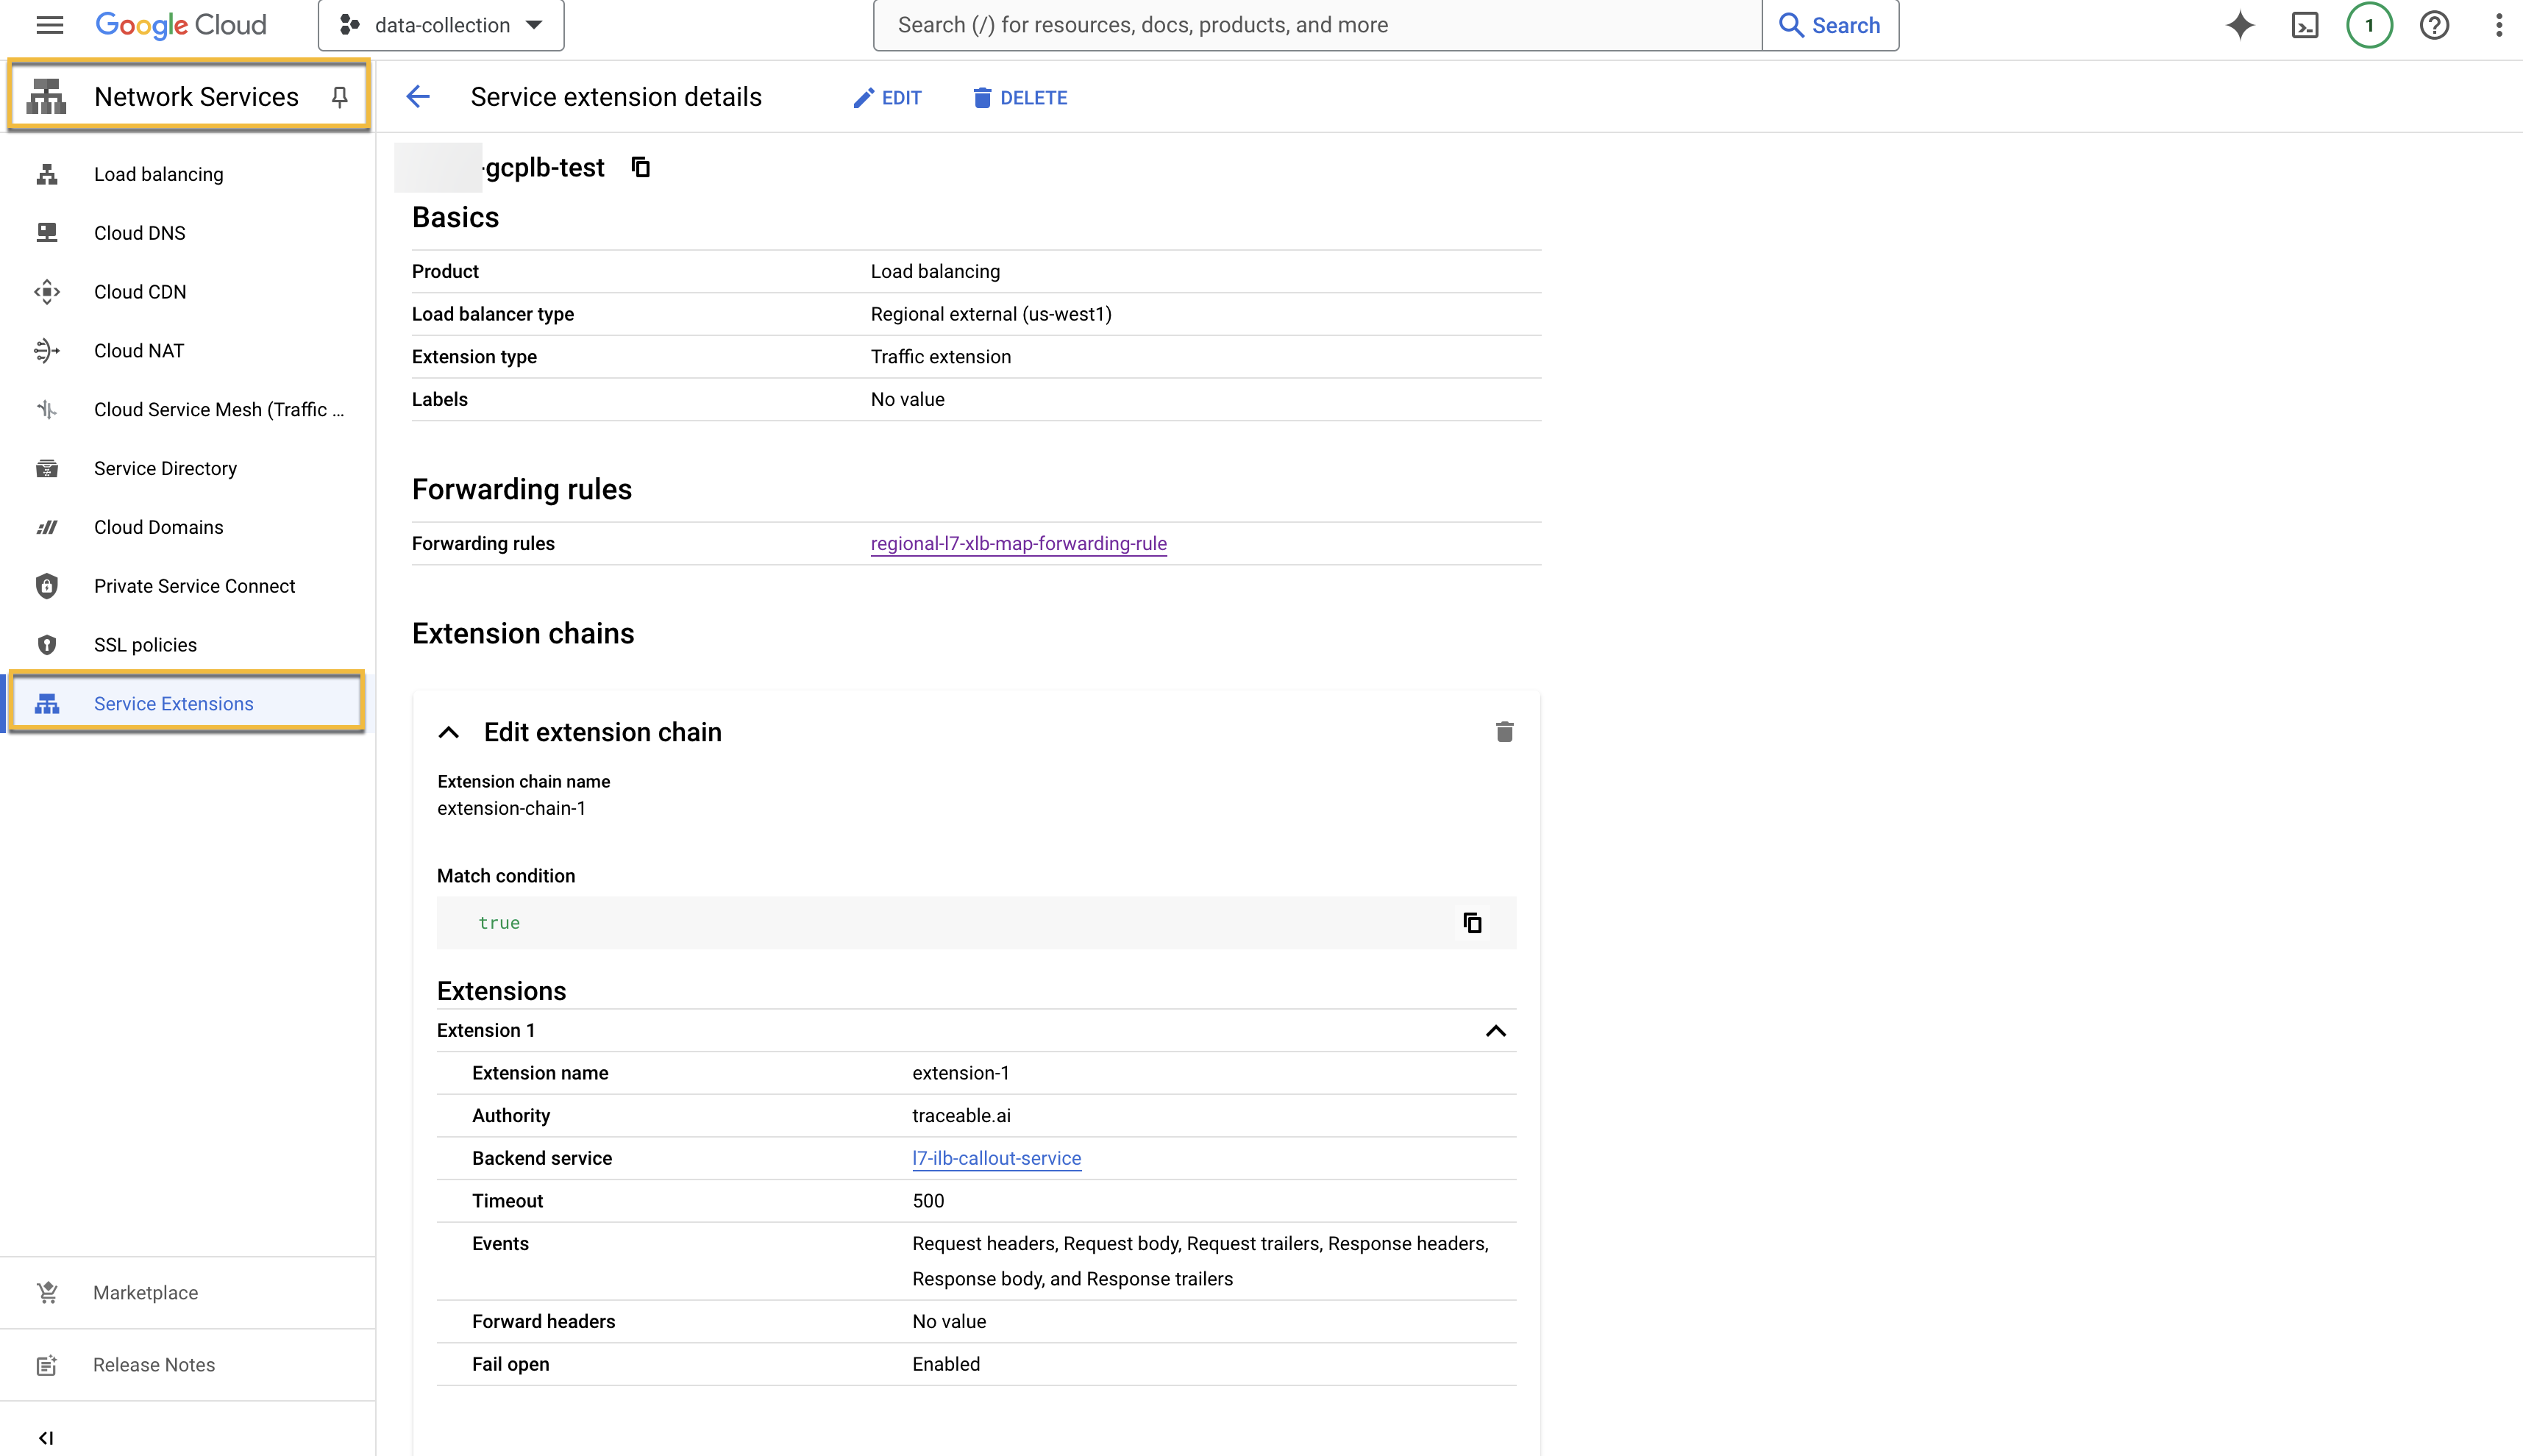
Verification
On successful creation of the extension, the extension will be listed under Service Extensions tab under Network Services.
Upgrade
Traceable Platform agent can be upgraded based on the deployment mode. For updating the service extension configuration, the import command be used again with the same extension name pointing to the updated configuration file.
gcloud service-extensions lb-traffic-extensions import <extension-name> \
--source=<path/to/yaml/file> \
--location=<region>
Uninstall
To uninstall, enter the following command:
gcloud service-extensions lb-traffic-extensions delete <extension-name> \
--location=<region>