Traceable's Data Protection page with live view helps you map the sensitive data to the users of the sensitive data and informs them of the rate at which the data is being accessed. The data protection also lets you know which APIs expose sensitive data. Knowing if you wish to create a robust data protection policy is important. As shown in the screenshot below, there were 3.59K users in the last week, along with the user's geolocation. The live view map shows the user's geographic location and the number of records accessed from a location.
.png)
The Summary section also shows the type of location from where the data was accessed. The location type can be:
An anonymous VPN
A bot
A hosting provider
A public proxy
An unknown source
All users
The All Users tab, as marked in the above screenshot, gives you the details about the user accessing the data and the type of data the user has accessed. For example, you can see that a user from tortoise.com domain has accessed 132 phone records. In addition, the user has accessed POST /loginservice/login and one more API endpoint. The Source information column shows the risk associated with the user, the location type of the user, and so on. In this tab, you can filter and sort data to view users according to your specified criteria. You can also click on the Actions drop-down and download the list of users as a CSV file. While downloading, you can also select the number of rows you want to download from the list.
In-depth data analysis
If you hover the cursor over, for example, the data type or click the + sign, the dashboard will provide you with more in-depth information. For example, in the screenshot below, the user has accessed numerous sensitive data types from many IP addresses. This information is useful in understanding the level of risk associated with the user. It also helps you understand what your expectation was with data access for a user and what the user is accessing.
(1).png)
Such in-depth analysis and information can give you indicators to create necessary controls to avoid unauthorized access and the theft of sensitive data. The next section explains how to use this information to create an effective data protection rule.
Create a Data Loss Prevention (DLP) rule
A DLP rule allows you granular control over data access. A DLP rule or a zero trust rule can define who can access data, what kind of data can be accessed, and at what rate the data can be accessed, among many other options. The DLP rule provides many granular options to configure, for example, source of traffic, IP addresses, IP type (bot, VPN, and so on), user ID, region, attributes, and so on.
You can create a data access rule by clicking the + Create Rule button. A data access rule allows you granular control over data access. A data access or a zero trust rule can define who can access data, what kind of data can be accessed, and at what rate the data can be accessed, among many other options. If you wish to create a specific rule using inputs from the access data of a user, click the Create Rule button displayed after clicking on the ellipse icon as shown below.

Creating a data access rule consists of three parts:
Setting up the criteria for the rule
Adding the conditions under which the rule would trigger
Setting up the actions to take once the rule is triggered
Step 1 — Criteria
The data access rule provides many granular options to configure, for example, source of traffic, IP addresses, IP type (bot, VPN, and so on), user ID, region, attributes, and so on. Many of these fields are pre-populated when you create a rule from specific user data, as shown below:
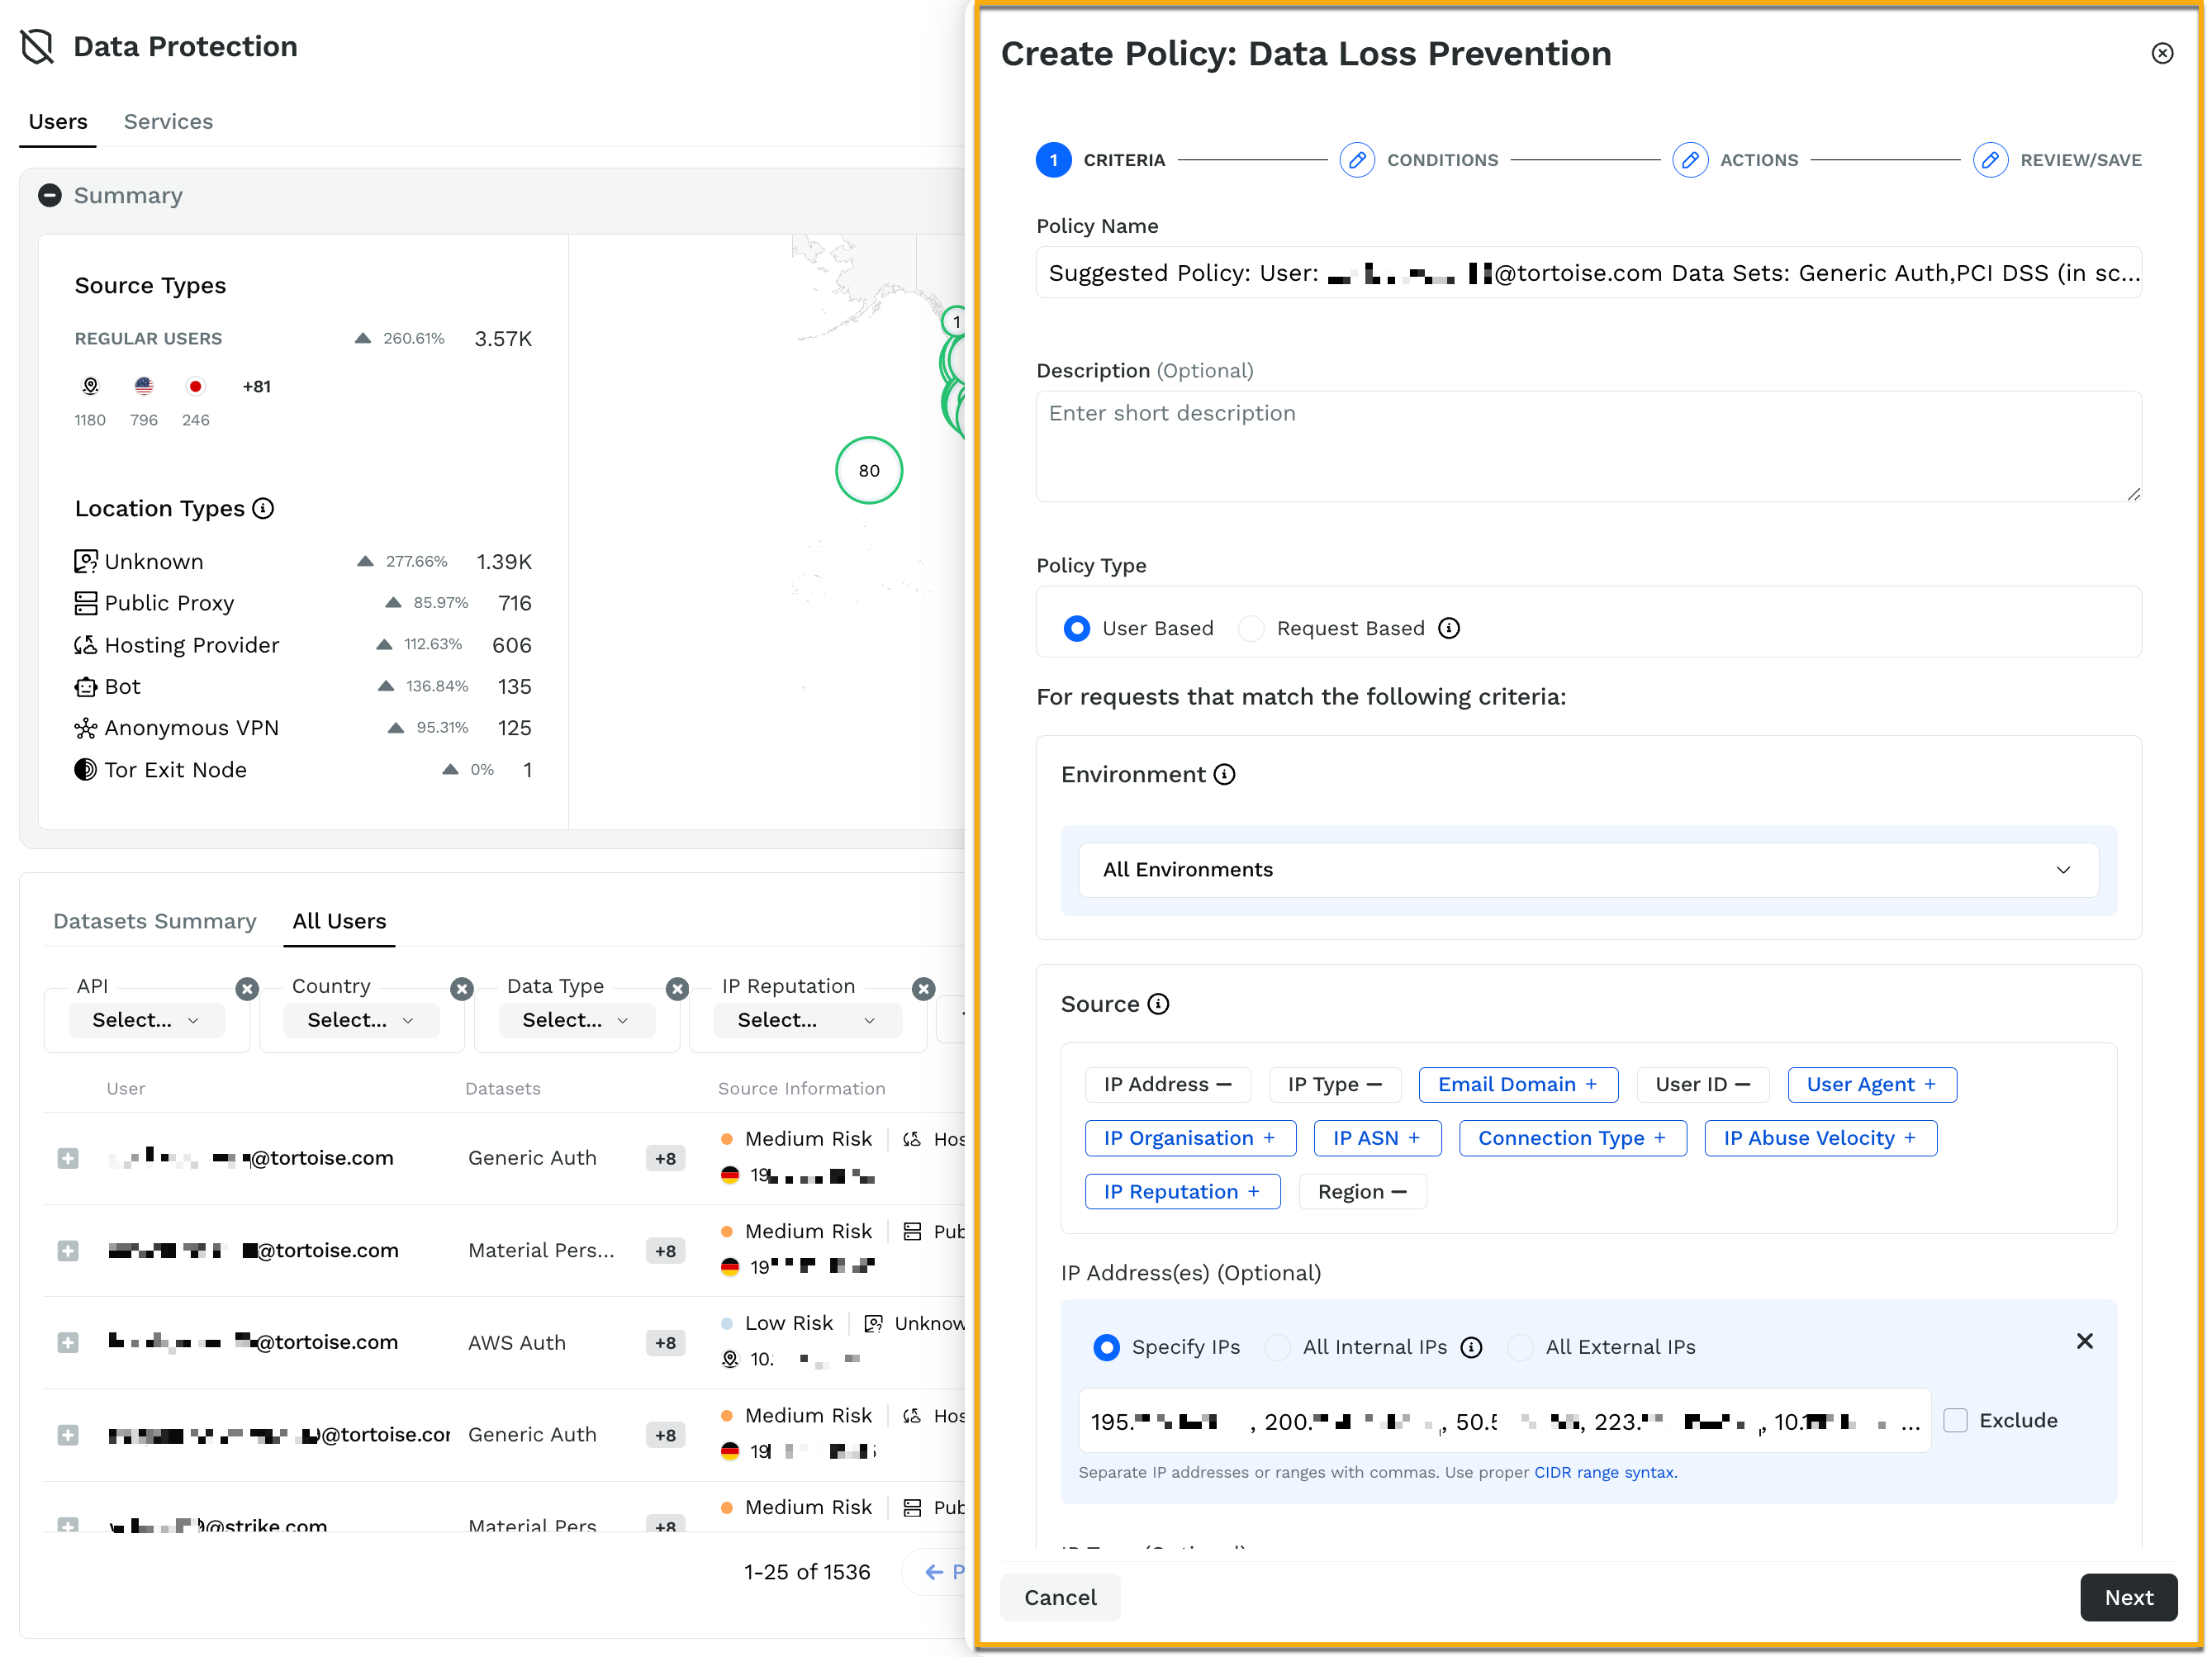
The screenshot shows that IP addresses that accessed sensitive data are pre-populated. Similarly, other configuration options are also automatically added. You can retain or reconfigure them based on your requirements. When creating the rule, make sure that you choose the correct environment to which this rule applies, or you can choose it to apply across all the environments. For example, you can have two entirely different rules for different environments like, staging and production. Following is a list of different configuration options to create a data protection or zero trust rule:
Rule Type — The type of rule you want to create.
Environment — Environment(s) to which the rule applies.
Source — The source criteria on which you want to apply the rule. For example, IP Addresses → All External IPs.
Payload — The type of API component on which you want to apply the rule. For example, data sets or data types.
Target — The API Endpoints that need to be monitored as part of the rule. When you click on Add Endpoints, the entire catalog of APIs is presented to you. You can choose the API endpoints that you want to be part of the rule. These API endpoints in the catalog can be sorted or filtered based on the type of sensitive data they carry, the risk category they belong to, whether the APIs are authenticated or not, whether they are external, and so on.
For example, an API endpoint that is external and authenticated would have higher priority, as authentication makes the basis of a zero trust rule. You can further select the type of authentication, for example, a basic authentication (username, password) or authentication based on bearer token. Further filtering of APIs can be done based on the types of security headers they carry, for example, CSP or HSTS, and so on. All these selections help you define the user who has access to your data, and in turn help you build a robust zero trust rule.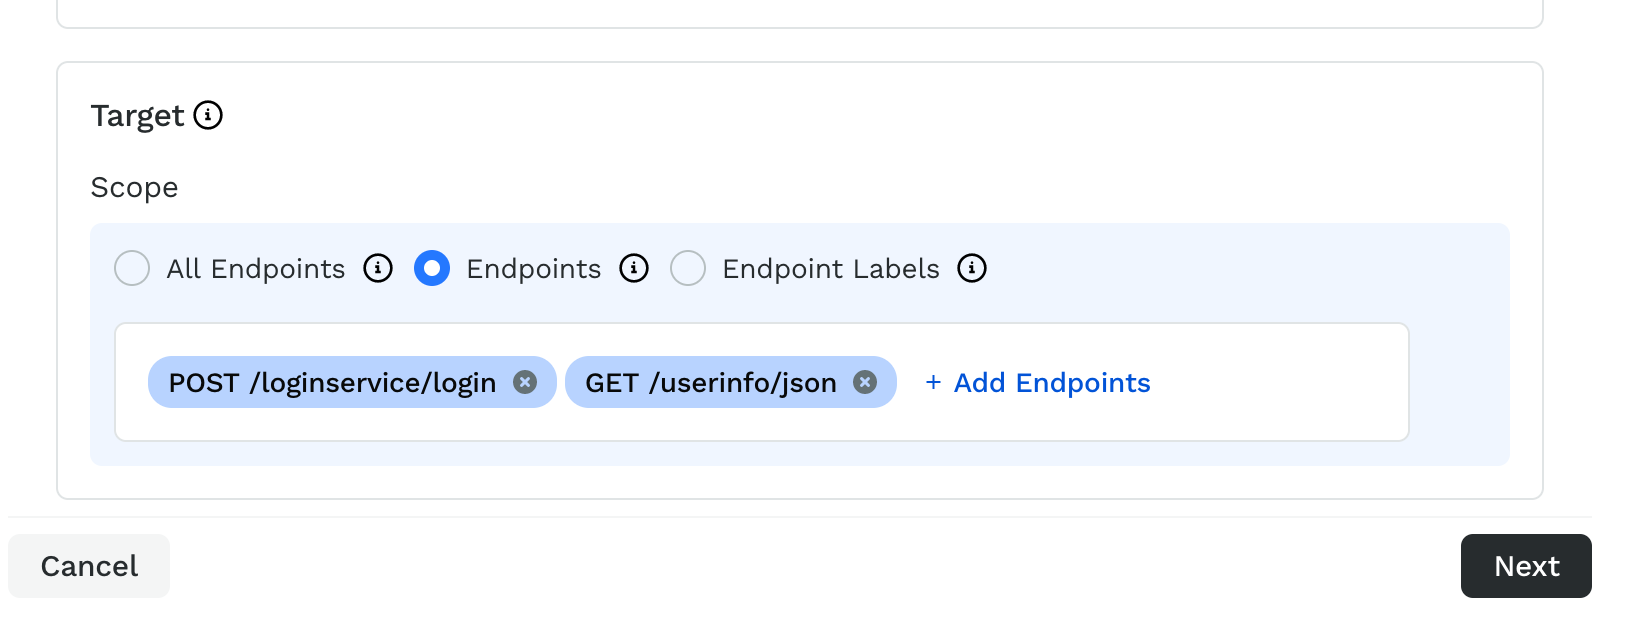
Click on Next after you have defined the criteria for the rule.
Step 2 — Choose conditions
In this step, define the conditions associated with the rule. A condition is a set of configurations that decide when the rule would trigger. These conditions could either be a static condition or a dynamic condition.
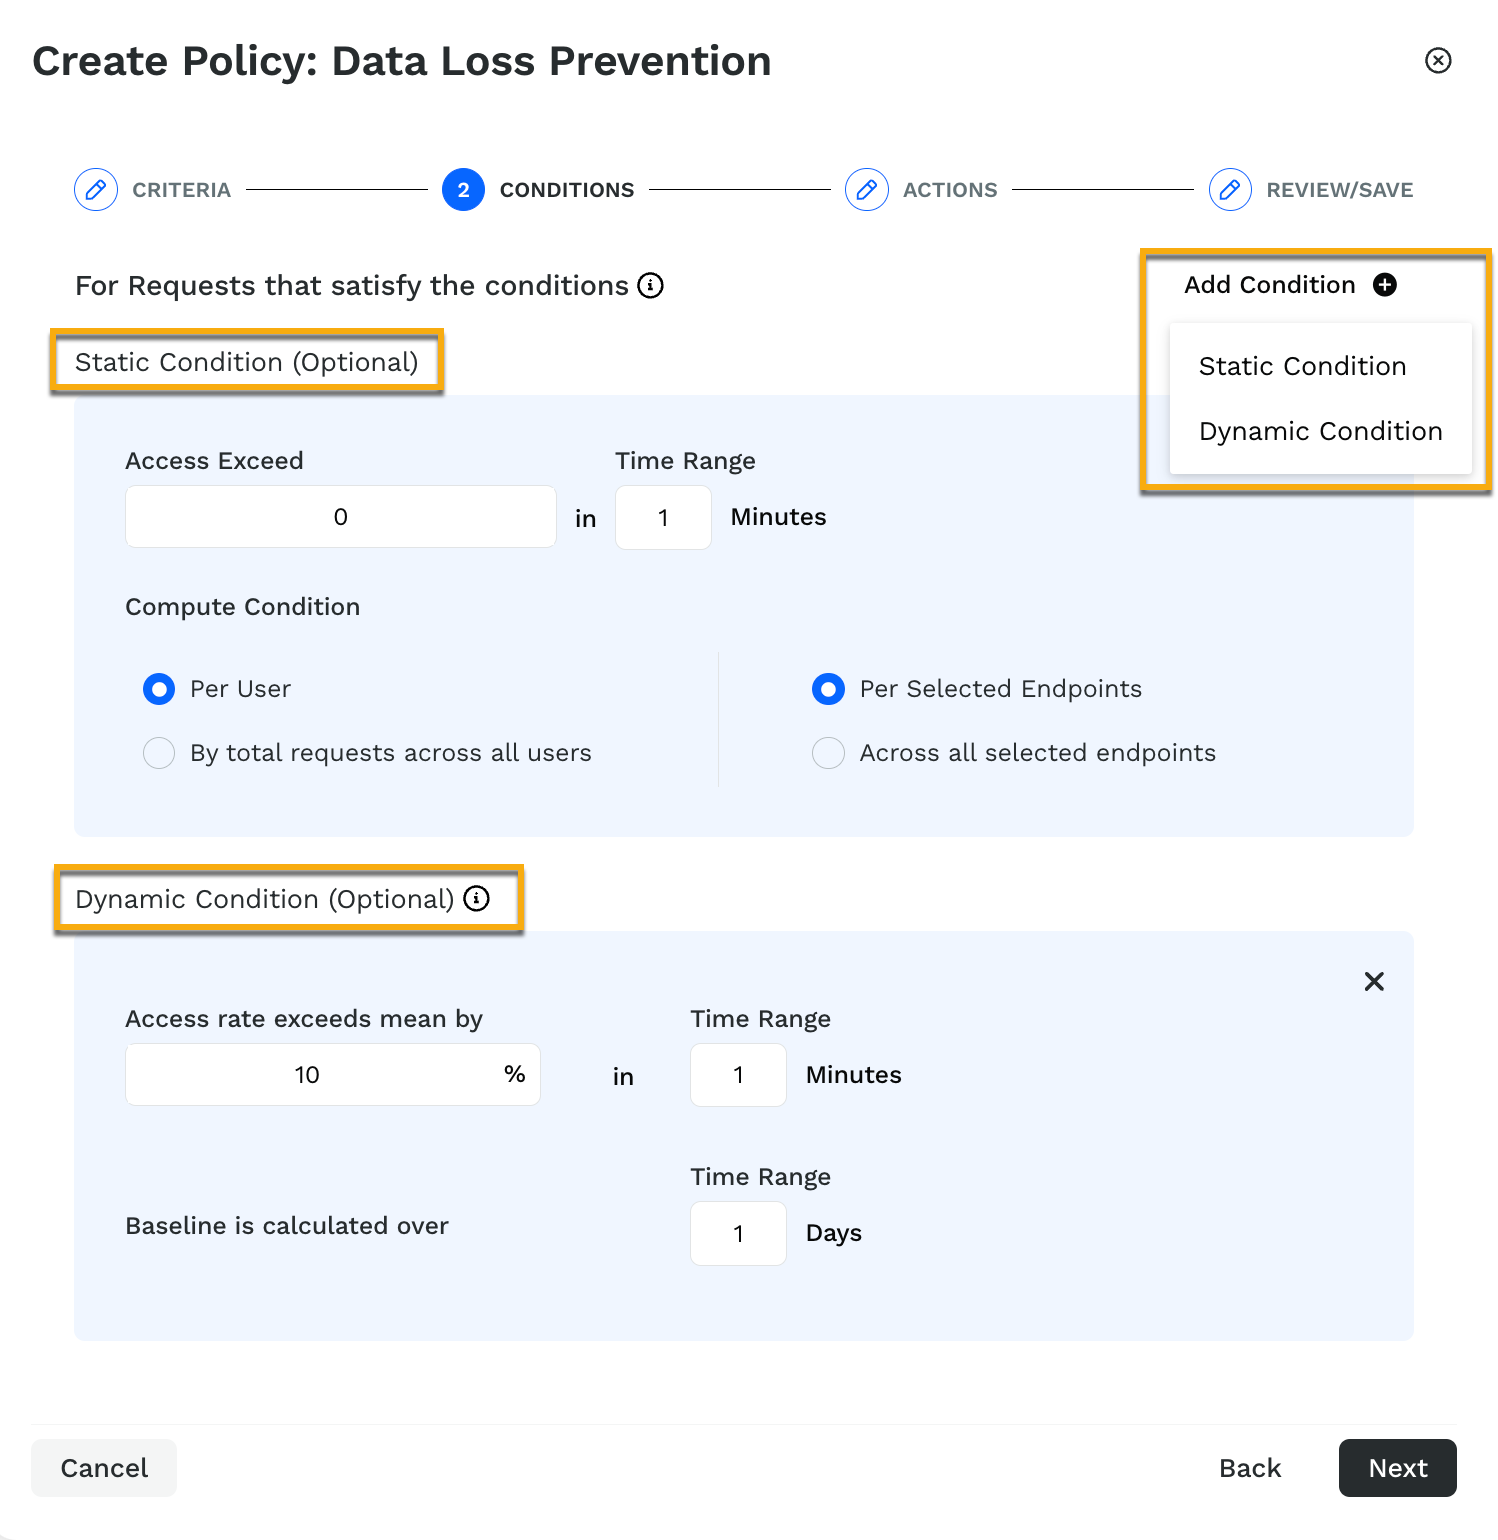
Dynamic conditions help you adjust the rate limit intelligently based on the baseline traffic that is calculated based on the number of days that you have configured. By default, the baseline is calculated based on the traffic received in the past one day. You can have both, the static and dynamic conditions work together. For example, you would use the static condition in case of account takeover, where you would want to block the access immediately.
Click on Next to define the actions that should be taken once the rule is triggered based on the conditions that you have defined.
Step 3 — Actions
The actions card helps you define the action that you would like to take when the data protection or zero trust rule is triggered. You can define the severity of the event as low, medium, high, or critical. As part of the actions that you can take, you can block the user indefinitely, or choose to block them for a certain period of time, or you can choose not to block them and instead monitor only.
You can also inject data in the header of the request to monitor and detect the presence of an anomaly in the request.
Click on Next to review and Submit the policy.
Default rules
Traceable provides a few default DLP rules that you can use out of the box. Navigate to Protection → Settings → Policies → Custom Policies tab and click the Data Loss Prevention tab.
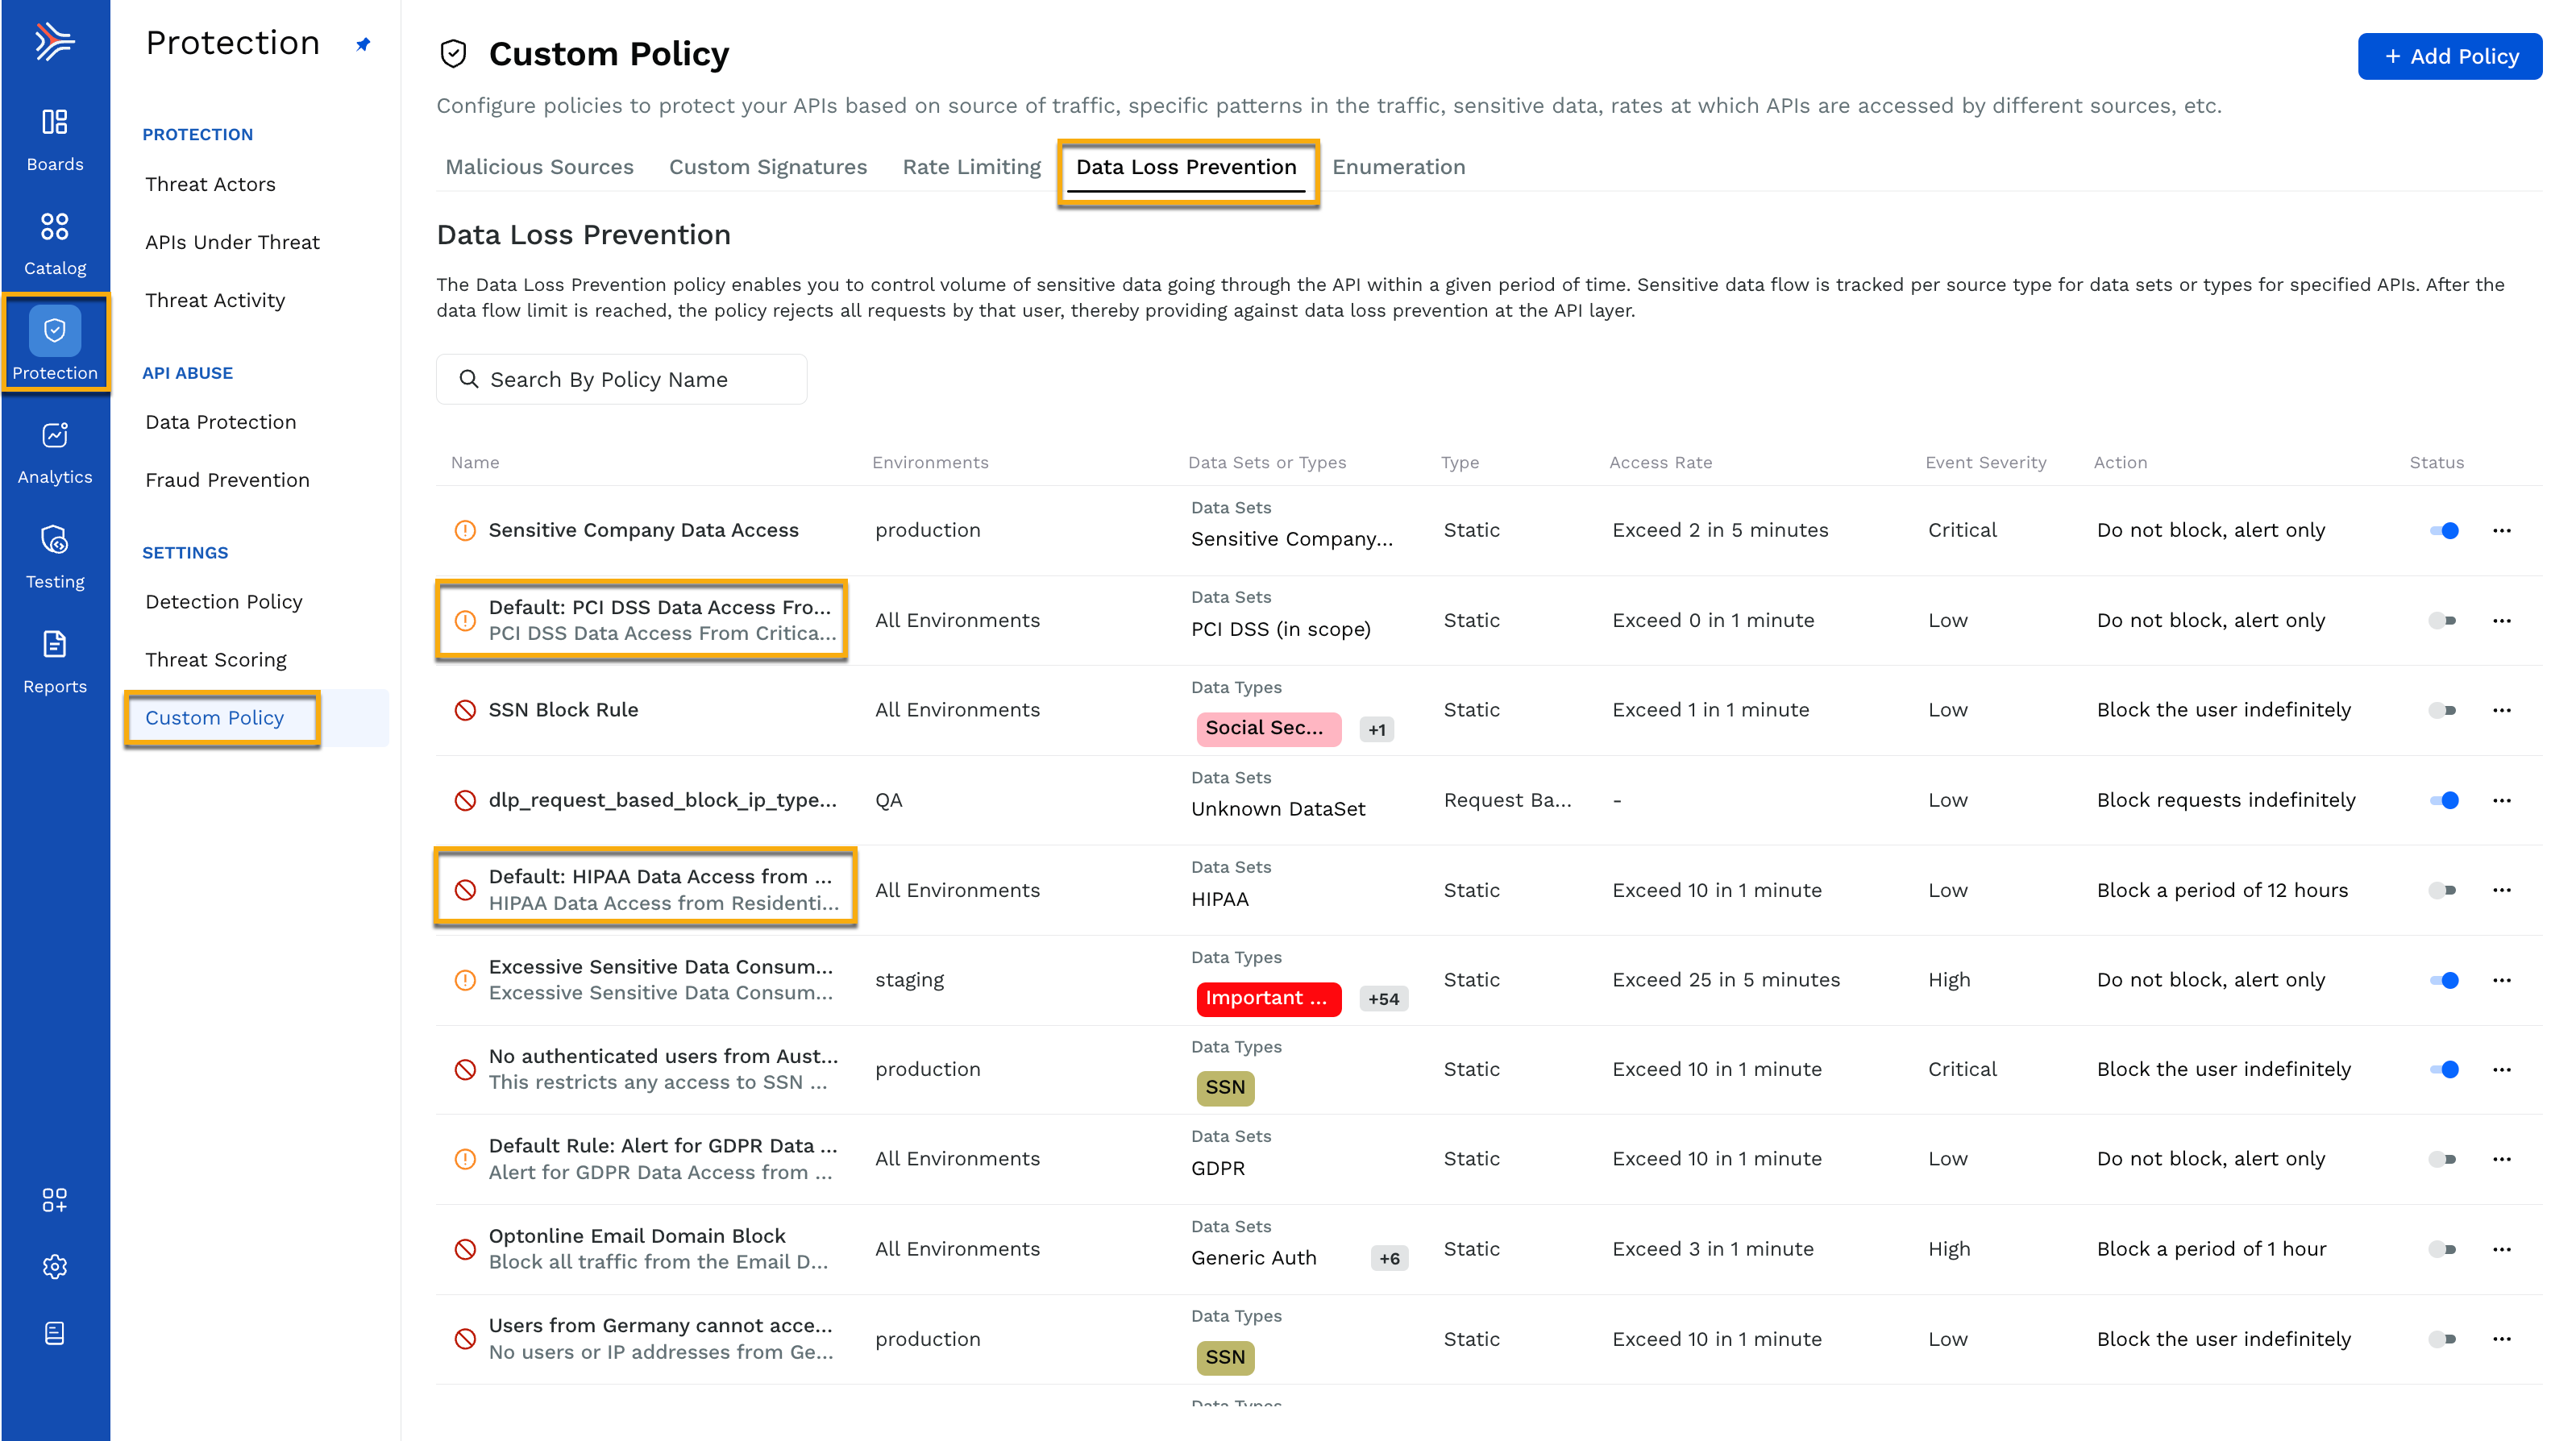
For example, you can click on the default rule that alerts for PCI DSS data for critical risk BOTs and anonymous VPNs and customize it according to your requirements. This default rule would help you build a trust policy that would never allow your PCI DSS data to be accessed through anonymous VPNs and BOTs. When you click on Next, you are taken through the same data access policy creation flow explained earlier.
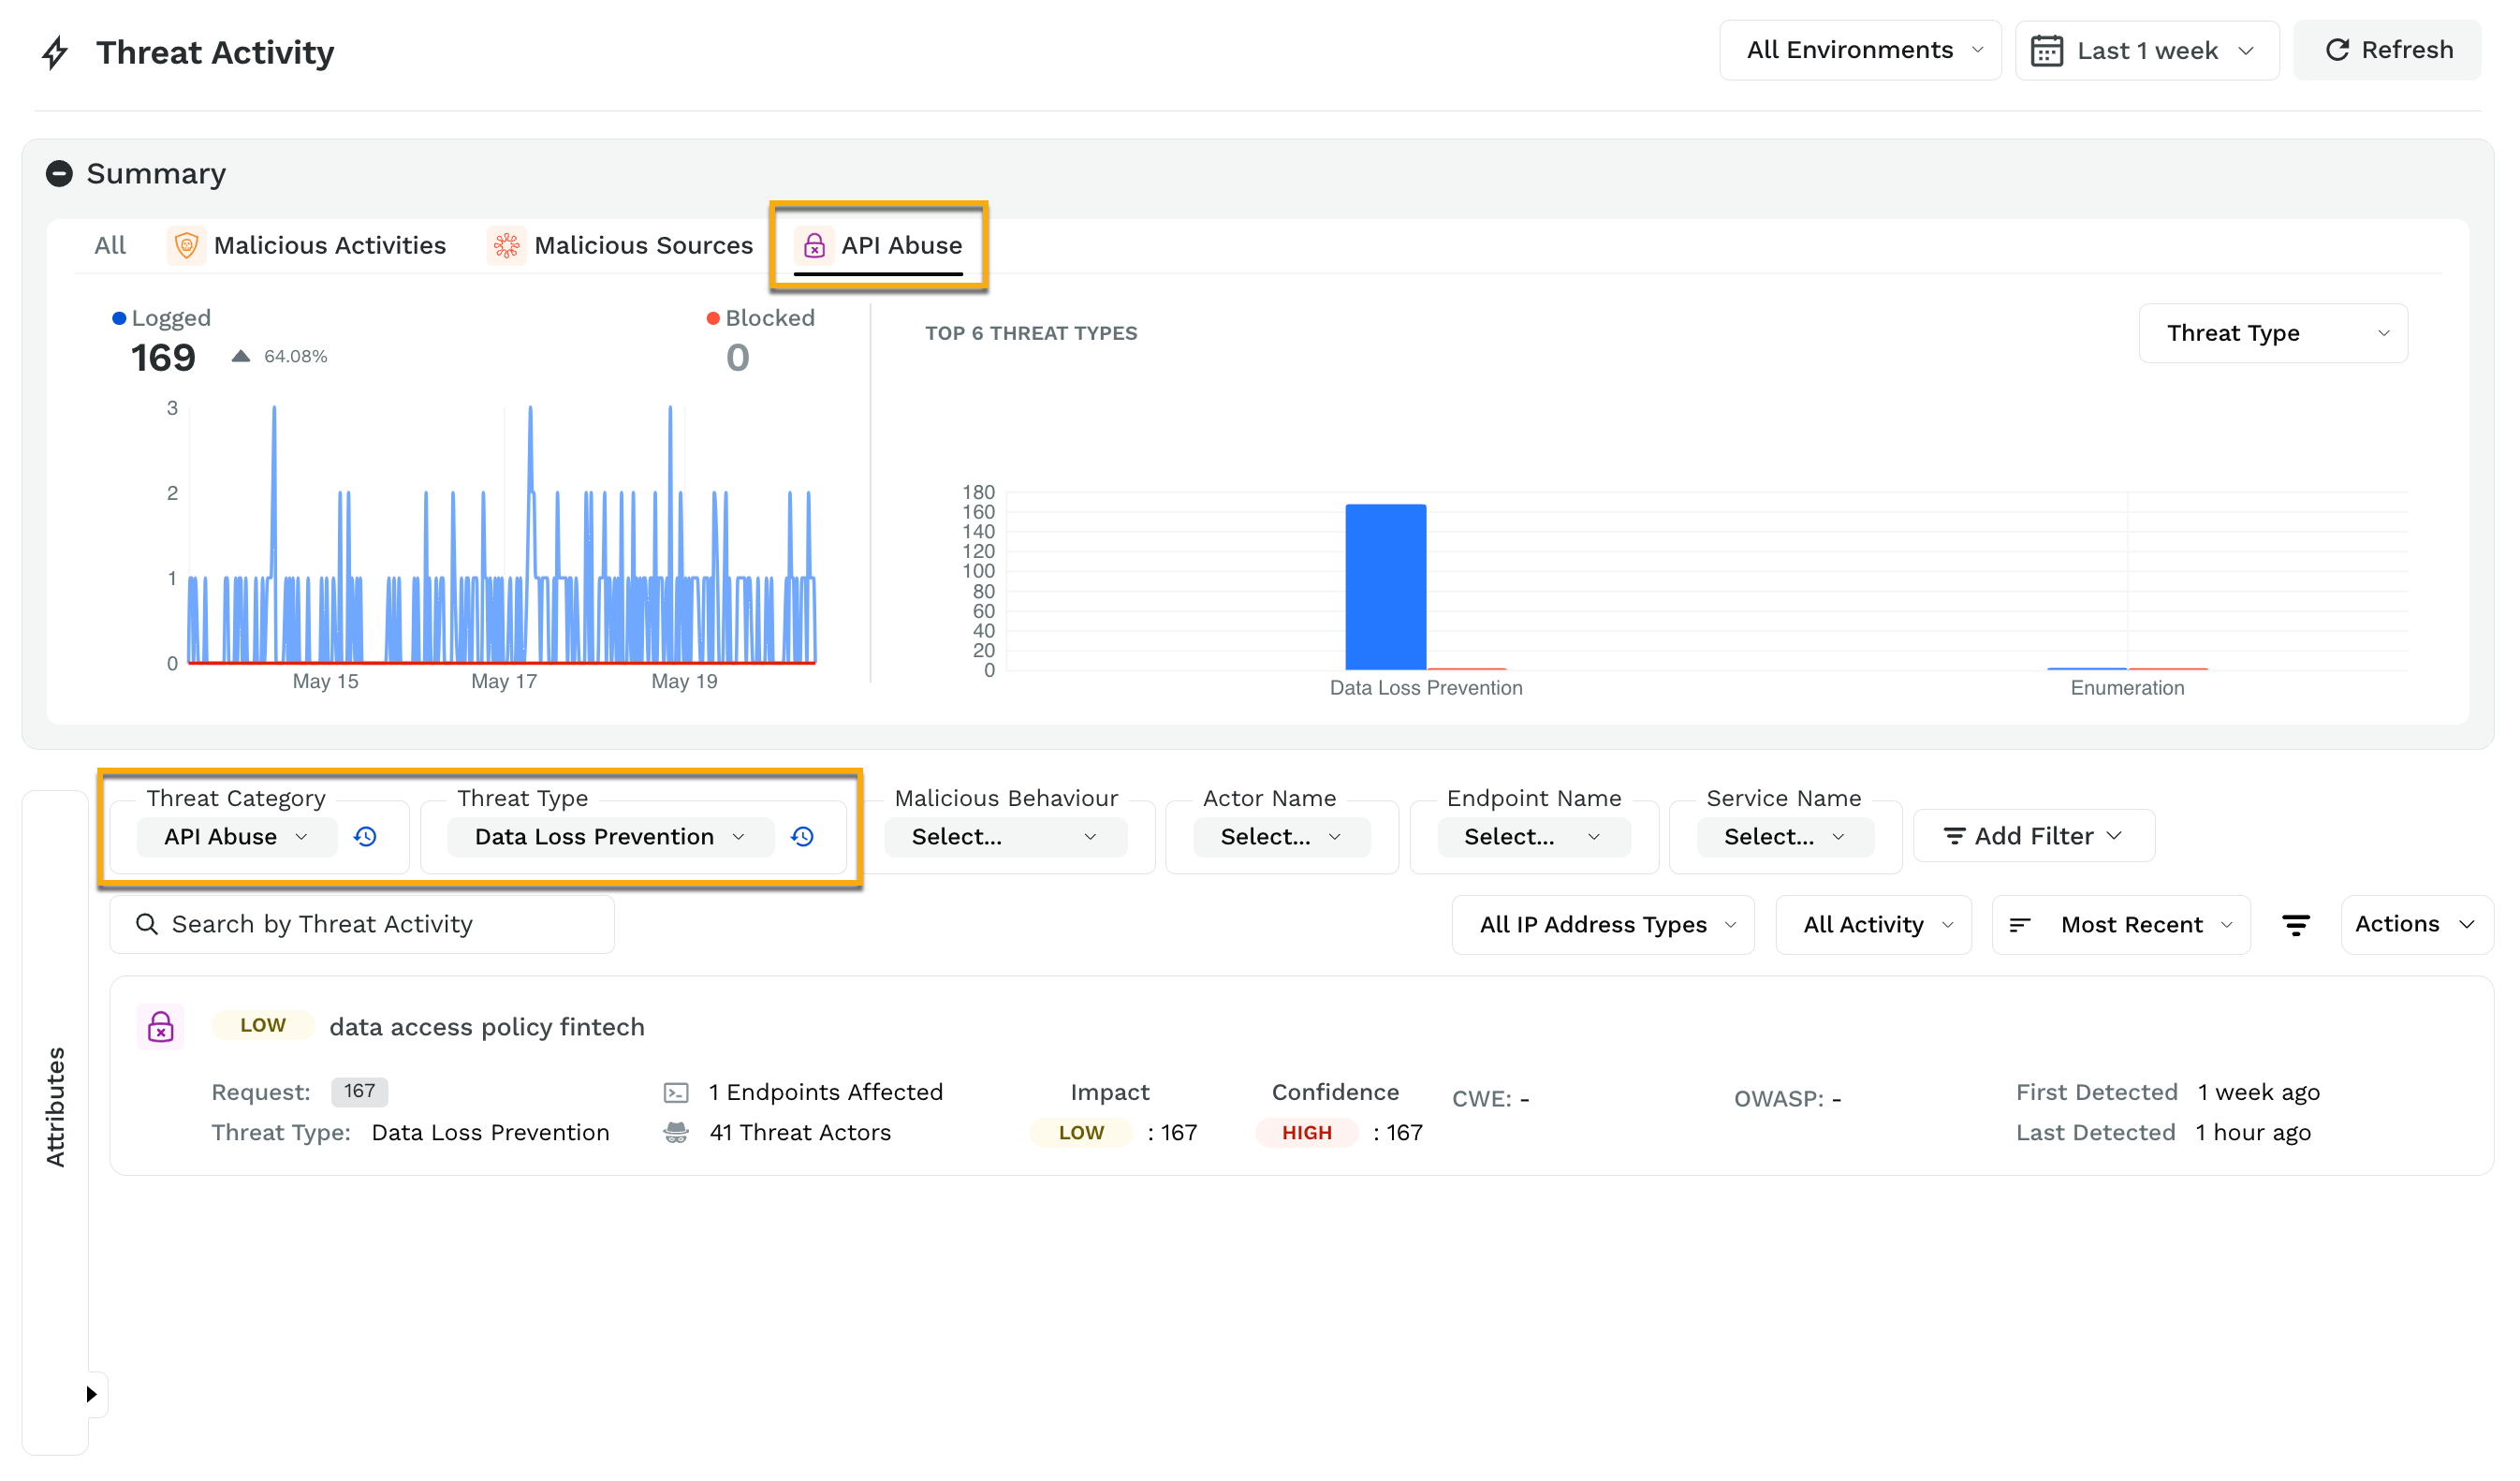
Understand API abuse
When these policies get triggered, you can see the results by navigating to the Protection → Threat Activity page. Select API abuse from the Threat Category filter and Data loss prevention from the Threat Type filter. Traceable then displays the threat activity triggered by the data protection policies that you have created.
If you click on a threat activity, for example, the data access policy fintech in the above screenshot, Traceable displays the detailed activity by users. You further drill down into their session activity, information about payload, request, response, and attributes.
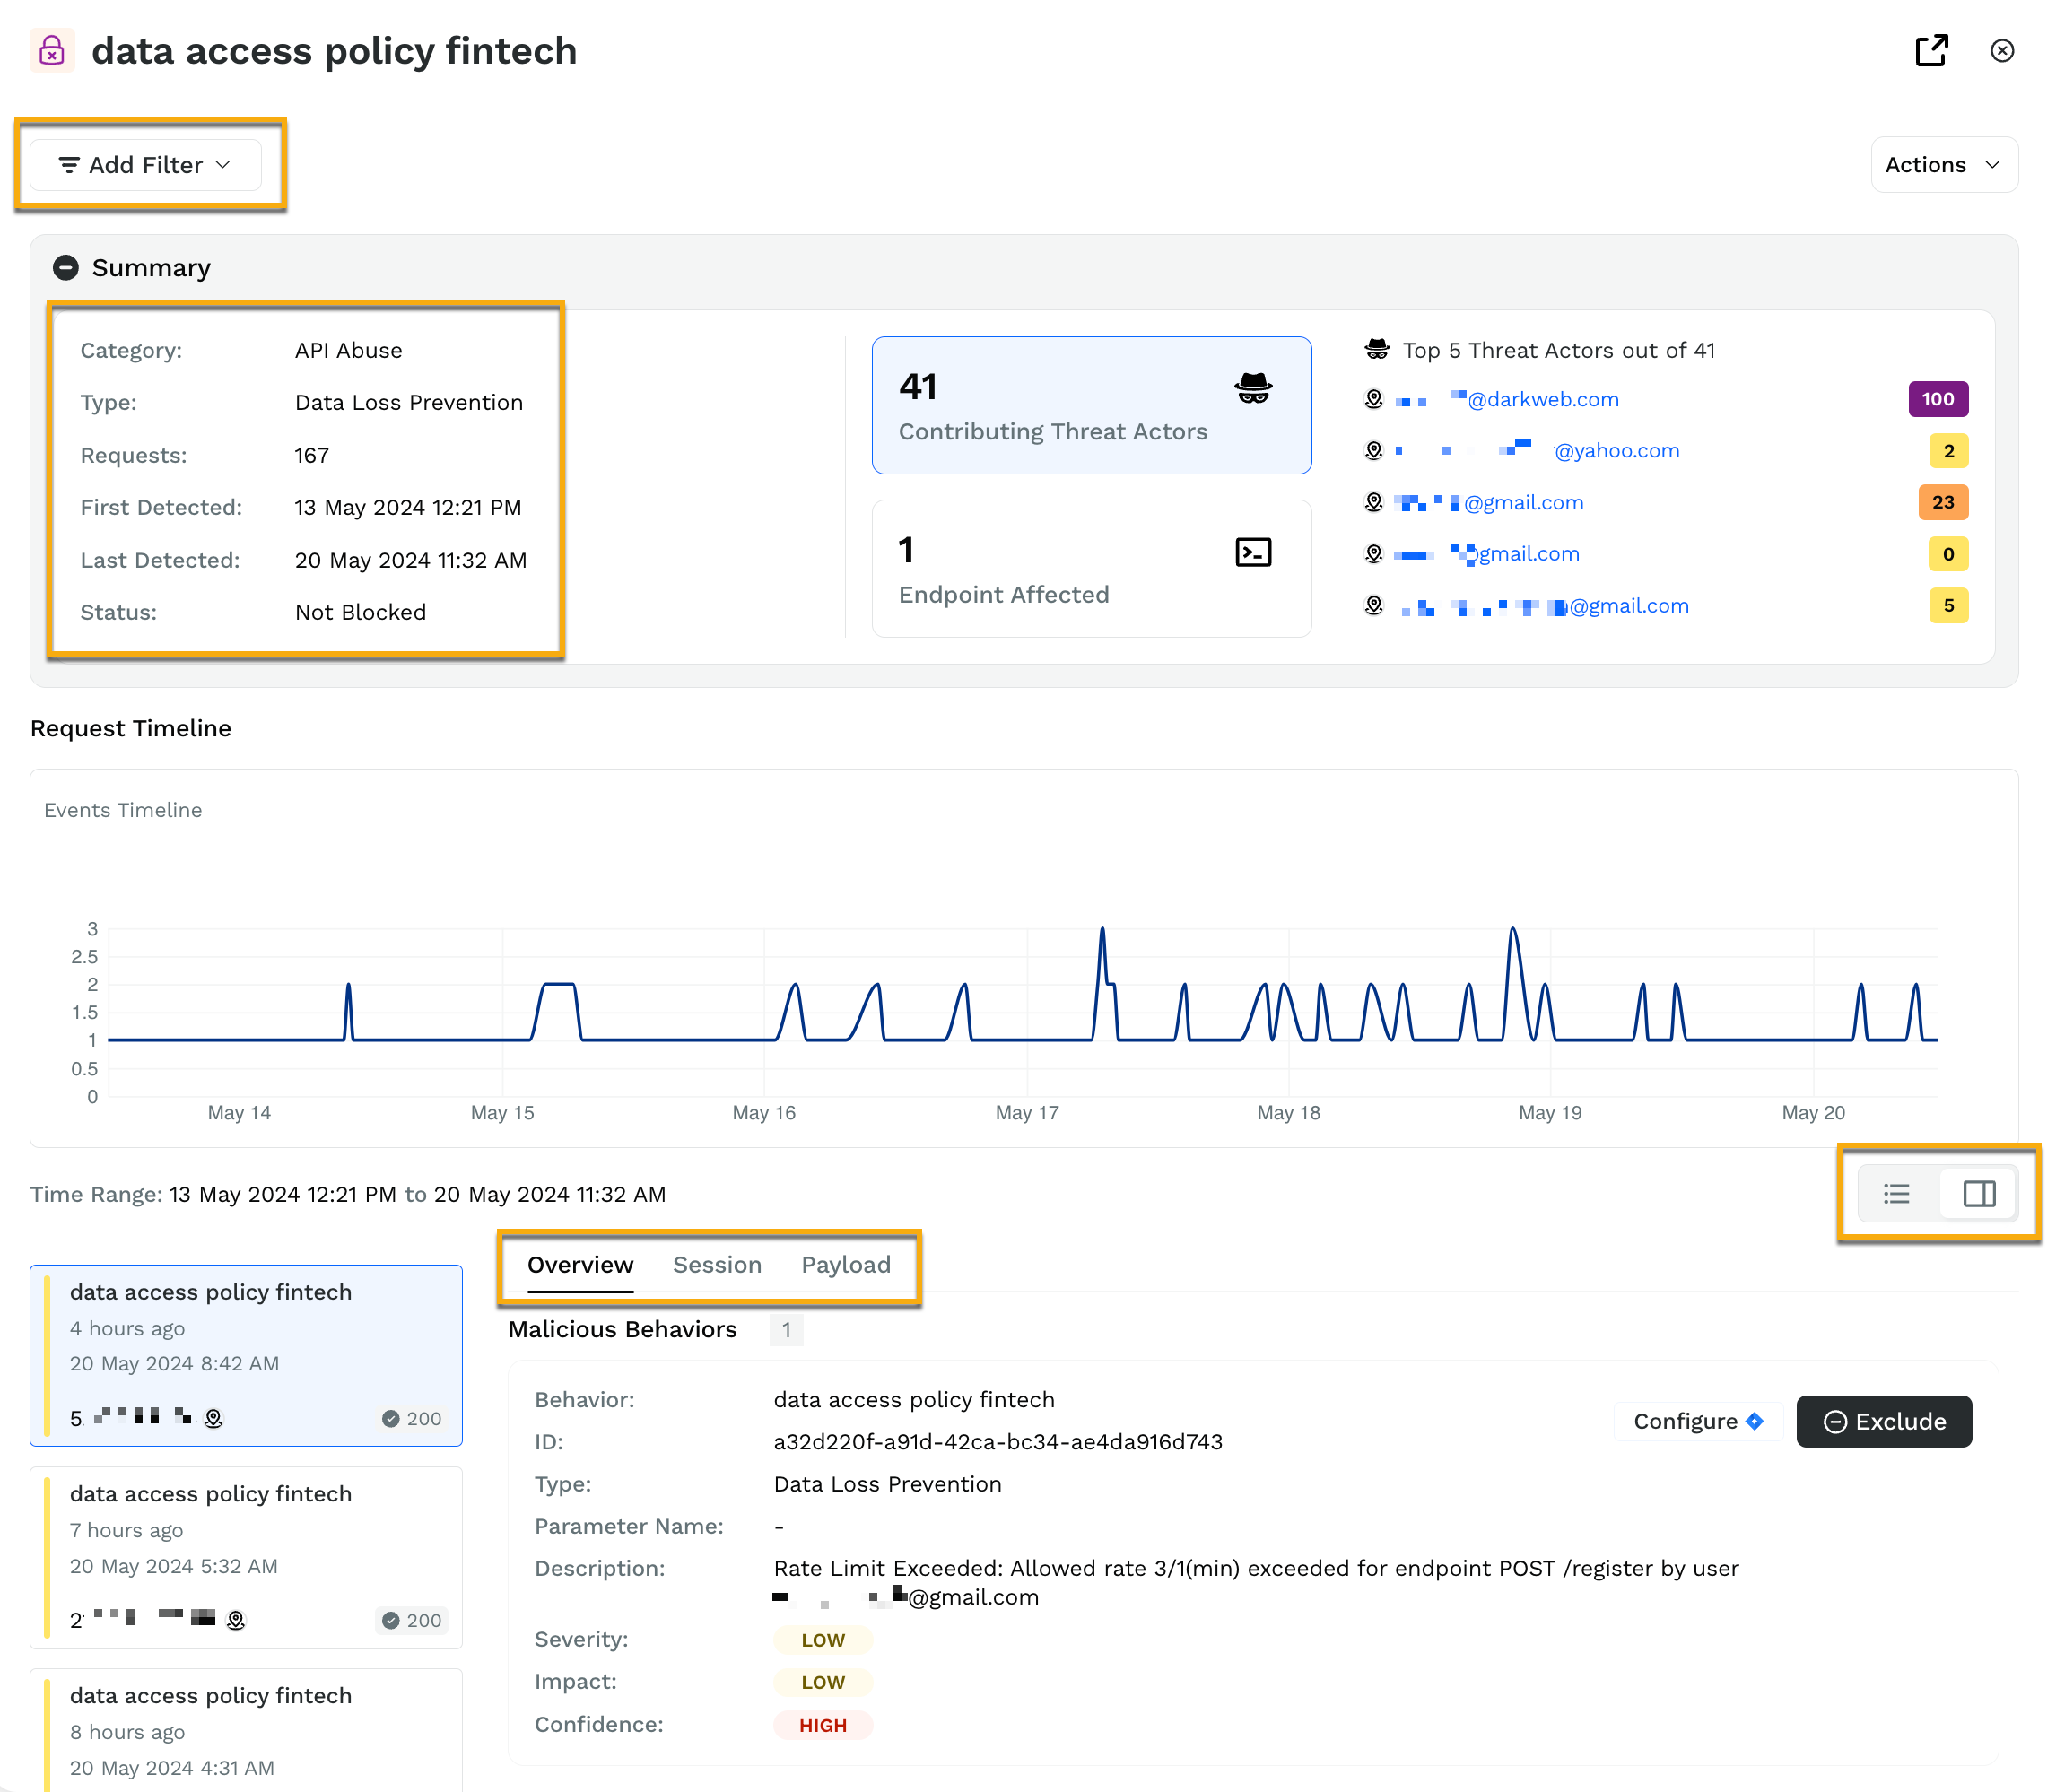
As illustrated by the above screenshot, there are 41 contributing threat actors, and one API endpoint is affected by them. If you click on the affected endpoint, Traceable will display the endpoint. You can further filter these activities based on one of the many filter options provided in the same view by clicking on Add Filter.
Datasets summary
The datasets summary tab displays the Data sets and types of data accessed by users in the selected period. It also displays the number of users who accessed each type of dataset.
.png)
The above screenshot, for example, shows that the Material Personal Info dataset was accessed in the last one week by 707 users across 195 API endpoints, 15 services, and 18 domains. The users accessed the email record 1647 times, full name 1374 times, and so on. When you click on the dataset, in this example on Material Personal Info, Traceable displays the details about the users who accessed that data set. Traceable in this way helps you identify such users who might be misusing their data access privileges.
Services
The services tab lists the different types of sensitive records accessed by different services. The timeline represents which APIs are accessing the sensitive data and how many records were accessed. For example, in the screenshot below, you can see that the API endpoint GET /identity/api/v2/vehicle/vehicles has accessed a total of 664 sensitive records across 343 users on 14th May 2024 at 11:18 PM.
.png)
The timeline aggregates all the sensitive records for a service for a specific time. This would help you in understanding the data access patterns and, in turn, helps in building a better data access policies.