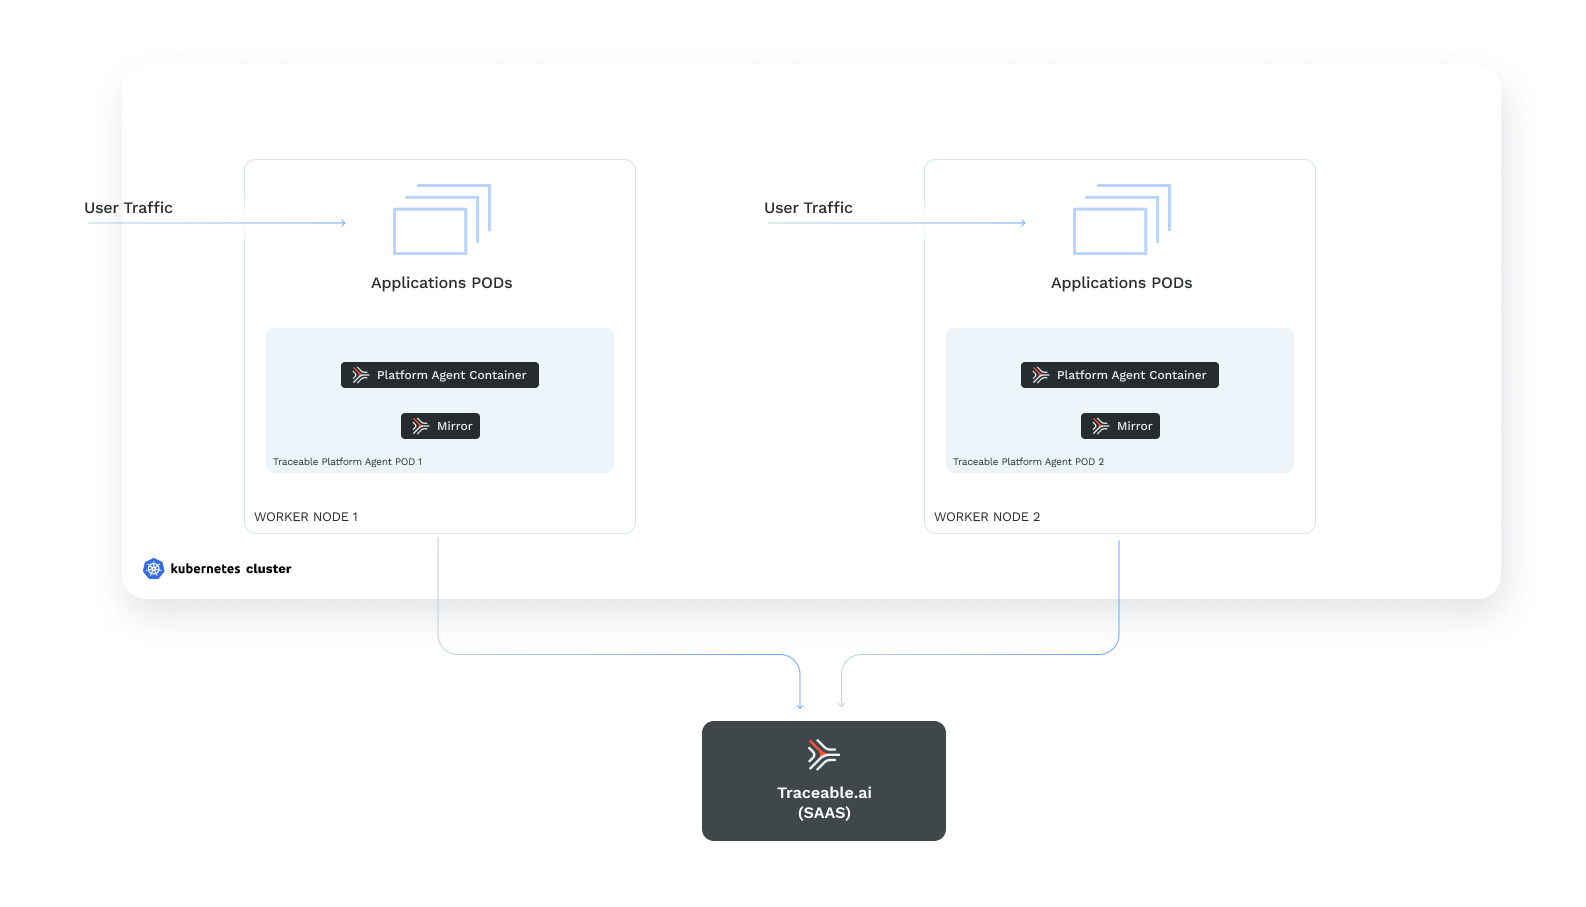
Traceable provides you with an option to mirror the traffic for Kubernetes pods by running the Traceable agent in a daemonSet. As shown in the diagram below, each worker node has a Traceable Platform agent pod running. The Traceable agent pod has two containers, the Traceable Platform agent container and the mirroring container.
Before You Begin
Keep the TA_REFRESH_TOKEN handy. It will be required while installing the Traceable Platform Agent. To fetch the token, log into Traceable Platform and navigate to Settings ( ) > Account > Agent Token.
Download
There is no download required for DaemonSet agentless traffic mirroring. The installation is completed using the Helm chart or Terraform template.
Installation
The installation process consists of the following steps:
- Create
traceableainamespace - Install Platform Agent
- Enable mirroring
- [optional] Set mirroring mode
Step 1 - Create traceableai namespace
Create a traceableai namespace. Enter the following command:
kubectl create namespace traceableaiStep 2 - Install Platform agent
You can install Traceable platform agent in Kubernetes environment using either Helm chart or Terraform template.
Install using Helm chart
- Create a
values.yamlfile with the following content:YAMLtoken: <ACCESS_TOKEN> environment: <ENVIRONMENT_NAME> runAsDaemonSet: true daemonSetMirroringEnabled: true - Enter the following commands to install Traceable Platform Agent into your Kubernetes cluster:ActionScript
helm repo add traceableai https://helm.traceable.ai
helm repo update
helm install --namespace traceableai traceable-agent traceableai/traceable-agent --values values.yaml
Install using Terraform
- Create a
main.tffile with the following content:ActionScriptmodule "traceable-agent" { source = "https://downloads.traceable.ai/install/traceable-agent/terraform/kubernetes/latest/traceable-agent-tf-k8s.tar.gz" token = "<ACCESS_TOKEN>" environment = "<ENVIRONMENT_NAME>" run_as_daemon_set = true daemon_set_mirroring_enabled = true } - Initialize the module by entering the following command:ActionScript
terraform init - Review the setup that will be installed by entering the following command:ActionScriptActionScript
terraform plan - Apply the module by entering the following command:ActionScriptActionScript
Terraform creates aterraform applyterraform.tfstatefile. The file stores the current state of the infrastructure. It is recommended to keep track of this file.
Step 3 - Enable mirroring
To configure mirroring, go through the following points:
- Enable mirroring for all namespaces - Mirroring is disabled by default. To enable mirroring for all namespaces, use the following configuration:
- If you are using Helm, then in
values.yaml, set -daemonSetMirrorAllNamespaces: true - If you are using Terraform, then in
main.tf, set -daemon_set_mirror_all_namespaces=true
- If you are using Helm, then in
- Enable mirroring for a namespace - set the namespace label
traceableai-mirrortoenabled. - Disable mirroring for a namespace - set the namespace label
traceableai-mirrortodisabled. - Disable mirroring for a pod - set the pod annotation
mirror.traceable.ai/enabledtofalse.
Step 4 [optional] - Set mirroring mode
By default, only ingress traffic is captured. However, you can capture only egress traffic, or both ingress and egress traffic, by configuring correct annotations.
Capture egress traffic
To capture the egress traffic for a deployment or namespace, set the following annotations.
Deployment
To capture the egress traffic, set the deployment annotation mirror.traceable.ai/mode to egress. Enter the following command:
kubectl patch deployment <deployment> -n <namespace> -p '{"spec": {"template":{"metadata":{"annotations":{"mirror.traceable.ai/mode":"egress"}}}} }'Namespace
To capture egress traffic at the namespace level, set the annotation mirror.traceable.ai/defaultMode to egress. Enter the following:
kubectl annotate namespace <NAMESPACE> mirror.traceable.ai/defaultMode=egressCapture ingress and egress traffic
To capture both ingress and egress traffic for a deployment or namespace, set the following annotations.
Deployment
To capture ingress and egress traffic for a deployment, set the deployment annotation mirror.traceable.ai/mode toingress_and_egress. Enter the following command:
kubectl patch deployment <deployment> -n <namespace> -p '{"spec": {"template":{"metadata":{"annotations":{"mirror.traceable.ai/mode":"ingress_and_egress"}}}} }'Namespace
To capture the ingress and egress traffic at a namespace level, set the annotation mirror.traceable.ai/defaultMode to ingress_and_egress. Enter the following command:
kubectl annotate namespace <NAMESPACE> mirror.traceable.ai/defaultMode=ingress_and_egressVerification
- To verify a successful installation of traceable-agent, enter the following command:
kubectl -ntraceableai get podsFor example,
NAME                    READY   STATUS    RESTARTS   AGE
traceable-agent-dwclc 2/2 Running 0 26m- You can also check whether traces are showing in the Traceable Platform by navigating to Traces.
Troubleshooting
If traces are not showing in Traceable Platform, then:
- Enter the following command to fetch the Traceable agent pod name:ActionScriptActionScript
kubectl -ntraceableai get pods - Enter the following command to get the logs of pods being monitored:ActionScriptActionScript
For example,kubectl -ntraceableai logs -f <TRACEABLE_AGENT_POD> -c traceable-agent | grep "Added pod to maps"ActionScriptActionScript{"level":"info","time":"2022-01-12T08:46:42.218Z","message":"Added pod to maps. {hello-world-deployment-1.default true 0 {default true 0}}","service":"ext_cap","name":"hello-world-deployment-1-58749467bf-d24dr","ip":"10.1.1.221"} {"level":"info","time":"2022-01-12T08:46:42.221Z","message":"Added pod to maps. {product-deployment.default true 0 {default true 0}}","service":"ext_cap","name":"product-deployment-7bd74db6dd-kkbl5","ip":"10.1.1.218"} {"level":"info","time":"2022-01-12T08:46:42.224Z","message":"Added pod to maps. {product-deployment.default true 0 {default true 0}}","service":"ext_cap","name":"product-deployment-7bd74db6dd-wtwrt","ip":"10.1.1.217"} {"level":"info","time":"2022-01-12T08:46:42.234Z","message":"Added pod to maps. {traceable-agent.traceableai true 0 {traceableai true 0}}","service":"ext_cap","name":"traceable-agent-hm7jp","ip":"192.168.65.4"}
Upgrade
You can upgrade the Traceable agent in Kubernetes using either Helm chart or Terraform.
Upgrade using Helm
Enter the following commands:
- Update helm charts by entering the following command:ActionScriptActionScript
helm repo update traceableai - Enter the following command to upgrade Traceable agent to the latest version:ActionScriptActionScript
helm upgrade traceable-agent --namespace traceableai traceableai/traceable-agent
Upgrade using Terraform
To upgrade using terraform, you would need to uninstall and reinstall the Platform agent.
Uninstall
You can uninstall the agent using either Helm chart or Terraform.
Uninstall using Helm
Enter the following command to uninstall the Platform agent using Helm:
helm uninstall traceable-agent --namespace traceableaiUninstall using Terraform
Enter the following command from the directory containing main.tf template file:
terraform destroy