Updates (April 2026 to June 2026)
June 2026 — Updated the topic to add information about the steps to create an API naming exclusion rule according to the latest Traceable user interface. For more information, see Setting up API Discovery, API Naming Exclusions tab.
API Discovery in Traceable helps you organize, manage, and maintain an accurate inventory of your APIs as traffic flows through your environment. Using discovery rules, you can control how APIs are named, which APIs are excluded from monitoring, and how different versions of an API are identified and tracked. These rules allow you to reduce noise, standardize API naming, and clearly distinguish between legacy and newer API versions. Once enabled, discovery rules apply consistently to incoming traffic, ensuring that Traceable presents a clean, meaningful view of your API landscape and enables more accurate analysis across inventory, posture, protection, and testing workflows.
While the uploaded documentation is visible across the Traceable platform, the naming and exclusion rules apply to all future API requests if enabled. However, you must have reasonable knowledge of regular expressions to create meaningful rules. You can use websites like regex101 to view and learn regular expressions. After configuring the rules, the Discovery displays the APIs based on these rules.
What will you learn in this topic?
By the end of this topic, you will understand:
The purpose and structure of API discovery in Traceable.
The steps to create and manage API naming rules to standardize and simplify discovered API names.
The steps to configure API exclusion rules to control which APIs are monitored.
The steps to define API versioning rules to accurately identify and track multiple API versions.
The way to use regular expressions to match API paths and extract naming or versioning information.
The steps to view and analyze API version information across Inventory and Endpoint Details in the Traceable platform.
Setting up API Discovery
The following tabs highlight the steps required to set up Discovery in your Traceable account.
API naming rules are helpful in situations when you wish to exclude certain portions from the Traceable provided API names. You can also create a rule to assign a completely different name to the discovered API. However, you should have reasonable knowledge of regular expressions to match the exact URI patterns and create a new API name. You can apply the naming rule to all environments or one or more environments and their specific services. To create a naming rule, navigate to Settings (![]() ) → API Discovery → API Naming tab and click + Create Naming Rule. Creating a naming rule consists of the following steps:
) → API Discovery → API Naming tab and click + Create Naming Rule. Creating a naming rule consists of the following steps:
Rule Creation
Request Matching
API Endpoint Naming
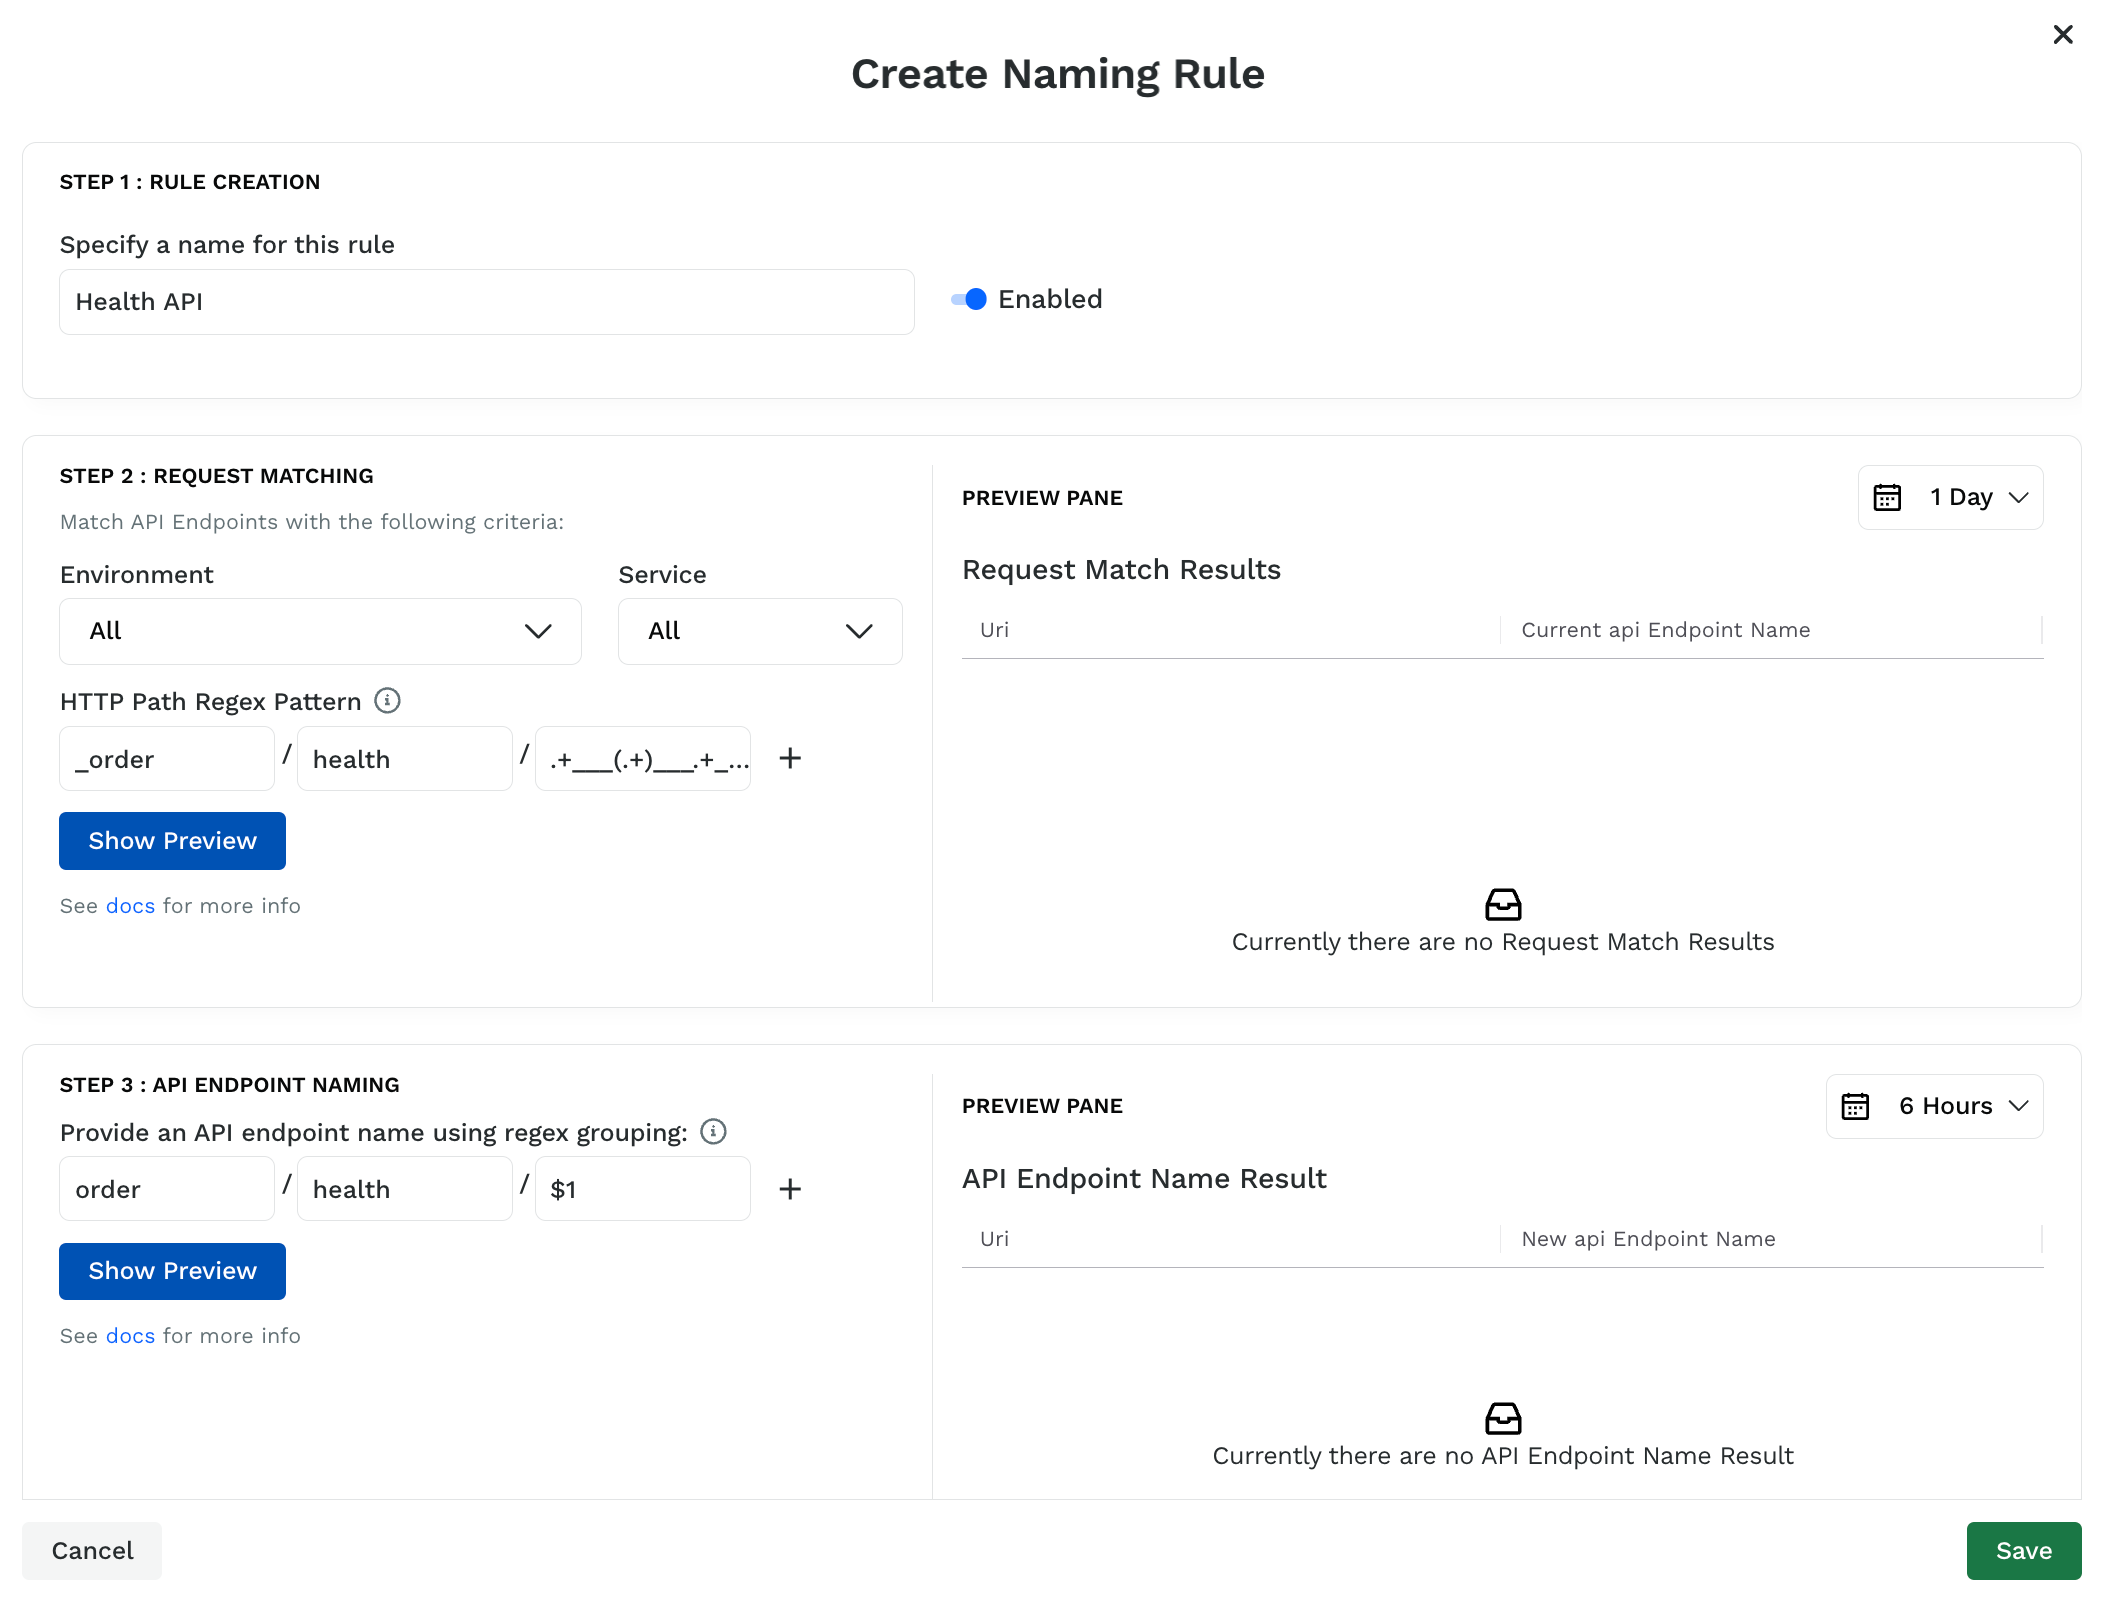
In the steps below, we assume that the API named by Traceable is _order/health/traceable__cart__test__tags__123456__0 and you wish to rename it to order/health/tags.
API Naming Rule
Step 1 — Rule creation
Complete the following steps to create a rule:
Specify a name for the rule. For example, Health API.
Click the toggle corresponding to the rule name to enable or disable the rule.
You can also enable or disable it at any time post-creation. By default, all rules are enabled.
Step 2 — Request matching
Complete the following steps to set up the criteria for the rule:
Select the Environment where you want to apply the rule. For example, All.
By default, all environments are selected.Select the Service where you want to apply the rule. For example, All.
By default, all services are selected.In the HTTP Path Regex Pattern field, specify the regex pattern Traceable should match. For example,
_order/health/.+___(.+)___.+___0.Click Show Preview.
Traceable displays a preview of all URIs that match the specified regex pattern in the Preview Pane. In the example above, the match is for URIs within the last 24 hours. You can change the period to 6 or 12 hours to see all the matching URIs. However, to achieve better match results, specify a more fine-tuned regular expression.
Step 3 — API endpoint naming
Complete the following steps to name the API:
Specify the updated API name using regex grouping. For example,
order/health/$1.Click Show Preview.
Traceable displays a preview of all URIs that match the specified regex pattern, along with their new endpoint names, in the Preview Pane. In the example above, the match is for URIs in the last 6 hours. You can change the time period to 12 hours or 1 day to see all the matching URIs. However, to achieve better match results, specify a more fine-tuned regular expression.
Note
The number of segments in the Request Matching and API Endpoint Naming sections should be the same. For example, as shown above, there are three segments in Request Matching (Step 2) and API Endpoint Naming (Step 3).
If you are satisfied with the listed URIs, click Save. However, to get better match results, you must specify a more fine-tuned regular expression.
API endpoint naming examples
The following are a few examples of API naming that you can use or modify according to your requirements:
Single ID
If you have URLs like:
orders/1Dvb0-xaLTnwYbkGxmMPq3cYdZFHkUSxIUWTGahW3aWMorders/1bw-G30aoMUa8XS7L6x-nAS0j4T6A_wWUCCxQqYB9xa
And you wish to rename them as orders/{orders-id}, then you should configure the rule as follows:
Regex — orders/[a-zA-Z0-9-_]+
Traceable renames the URL as orders/{orders-id}
Multiple IDs
If you have URLs like:
users/alice/orders/1bw-G30aoMUa8XS7L6x-nAS0j4T6A_wWUCCxQqYB9xagusers/bob/orders/1bw-G30aoMUa8XS7L6x-nAS0j4T6A_wWUCCxQqYB9xag
And you wish to rename them as users/{users-id}/orders/{orders-id}, then you should configure the rule as:
Regex — users/[a-zA-Z]+/orders/[a-zA-Z0-9-_]+
Traceable renames the URL as users/{users-id}/orders/{orders-id}
Simple Groups
If you have URLs with groups, such as:
blogs/2014-flags-are-a-code-smellblogs/2012-boolean-as-primitive-argument
And you wish to rename them as:
blogs/flags-are-a-code-smellblogs/boolean-as-primitive-argument
Then, you should configure the rule as:
Regex — blogs/[0-9]{4}-([a-z-]+), that is, ( and ) are used to capture the groups.
Traceable renames the URL as blogs/$1. In the renamed URL, $1 points to the first captured group. Similarly, $2 captures the second group, $3 captures the third group, and so on.
Rearrange groups
If you have URLs with groups, such as:
users/browse/productsusers/browse/catalogusers/checkout/cart
And you wish to rearrange them as:
users/products/browseusers/catalog/browseusers/cart/checkout
Then, you should configure the rule as:
Regex — users/([a-z]+)/([a-z]+)
Traceable rearranges the URL as users/$2/$1
If you have numerous APIs in your API infrastructure and want to monitor only a specific subset, you can create an exclusion rule to prevent selected APIs from being included in API discovery. If multiple exclusion rules exist, they are applied in the order they are listed.`
To create an exclusion rule, navigate to Settings (![]() ) → API Discovery → API Naming Exclusions tab and click + Create Exclude Rule. In the Create Exclude Rule pop-up window, complete the following steps:
) → API Discovery → API Naming Exclusions tab and click + Create Exclude Rule. In the Create Exclude Rule pop-up window, complete the following steps:
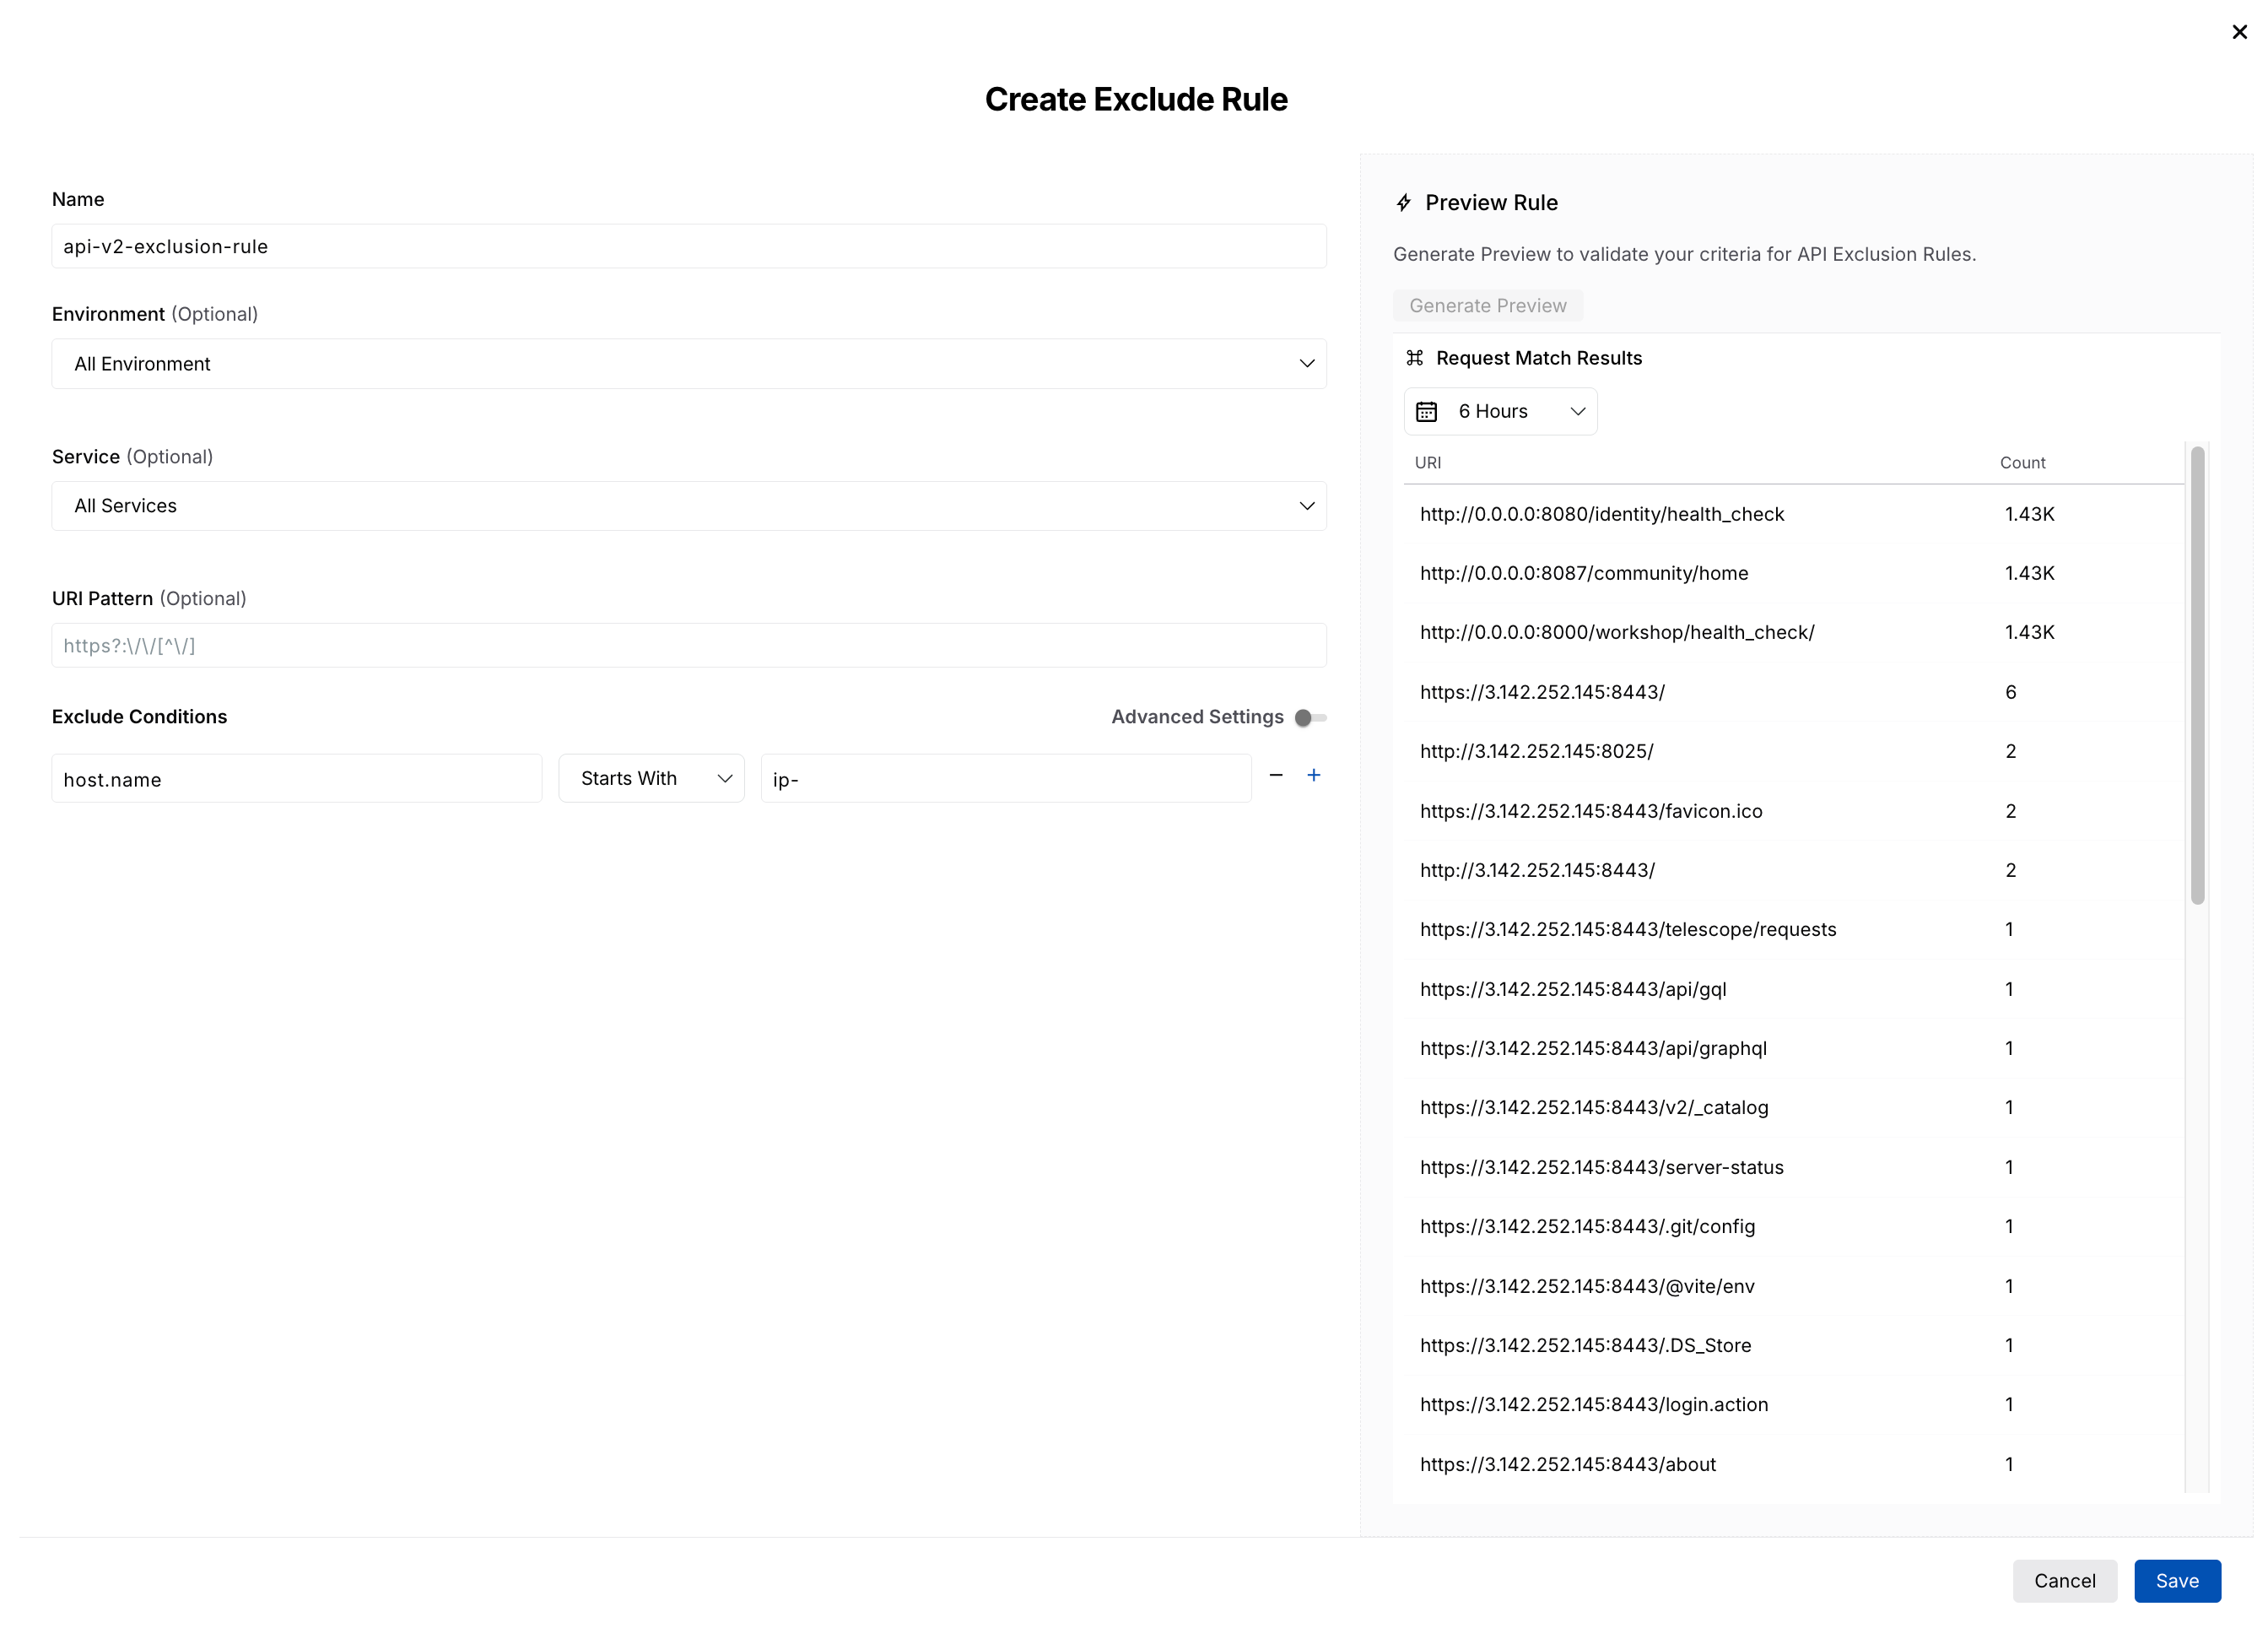
Create an API Naming Exclusion Rule
Specify a Name for the rule, for example, api-v2 exclusion rule.
(Optional) Select an Environment where Traceable should apply the rule, for example, All Environments.
(Optional) Select a Service where Traceable should apply the rule, for example, All Services.
(Optional) Specify a URI Pattern to narrow the scope of the exclusion rule, for example,
/internal/heath/*.Under Exclude Conditions, use one of the following methods to define the criteria that Traceable should use to exclude matching API requests:
Method
Description
Configuration
Sample Configuration
Basic Conditions (Default)
Enables you to create one or more exclusion conditions by specifying an attribute, operator, and value.
Click + Add Condition.
In the Attribute field, specify the request attribute to evaluate, for example, method.
Select an Operator, for example, =.
Specify the Value to match, for example, OPTIONS.
Click + to add additional conditions.
Condition 1:
Attribute — response_code
Operator — =
Value — 200
Condition 2:
Attribute — method
Operator — =
Value — OPTIONS
Advanced Conditions
Enables you to create complex exclusion logic using condition groups.
Turn on the Advanced Settings toggle.
Select how Traceable should evaluate condition groups:
Match All — All condition groups must evaluate to True.
Match Any — At least one condition group must evaluate to True.
Click + Condition Group to add a condition group.
Within each condition group, select how conditions should be evaluated:
Match All — All conditions in the group must evaluate to True.
Match Any — At least one condition group must evaluate to True.
Click + Add condition to add one or more conditions to the group.
Condition Group Logic — Match Any condition groups
Condition Group 1 (Match All conditions):
Condition 1:
Attribute — response_code
Operator — =
Value — 200
Condition 2:
Attribute — method
Operator — =
Value — OPTIONS
Condition Group 2 (Match All conditions):
Condition 1:
Attribute — user_agent
Operator — Contains
Value — kubernetes
Condition 2:
Attribute — response_code
Operator — =
Value — 200
Click Generate Preview to validate the rule. The Request Match Results pane displays API requests that match the configured criteria. The pane displays previews of matches from the last 6 hours. You can change this time period to 12 hours or 1 day, according to your requirements.
Note
This option is available only for the Basic Conditions method mentioned above.
Review the matching requests and verify that the rule excludes the intended traffic.
Click Save.
API Versioning enables you to define, identify, and classify different versions of your APIs, so that each version is discovered, and you can analyze and monitor it independently. This is useful if you maintain multiple versions of an API in parallel or use versioning practices that are not reflected in the URI paths.
While Traceable identifies the API version through URI paths by default, API versioning supports detection through request headers, URL path, and query parameters. This provides you with the flexibility regardless of how your APIs expose version information.
Understanding the use of API versioning
Modern applications often run multiple versions of an API endpoint concurrently. Older versions remain active for legacy integrations, while newer versions introduce updated flows or schema changes. Without a clear way to distinguish them, different versions may appear as a single API in Inventory, resulting in inaccurate visibility and impacting downstream security workflows.
API versioning helps you:
Maintain an accurate API inventory — Traceable recognizes each version as a separate API, ensuring clean boundaries between older versions, current stable versions, and newly introduced ones.
Strengthen testing and validation — When Traceable identifies the API version, it evaluates its behavior during the learning phase, reducing false positives in posture issues, protection, and testing.
Improve posture analysis — You can correlate security issues, sensitive data flows, schema inconsistencies, and anomalous behavior with the correct version. This prevents misleading alerts and helps prioritize remediation.
Creating a versioning rule
API versioning rules define how Traceable reads and extracts version values from API traffic. To create a versioning rule, complete the following steps:
Configuring API Versioning Rule
Navigate to Settings → API Discovery → API Versioning tab.
In the tab, click + Create Rule.
In the Create API Versioning Rule window, complete the following:
Specify the Rule Name, for example, Orders API Versioning.
(Optional) Specify a Rule Description, for example, A rule to capture versions of the new and legacy Order APIs.
Select the Environment(s) where Traceable should check for the API(s), for example, fintech-app.
(Optional) Select the Service(s) where Traceable should check for the API(s), for example, frontend.
Specify the URI Pattern based on which Traceable understands the API(s) that should utilize the versioning rule, for example, /order/*.
Select and specify the Versioning Parameter fields where Traceable should find and check for the version in an API:
The Parameter Type where the versioning information is located, for example, Request Header.
The Operator for comparing the key and value you specify below, for example, Contains.
The Value (key) where Traceable should find the API version, for example, x-api-version.
(Optional) Specify any Value Transformation you wish to apply to the version value extracted from the API.
Click Save.
Traceable displays the created rule(s) in the API Versioning actions, where you can perform multiple actions. For more information, see Actions on versioning rules.
Example — Header-based versioning for your payment APIs
Let us say, for the Production environment, you have the version information in the Request Header of the API rather than the URL. For example, the PaymentService may include a header such as x-api-version: v2. Suppose these versions are available in endpoints having a common URI structure, starting with /payments/.
To configure the versioning rule, you can:
Select the Environment as Production.
Select the Service as PaymentService.
Specify the URI Pattern as /payments/*.
Select the Parameter Type as Request Header.
Select the Operator as Equals.
Specify the Value as x-api-version.
Once you save the rule, Traceable identifies the version from APIs based on the header. This enables you to track traffic across different payment API versions, understand whether your older APIs are still in use, and analyze the security posture of each version.
Demo
The following demo illustrates the steps to create a versioning rule:
Understanding the working of API versioning
You create one or more versioning rules that provide Traceable information on where it should look for the version. These rules extract the version value from the Location and Key, and attach it to the corresponding API during discovery.
Once a rule is enabled, Traceable processes the incoming traffic, extracts the version based on the configuration you specified, performs any necessary transformations, and applies the version to the corresponding API.
Traceable displays the version information on the Inventory page under Discovery and on the detailed view page of an endpoint. For more information on viewing this information, see Viewing versions across Traceable.
Note
The version extracted by the API versioning rule you configure always takes precedence over the one that Traceable identifies automatically.
Viewing versions across Traceable
Once you create the versioning rules and Traceable is processing this traffic, the version information is highlighted in the following areas of the platform:
Inventory — You can navigate to Discovery → Inventory → API Endpoints tab and view the version information for an API using the Version column. To view this column, you can click a Column → Edit Columns, and in the window, search and select Version.
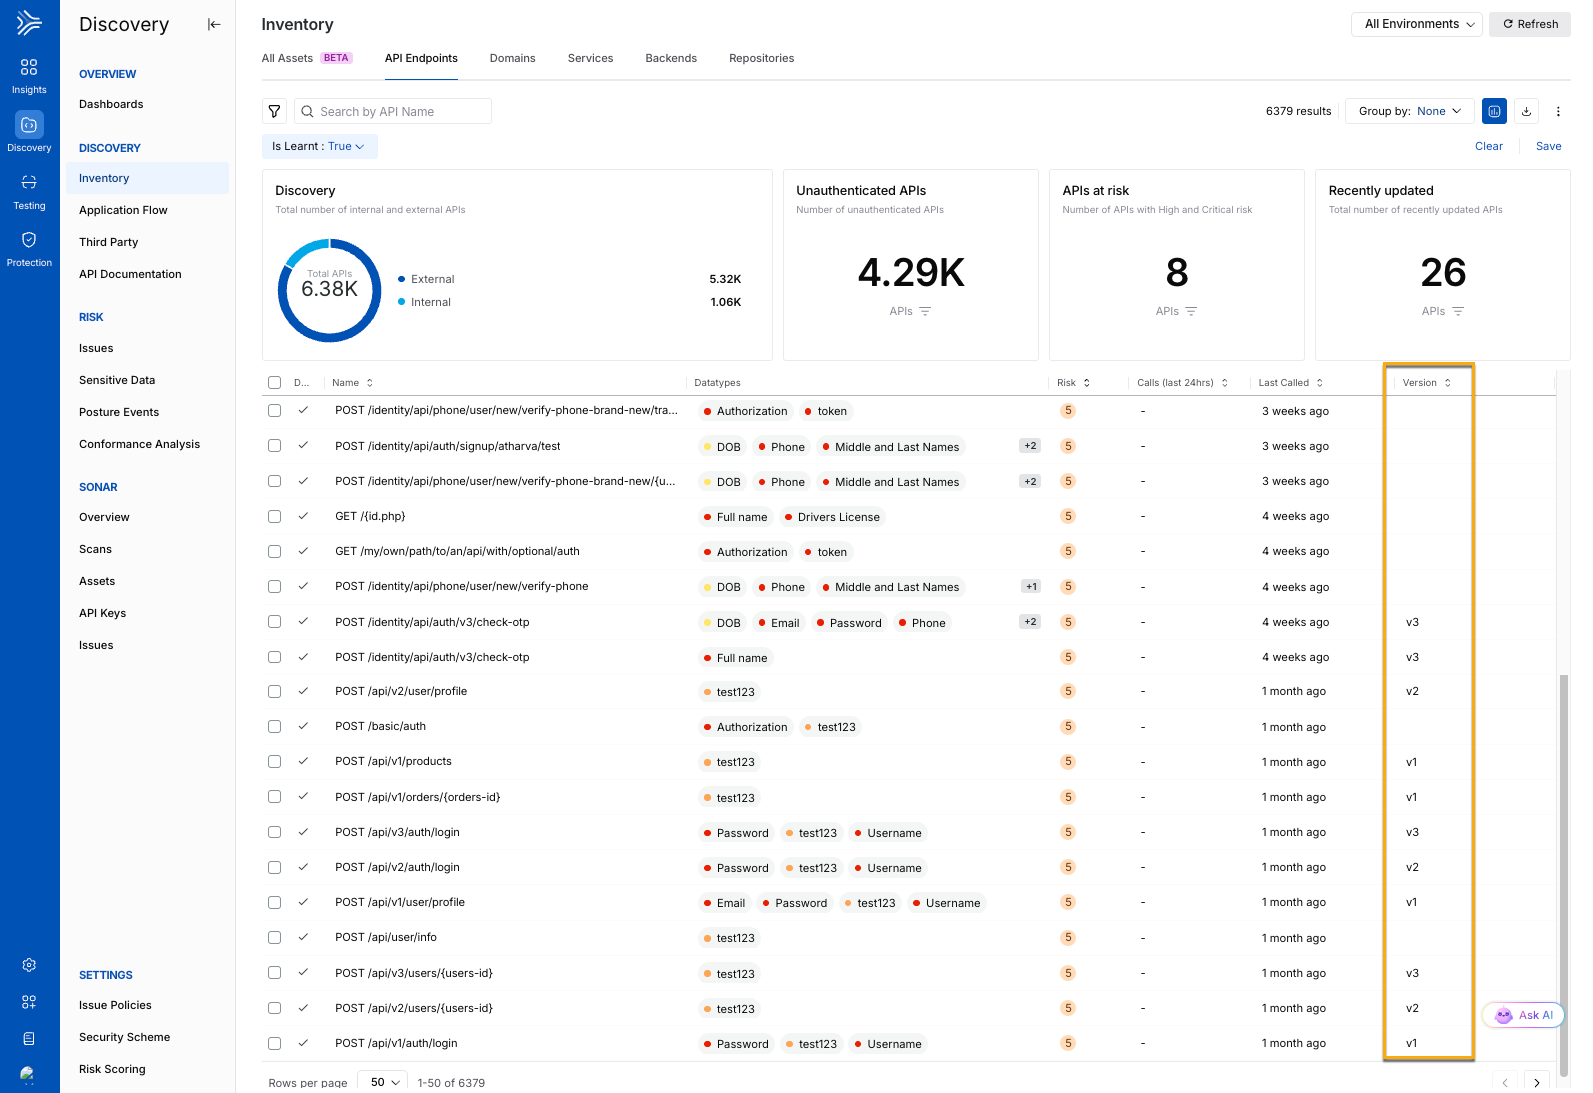
API Endpoint Details — You can click on an API endpoint to view its details. In the Overview tab, the Details section of the API, Traceable displays the version information for the API.
Actions on a versioning rule
You can carry out the following actions on an API versioning rule. These actions help you keep your configurations aligned with the API changes.
Enable or Disable — While an API versioning rule is enabled by default post-creation, you can enable or disable it according to your requirements.
Edit — Modify the parameter names and values to update the rules according to your requirements.
View — View the configurations.
Delete — Delete the rule from your Traceable account.
Note
A deleted rule cannot be restored.