Mulesoft is an integration platform that helps businesses connect their data, devices, and applications for cloud computing and on-premise deployments. Mulesoft's Anypoint Platform™ is a solution for API-led connectivity that creates an application network of apps, data, and devices for both on-premise and cloud deployments. Traceable provides a policy that can help you in protecting your APIs. You can attach the Traceable policy to any API registered on the Anypoint platform for security and monitoring purposes.
The following diagram shows the high-level deployment of Traceable policy in your environment.

Traceable’s Mulesoft agent communicates with Traceable’s Platform agent. For each request, the Traceable’s Mulesoft agent fetches the information from the Traceables Platform agent on whether to block or allow the request. After the response is sent to the client, the Mulesoft agent sends data to the Platform agent and then further to the Traceable Platform.
Note
If you wish to deploy Traceable’s policy without blocking, see the Mulesoft XML policy topic.
Before you begin
Before proceeding to attach the Traceable policy to an API on your Mulesoft Anypoint Platform, make a note of the following points:
Maven (
mvn) must be installed.Make sure that you have a setup to use the Enterprise repository in Mule in mvn. For more information, see Configuring Maven to Work with Mule.
You should have access and permission to upload artifacts to Mulesoft Exchange in your organization's Mulesoft Anypoint Platform account.
Note
To upload Traceable's custom policy to Mulesoft Exchange, you must have the exchange contributor's role assigned to you. For more information, see Uploading a Custom Policy to Exchange.
Keep the IP address of your Traceable agent handy. You would need this IP address to configure Traceable's Mulesoft policy.
The process to attach Traceable's policy consists of two steps:
Download the policy from Traceable's download site and then upload it to Mulesoft's Exchange
Attaching the policy to the API in Mulesoft.
Step 1 – Download the policy and upload it to Mulesoft Exchange
Complete the following steps to download and unzip Traceable's policy:
Navigate to Traceable's download site and then navigate to agent > mulesoft-blocking > latest.
Download and unzip the downloaded file.
Change the directory to the Mulesoft policy directory:
ActionScript
cd traceable-mule-policyNavigate to Traceable policy:
ActionScript
cd traceable-blockingEdit the
pom.xmlfile to update your Mulesoft's organization ID:ActionScript
<?xml version="1.0" encoding="UTF-8"?>
<project xmlns="http://maven.apache.org/POM/4.0.0"
         xmlns:xsi="http://www.w3.org/2001/XMLSchema-instance"
         xsi:schemaLocation="http://maven.apache.org/POM/4.0.0 http://maven.apache.org/xsd/maven-4.0.0.xsd">
    <modelVersion>4.0.0</modelVersion>

<!--UPDATE GROUP ID-->
    <groupId>4c2d42c8-910d-42fe-8f21-bc76f21ef3fe</groupId>
    <artifactId>traceable-blocking</artifactId>
    <version>1.14.0</version>
Policy deployment options
You have two options to deploy the Traceable policy. You can either use mvn or curl command to deploy the policy.
Note
If you are using a Windows machine to deploy the policy, use the
mvnoption only.
Option 1 - Deploy using mvn
Make a note of the following before proceeding with this option. For more information on mvn install, see Mulesoft documentation, Uploading a Custom Policy to Exchange. Update the settings.xml file with your Exchange credentials.
ActionScript
<?xml version="1.0" encoding="UTF-8"?>
<settings xmlns="http://maven.apache.org/SETTINGS/1.0.0"
        xmlns:xsi="http://www.w3.org/2001/XMLSchema-instance"
        xsi:schemaLocation="http://maven.apache.org/SETTINGS/1.0.0 http://maven.apache.org/xsd/settings-1.0.0.xsd">
  <servers>
    <server>
       <id>anypoint-exchange-v3</id>
       <username>myusername</username>
       <password>mypassword</password>
     </server>
  </servers>
</settings>
myusername and mypassword are your username and password to log in to your Mulesoft account.
Deploy the Traceable policy. Enter the following command:
mvn clean deployVerify in your Mulesoft Anypoint Platform Exchange whether a Traceable policy is present or not.
Option 2 - Deploy using the curl command
To deploy using the curl command, you would need a bearer token. You can use your bearer token or use Connected App credentials. Enter the following commands to deploy:
Build the Traceable policy. Enter the following command:
ActionScript
mvn clean installPublish the policy by running the following. Make sure to enter all the values in the <> brackets. The
traceable_versionis the version of Traceable's Mulesoft policy.ActionScript
curl -v \
  -H 'Authorization: bearer <bearer-token>' \
  -H 'x-sync-publication: true' \
  -F 'files.pom=@/path/to/traceable-mule-policy/traceable-blocking/pom.xml' \
  -F 'files.mule-policy.jar=@/path/to/traceable-mule-policy/traceable-blocking/target/traceable-blocking-mule-policy.jar' \
  -F 'files.policy-definition.yaml=@/path/to/traceable-mule-policy/traceable-blocking/traceable-blocking.yaml' \
  -F 'files.docs.zip=@docs.zip' \
https://anypoint.mulesoft.com/exchange/api/v2/organizations/<org_id>/assets/<org_id>/traceable-blocking/<traceable_version>
Step 2 – Attach the policy
You can attach the policy to the API at a global or at an individual API level.
Option 1 – Attach using automated policy
You can attach Traceable's agent for Mulesoft as a policy that would apply to all the APIs. You can achieve this using Mulesoft's Automated policy option. Complete the following steps:
Login to your Anypoint Platform and navigate to API Manager.
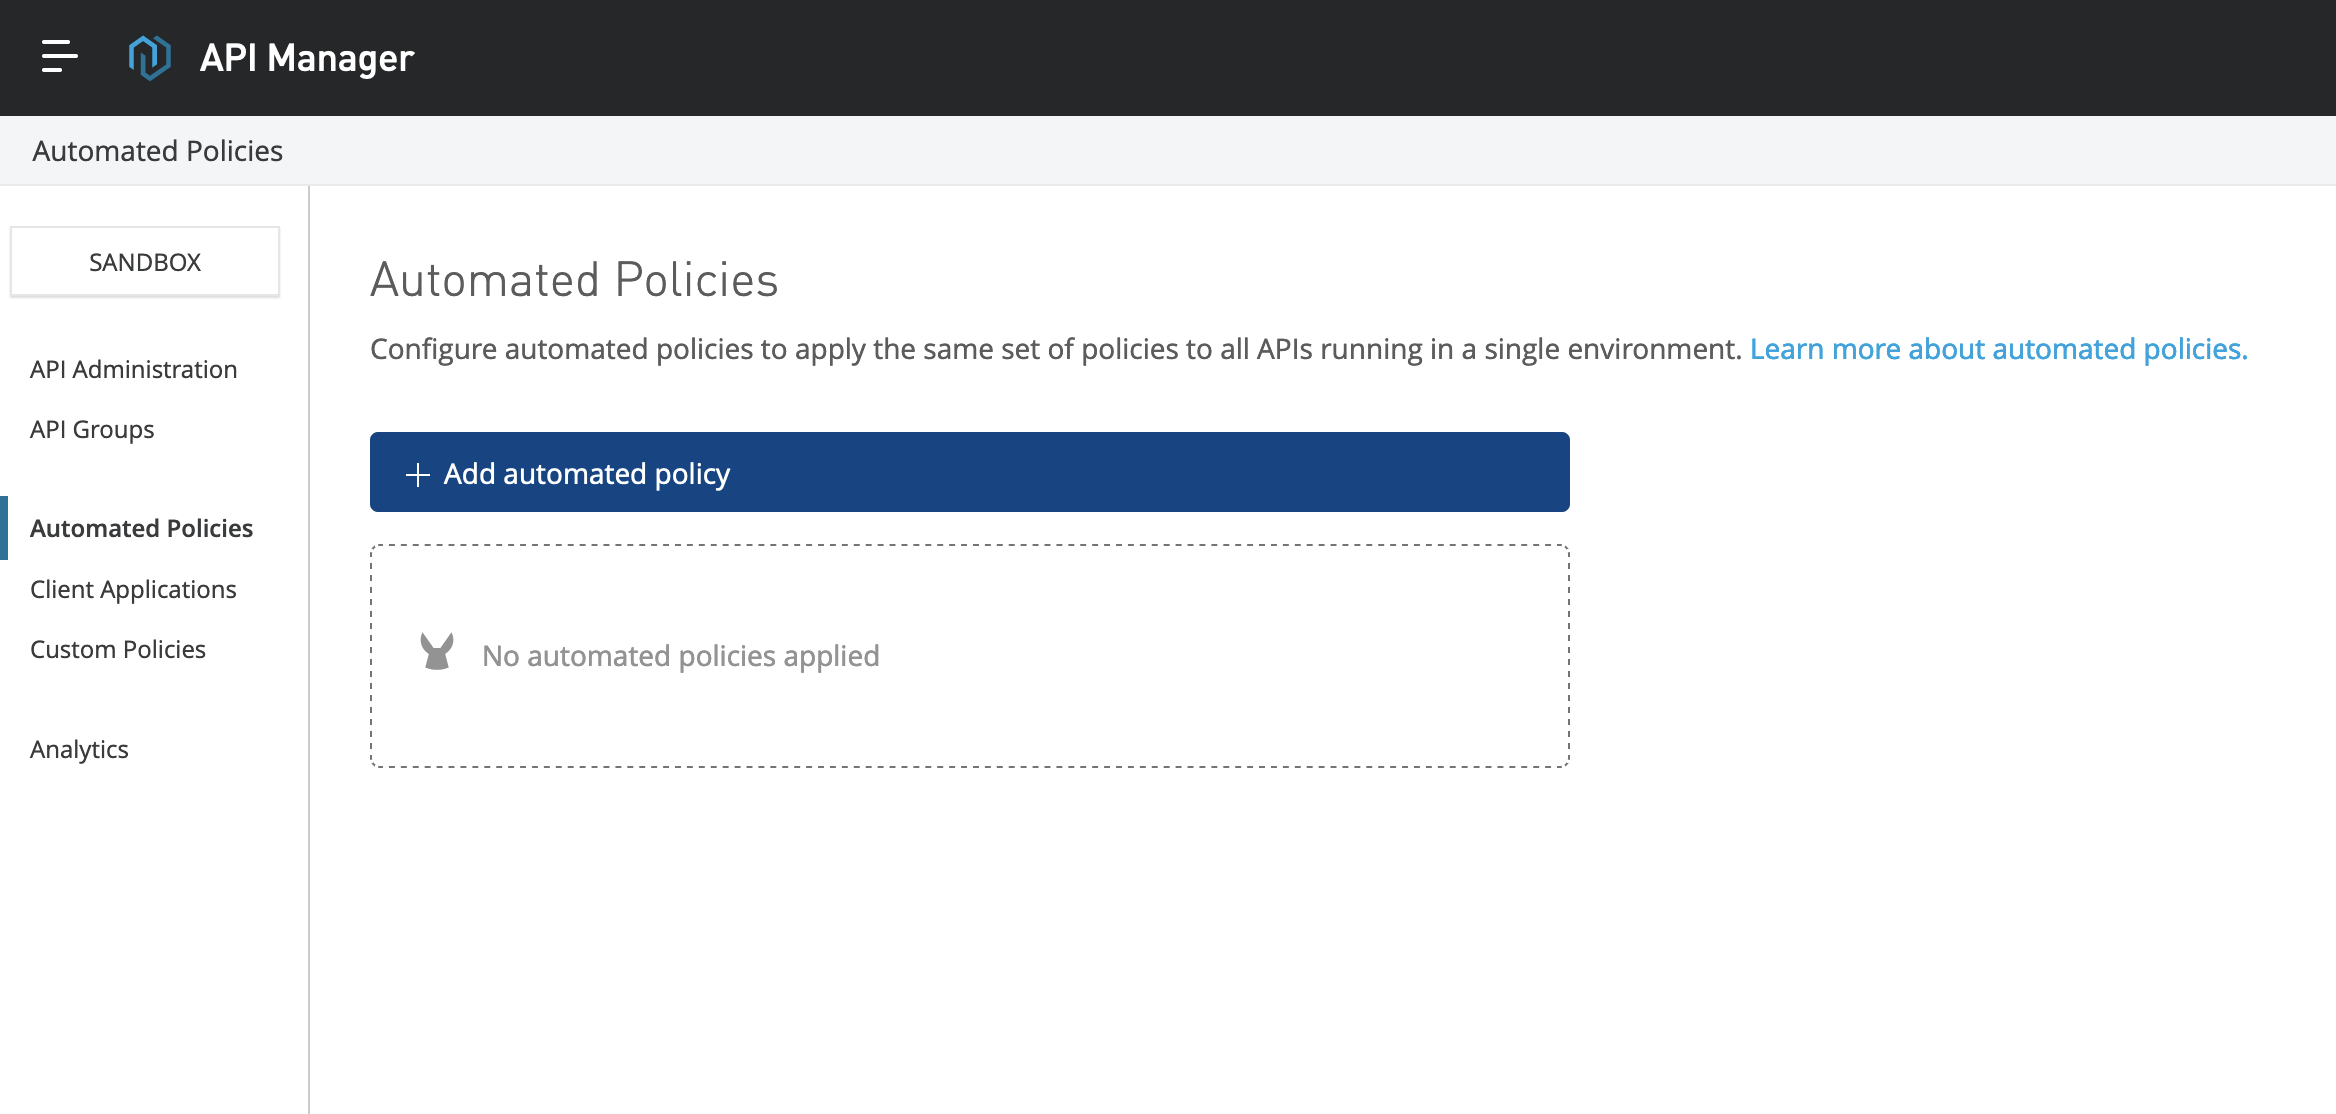
Click on Automated Policies from the left navigation menu.

Click on add automated policy in the Automated Policies page.
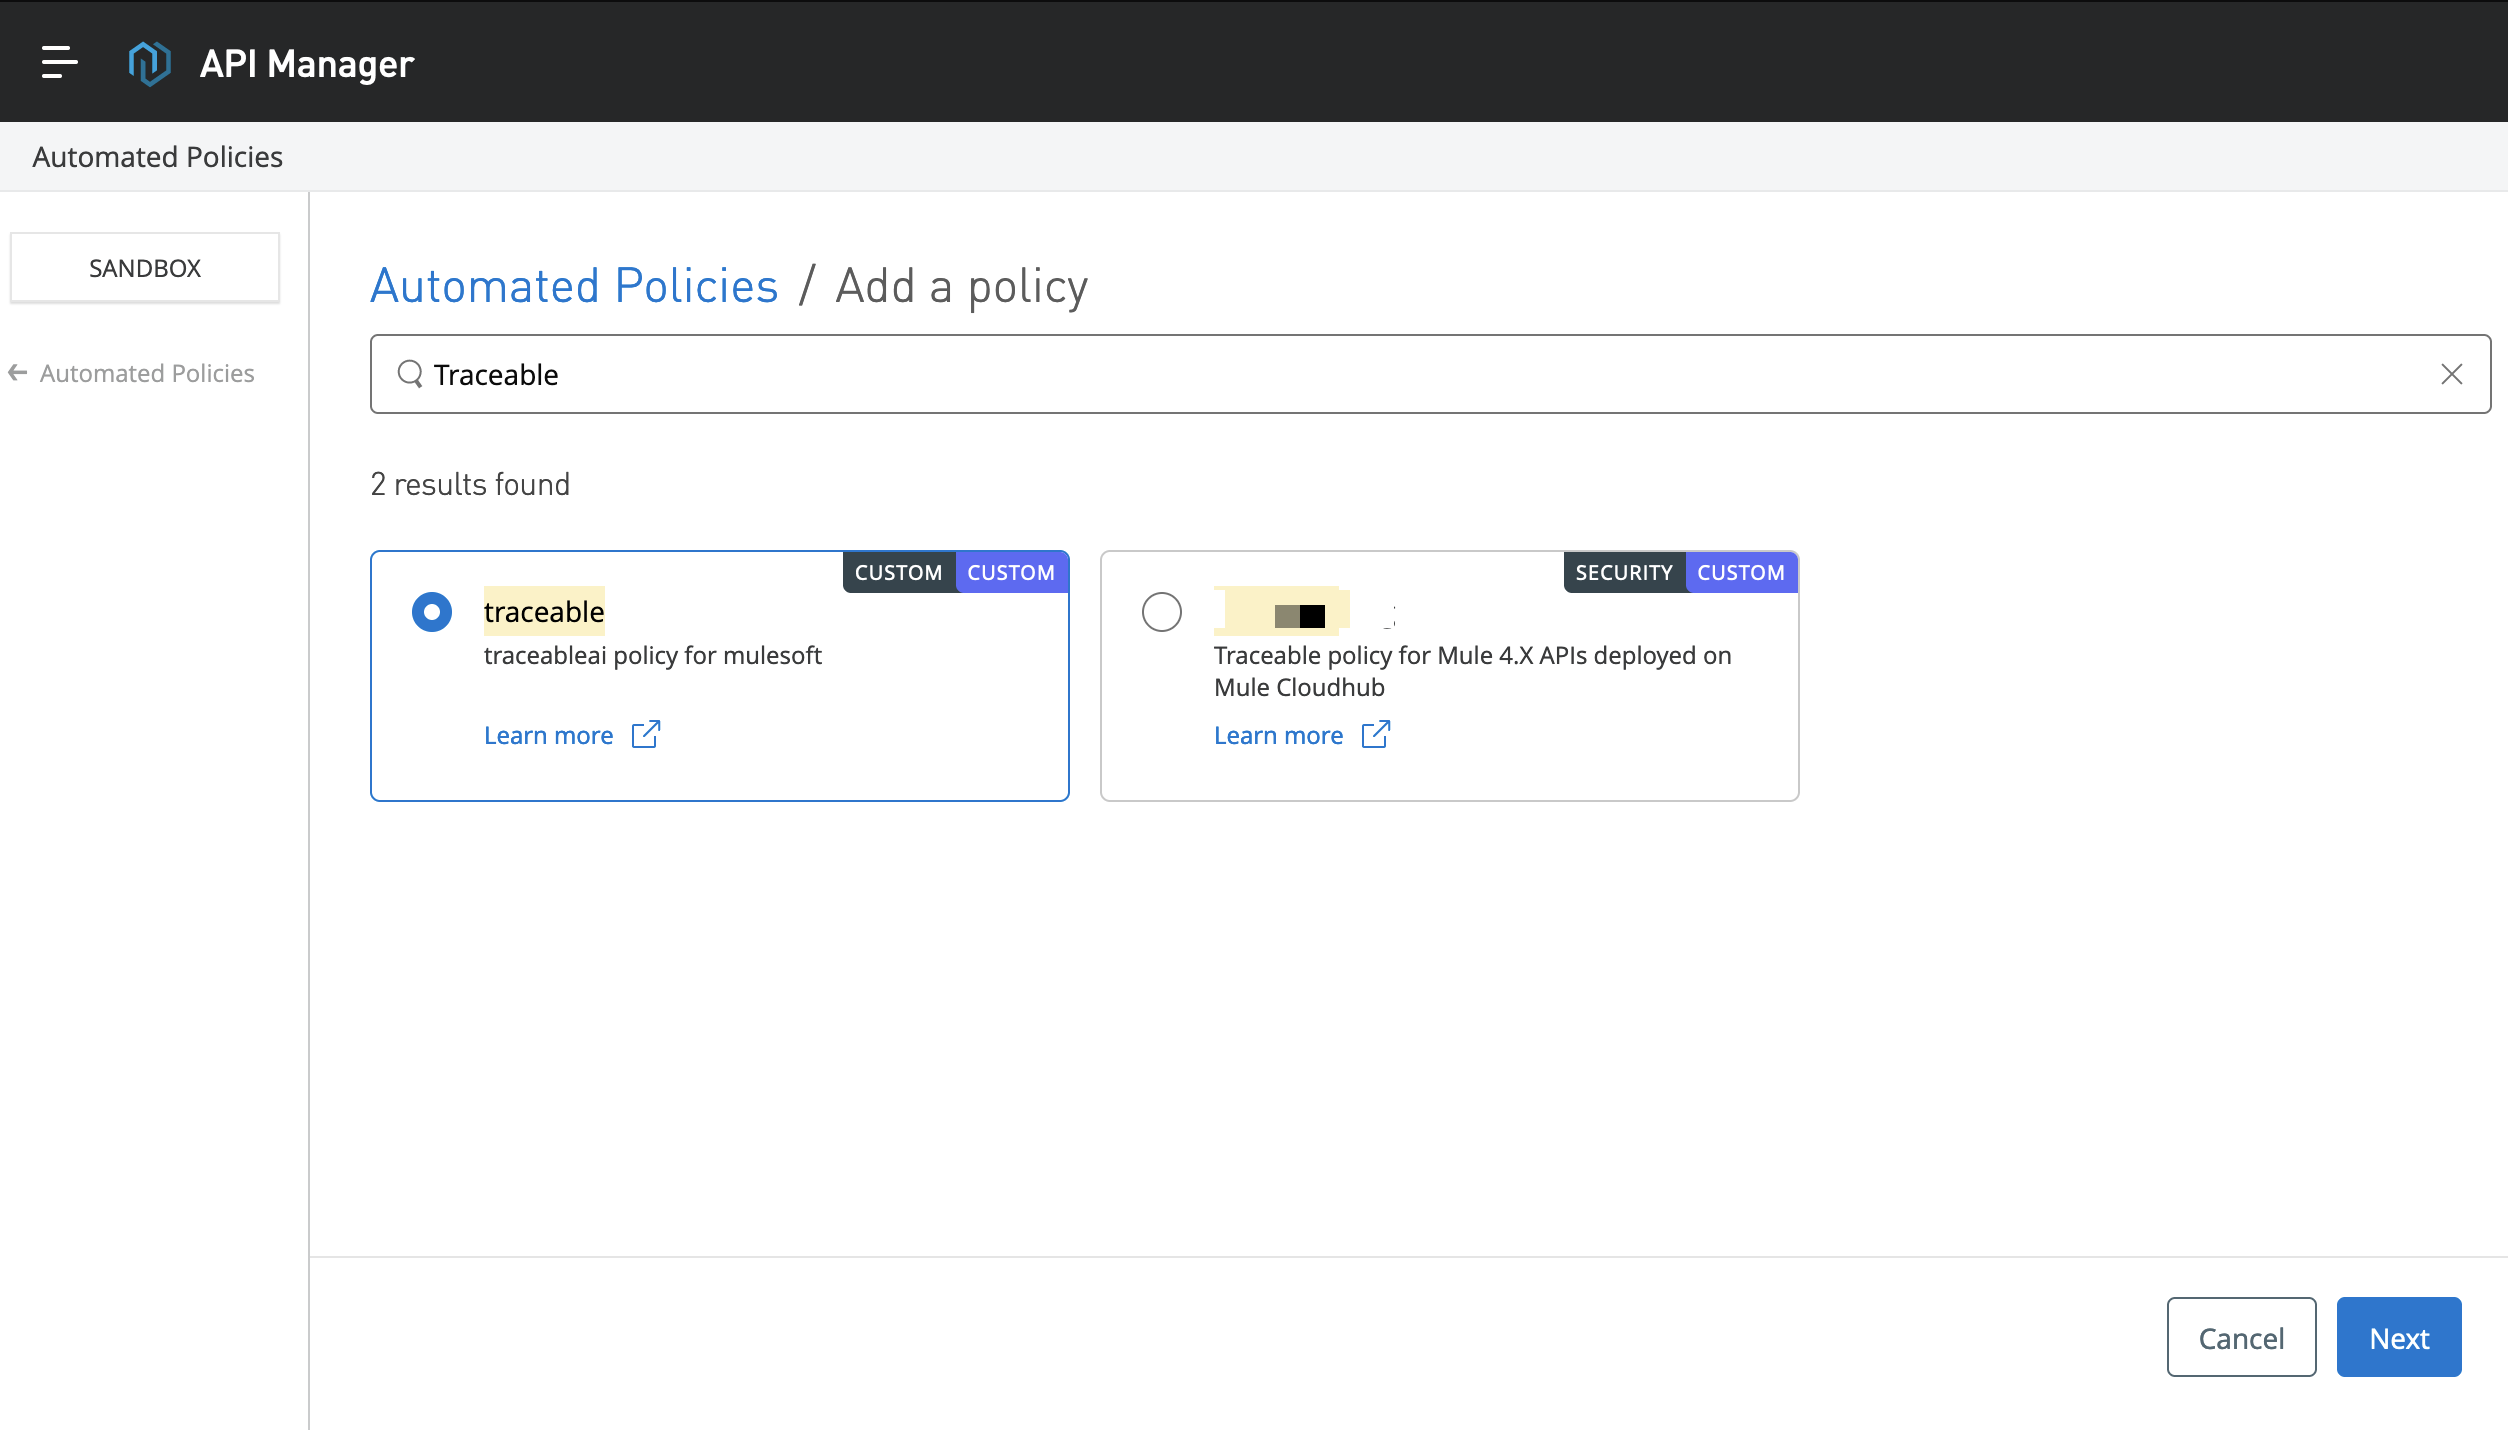
Search for the Traceable policy. Select the appropriate policy and click on Next.
Enter the different values to configure Traceable. Make sure to configure
TA REPORTING ENDPOINT. The value should behttp://traceable_platform_agent_host:5442. You can use the default values for the rest of the properties or modify them if you wish.Click on Apply to apply the policy.
Note
If you are using CloudHub 1.0 applications, the service name is the mule-app name, not the one you configured in the policy. The service name configured in the policy is used only for CloudHub 2.0 applications.
Option 2 – Attach policy to an API
Complete the following steps to attach the Traceable policy to the APIs that you wish to secure:
Login to your Anypoint Platform and navigate to API Manager.
Select the API to which you wish to attach the Traceable policy.
Click on the Policies option as shown below:
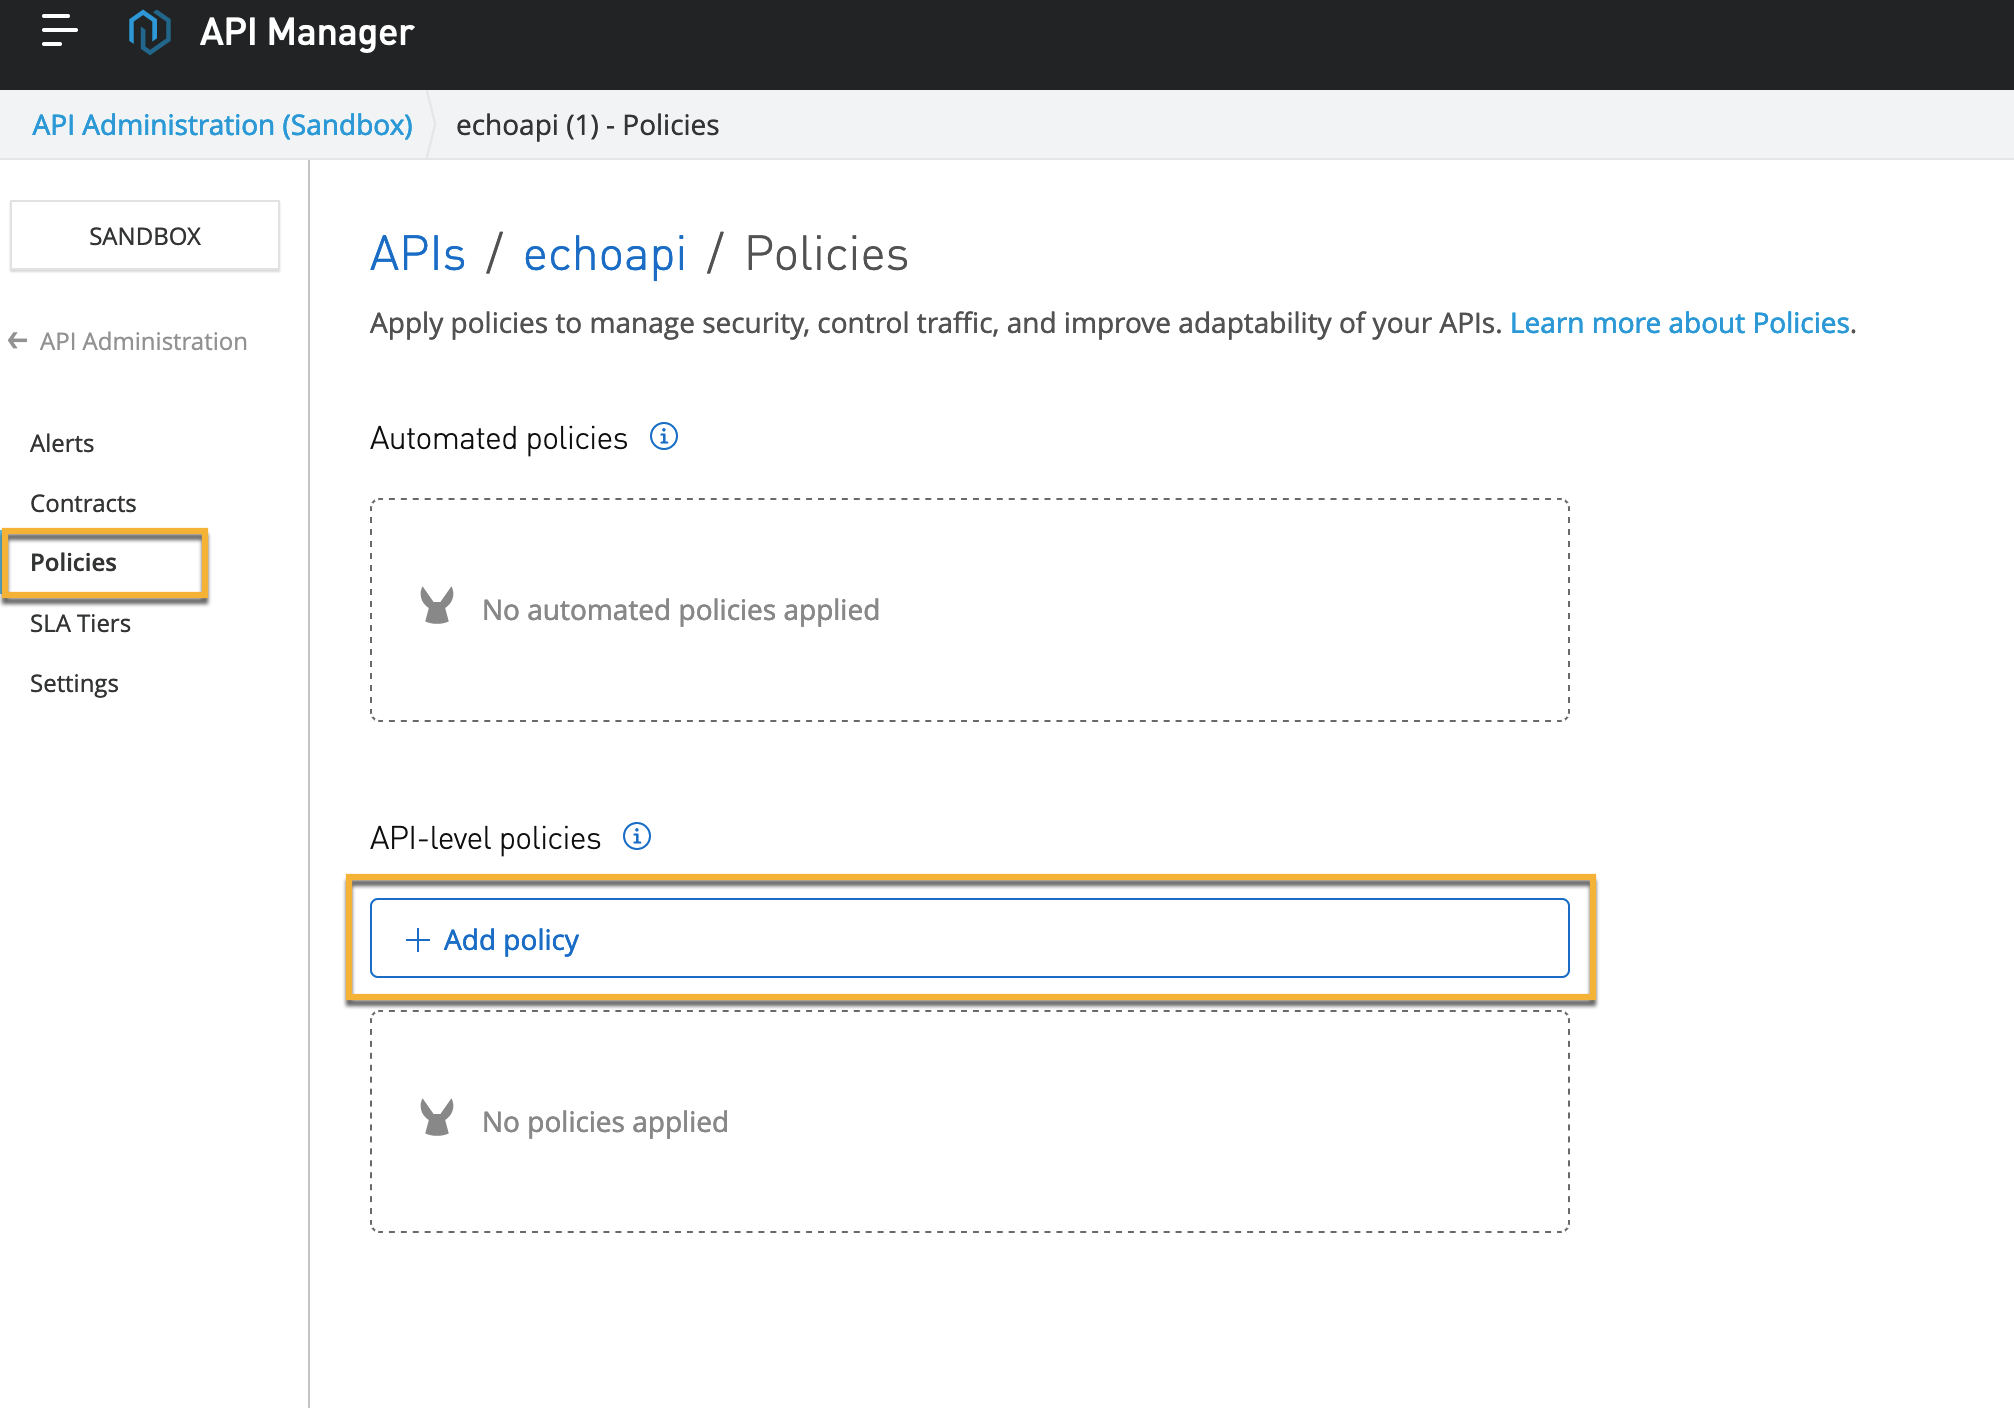
Click on Add policy
Search for Traceable policy. Select the policy.
Add the Traceable Platform agent's IP address. The value should be
http://traceable_platform_agent_host:5442.Update the other configurations, or you can use the default values.
Apply the policy.
Configuration options
The following table describes the various configuration options.
Configuration option | Description |
|---|---|
| This is a mandatory value. The value should be In case you are using a TLS connection, then the value should be: |
| Service name of CloudHub 2.0 applications. For CloudHub 1.0, the service name would be the application's name. |
| List of values without spaces (json,graphql,x-www-form-urlencoded) |
| Defines the maximum size that should be captured from the body. |
| Set to |
| Set to |
| Set to |
| Set to |
| Set it to |
|
Note If you change the value to |
Following is a short demo to add the Traceable policy in Mulesoft's Anypoint Platform:
Verification
Navigate to the Traceable platform to verify whether the policy is successfully attached to the API in Mulesoft. Click on Settings → Data Collection → Tracing agents. Check if the Mulesoft agent is displayed and the status is active. You can further check for spans in API Analytics or API Activity under the API Catalog.
.png)
Upgrade and uninstall
To upgrade the policy, follow the steps mentioned in the Step -1 section to add the new policy to Mulesoft's Exchange. After you have added the new policy to Mulesoft Exchange, complete the following steps:
Navigate to the API for which you want to upgrade the policy.
Click on the Policies option.
Click on the menu item as shown below.
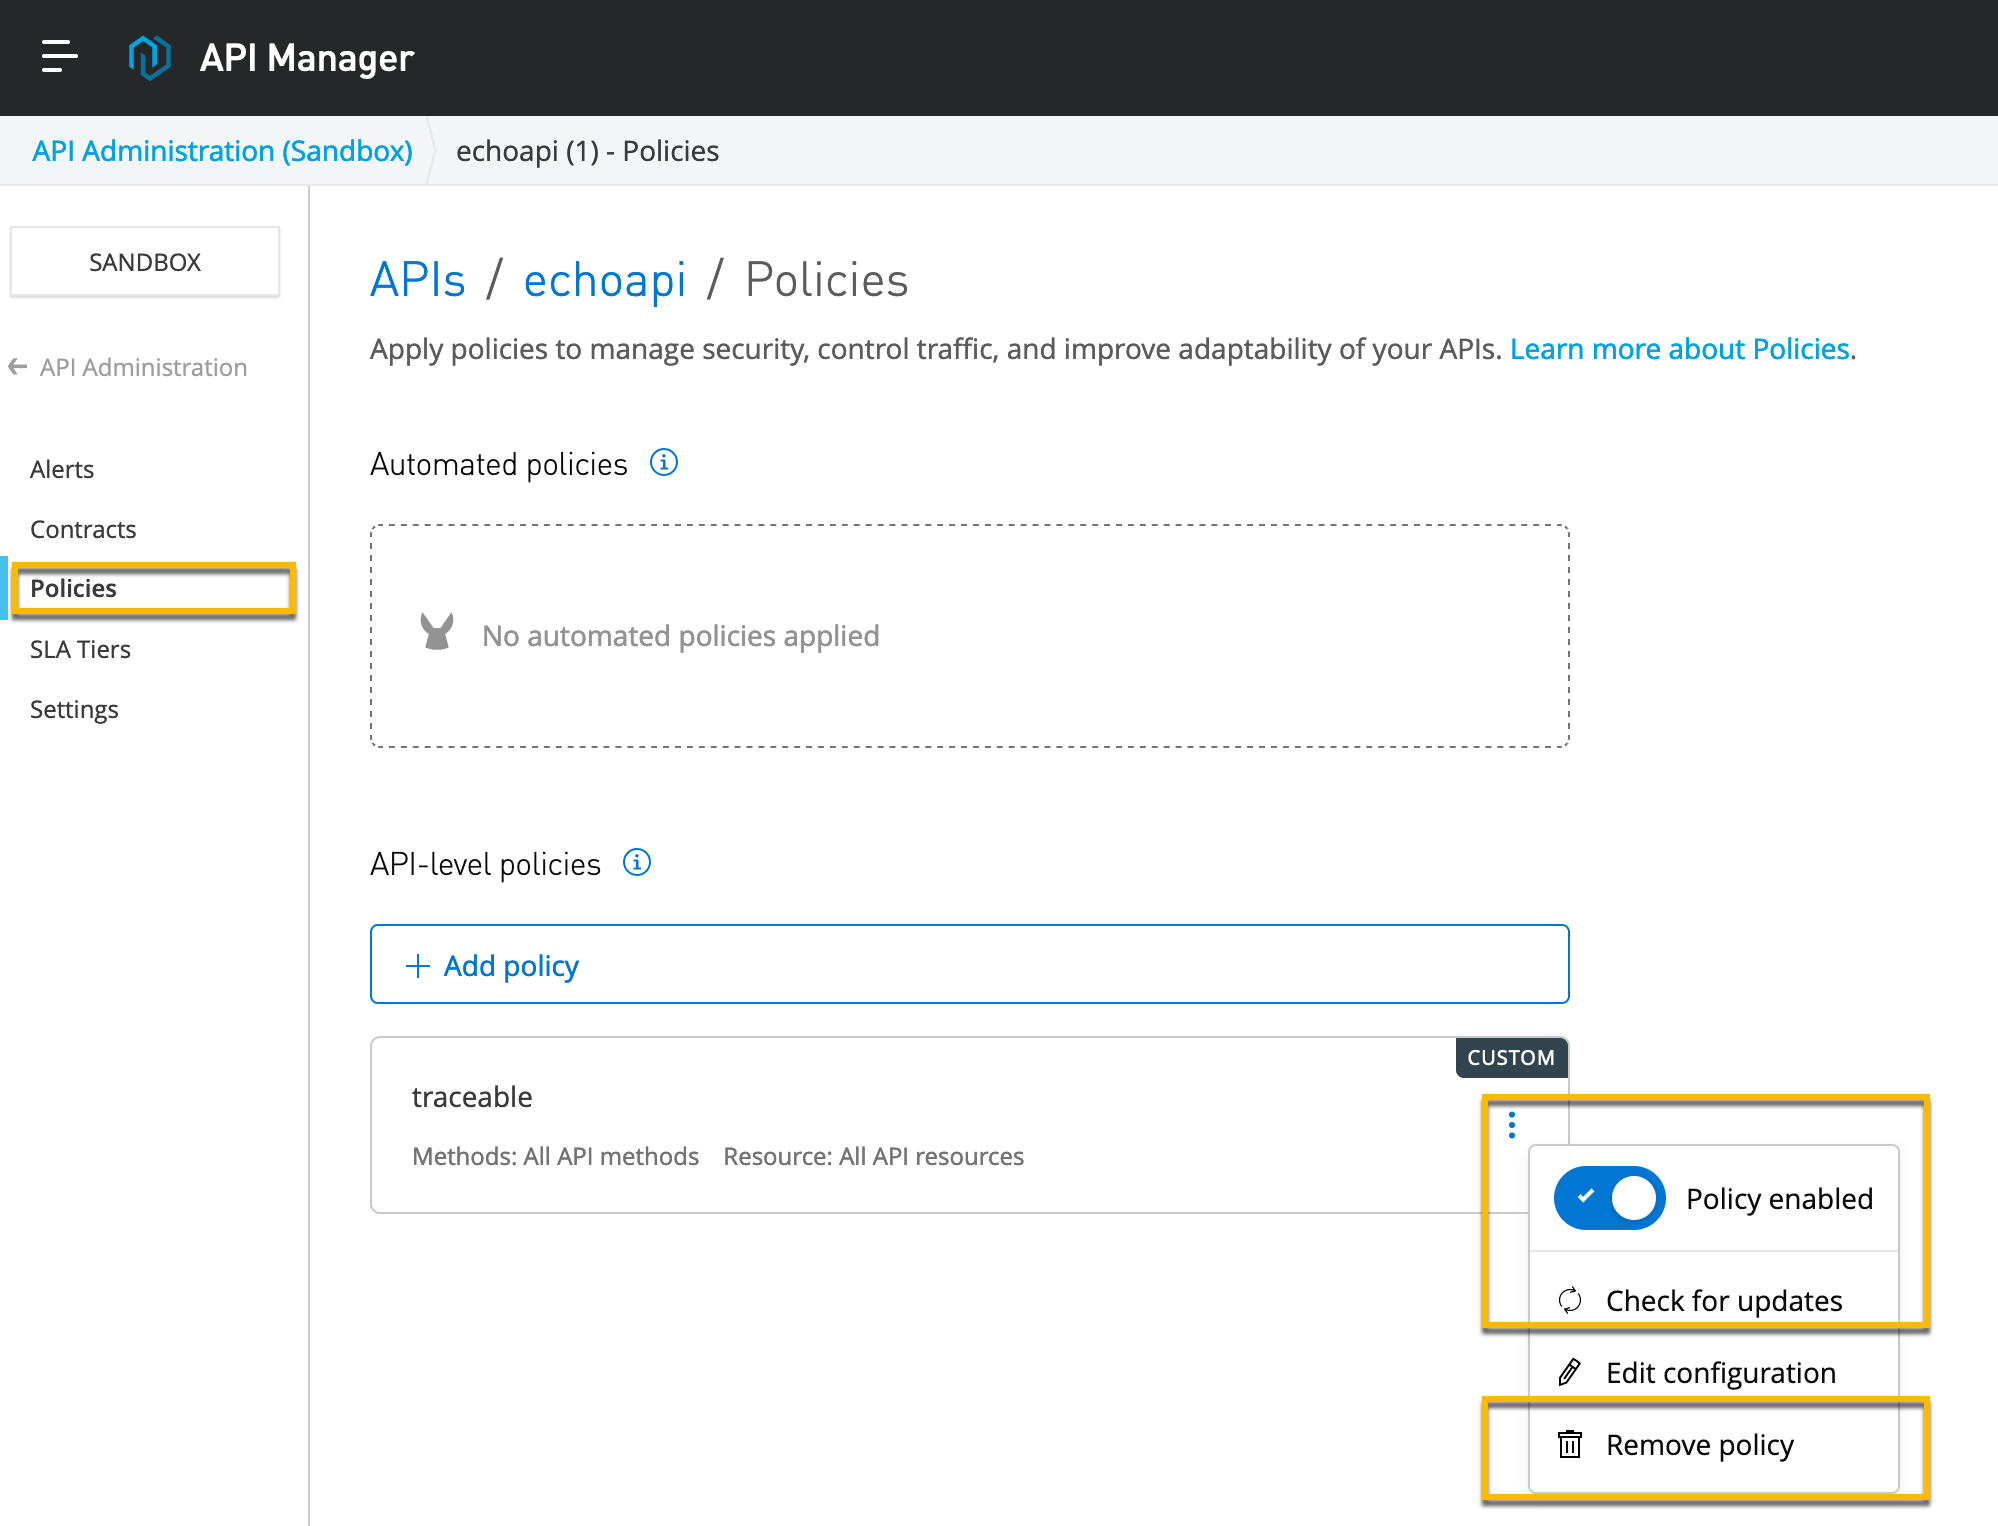
Click on Check for updates to update the policy.
If you wish to uninstall the policy, click on Remove policy.
Enable debug logs
You can enable debug logs by completing the following steps:
In Runtime Manager in your Anypoint Platform, navigate to the application for which you wish the logs to be enabled.
Navigate to the logging tab.
Add a new entry with the level set to
debugandorg.traceable.ai.internalas package name.