Mulesoft with Java Plugin
- 08 Jun 2023
- 7 Minutes to read
- Print
- DarkLight
- PDF
Mulesoft with Java Plugin
- Updated on 08 Jun 2023
- 7 Minutes to read
- Print
- DarkLight
- PDF
Traceable's Java policy for Mulesoft is deprecated and no more maintained.
Article summary
Did you find this summary helpful?
Thank you for your feedback
Mulesoft is an integration platform that helps different businesses connect their data, devices, and applications for both cloud computing and on-premise deployments. Mulesoft's Anypoint Platform™ is a solution for API-led connectivity that creates an application network of apps, data, and devices for both on-premise and cloud deployments. Traceable provides a Java policy that can help you in protecting your APIs. You can attach the Traceable policy to any API registered on the Anypoint platform for security and monitoring purposes. The following diagram shows the high-level deployment of Traceable policy in your environment.
.jpg)
Before you begin
Before proceeding to attach Traceable policy to an API on your Mulesoft Anypoint Platform, make a note of the following points:
- Maven (
mvn) must be installed.Note:Maven 3.9 has compatibility issues with the Mule plugin, we recommend using Maven 3.8 or earlier. - Java 8 must be installed.
- You should have access and permission to upload artifacts to Mulesoft exchange in your organization's Mulesoft Anypoint Platform account.NoteTo upload Traceable's custom policy to Mulesoft Exchange, you must have the exchange contributor's role assigned to you. For more information, see Uploading a Custom Policy to Exchange.
- Keep the IP address of your Traceable agent handy. You would need this IP address to configure the Traceable's Mulesoft policy.
The process to attach Traceable's policy consists of two steps:
- Download the policy from Traceable's download site and then upload to Mulesoft's Exchange
- Attaching the policy to the API in Mulesoft.
Step 1 — Download the Java policy and upload to Mulesoft Exchange
Complete the following steps to download and unzip Traceable's Java policy:
- Navigate to Traceable's download site and then navigate to agent > mulesoft-java-plugin > latest.
- Unzip the downloaded file.
- Change directory to Mulesoft policy directory.ActionScript
cd traceable-mule-policy - Install the Traceable extension to your local Maven. Enter the following command:ActionScript
mvn install:install-file -Dfile=$(ls | grep traceable-mule-extension) -DgroupId=ai.traceable.agent -DartifactId=traceable-mule-extension -Dversion=1.0.0 -Dclassifier=mule-plugin -Dpackaging=jar -DgeneratePom=true - Navigate to Traceable policy.ActionScript
cd traceable-java - Update the groupId in pom.xml file to your Mulesoft organization's ID.ActionScript
<?xml version="1.0" encoding="UTF-8"?>
<project xmlns="http://maven.apache.org/POM/4.0.0"
         xmlns:xsi="http://www.w3.org/2001/XMLSchema-instance"
         xsi:schemaLocation="http://maven.apache.org/POM/4.0.0 http://maven.apache.org/xsd/maven-4.0.0.xsd">
    <modelVersion>4.0.0</modelVersion>

<!--UPDATE GROUP ID-->
    <groupId>4c2d42c8-910d-42fe-8f21-bc76f21ef3fe</groupId>
    <artifactId>traceable</artifactId>
    <version>1.15.0</version>
Policy deployment options
You have two options to deploy Traceable policy. You can either use mvn or curl command to deploy the policy.
Note:
If you are using a Windows machine to deploy the policy, use the
mvn option only.Option 1 - Deploy using mvn
Make a note of the following before proceeding with this option. For more information on mvn install, see Mulesoft documentation, Uploading a Custom Policy to Exchange.
- Traceable's Mulesoft agent earlier than 1.21.0 - If you are using Traceable's Mulesoft agent earlier than 1.21.0, then in your Maven installation directory, update the
settings.xmlfile with your Exchange credentials.ActionScript<?xml version="1.0" encoding="UTF-8"?> <settings xmlns="http://maven.apache.org/SETTINGS/1.0.0" xmlns:xsi="http://www.w3.org/2001/XMLSchema-instance" xsi:schemaLocation="http://maven.apache.org/SETTINGS/1.0.0 http://maven.apache.org/xsd/settings-1.0.0.xsd"> <servers> <server> <id>exchange-server</id> <username>myusername</username> <password>mypassword</password> </server> </servers> </settings> - Traceable's Mulesoft agent 1.21.0 and later - If you are using Traceable agent 1.21.0 or later, then in your Maven installation directory, update the
settings.xmlfile with your Exchange credentials.ActionScriptActionScript <?xml version="1.0" encoding="UTF-8"?> <settings xmlns="http://maven.apache.org/SETTINGS/1.0.0" xmlns:xsi="http://www.w3.org/2001/XMLSchema-instance" xsi:schemaLocation="http://maven.apache.org/SETTINGS/1.0.0 http://maven.apache.org/xsd/settings-1.0.0.xsd"> <servers> <server> <id>anypoint-exchange-v3</id> <username>myusername</username> <password>mypassword</password> </server> </servers> </settings>
myusername and mypassword are your username and password to log in to Mulesoft account.
Deploy the Traceable policy. Enter the following command:
ActionScript
mvn clean deployVerify in your Mulesoft Anypoint Platform Exchange whether Traceable policy is present or not.
Option 2 - Deploy using curl command
To deploy using curl command, you would need a bearer token. You can use your bearer token or use Connected App credentials. Enter the following commands to deploy:
- Build the Traceable policy. Enter the following command:ActionScript
mvn clean install - Publish the policy by running the following. Make sure to enter all the values in the <> brackets. The
traceable_versionis the version of Traceable's Mulesoft policy.ActionScriptcurl -v \ -H 'Authorization: bearer ' \ -H 'x-sync-publication: true' \ -F 'files.pom=@/path/to/traceable-mule-policy/traceable/pom.xml' \ -F 'files.mule-policy.jar=@/path/to/traceable-mule-policy/traceable/target/traceable--mule-policy.jar' \ -F 'files.policy-definition.yaml=@/path/to/traceable-mule-policy/traceable/traceable.yaml' \ -F 'files.docs.zip=@docs.zip' \ https://anypoint.mulesoft.com/exchange/api/v2/organizations/<org_id>/assets/<org_id>/traceable/<traceable_version> - Verify in your Mulesoft Anypoint Platform Exchange whether Traceable policy is present or not.
Step 2 – Install Mulesoft agent as a policy
Complete the following steps:
- Login to your Anypoint Platform and navigate to API Manager.
- Select the API to which you wish to apply the Traceable policy.
.png)
- Navigate to the Policies menu and click on Add Policy.
.png)
- Search and select the Traceable policy and click on Next.
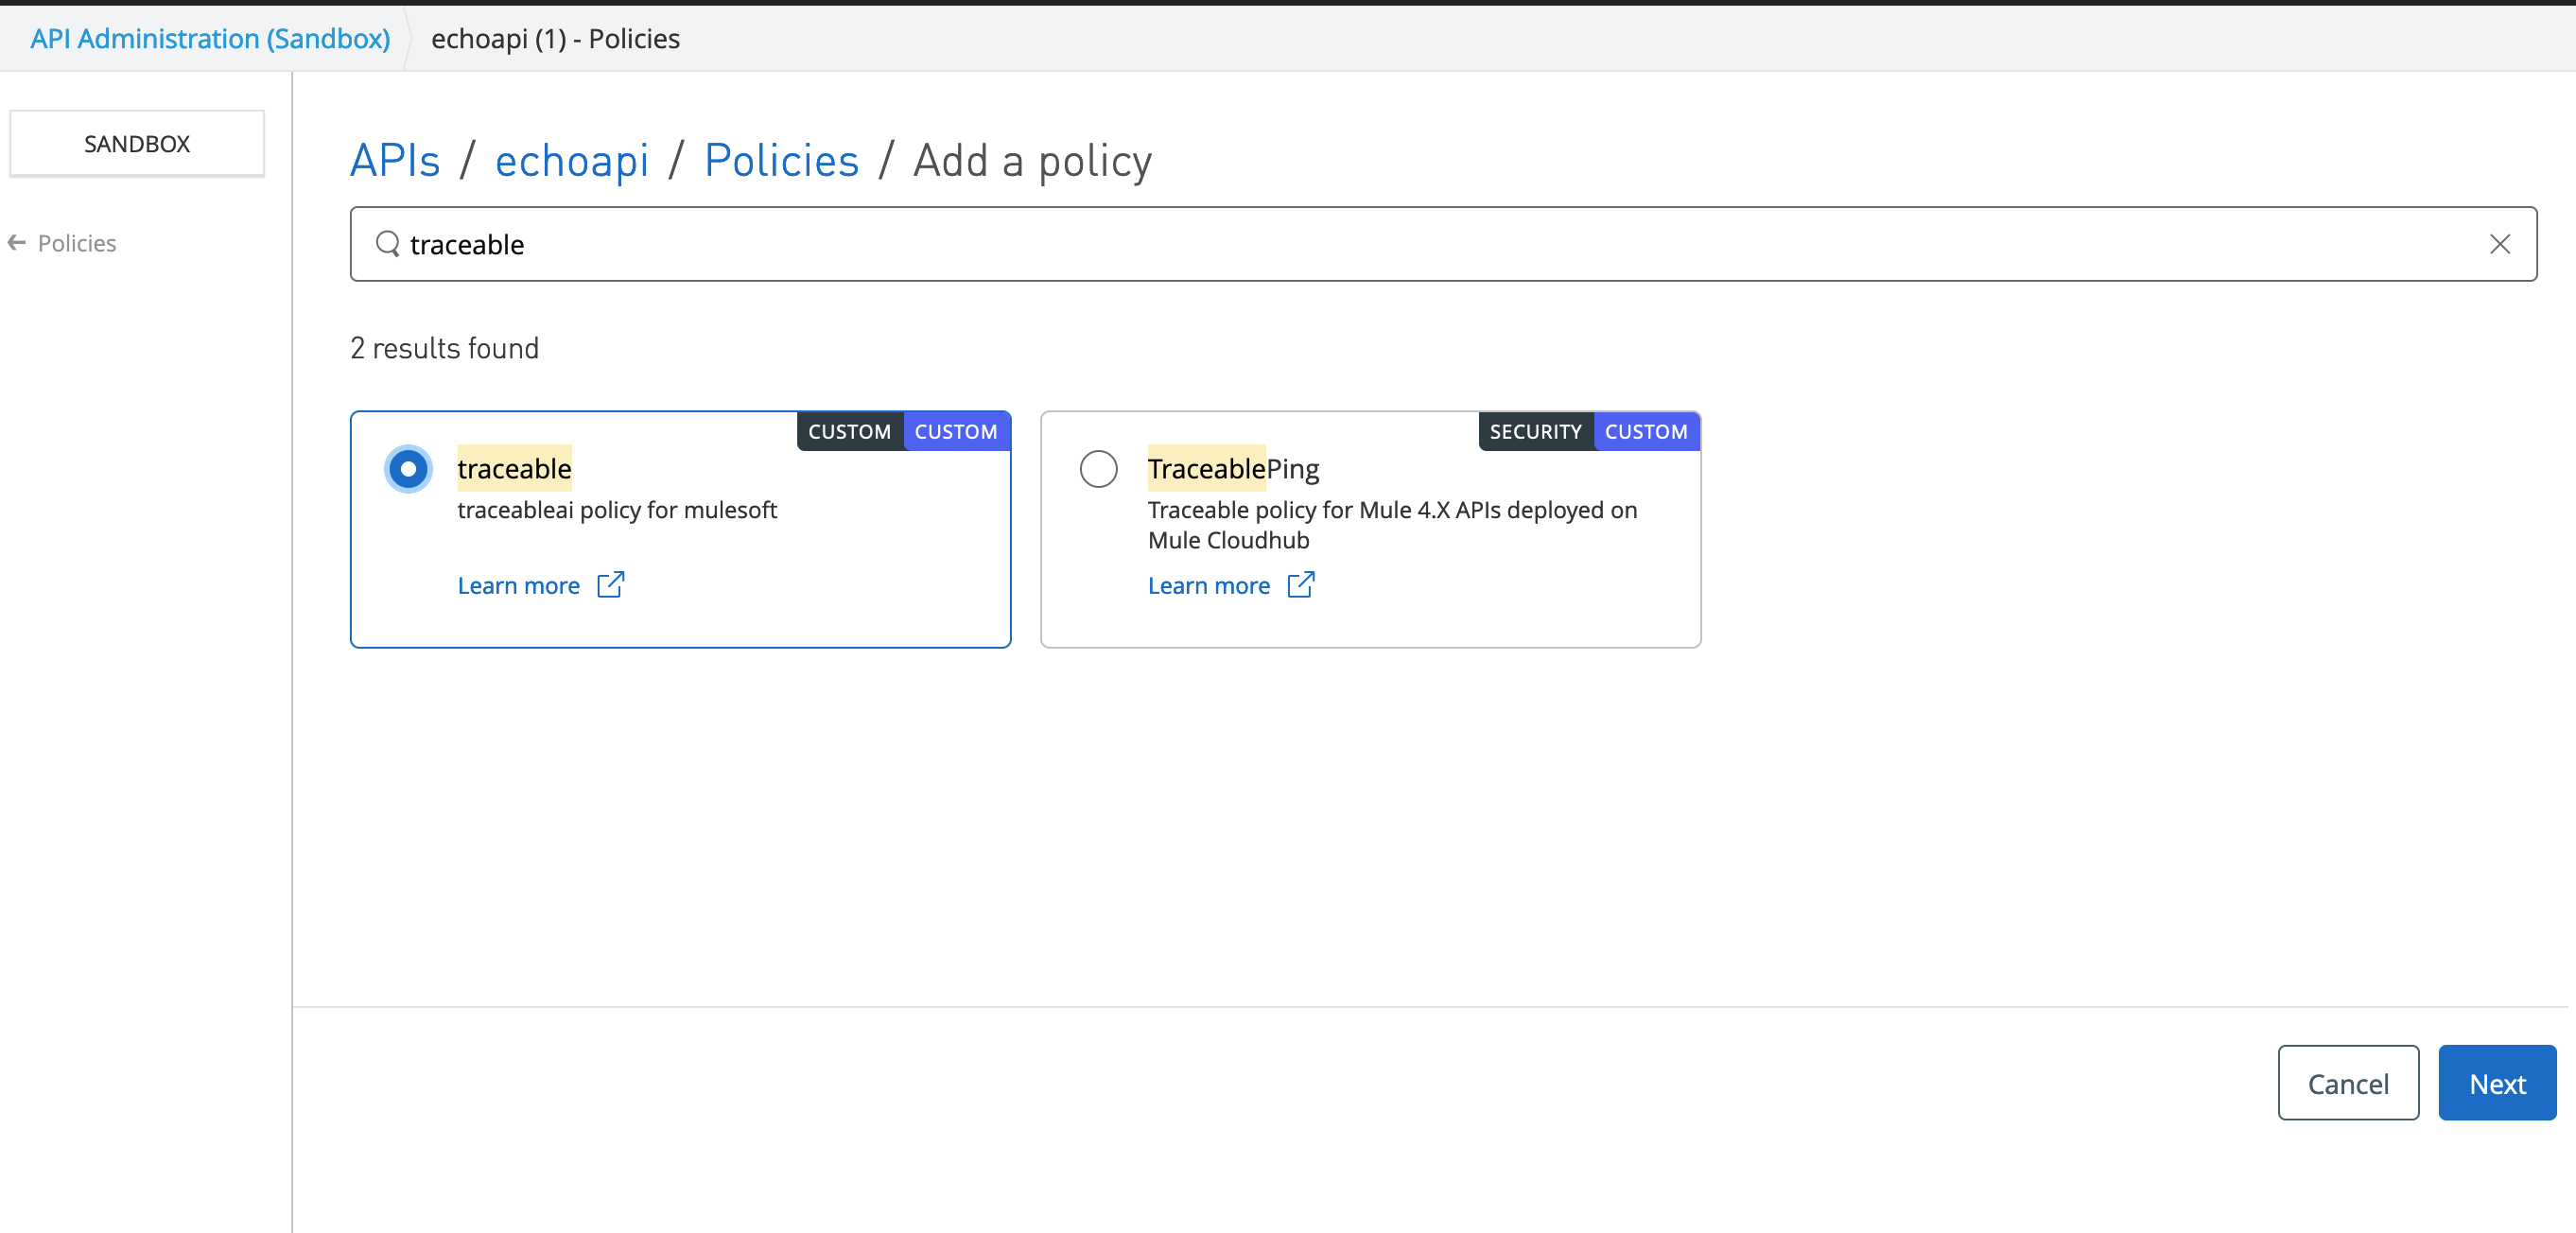
- Configure the various options and click on Apply.
.png)
.png)
.png)

.png)
Note
If you are using CloudHub 1.0 applications, the service name is the mule-app name, not the one you configured in policy. The service name configured in policy is used only for CloudHub 2.0 applications.
Configure TLS (optional)
You can optionally configure TLS for communication between Mulesoft and Traceable's Platform agent. To configure TLS, complete the following steps:
- Create a truststore with trust anchor certificate used for creating the certificates for Traceable Platform agent. Enter the following command:ActionScript
keytool -import -alias serverkey -keystore <truststore_name> -file <trust_anchor_cert_name> -storetype JKSHere is a breakdown of each command argument:
- "keytool" refers to the Java keytool program that is used for managing public and private keys, digital certificates, and keystores.
- "-import" is a command that specifies that you want to import a certificate.
- "-alias" is used to specify a name for the certificate being imported.
- "serverkey" is the name given to the imported certificate.
- "-keystore" is used to specify the name and location of the truststore file where the certificate should be imported.
- "<truststore_name>" is the name of the truststore file where the certificate should be imported. Replace this with the actual filename and path.
- "-file" is used to specify the name and location of the trust anchor certificate file that should be imported.
- "<trust_anchor_cert_name>" is the name of the trust anchor certificate file that should be imported. Replace this with the actual filename and path.
- Overall, this command imports a certificate with the name "serverkey" into the truststore with the specified name and location, using a trust anchor certificate with the specified name and location.
For example,
ActionScriptkeytool -import -alias serverkey -keystore client_truststore.jks -file root_ca.crt -storetype JKSNoteIf you already have a truststore, make sure that it is in the jks format.
- Navigate to the policy directory. Enter the following command:ActionScript
cd traceable-mule-policy/traceable-java/src/main - Copy your truststore into resources/truststore directory.
- Navigate to the policy template. Enter the following command:ActionScript
cd mule - In template.xml file, find the following line and change
dummy_truststore.jkswith the name of your truststore anddummyPasswordwith the password set while creating the truststore.ActionScript<tls:trust-store/>and change it into the following format:
<tls:trust-store path="truststore/<truststore_name>" password="<truststore_password>" type="jks"/>dummy_truststore.jksis the name of the truststore anddummyPasswordis the password set while creating the truststore. - Navigate back to project's root directory (
traceable-mule-policy) and deploy the policy.
Configuration options
The following table describes the various configuration options.
| TA REPORTING ENDPOINT | This is a mandatory value. The value should be http://traceable_platform_agent_host:5442/ext_cap/v1/req_res_capIn case if you are using TLS connection, then the value should be: https://traceable_platform_agent_host:5443/ext_cap/v1/req_res_cap |
| TA SERVICE NAME | Service name of CloudHub 2.0 applications. For CloudHub 1.0, the service name would the name of the application itself. |
| TA DATA CAPTURE ALLOWED CONTENT TYPES | List of values without spaces (json,graphql,x-www-form-urlencoded) |
| TA DATA CAPTURE BODY MAX SIZE BYTES | Defines the maximum size that should be captured from the body. |
| TA DATA CAPTURE HTTP BODY REQUEST | Set to true to capture HTTP request body. The other value that can be set is false. |
| TA DATA CAPTURE HTTP BODY RESPONSE | Set to true to capture HTTP response body. The other value that can be set is false. |
| TA DATA CAPTURE HTTP HEADERS REQUEST | Set to true to capture request headers. The other value that can be set is false. |
| TA DATA CAPTURE HTTP HEADERS RESPONSE | Set to true to capture request headers. The other value that can be set is false. |
| TA TLS ENABLED | Set it to true if you wish to use TLS connection to Traceable's Platform agent. |
| TA DATA CAPTURE COMPRESS GZIP | true or false. The default value is false.Note If you change the value to true, make sure that your minimum Traceable Platform agent version is 1.27.0 or later. |
Verification
To verify whether the policy successfully attached to the API in Mulesoft, navigate to Traceable platform. Click on Administration > Data Collection > Tracing agents. Check if Mulesoft agent is displayed and the status is active. You can further check for spans in API Analytics or API Activity under API Catalog.
.png)
Upgrade and uninstall
To upgrade the policy, follow the steps in mentioned in Step -1 section to add the new policy to Mulesoft's Exchange. After you have added the new policy to Mulesoft Exchange, complete the following steps:
- Navigate to the API for which you want to upgrade the policy.
- Click on the Policies option.
- Click on the menu item as shown below.
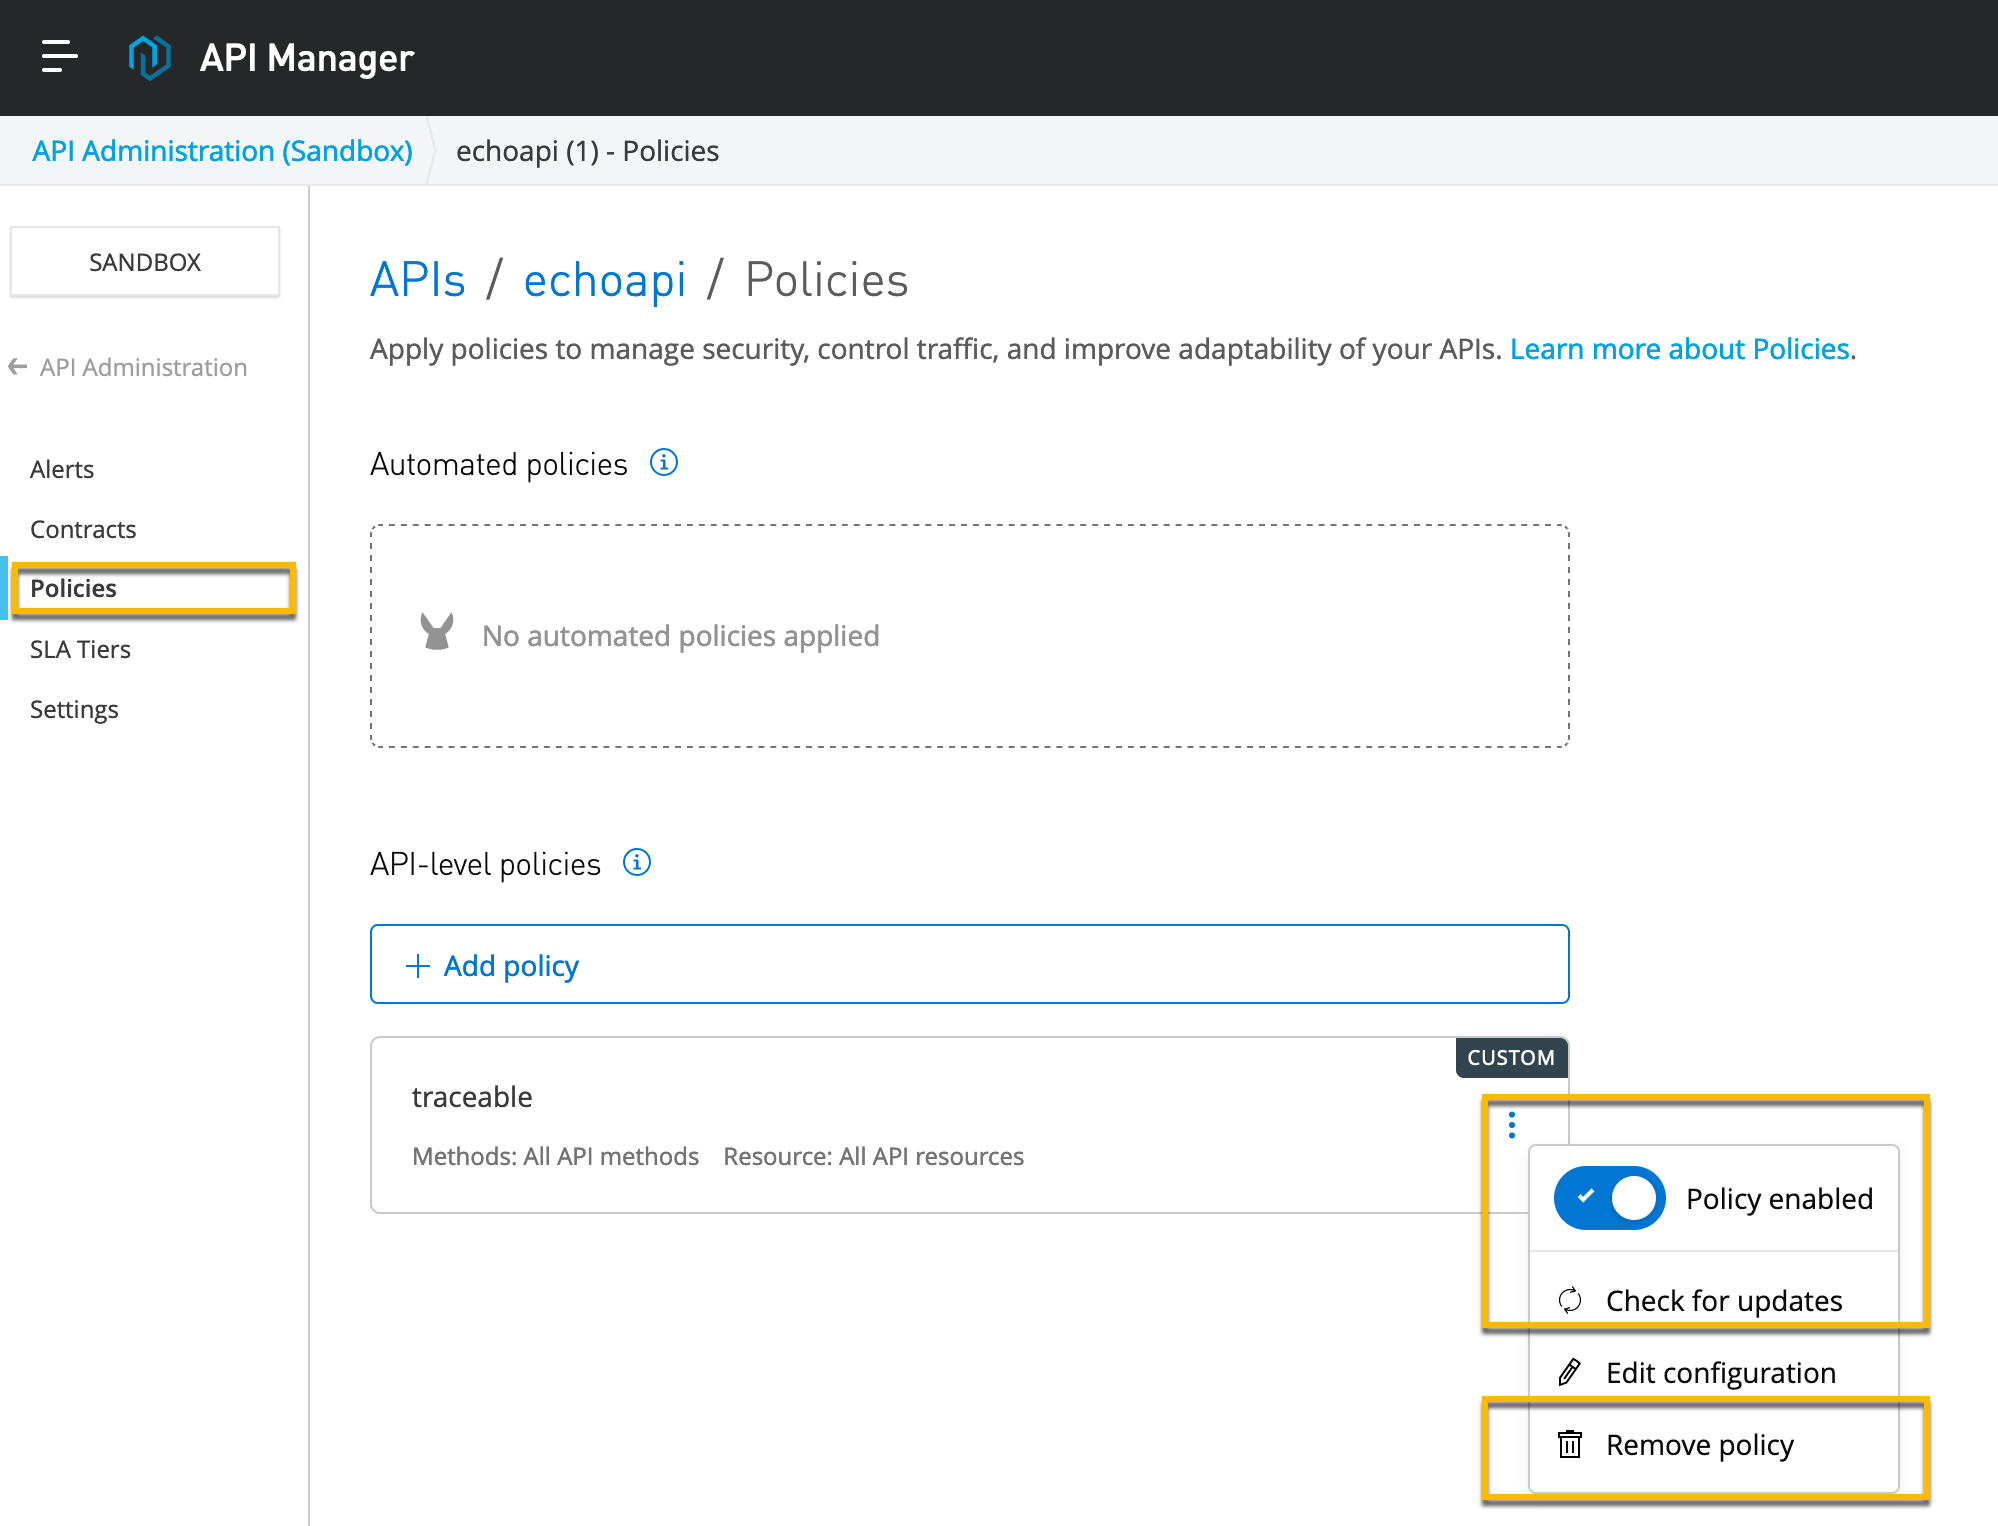
- Click on Check for updates to update the policy.

If you wish to uninstall the policy, click on Remove policy.
Enable debug logs
You can enable debug logs by completing the following steps:
- In Runtime Manager in your Anypoint Platform, navigate to the application for which you wish the logs to be enabled.
- Navigate to the logging tab.
- Add a new entry with the level set to
debugandorg.traceable.ai.internalandorg.traceable.ai.implpackage name.
Was this article helpful?