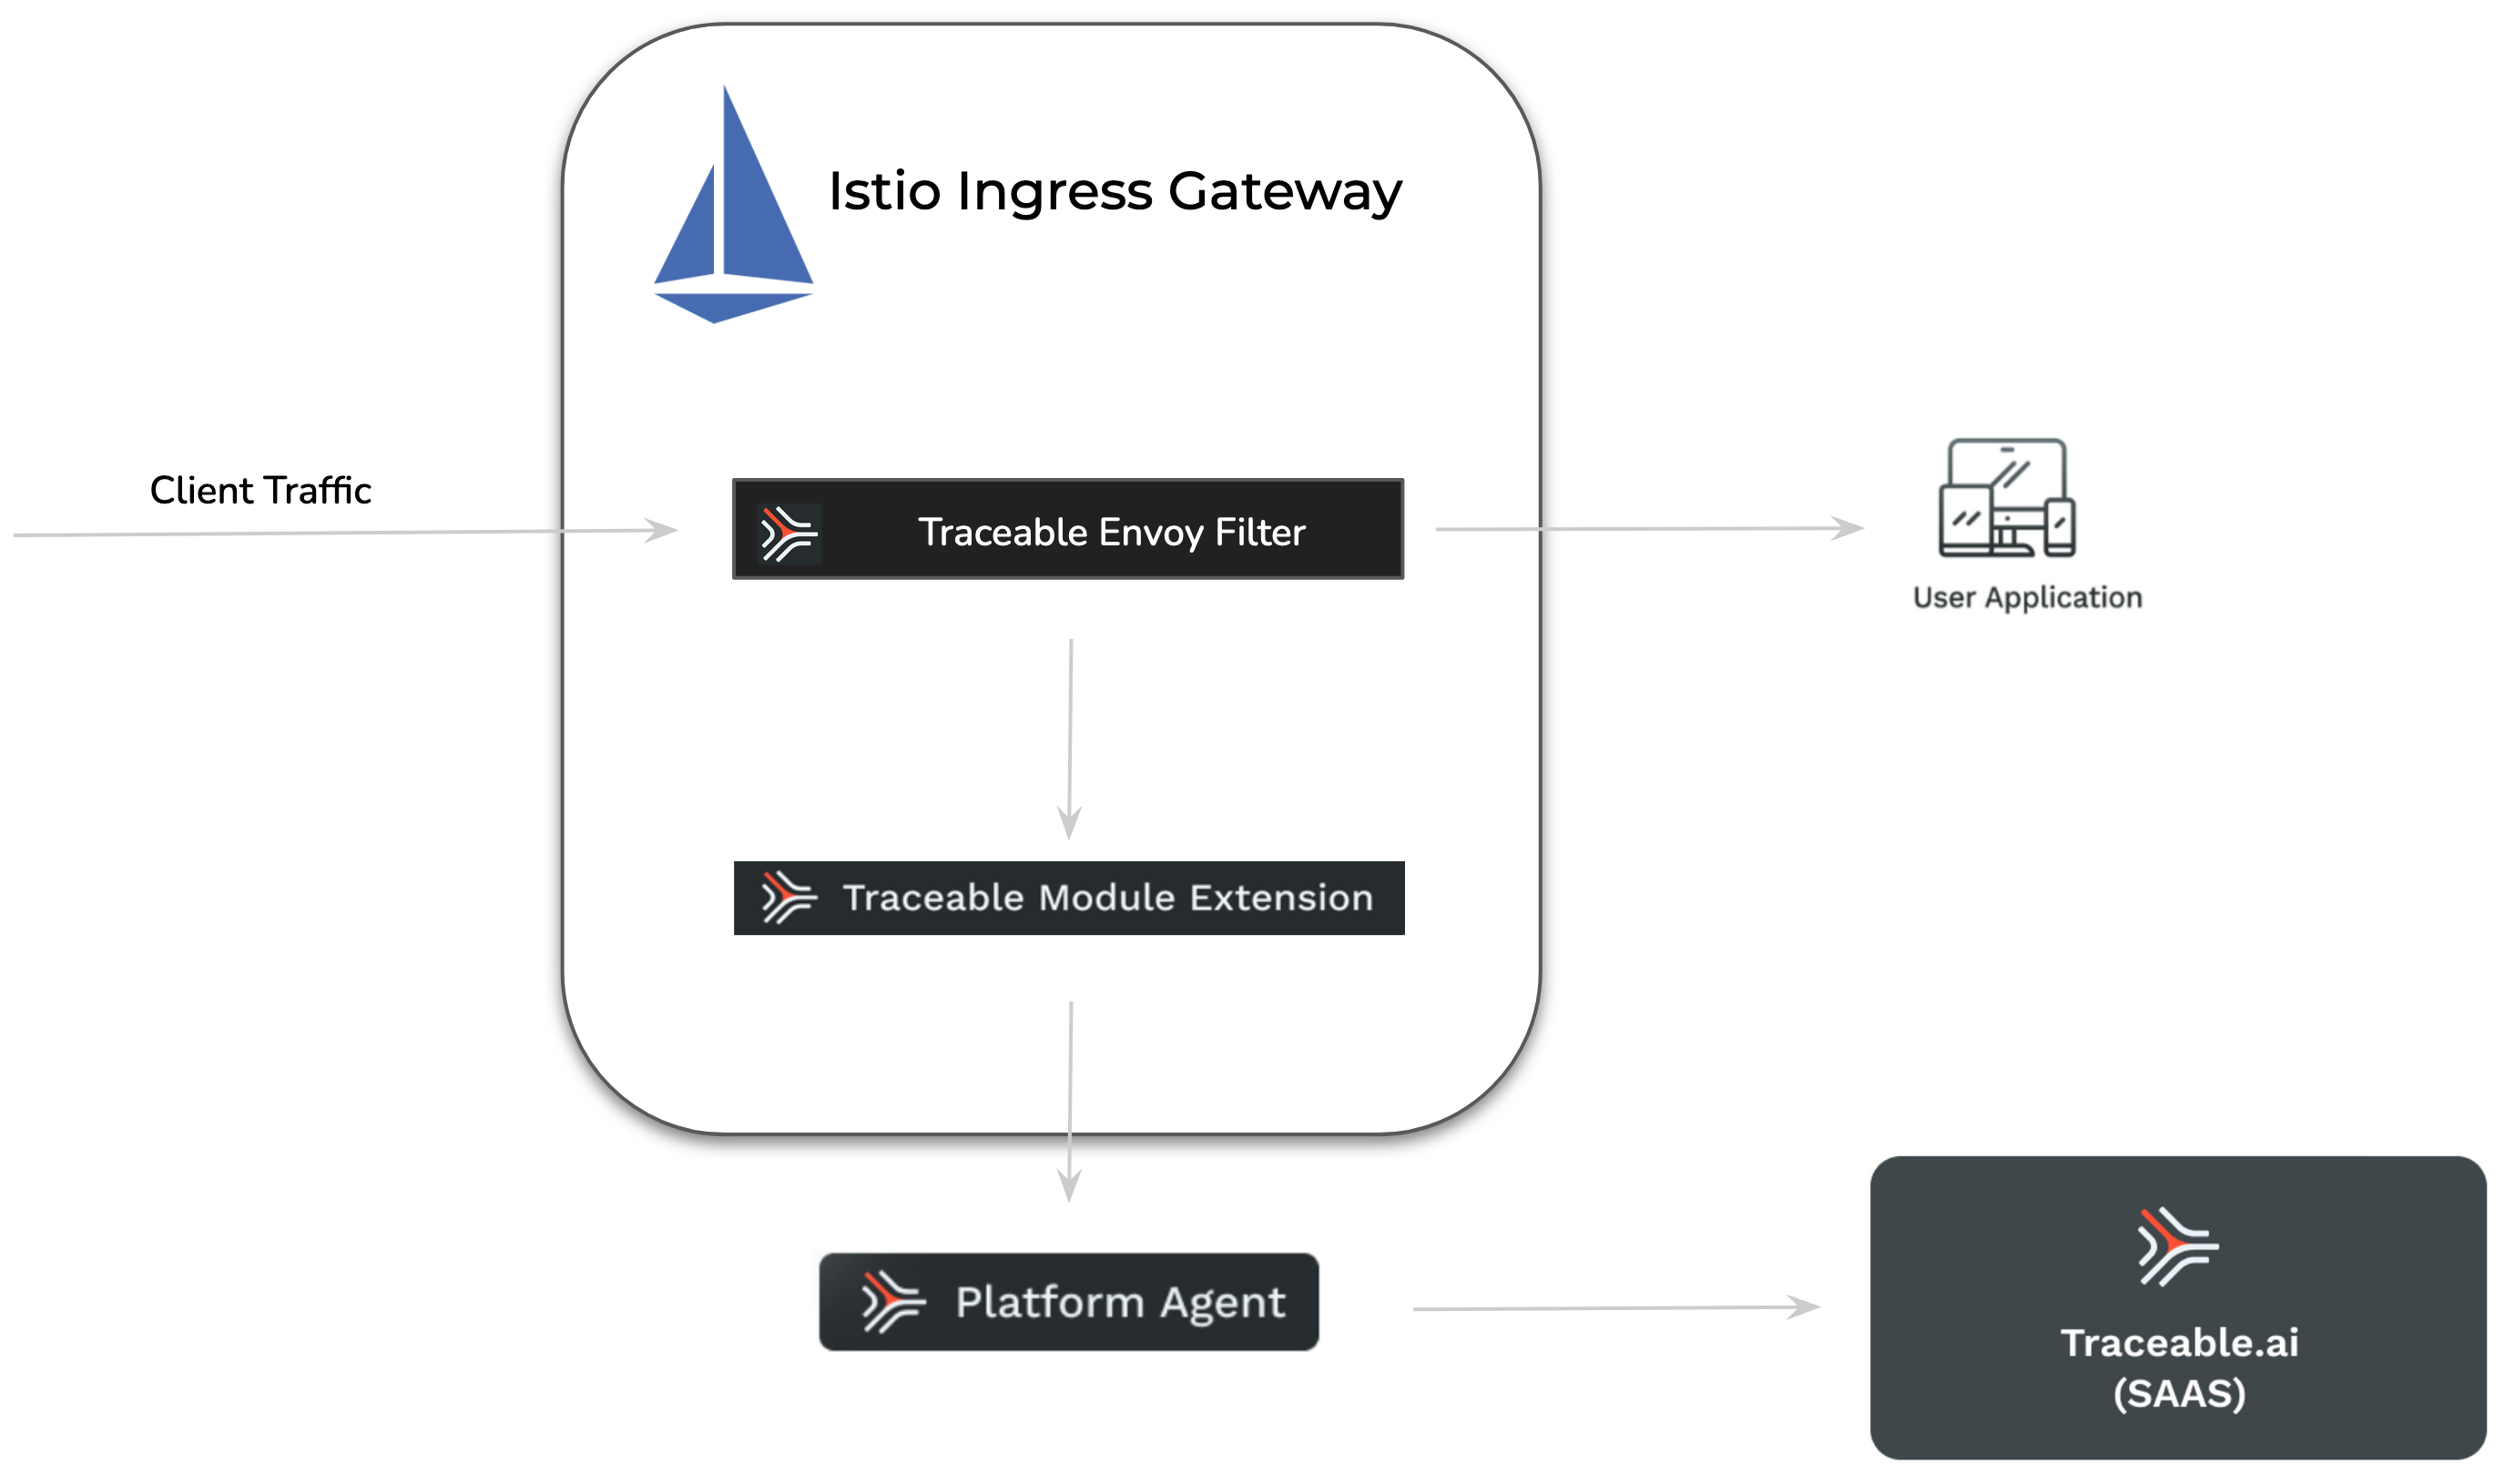
Istio is an open-source service mesh that integrates with existing distributed applications. It also serves as a platform with APIs that enable integration with logging and telemetry systems. Traceable provides an agent that integrates with Istio to monitor your system and detect anomalies and attacks. Traceable can also block attacks on your system based on the configurations that you make on the platform. For more information on blocking, see Policies. The following is a high-level deployment diagram for Traceable's Istio solution. Note that Traceable attaches to only the Istio ingress gateway.
The deployment steps assume that a standard Istio deployment is already available.
Traceable module extension (TME)
A Traceable Module Extension (TME) is a type of sidecar container that a Traceable Platform agent can inject into an application pod. It can be considered a miniature Traceable Platform agent.
.png)
TME has ext_cap as a component. This synchronously receives requests from applications, such as a gateway. The traceable module extension also houses libtraceable, which has the request-blocking logic. TME is used when native instrumentation or a native plugin is unavailable. In such cases, TME captures data inline and sends it to the Traceable Platform agent asynchronously. TME also blocks the requests inline.
Before you begin
Before you begin deploying Traceable's tracing agent, note that the deployment assumes a stock deployment of Istio is already available.
Support matrix
Component | Version |
|---|---|
Istio |
|
Traceable Platform agent |
|
Verify your Istio deployment. It is a good practice to have your Istio's deployment diagram with you for reference. If you are installing for a demo environment, the control and ingress are in the Istio-system namespace; however, the namespace may vary. Verify where the control plane and ingress are installed by entering the following command:
kubectl get svc -n istio-systemFollowing is a sample output of the above command:
$ kubectl get svc -n istio-system
NAME                      TYPE           CLUSTER-IP       EXTERNAL-IP      PORT(S)                                                                      AGE
istio-ingressgateway      LoadBalancer   10.100.200.50    a1b2c3d4e5.us-west.elb.amazonaws.com   80:31380/TCP,443:31390/TCP                             10d
istiod                    ClusterIP      10.100.180.20    <none>           15010/TCP,15012/TCP,443/TCP,15014/TCP                                        10d
Explanation:
istio-ingressgateway: This is the external gateway for traffic entering the cluster. It is usually of
LoadBalancertype in cloud environments.istiod: This is the Istio control plane, typically exposed internally via
ClusterIP.The
NAMESPACEisistio-system, which is the default in many setups, but could vary in customized deployments.
Other notable points
Modify the Istio networking configuration to use Envoy Filter for authorization
Make sure that Traceable's platform agent is already installed. For more information on installing, see Platform agent.
Use the sidecar injector to deploy the Traceable module extension (
tme). For more information on the Traceable module extension, see Annotations and Labels. Thetmereceives data from the Istio module and reports it to traceable-agent.Point the Envoy filter to the
tme.Ensure that port 5442 is available for Traceable module extension (
tme).
Tracing agent at Istio ingress gateway
Configuring the Traceable agent for the Istio ingress gateway consists of the following four steps:
Adding a label to the namespace
Adding an annotation to the spec in your deployment
Enabling Envoy filter
Restart Ingress controller
Step 1 - Add Label
Add traceableai-inject-tme=enabled label to the istio-system namespace.
kubectl label ns istio-system traceableai-inject-tme=enabledStep 2 - Add Annotation
Add "tme.traceable.ai/inject:" "true" annotation to the Istio ingress gateway deployment. Enter the following command:
kubectl patch deployment.apps/istio-ingressgateway -p '{"spec": {"template": {"metadata": {"annotations": {"tme.traceable.ai/inject": "true"}}}}}' -n istio-systemVerification of TME Injection:
After injecting the TME, check the
istio-ingressgatewaypod status. If the TME has been successfully injected, the status should change from1/1to2/2.You can further confirm this by running
kubectl describe pod <istio-ingressgateway-POD_ID>and verifying that the second container listed is indeed the TME.
To get the POD_ID for a specific pod like istio-ingressgateway, you can use the following kubectl command:
kubectl get pods -n <namespace>For example,
kubectl get pods -n istio-systemLook for a pod with a name similar to istio-ingressgateway-<unique_ID>. The <unique_ID> at the end is the POD_ID you are looking for.
Example output:
NAME                                       READY   STATUS    RESTARTS   AGE
istio-ingressgateway-7f6bb877-6qhzz        2/2     Running   0          53s
In this case, the POD_ID is istio-ingressgateway-7f6bb877-6qhzz.
You can now use this POD_ID to run commands like kubectl describe pod istio-ingressgateway-7f6bb877-6qhzz -n istio-system.
Step 3 - Enable Envoy Filter
Add traceableai-istio=enabled label to the Istio ingress gateway deployment.
If everything has default names, the following command will add the above label to the Istio ingress in istio-system namespace:
kubectl patch deployment.apps/istio-ingressgateway -p '{"spec": {"template": {"metadata": {"labels": {"traceableai-istio": "enabled"}}}}}' -n istio-systemStep 4 - Restart the Ingress controller
Restart the Ingress controller for the tme to attach. Enter the following command:
kubectl rollout restart deployment istio-ingressgateway -n istio-systemVerify the deployment
Enter the following command to verify the deployment.
kubectl get pods -n istio-systemExample output
NAME                                  READY   STATUS    RESTARTS   AGE
istio-egressgateway-96cf6b468-87bkf   1/1     Running   0          13m
istio-ingressgateway-7f6bb877-6qhzz   2/2     Running   0          53s
istiod-58c5fdd87b-k9j29               1/1     Running   0          13m
Install Traceable Istio helm chart
Enter the following command to install the Traceable Istio helm chart:
helm install traceableai-istio traceableai/traceableai-istio --namespace istio-systemThe above command creates an Envoy Filter object in the Ingress controller.
Helm values
The following tab lists the Helm values for Traceable’s Istio agents 1.x and 2.x. Use the values as per your deployment.
The following table details the various Helm values.
Value | Default value | Description |
|---|---|---|
| 131072 | Defines the maximum payload size in bytes to capture. |
|
| When set to |
| 5441 | Traceable Module Extension ( |
| 5442 | Traceable Module Extension ( |
| 127.0.0.1 | Traceable Module Extension ( |
|
| Labels to add to pods in the mesh to enable Traceable Istio module. |
|
| Capture response bodies whose content-type header contains one of the configured substrings. |
|
| The service name for spans that are captured by the Traceable Istio module. |
| 50ms | Timeout to connect to Traceable Module Extension ( |
| 0.2s | Timeout to the |
| 50 | Timeout to the envoy response handler in milliseconds. |
|
| Webhook must only be enabled if traceable-agent is running outside the Istio cluster. This Webhook will be used to call into the external traceable-agent to inject the |
| - | External traceable-agent URL. It must be HTTPS. |
| - | A base64 PEM encoded CA bundle that will be used to validate the external traceable-agent’s (which is Webhook's server) certificate. |
| ignore | Defines how to handle webhook failures. |
|
| Use namespace selector match labels to inject the |
|
| Use namespace selector match labels to inject the Java sidecar. |
ExtProc filter configurations
Helm value | Default | Description |
|---|---|---|
|
| Allows Istio to accept client requests even if communication with TME fails or ext_cap returns HTTP 5xx. |
|
| Enables override of the filter processing mode via TME response. |
|
| Timeout for individual messages on the stream in synchronous mode. |
|
| Enables "Send and Go" mode, sending each HTTP request/response part without pausing. |
|
| Controls request body processing mode (Allowed values: |
|
| Controls request header handling (Allowed values: |
|
| Controls request trailer handling (Allowed values: |
|
| Controls response body processing mode (Allowed values: |
|
| Controls response header handling (Allowed values: |
|
| Controls response trailer handling (Allowed values: |
|
| Specifies the |
Module extension configurations
Helm value | Default | Description |
|---|---|---|
|
| Timeout for connecting to the TME. |
|
| gRPC port for the TME sidecar. |
|
| IP address of the TME sidecar (defaults to the same pod as the Istio gateway). |
Webhook configurations
Helm value | Default | Description |
|---|---|---|
|
| Base64 PEM encoded CA bundle for validating webhook server certificates. |
|
| Enables webhook if the Traceable agent runs outside the Istio cluster. |
|
| Defines the webhook failure handling policy. |
|
| External Traceable agent URL (must be HTTPS). |
|
| Uses namespace selector match labels to inject the TME sidecar. |
|
| Namespace selector labels for TME injection. Only namespaces with these labels will have the webhook applied. |
General configurations
Helm value | Default | Description |
|---|---|---|
|
| Timeout for the |
|
| Labels to add to pods in the mesh to enable the Traceable Istio module. |
|
| The service name for the Traceable agent. |
| The default configured TPA environment | The name of the environment in which the Traceable agent is running. |
| - | Agent token for authentication |
|
| Name of the EnvoyFilter resource that will be created. |
| - | Namespace where the EnvoyFilter will be created. If not specified, defaults to the release namespace. |
Body Size Limitation
The maximum body size that will be captured in spans is controlled by the
maxBodySizevariable in the Traceable Platform Agent (TPA) Helm chart or themax_body_sizevariable in the TPA Terraform configuration. This setting is defined in the TPA configuration, not in the Istio agent configuration.If you need to capture larger payloads, you must adjust this setting in your TPA configuration. The default value is typically 131072 bytes (128KB).
Restart Ingress gateway
Restart the ingress gateway so the changes take effect. Enter the following command:
kubectl rollout restart deployment istio-ingressgateway -n istio-systemVerify the deployment
Enter the following command to verify the deployment:
kubectl get envoyfilters.networking.istio.io -n istio-system Example output:
traceableai-istio 104sUpgrade
Follow these steps to upgrade the Traceable components within your Istio deployment. This process includes updating the Traceable Platform Agent (TPA), upgrading the Istio filter, and verifying the deployment to ensure a successful upgrade.
Complete the following steps:
Update the Helm Repository.
helm repo updateUpgrade the Traceable Platform Agent (TPA) to the latest version to maintain compatibility with the latest Istio filter and features.
Upgrade the Traceable Istio Filter
Search for the Latest Filter Version
helm search repo traceableai/traceableai-istioUpgrade the Istio Filter. This command upgrades the Traceable Istio filter in the
istio-systemnamespace to the latest version.helm upgrade traceableai-istio traceableai/traceableai-istio --namespace istio-systemRestart the Istio Ingress Gateway. Restarting the ingress gateway ensures that the updated filter is applied to incoming traffic.
kubectl rollout restart deployment istio-ingressgateway -n istio-system
Verify the deployed chart versions.
Check the Traceable Chart Version in the Traceable Namespace.
helm ls -n traceableai-systemCheck the Traceable Istio Chart Version in the Istio System Namespace.
helm ls -n istio-system | grep traceableai-istio
Verify the TME Image Version in the Istio Ingress Gateway. Describe any
istio-ingressgatewaypod to confirm the TME (Traceable Module Extension) image version:kubectl describe pod <istio-ingressgateway-pod-name> -n istio-systemVerify Versions in the Traceable UI
Check Platform Agent Version: Confirm that the Platform Agent version reflects the latest release.
Check Tracing Agent Version: Ensure the Tracing Agent version matches the latest deployment.
Check TME Version in Span Attributes: Inspect the
traceableai.module.versionattribute in incoming spans to verify that they reflect the latest module version post-upgrade.
(Optional) Custom error message
You can optionally configure a custom error code and message for the blocking function by editing the Traceable Platform agent configuration, as shown below. Configure this inside the injector section.
ext_cap:
  blocking_config:
    response_status_code: 403
    response_message: "Access Forbidden"
injector:
  blocking_config:
    response_status_code: 403
    response_message: "Access Forbidden"
If you are using Helm in values.yaml, then you would need to set:
blockingStatusCode:
blockingMessage:
injector:
  blockingConfig:
    blockingStatusCode:
    blockingMessage:
Make sure that the status code is set between 400 and 499. If you add values outside the 4xx range, then 403 (the default status code) is displayed in the Traceable Platform.