Traffic mirroring can capture a copy of the original data from the source network interface without disrupting your existing infrastructure and adding latency to your requests. For example, this mirrored data can be used for telemetry, attack detection, etc. Traceable provides a GCP setup script that automates data collection by using traffic mirroring. Traceable uses open-source Suricata to capture mirrored traffic for further processing. The topic describes the steps to deploy Traceable’s platform agent and enable traffic mirroring using Google Cloud Platform (GCP) CLI.
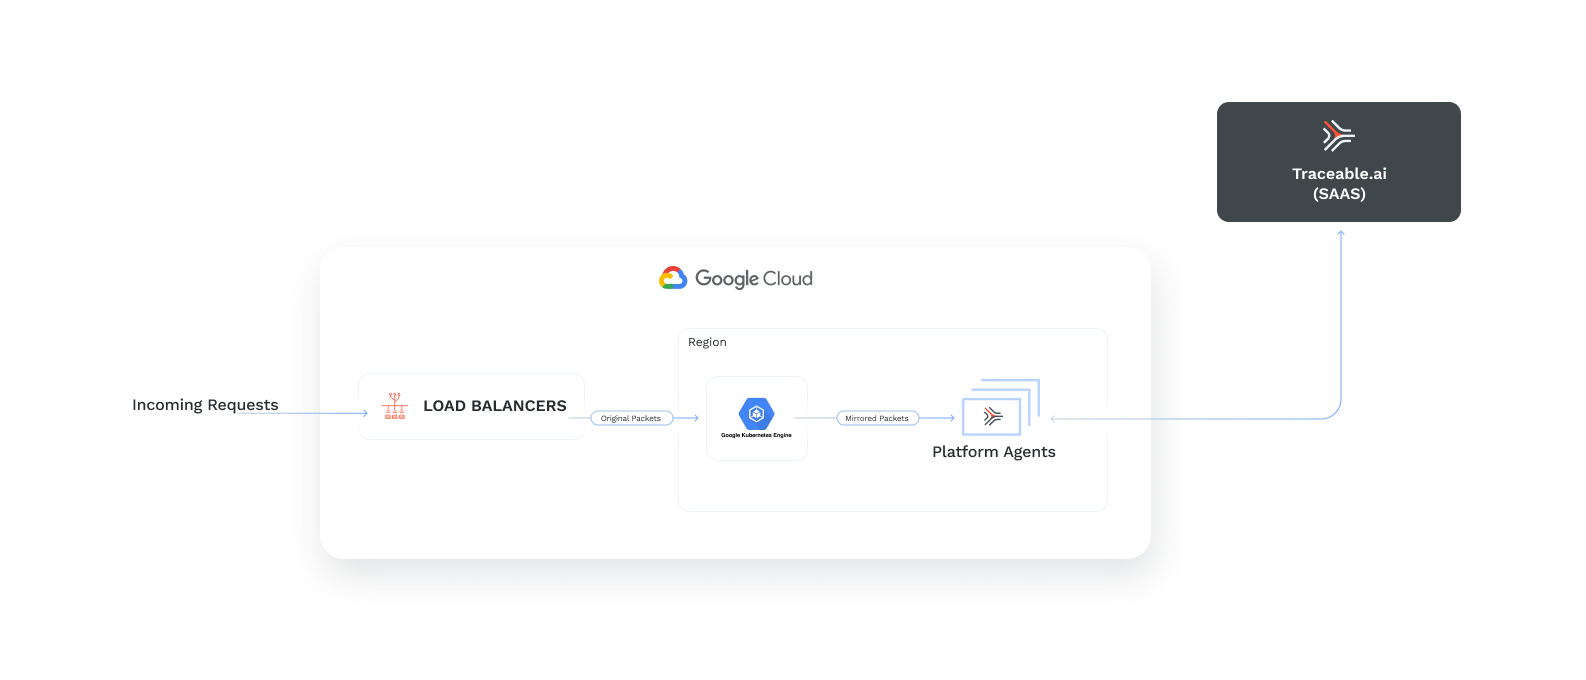
For a specific VPC network and region, Traceable can mirror traffic from some or all the instances. The following is a high-level deployment diagram for a Traceable agent in a GCP project.
Before you begin
Make sure that you have a GCP account. This account should have access to the GCP project containing instances you want to mirror.
Roles: Your GCP account should have the following set of roles or higher in the GCP project where you wish to install the Traceable agent:
roles/compute.adminroles/container.clusterViewerroles/iam.serviceAccountUser
Keep Traceable's access token handy. The token authenticates the agent during installation. To copy the token, log in to your Traceable Platform. In the top-right corner, under your profile, navigate to Settings → Account → Agent Token and click the copy icon.
Download
There are no separate download steps. Traceable uses a setup script that automatically downloads the agent.
Installation
Traceable Platform agent can be installed as follows:
Login to the cloud console
Download the setup script
Run the setup script
Step 1 - Login to the cloud console
Navigate to Google cloud console and log in with your account. Click on the terminal button at the top-right corner to activate Cloud Shell.
Step 2 - Download setup script
Complete the following steps:
Enter the following command to download the setup script:
ActionScript
ActionScript
curl -o setup.sh https://downloads.traceable.ai/install/traffic-mirroring/gcp/latest/setup.shEnter the following command to make the script executable:
ActionScript
ActionScript
chmod +x setup.sh
Step 3 - Run the setup script
The setup script requires a config.yaml file to set up Traceable's traffic mirroring for your project. Complete the following steps:
Enter the following command to print a sample config file:
ActionScript
ActionScript
./setup.sh sample-createFollow the sample to create
config.yamlfile. For example, if you want to mirror a regional GKE clustermy-regional-gke-clusterin regionus-east4in the projectmy-gcp-project, you may use:ActionScript
YAML
resourcePrefix: traceable-gcp-mirroring
token: ***
agentProject: my-gcp-project
region: us-east4
mirror:
  clusters:
    - name: my-regional-gke-cluster
If you wish to mirror subnet
my-subnetin the above example, instead, then use:ActionScript
YAML
resourcePrefix: traceable-gcp-mirroring
token: ***
agentProject: my-gcp-project
region: us-east4
mirror:
  subnets:
    - my-subnet
Traceable's traffic mirroring requires the inclusion of a
resourcePrefixvariable in theconfig.yamlfile. This is a mandatory field that must be defined alongside the existing parameters liketoken,agentProject, andregion. TheresourcePrefixis used to identify resources uniquely associated with the traffic mirroring setup. An example value for this field istraceable-gcp-mirroring.
TheresourcePrefixserves as a unique identifier for resources created during the traffic mirroring setup in GCP. Using a specific prefix, you can easily manage and distinguish resources related to Traceable's traffic mirroring from other resources in your project. This helps in organizing, filtering, and potentially cleaning up resources by prefix, ensuring that only relevant resources are associated with this particular setup.Note:
The traceable Platform agent must be in the same region as the mirrored instances.
Enter the following command to run the script:
ActionScript
ActionScript
./setup.sh create config.yaml
Verification
You can verify a successful installation of Traceable Platform agent for Google Cloud Platform by completing the following steps:
Log into the Traceable platform.
Select traffic-mirroring from the Environment drop-down list.
This would display the mirrored data on the Traceable platform.
Note:
The data may take a few minutes to show up the first time.
You can also see the list of installed traffic-mirroring agents by navigating to Settings → Configuration → Data Collection section and searching for traffic-mirroring agents.
Troubleshooting
Installation - login issue
Enter the following command to check that the correct account is set in [core] property:
ActionScript
gcloud config listEnter the following command to list all the GCP accounts. Make a note of ACCOUNT that you want to configure:
ActionScript
gcloud auth listEnter the following command to set the account:
ActionScript
gcloud config set account <ACCOUNT>Installation - The setup script failed to run
Follow the instructions given in the output when the setup script fails.
Verification - No traces displayed in the Traceable Platform
If you can view agents in the Traceable platform, however, you do not see any traces:
Make sure traffic is coming through your mirrored instances.
In the cloud console, from the top-left, navigate to ≡ > Compute Engine > Instance Groups. Look for the Traceable instance-group. Click on its name to display the page as shown below:
.png)
Choose any instance from the Instance Group Members list and click on the SSH button, as shown. This will open a new terminal for further debugging.
Check traceable and Suricata status
Check status of traceable and suricata agents by running the following commands:
ActionScript
sudo systemctl status traceable
sudo systemctl status suricata
If these appear to be working fine, navigate to /var/traceable/log to view log files. Log files are rotated and are timestamped. View the latest log file. All stats are printed at a 5-minute interval:
ActionScript
{"level":"info","time":"2021-09-03T13:19:13.302Z","message":"Stats",
"service":"ext_cap","total":"412","post":"0","get":"387","put":"25",
"delete":"0","head":"0","other":"0","20x":"412","30x":"0","40x":"0",
"50x":"0","RCother":"0","header_summary_blobs_read":"0",
"body_summary_blobs_read":"0","total_blobs_read":"496","queued_work":
"0","active_routines":"0","queue_capacity":"5000","http1x":"412",
"http2":"0","grpc":"0","errors":"0"}
If you need further assistance, reach out to Traceable support.
Upgrade
In Google Cloud console, navigate to ≡ → Compute Engine → Instance Groups. Look for the Traceable instance group. Click on its name to display the page as shown below:
Click on the Restart/Replace VMs button as shown. This will display a new page as shown below: Click on the Restart button. This restarts all collector instances while upgrading the Traceable agent installed on them.
Pause
If you want to temporarily pause traffic mirroring while keeping all Traceable resources intact, complete the following steps. Pause or Resume are completely reversible.
In the Google Cloud console, navigate to ≡ → VPC network → Packet mirroring. Look for the Traceable mirroring policy. Select the checkbox on left-side and then click on Disable as shown:
For a disabled policy, click the Enable button above to resume mirroring.
Uninstall
To uninstall Traceable resources from your Google Cloud project, complete Installation steps 1 and 2.
Scenario 1
When you successfully run the setup script in step 3 of Installation, you will see an output similar to this:
ActionScript
Creating Traceable resource config file traceable-b8613ac0.yamlIf you have this yaml file, enter the following command to uninstall Traceable platform agent:
ActionScript
./setup.sh delete traceable-b8613ac0.yamlThe command prompts for a confirmation before deleting Traceable resources. Enter yes to confirm.
Scenario 2
If you do not have the above yaml file, you must create it manually. Complete the following steps:
Enter the following command to print the sample delete config file:
ActionScript
ActionScript
./setup.sh sample-deleteThe above command will print a sample delete configuration with three values: project, region, and prefix.
In Google cloud console, navigate to ≡ > VPC network > Packet mirroring or search for Packet mirroring through the search bar. Look for the Traceable mirroring policy. As shown in the image below, extract the project, region, and prefix from there. Create a
config.yamlusing these values. For example, in the case below, you may use:ActionScript
ActionScript
project: traffic-mirroring-sharedvpc region: us-east4 prefix: traceable-b8613ac0.png)
In the above screenshot, the policy name is
traceable-b8613ac0-pktm, so the prefix would betraceable-b8613ac0.Enter the following command to uninstall Traceable platform agent:
ActionScript
ActionScript
./setup.sh delete config.yamlThe command prompts for a confirmation before deleting Traceable resources. Enter
yesto confirm.