Updates (January 2026 to March 2026)
March 2026 — Updated the topic to add information about allowing
traceable.aiin your Content Security Policy (CSP) to prevent JavaScript API calls to Traceable services from being blocked. For more information, see Out-of-Band (OOB).
This topic explains how to instrument Traceable’s JavaScript tag for bot protection using two deployment modes: Edge and Out-of-Band (OOB). Bot Protection uses both API and client telemetry to detect bots and abuse; this topic covers JavaScript instrumentation for client telemetry. For API data collection, refer to the main data collection documentation. After you create a configuration and it is provisioned, the UI presents a copy-ready JavaScript snippet for either mode. For OOB, the UI also provides a URL to Validate Token and an API Token for your backend. Traceable strongly recommends instrumenting Traceable at the edge for maximum protection.
Note
After you create a configuration, Traceable provisions the instrumentation in the background. Provisioning is not immediate. The required values appear after Traceable’s team completes the instrumentation.
What will you learn in this topic?
By the end of this topic, you will be able to understand:
When to choose Edge versus Out-of-Band.
How to create a configuration in JS Tag Management.
How to download and embed the generated JavaScript.
How Out-of-Band involves your backend for token validation.
Before you begin
Before you proceed with configuration, make a note of the following:
Decide which mode you intend to use. Confirm you can add a small JavaScript snippet to the pages you want to protect.
If you plan to use Out-of-Band, plan a lightweight backend endpoint in your application (for example,
POST /traceable/validate-token). You will implement this endpoint after the UI shows the URL to Validate Token and the API Token.
Understand the two deployment types
Edge (inline)
In the Edge instrumentation, Traceable is in the path. It can evaluate traffic and, if needed, challenge inline. Your snippet primarily enables client telemetry.
In Edge mode, Traceable sits in-path at the edge (Cloud WAAP or Edgeworkers). Traffic flows through Traceable, so evaluation and any required challenges occur inline. You still place a small JavaScript snippet on your pages, but you do not build a backend for token validation. Domains come from your Edge onboarding, and you select the Edge Cluster in the configuration.
Out-of-Band (OOB)
In Out-of-Band, Traceable is not in the path. The browser receives a token, your server verifies that token with Traceable, and your application then sets the session.
In OOB mode, the browser runs JavaScript, obtains a token, and sends it to your backend. Your backend then calls Traceable’s Validate Token endpoint, authenticating with the API Token provided by the UI after provisioning. On success, your backend establishes the session, for example, by setting a cookie in your applicationCookie.
Quick comparison
Aspect | Edge (inline) | Out-of-Band |
|---|---|---|
Placement | In-path at the edge | Not in path, server-to-server validation |
Backend | Not required | Required: uses URL to validate Token and API Token |
JavaScript | Generated by UI, embedded on target pages | Generated by UI, includes a |
Domains | From Edge onboarding | Enter your domains |
Choose when | You already front the app with Traceable | You cannot place Traceable inline and still need bot protection |
Navigation
To add a new configuration, navigate to Settings → Deployment → JS Tag Management, then click +Add New Configuration.
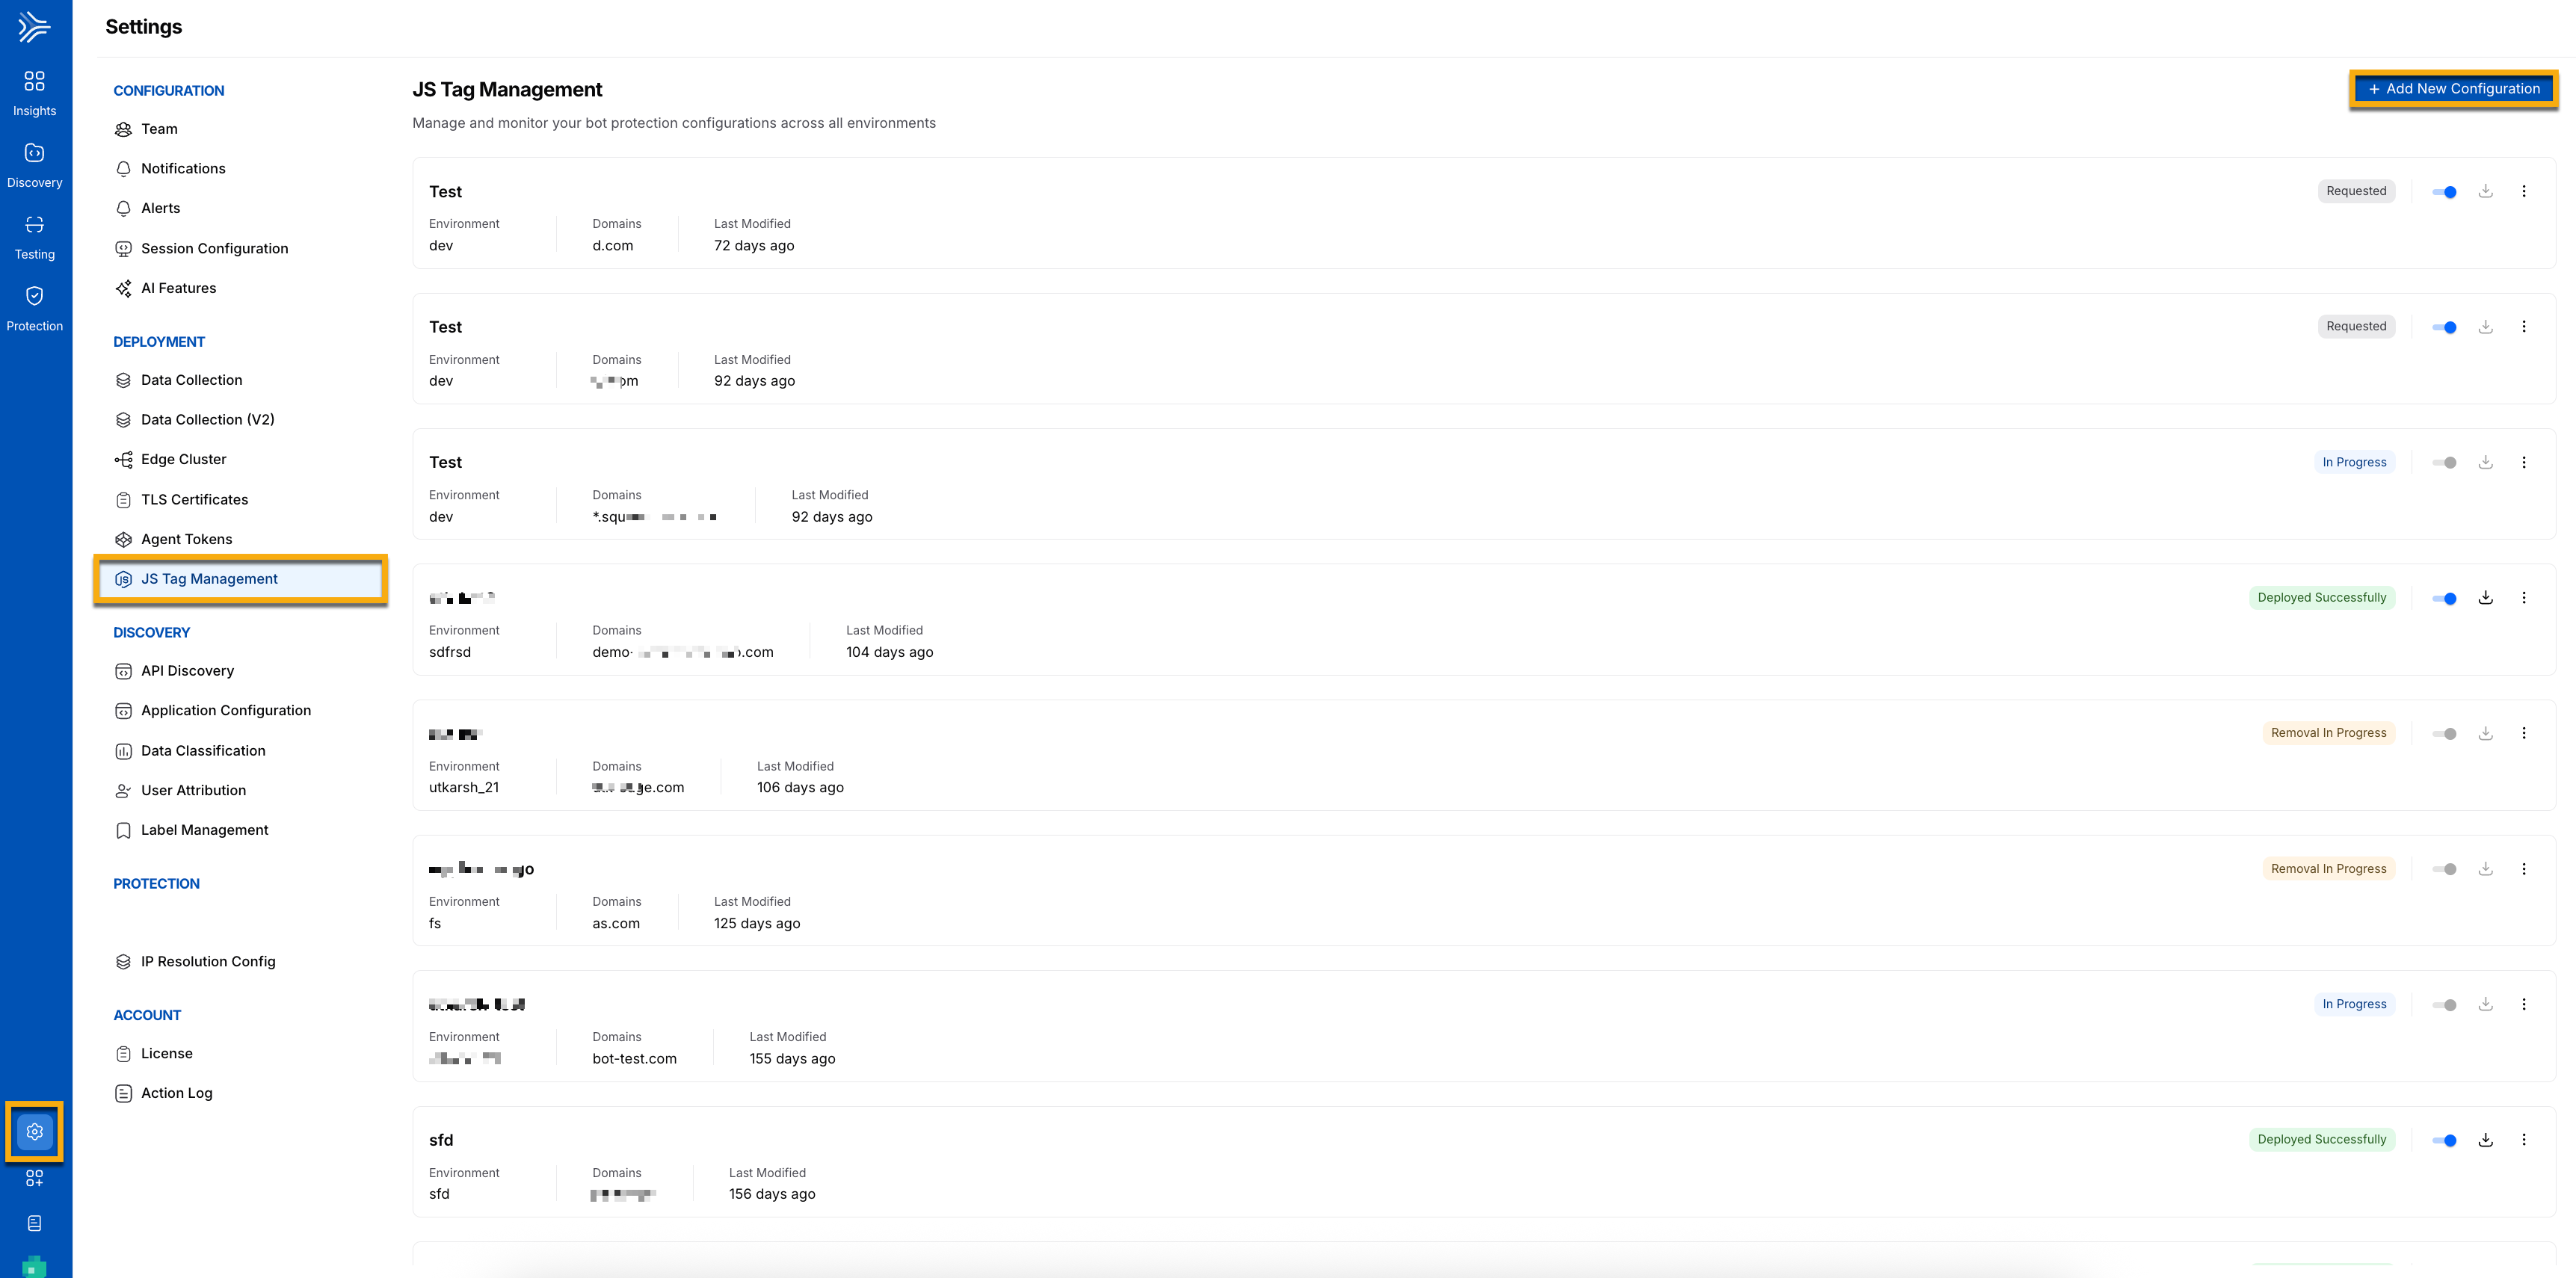
JS Tag Management
Edge deployment
This section explains how to create an Edge configuration, save it, and embed the generated JavaScript.
Configuration overview
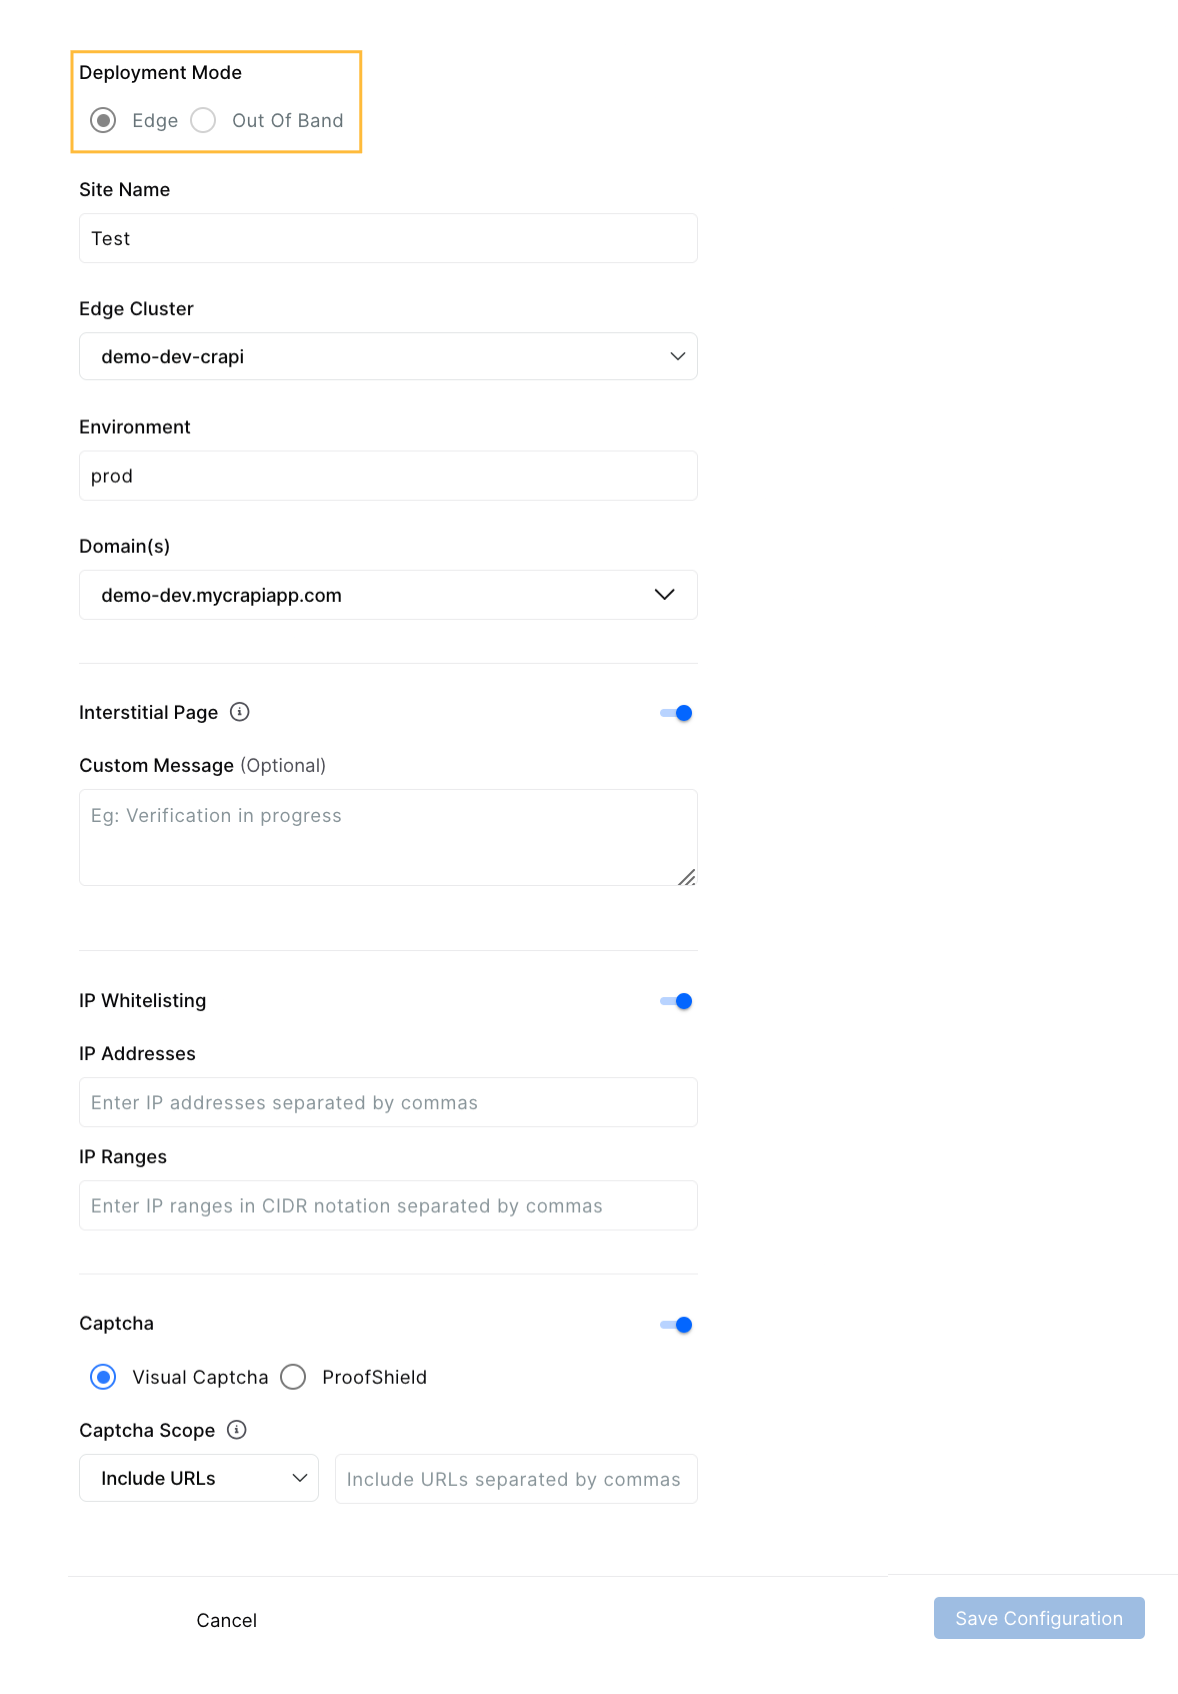
Provide a Site Name for this configuration, select an Edge Cluster, choose an Environment label (free text; a new value is created if it does not exist), and review the Domain(s) shown from your Edge onboarding.
Note
To configure Edge deployment, Edge Cluster, and Domain should already be configured.
(Optional) You may also enable:
Interstitial Page with an optional message. A brief, neutral holding screen appears while Traceable evaluates the request; your page continues afterward.
IP Whitelisting — Traffic from trusted IP addresses or ranges bypasses bot challenges for this configuration. Keep the list focused and reviewed.
Captcha — Visual Captcha or ProofShield. Visual Captcha presents an interactive challenge. ProofShield emphasizes passive checks to reduce end-user friction.
Captcha Scope — Choose Include URLs to protect a narrow set of paths or Exclude URLs to provide broad coverage with a few exceptions.
Steps
Follow these steps to configure Edge and place the JavaScript in your pages.
Select Deployment Mode: Edge and complete the fields described above.
Save the configuration. After provisioning completes, download the JavaScript.
In the dialog, select Captcha Display Type (Modal or User-defined container), then copy the generated JavaScript and embed it on the relevant pages.
The process is complete when the snippet is embedded, and traffic appears in Bot telemetry for the configured environment and domains.
Example (Edge)
<script>
  var traceableCaptchaConfig = { sitekey: "<SITE_KEY>" };
</script>
<script src="/traceable/captcha/v3/<SITE_KEY>/fp.js"></script>
Out-of-Band deployment
This section explains Out-of-Band end-to-end instrumentation, what you configure in the UI, what the UI provides after provisioning, and how your backend integrates.
How Out-of-Band works in two steps
Out-of-band has a simple handoff between your UI configuration and your backend.
Step 1 — Configure in the UI.
Create the OOB configuration and save it. After provisioning, the UI shows three items: the URL to Validate Token, the API Token, and a generated JavaScript snippet.
Where to find your Site Key ID
If you need to copy the site key later, open JS Tag Management, click the (⋯) menu on your configuration, and choose View. The View Configuration panel shows Site Key ID, API Token, and URL to Validate Token together.
Step 2 — Set up your backend API.
Using the URL to Validate Token and API Token, create a lightweight endpoint in your application, for example, POST /traceable/validate-token. The JavaScript snippet sends the browser token to your endpoint. Your endpoint calls Traceable’s validation URL with the API token and, on success, establishes the session.
Note
The JavaScript snippet alone will not complete validation. It becomes fully effective only after your backend endpoint is in place and you call the Validate Token endpoint with the API Token.
Configuration values
Specify the Site Name, for example, Traceable.
Specify the Environment (free text).
Specify the Domain(s).
(Optional) Enable the IP Whitelisting.
Note
Ensure that
traceable.aiis whitelisted in your Content Security Policy (CSP) to prevent JavaScript API calls to Traceable servers from being blocked.Enable the Captcha (Visual Captcha or ProofShield) with your chosen display, and Captcha Scope to include or exclude URL

After you save the configuration and Traceable provisions, you get a Site Key ID (available under ⋯ → View), API Token with Rotate Token, and URL to Validate Token.
Steps
Follow these steps to complete OOB from configuration to backend handoff.
Select Deployment Mode: Out-of-Band, then save the configuration.
When provisioning completes, open Download JavaScript or the configuration view and copy the URL to Validate Token, API Token, and the JavaScript snippet.
Implement the backend endpoint in your application. It should accept the token object from the browser, call the URL to validate the Token with the API Token, and, on success, establish your application session.
Embed the generated JavaScript on your pages. The flow completes end-to-end once your backend is live.
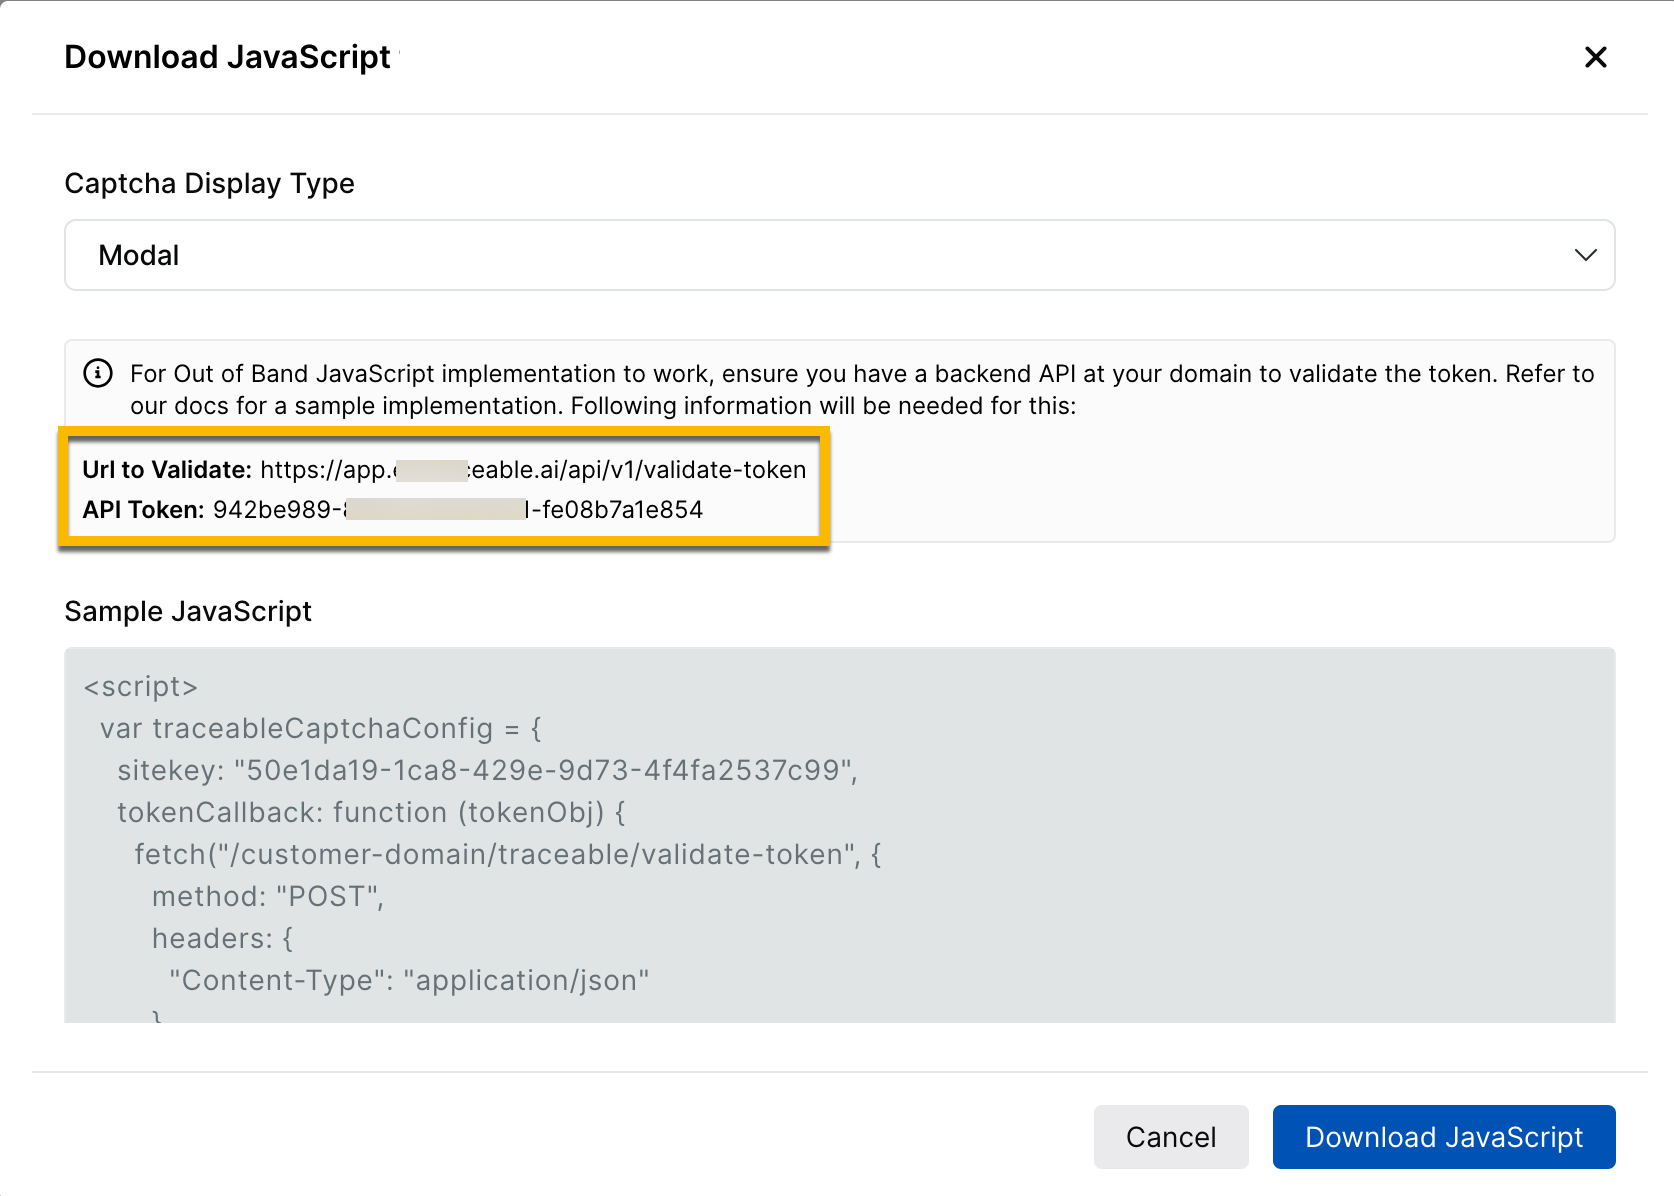
Note
As shown in the screenshot above, use the URL to validate and the API token to set up your API backend.
The process is complete when your backend successfully validates tokens, and the application establishes a session after the Traceable check.
Example (OOB)
<script>
  var traceableCaptchaConfig = {
    sitekey: "<SITE_KEY>",
    tokenCallback: function (tokenObj) {
      fetch("https://<YOUR_APP_DOMAIN>/traceable/validate-token", {
        method: "POST",
        headers: { "Content-Type": "application/json" },
        body: JSON.stringify(tokenObj)
      });
    }
  };
</script>
<script src="https://app.<region>.traceable.ai/traceable/captcha/v3/<SITE_KEY>/fp.js"></script>
Rotating the API token
Use Rotate Token when you need to change credentials. The previous token remains valid for 7 days to allow a safe switchover.
Backend API implementation
This section provides you with a sample of how to implement the backend API using Python or Java.
HTTP Method: POST
Parameters:
Parameter | Description |
|---|---|
secret | Account secret key |
token | Traceable token (sent as input to callback) |
remoteip | User's IP address (recommended, optional) |
sitekey | Account sitekey (optional) |
Response - Token Validation Success:
{
  "valid": true,
  "message": "",
  "timestamp": "ISO 8601 timestamp",
  "error-codes": [],
  "traceableSessionCookieString": "traceable-session=cookie"
}
Response - Token Validation Failure:
{
  "valid": false,
  "message": "",
  "timestamp": "ISO 8601 timestamp",
  "error-codes": []
}
Traceable Session Cookie:
If the token is valid, a traceableSessionCookieString is returned in the API response. This string must be added to the response headers using the Set-Cookie header.
Sample Token Validation API Implementation:
Sample code for Python and Java is provided below:
Java
package com.crapi.service.Impl;
import com.crapi.model.TraceableCaptchaRequest;
import com.crapi.model.TraceableCaptchaResponse;
import com.crapi.service.TraceableCaptchaValidateTokenService;
import com.fasterxml.jackson.databind.ObjectMapper;
import lombok.extern.slf4j.Slf4j;
import org.springframework.beans.factory.annotation.Value;
import org.springframework.http.HttpEntity;
import org.springframework.http.HttpHeaders;
import org.springframework.http.MediaType;
import org.springframework.http.ResponseEntity;
import org.springframework.stereotype.Service;
import org.springframework.web.client.RestTemplate;
/*
 * Sample Implementation of the Customer Validate Token Endpoint
 * Please note that this snippet only provides a required basic API implementation, without any additional supporting code.
 * Get TRACEABLE_SITE_KEY, TRACEABLE_API_SECRET, TRACEABLE_VALIDATE_TOKEN_URL from Traceable
 */
@Slf4j
@Service
public class TraceableCaptchaValidateTokenServiceImpl
    implements TraceableCaptchaValidateTokenService {
  private final RestTemplate restTemplate;
  private final ObjectMapper objectMapper;
  @Value("${traceable.captcha.site-key:TRACEABLE_SITE_KEY}")
  private String siteKey;
  @Value("${traceable.captcha.secret:TRACEABLE_API_SECRET}")
  private String secret;
  @Value("${traceable.captcha.validate-url:TRACEABLE_VALIDATE_TOKEN_URL}")
  private String validateUrl;
  public TraceableCaptchaValidateTokenServiceImpl() {
    this.restTemplate = new RestTemplate();
    this.objectMapper = new ObjectMapper();
  }
  @Override
  public ResponseEntity<?> validateToken(String token, String remoteIp) {
    try {
      // Create headers
      HttpHeaders headers = new HttpHeaders();
      headers.setContentType(MediaType.APPLICATION_JSON);
      // Create request object
      TraceableCaptchaRequest requestData = new TraceableCaptchaRequest();
      requestData.setToken(token);
      requestData.setRemoteip(remoteIp);
      requestData.setSecret(secret);
      requestData.setSiteKey(siteKey);
      // Create request entity
      HttpEntity<TraceableCaptchaRequest> requestEntity = new HttpEntity<>(requestData, headers);
      //Request Traceable API
      ResponseEntity<String> response =
          restTemplate.postForEntity(validateUrl, requestEntity, String.class);
      // Parse the response
      TraceableCaptchaResponse captchaResponse =
          objectMapper.readValue(response.getBody(), TraceableCaptchaResponse.class);
      log.info("Traceable Captcha response: {}", captchaResponse);
      if (!captchaResponse.isValid()) {
        log.error("Traceable Captcha response is not valid: {}", captchaResponse);
        return ResponseEntity.status(response.getStatusCode()).body(captchaResponse);
      }
      // Create response headers
      HttpHeaders responseHeaders = new HttpHeaders();
      responseHeaders.setContentType(MediaType.APPLICATION_JSON);
      // Set cookie if present in the response
      if (captchaResponse.getTraceableSessionCookieString() != null
          && !captchaResponse.getTraceableSessionCookieString().isEmpty()) {
        String cookieString = captchaResponse.getTraceableSessionCookieString();
        if (cookieString.contains("=")) {
          String[] cookieParts = cookieString.split("=", 2);
          String cookieValue = cookieParts[1];
          log.info("Extracted cookie value: {}", cookieValue);
          responseHeaders.add("Set-Cookie", "traceable-session=" + cookieValue);
        }
      }
      // Return the response with headers
      return new ResponseEntity<>(captchaResponse, responseHeaders, response.getStatusCode());
    } catch (Exception e) {
      log.error("Error validating token: {}", e.getMessage(), e);
      TraceableCaptchaResponse errorResponse = new TraceableCaptchaResponse();
      errorResponse.setValid(false);
      errorResponse.setMessage("Internal server error: " + e.getMessage());
      return ResponseEntity.internalServerError().body(errorResponse);
    }
  }
}
Python
import http.server
import json
import urllib.request
import urllib.error
import urllib.parse
# Sample Implementation of Customer's Validate token endpoint
# Please note that this snippet only provides a required basic API implementation, without any additional supporting code.
# Get TRACEABLE_SITE_KEY, TRACEABLE_API_SECRET, TRACEABLE_VALIDATE_TOKEN_URL from Traceable
class SecureHTTPRequestHandler(http.server.SimpleHTTPRequestHandler):
    def __init__(self, *args, **kwargs):
        super().__init__(*args, directory="public", **kwargs)
    def do_POST(self):
        if self.path == "/traceable/validate-token":
            self.handle_validate_token()
    def handle_validate_token(self):
        content_length = int(self.headers.get("Content-Length", 0))
        request_body = self.rfile.read(content_length) if content_length > 0 else b"{}"
        try:
            body_data = json.loads(request_body)
            token = body_data.get("token", "")
            if not token:
                self.send_error(400, "Token is required")
                return
            request_data = {
                "token": token,
                "remoteip": self.client_address[0],
                "secret": TRACEABLE_API_SECRET,
                "site-key": TRACEABLE_SITE_KEY
            }
            data = json.dumps(request_data).encode('utf-8')
            req = urllib.request.Request(TRACEABLE_VALIDATE_TOKEN_URL, data=data, method="POST")
            req.add_header("Content-Type", "application/json")
            with urllib.request.urlopen(req) as response:
                response_bytes = response.read()
                response_text = response_bytes.decode("utf-8")
                response_data = json.loads(response_text)
                self.send_response(200)
                self.send_header("Content-Type", "application/json")
                if "traceableSessionCookieString" in response_data:
                    cookie_string = response_data["traceableSessionCookieString"]
                    cookie_string = cookie_string.encode('utf-8').decode('unicode_escape')
                    self.send_header("Set-Cookie", cookie_string)
                self.end_headers()
                self.wfile.write(response_bytes)
        except JSON.JSONDecodeError:
            self.send_error(400, "Invalid JSON")
        except urllib.error.HTTPError as e:
            self.send_error(e.code, f"Validation error: {e.reason}")
        except Exception as e:
            self.send_error(500, f"Internal server error: {str(e)}")
Download and embed the JavaScript
Both modes end at the same place: a Download JavaScript dialog with a copy-ready snippet. For Edge, the snippet works once provisioning completes. For Out-of-Band, the snippet works end-to-end once your backend endpoint is in place, by calling the Validate Token URL with the API Token.
If you only need the Site Key ID and not the snippet, open (⋯) → View on the configuration to copy it from the View Configuration panel.
Note
In the JavaScript download window, the CaptchDisplay type drop-down provides two options:
Modal presents a centered overlay.
User-defined container renders inside an element you specify in your page layout.