APIM is Azure's API management platform. Azure APIM supports private, public, and hybrid integrations. Azure APIM supports the following four tiers:
Developer
Basic
Standard
Premium
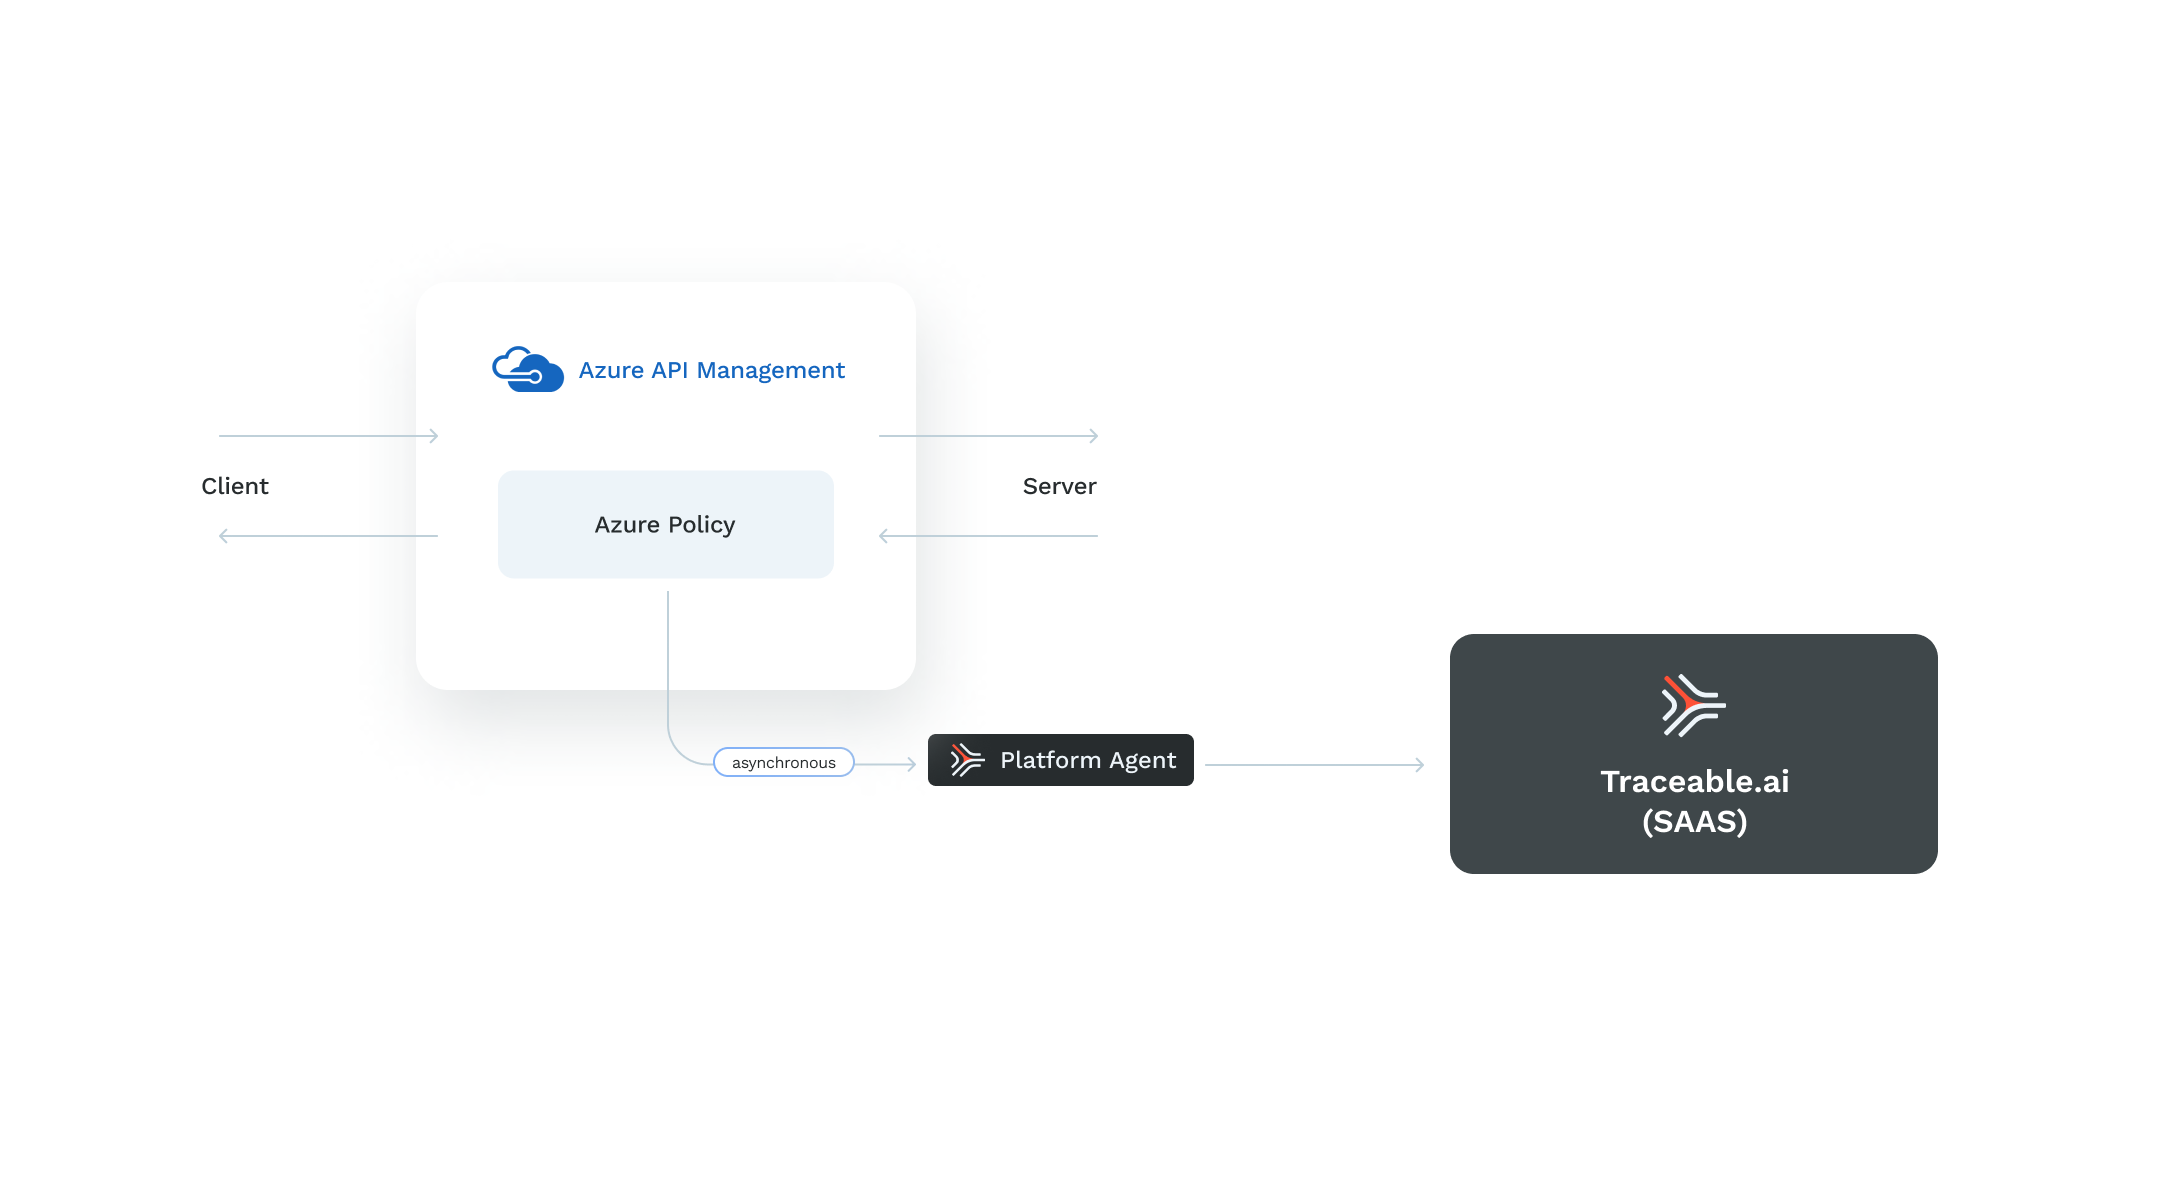
The Azure APIM policy is written in XML and C#. The policy provides hooks to capture and perform transformations on the request and responses. A policy consists of an inbound and an outbound section. Traceable's policy is added in both inbound and outbound sections to capture requests and responses. The policy captures the data, creates a JSON payload, and sends it to the ext_cap request and response endpoint. The Traceable policy waits for a response from ext_cap before it forwards the request to the backend.
Traceable supports both synchronous and asynchronous request and response capture depending on the Traceable policy you download from Traceable's download site. When you use the synchronous policy, the request blocking is immediate; however, the request is not blocked with the asynchronous policy.
The following diagram shows a high-level deployment of Traceable in Azure APIM setup:

Before you begin
Make sure that Azure APIM is deployed in either a Developer or Premium tier with a vNet configuration.
Decide whether you want to deploy Traceable's sync or asynchronous policy.
Deployment
The deployment of the Traceable policy consists of the following steps:
Launch Traceable agent VM using ARM templates.
Create a named variable in the APIM portal that has a newly created VM’s private IP.
Apply the Traceable policy. You can apply the policy at the global level for all the APIs, at the individual level, or for a specific operation for an API.
Step 1 – Launch and configure Traceable agent using ARM template
Click on the launch link to start the configuration process. ARM template portal is displayed.
.png)
Click on the Next: Review + create> button after you have configured the values in the template.

The following table describes the options.
Option | Description |
|---|---|
Resource Group | Select Resource group from the dropdown list. Do not create new ones. Use Azure APIM resource group. |
Region | Gets selected automatically |
Traceable Remote Endpoint | Traceable API used by the Traceable Platform agent to connect to Traceable SaaS. |
Traceable Environment | Environment name for Traceable platform agent. |
Traceable Service | Service name for ext_cap |
Traceable Refresh Token | Add the token from the Traceable platform. Copy the token from Agent Token. |
Admin Username | username for VM. The default value is |
SSH key | ssh key to be used for accessing VM. Add your public key (contents of |
Vm Size | VM instance type for Traceable agent. |
NetworkResourceGroup | The resource group name that has the VNet to be used for the VM. You can skip this field if you wish to create the VM in the same resource group. |
Vnet Name | The VNet in which you wish to deploy the VM. For more information, see Azure APIM and Traceable Platform agent connection. |
Subnet Name | Name of the subnet (Subnet in the above Vnet). |
Tracing Format | Possible values are |
Enable Blocking | Possible values are Note Enabling blocking is only applicable to synchronous policy, that is when you use the policy.xml file. Furthermore, see Step 3. |
Assign Public IP | Assign public IP to Traceable agent VM. The default value is |
APIM Gateway Public IP | The public IP address of the Azure APIM instance. You can skip this field if the private IP address of the VM is accessible to the APIM instance. For more information, see Azure APIM and Traceable Platform agent connection. |
TLS Key Base64Encoded | Private RSA key to be used by Traceable agent’s TLS server. Note that the key should be in OpenSSH PEM format. |
TLS Cert Base64Encoded | Certificate to be used by Traceable agent’s TLS server. Note that the key should be in OpenSSH PEM format. |
Root Cert Base64Encoded | Root/CA cert. Make sure that the certificate file is a single file listing the root CA and all the intermediate CAs. |
Note the following:
If you use self-signed certificates for TLS, add root CA and intermediate certificates to Azure APIM's certificate trust store. Complete the steps as shown in the screenshots below.
.png)
Click on Add and choose Intermediate from the drop-down list, as shown below.
.png)
Step 2 – Create a named variable in the APIM portal
Complete the following steps to create a named variable in the APIM portal:
Open your APIM in the Azure portal.
Create a named variable
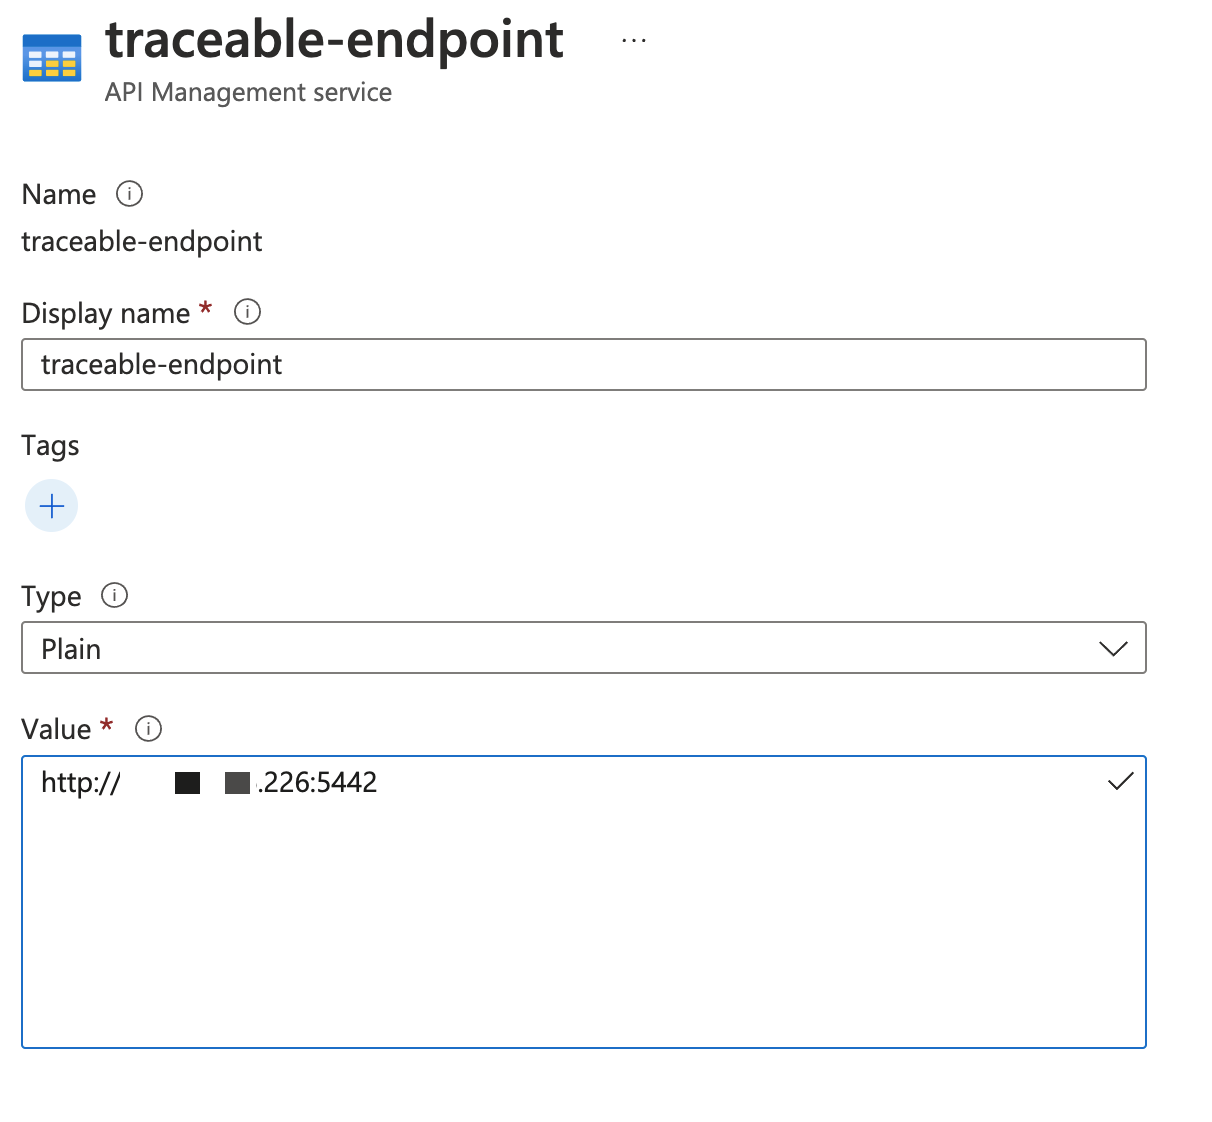
traceable-endpointwith value as the URL of the Traceable agent's endpoint.For non-TLS connections, use the value:
http://<ip>:5442For TLS connections, use the value:
https://<ip>:5443Note
The name and display name should be traceable-endpoint.

Step 3 – Add the Traceable policy
Download Traceable's Azure policy from the download site. Navigate to install → azure-apim → latest → policy.xml or policy_async.xml. You can add the policy at multiple levels:
For all the APIs at the global level
For all the operations of an API
For a specific operation of an API
Note
Blocking of a request is only applicable to a synchronous policy, that is when you use the policy.xml file.
The step to apply the Traceable policy is a copy-and-paste operation into your existing setup. Complete the following steps:
Open the downloaded policy in any editor.
Add or edit the existing policy in APIM.
Copy the content of the policy between
<inbound>and</inbound>and paste it into theinboundsection of the existing policy.Copy the content of the policy between
<outbound>and</outbound>and paste it into theoutboundsection of the existing policy..png)
Apply the policy.
Note
While copying and pasting the policy for all the APIs, if an error in the element “base” appears, then remove the <base /> element.
You can add Traceable's policy to different scopes. For more information, see Configure policies at different scopes in Microsoft's documentation.
Azure APIM and Traceable Platform agent connection
Following are a few scenarios for connection between Azure APIM and Traceable Platform agent based on VNet, private IP address or public IP address, etc.
Case 1 - Same VNet
If both the Traceable Platform agent VM and Azure APIM instance are using the same VNet, the private IP address of the VM can be used by the policy to connect to the Platform agent.
Case 2 - Different VNets
If the Traceable Platform agent and Azure APIM are on different VNets, you have the following two options:
Option 1 (private IP address) - You can configure VNet peering if you wish to use the private IP address of the Traceable Platform agent in the policy. For more information on VNet peering in Azure APIM, see Connect virtual networks with virtual network peering using the Azure portal.
Option 2 (public IP address) - You can assign a public IP to the Traceable Platform agent VM that can be used by the policy. If you decide to use this option, set
Assign Pubic IPfield totruein the template.
Case 3 - Azure APIM not in a VNet
If your Azure APIM is not deployed in a VNet, then the communication between the Traceable Platform agent and Azure APIM can happen only through a public IP address. In this case, set Assign Pubic IP field to true in the template.
Upgrade
Replace the current policy by downloading and copy-pasting the new policy (as described in Step 3 above) from Traceable's download site.
Uninstall
To uninstall Traceable agent:
Manually delete all the resources that were created by the template.
Remove the Traceable section that was added to the policy.