Apigee - Cloud deployment
- 22 Apr 2024
- 5 Minutes to read
- Print
- DarkLight
- PDF
Apigee - Cloud deployment
- Updated on 22 Apr 2024
- 5 Minutes to read
- Print
- DarkLight
- PDF
This article version is deprecated
Article summary
Did you find this summary helpful?
Thank you for your feedback
Apigee is a platform for developing and managing APIs. By fronting services with a proxy layer, Apigee provides an abstraction for your backend service APIs and provides security, rate limiting, quotas, analytics, and more. Traceable provides a JavaScript (JS) policy to capture requests and responses passing through your Apigee deployment to detect any anomalous behavior or attacks. The following deployment diagram shows a high-level architecture of traffic flow through Apigee and Traceable agent. Traceable's policy captures the incoming request and makes an asynchronous call to Traceable's platform.
.png)
Note
The Traceable policy does not support blocking.
Before you begin
Make a note of the following points before you begin with the deployment:
The document expects a basic working knowledge of the Apigee environment.
Traceable supports Apigee-x, hybrid, and Apigee Edge cloud.
Make sure that Traceable platform agent is already deployed on a VM that is accessible from the Apigee environment. For more information, see Virtual Machine.
Note the IP address of the Traceable platform agent. This will be used in Traceable policy configuration.
Make sure that port numbers 5442 (HTTP) and 5443 (HTTPS) are available for receiving data on Traceable platform agent.
Download
Download the Traceable policy for Apigee from Traceable's download site. Navigate to agent → apigee → latest to download the traceable-shareflow.zip file. Save the file. This file would be used in the Configuration section.
Configuration
The configuration of Traceable policy for Apigee consists of the following two steps:
Adding Traceable agent for Apigee as sharedflow
Attaching Traceable agent to:
All API proxies using FlowHooks, or
To a specific API proxy only
Step 1 - Add Traceable agent for Apigee as Shared Flow
Complete the following steps to add Traceable's Shared Flow:
Login to your Apigee account.
Click on the Develop tab and navigate to SharedFlows.
.png)
Add a new SharedFlow. Click on Upload Bundle. Navigate to the location where you have downloaded Traceable's Apigee policy.
.png)
Upload the Traceable SharedFlow zip. You may wish to change the name of the file and import it.
Click on the imported SharedFlow and navigate to the Develop tab.
.png)
Click on the TraceableJS policy and update the configuration values. The variable
ta_reporting_endpointis by default not configured. The value should behttp//:traceable_platform_agent_host:5442for HTTP orhttps://traceable_platform_agent_host:5443for HTTPS..png)
Click on Save.
Deploy the SharedFlow - Click on the Deploy button and select the environment to which you wish to deploy the agent. This deploys the agent as a SharedFlow to that environment.
.png)
.png)
.png)
.png)
.png)
.png)
Traceable agent configurations
The following table lists the various Traceable agent configurations.
Configuration | Description |
|---|---|
| This is a mandatory configuration. Provide the IP address of the Traceable platform agent in |
| Set it to |
| Set it to |
| Set it to |
| Set it to |
| Defines the type of data that is captured. List without spaces: |
| Defines whether to capture outgoing calls to target backend from Apigee. The default value is |
| The name of the service. This is the name that will be displayed on the Traceable Platform. The default name is |
Step 2 - Attach the traceable agent
You can attach the Traceable agent to all the API proxies or a specific API proxy. Follow the steps in one of the following sections. Make a note of the following while attaching Traceable's Flow Callout policy. If you are attaching the policy directly to an API proxy, then make Traceable's Flow Callout policy as follows:
Traceable policy should be the first one in Proxy → Request → Preflow
Traceable policy should be the last one in Target → Request → Preflow
Traceable policy should be the first one in Target → Response → Postflow
Traceable policy should be the last one in Proxy → Response → Postflow
Option 1 - Attach Traceable agent to all API proxies using Flow Hooks
Complete the following steps to attach Traceable agent to all the API proxies:
Navigate to Admin Environment > Flow Hooks.
Edit the Flow Hooks and attach the
traceable-agentsharedflow to Pre-proxy, Pre-target, Post-target, and Post-proxy Flow Hooks. This will attach Traceable agent with all API Proxies..png)
.png)
You can now make requests to your API proxy. Traceable will capture these requests for analysis.
Option 2 - Attach Traceable agent to a specific API proxy
Complete the following steps to attach the Traceable agent to a specific API proxy:
Navigate to API Proxy to which you wish to attach traceable-apigee agent and click on the Develop tab.
.png)
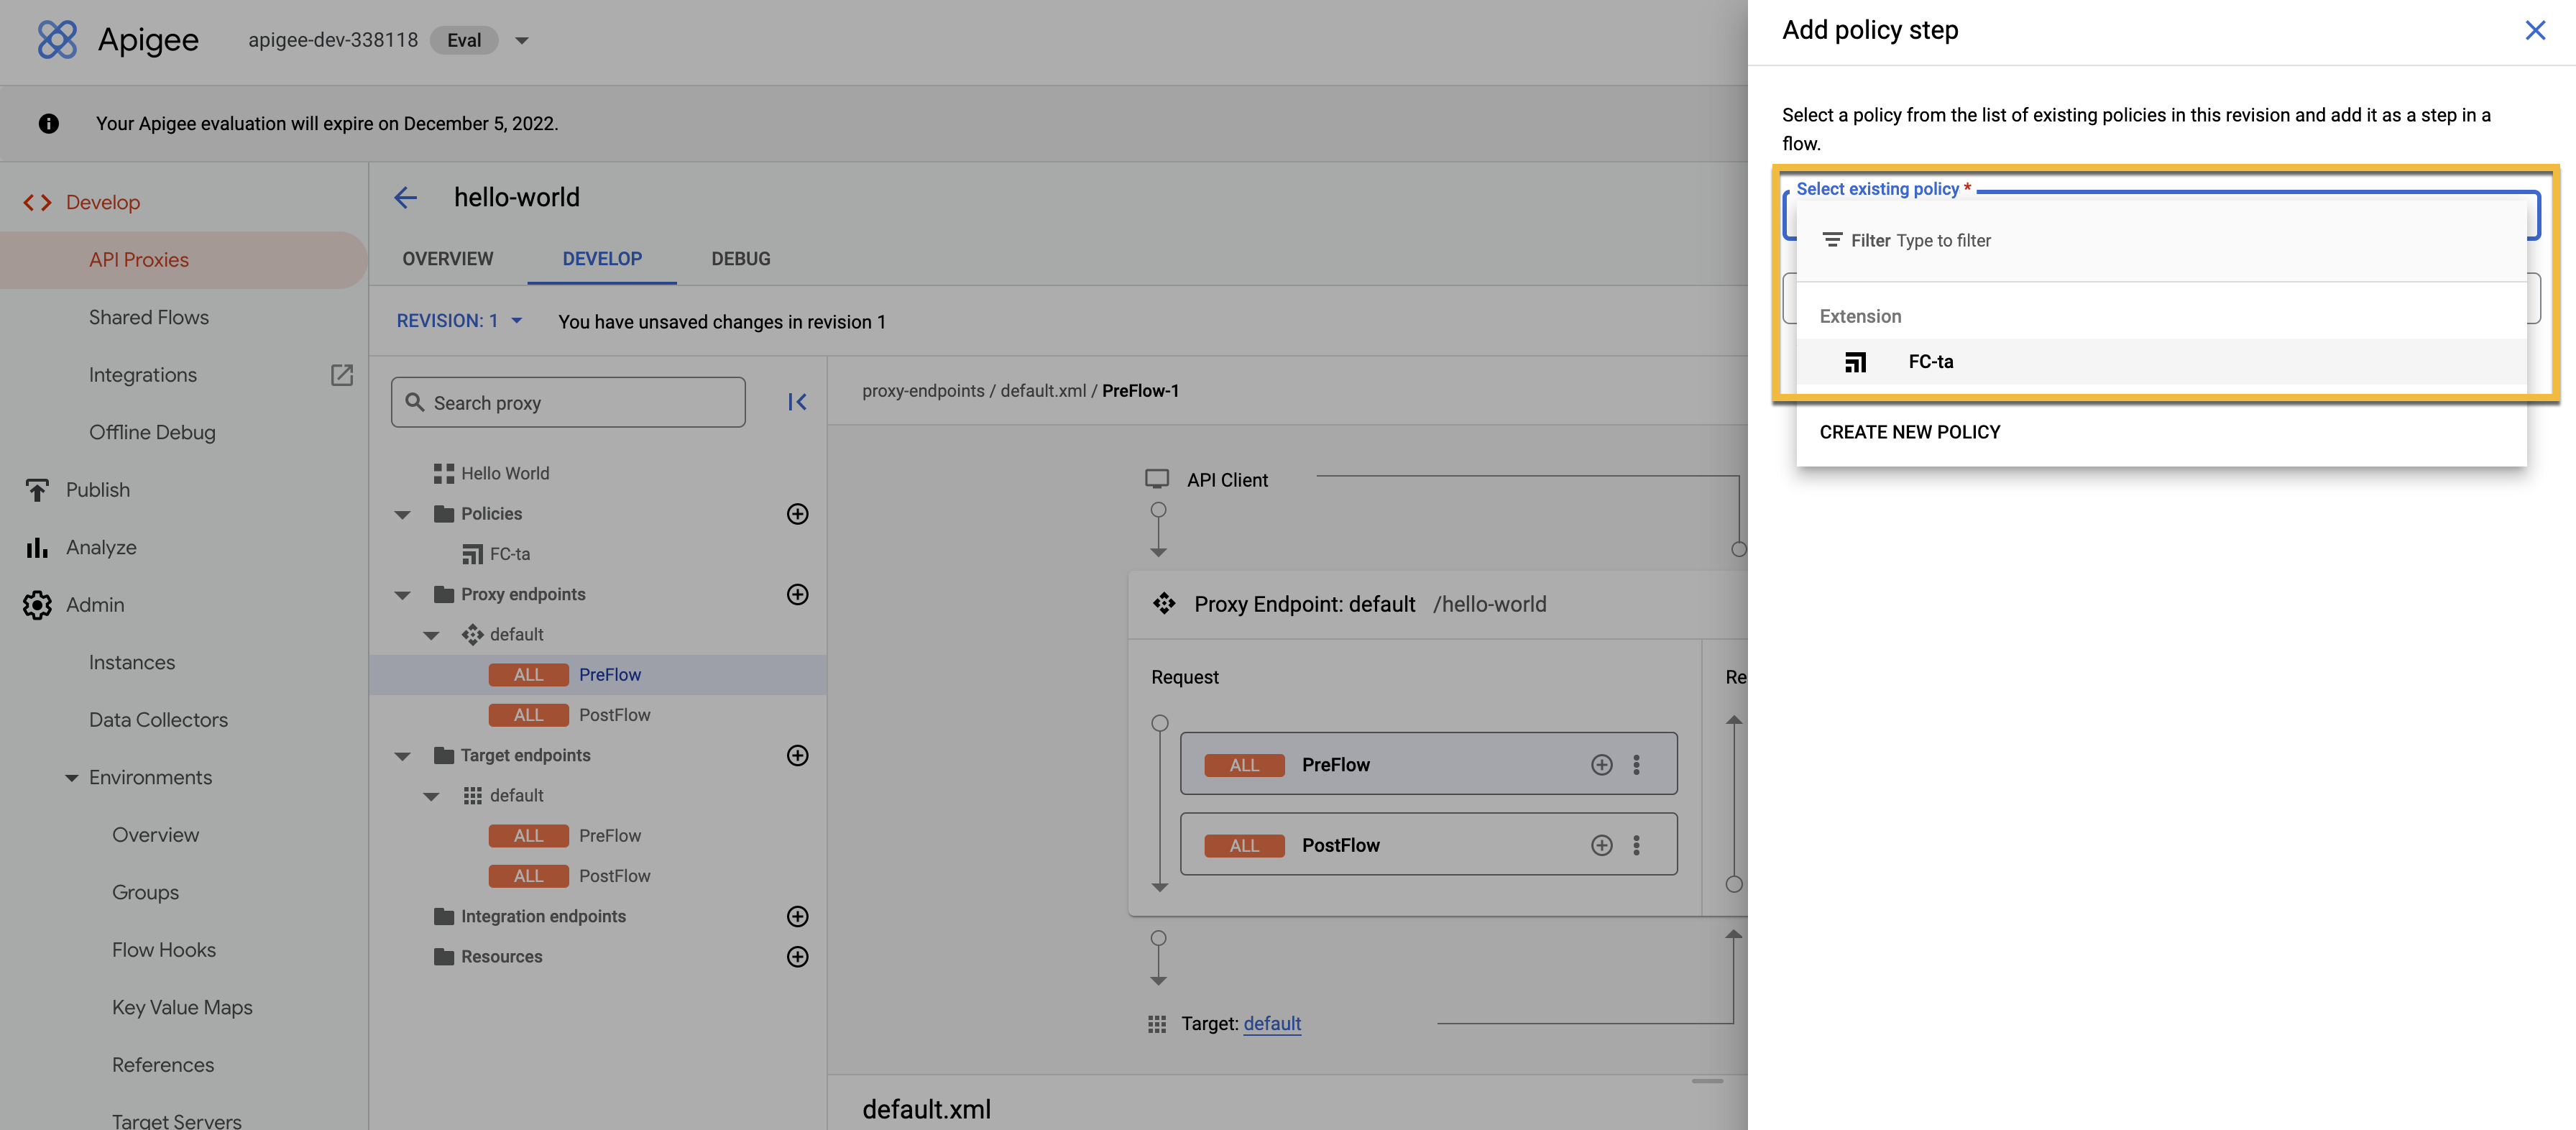
Click on Add a policy, the + sign beside Policies.
.png)
Select Policy Type Flow Callout (refer to the above screenshot), update the names, and select traceable-shared-flow from the list of sharedflows.
In the Proxy Endpoints, click on PreFlow for the endpoint to which you want to attach the agent.
Click +Step for PreFlow on the request side in the flow diagram.
.png)
In the Add Step dialogue box, click on the Existing Policy instance.
Select the Flow Callout Policy we added earlier and click on Add.
Click on Postflow for the proxy endpoint.
In the flow diagram, click on +Step for Preflow on the response side.
.png)
In the Add Step dialogue box, click on Existing Policy instance.
Select the Flow Callout Policy we added earlier and click on Add.
Repeat the above steps for Target endpoints with keeping the following in the mind to attach the policy.
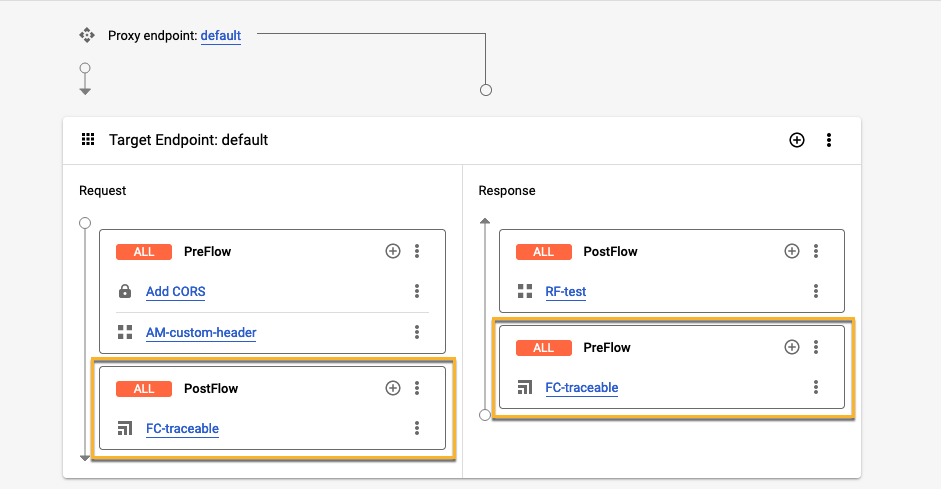
Traceable policy should be the last one in Target → Request → Postflow
Traceable policy should be the first one in Target → Response → Preflow
Note
This applies if you are using Traceable Platform agent 1.32.1 or later and Apigee agent 1.27.0 or later.
Add a Fault Rule in both the Proxy Endpoints and Target Endpoints in XML as follows. Update the name of flow callout policy.
ActionScript
<FaultRules>
    <FaultRule name="traceable fault rule">
        <Step>
            <Name>NAME_OF_TRACEABLE_FLOW_CALLOUT_POLICY_ADDED_ABOVE</Name>
        </Step>
    </FaultRule>
</FaultRules>
Click on Save the configuration.
.png)
.png)
.png)

.png)

You can now make requests to your API proxy. Traceable will capture these requests for analysis.
Uninstall
If you have attached a Traceable agent as a flow hook, then remove the agent from flow hook. Or, remove from the APIs if you have attached to specific APIs. Navigate to traceable sharedflow and click on Status. Click on Status > Undeploy. 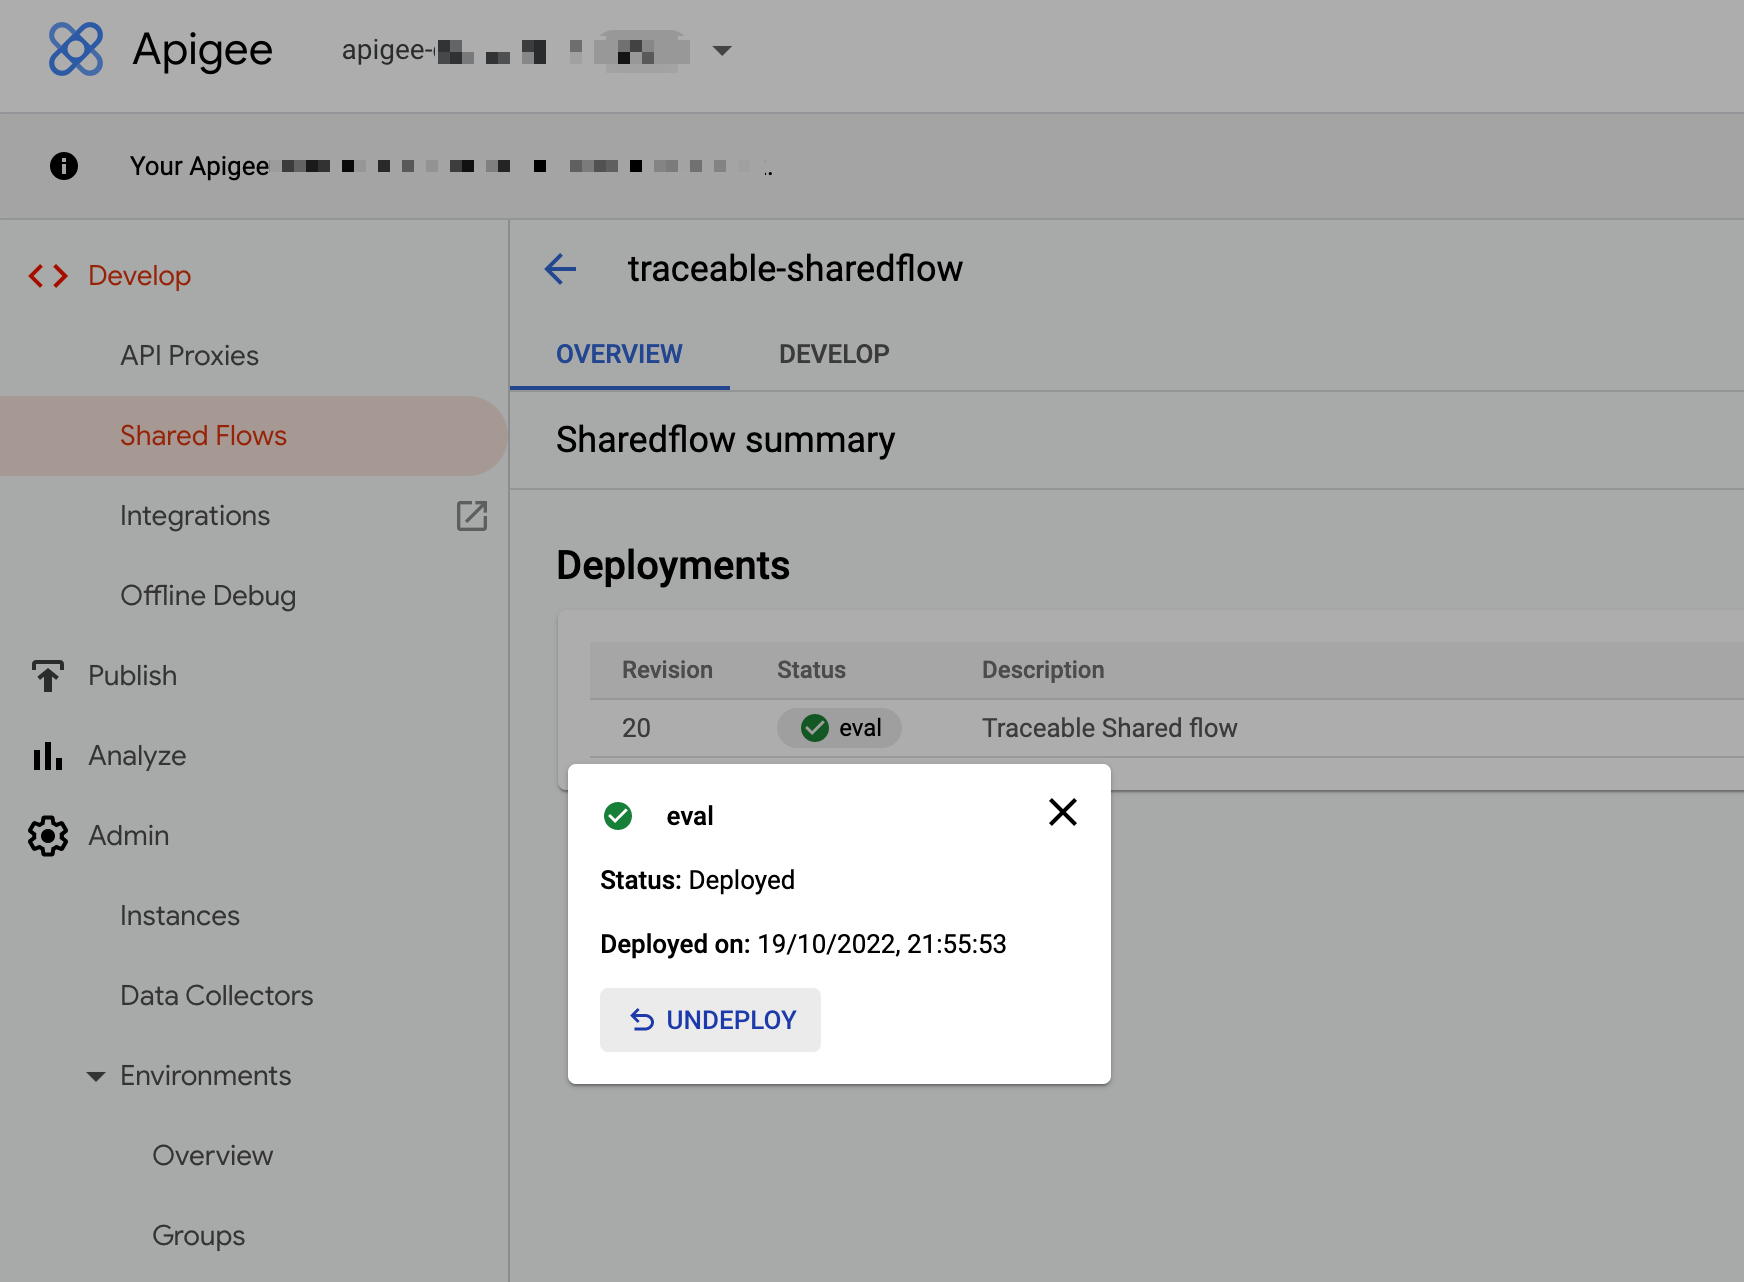
To delete completely, navigate back to SharedFlows Tab. In the list, delete traceable-sharedflow.
Troubleshooting
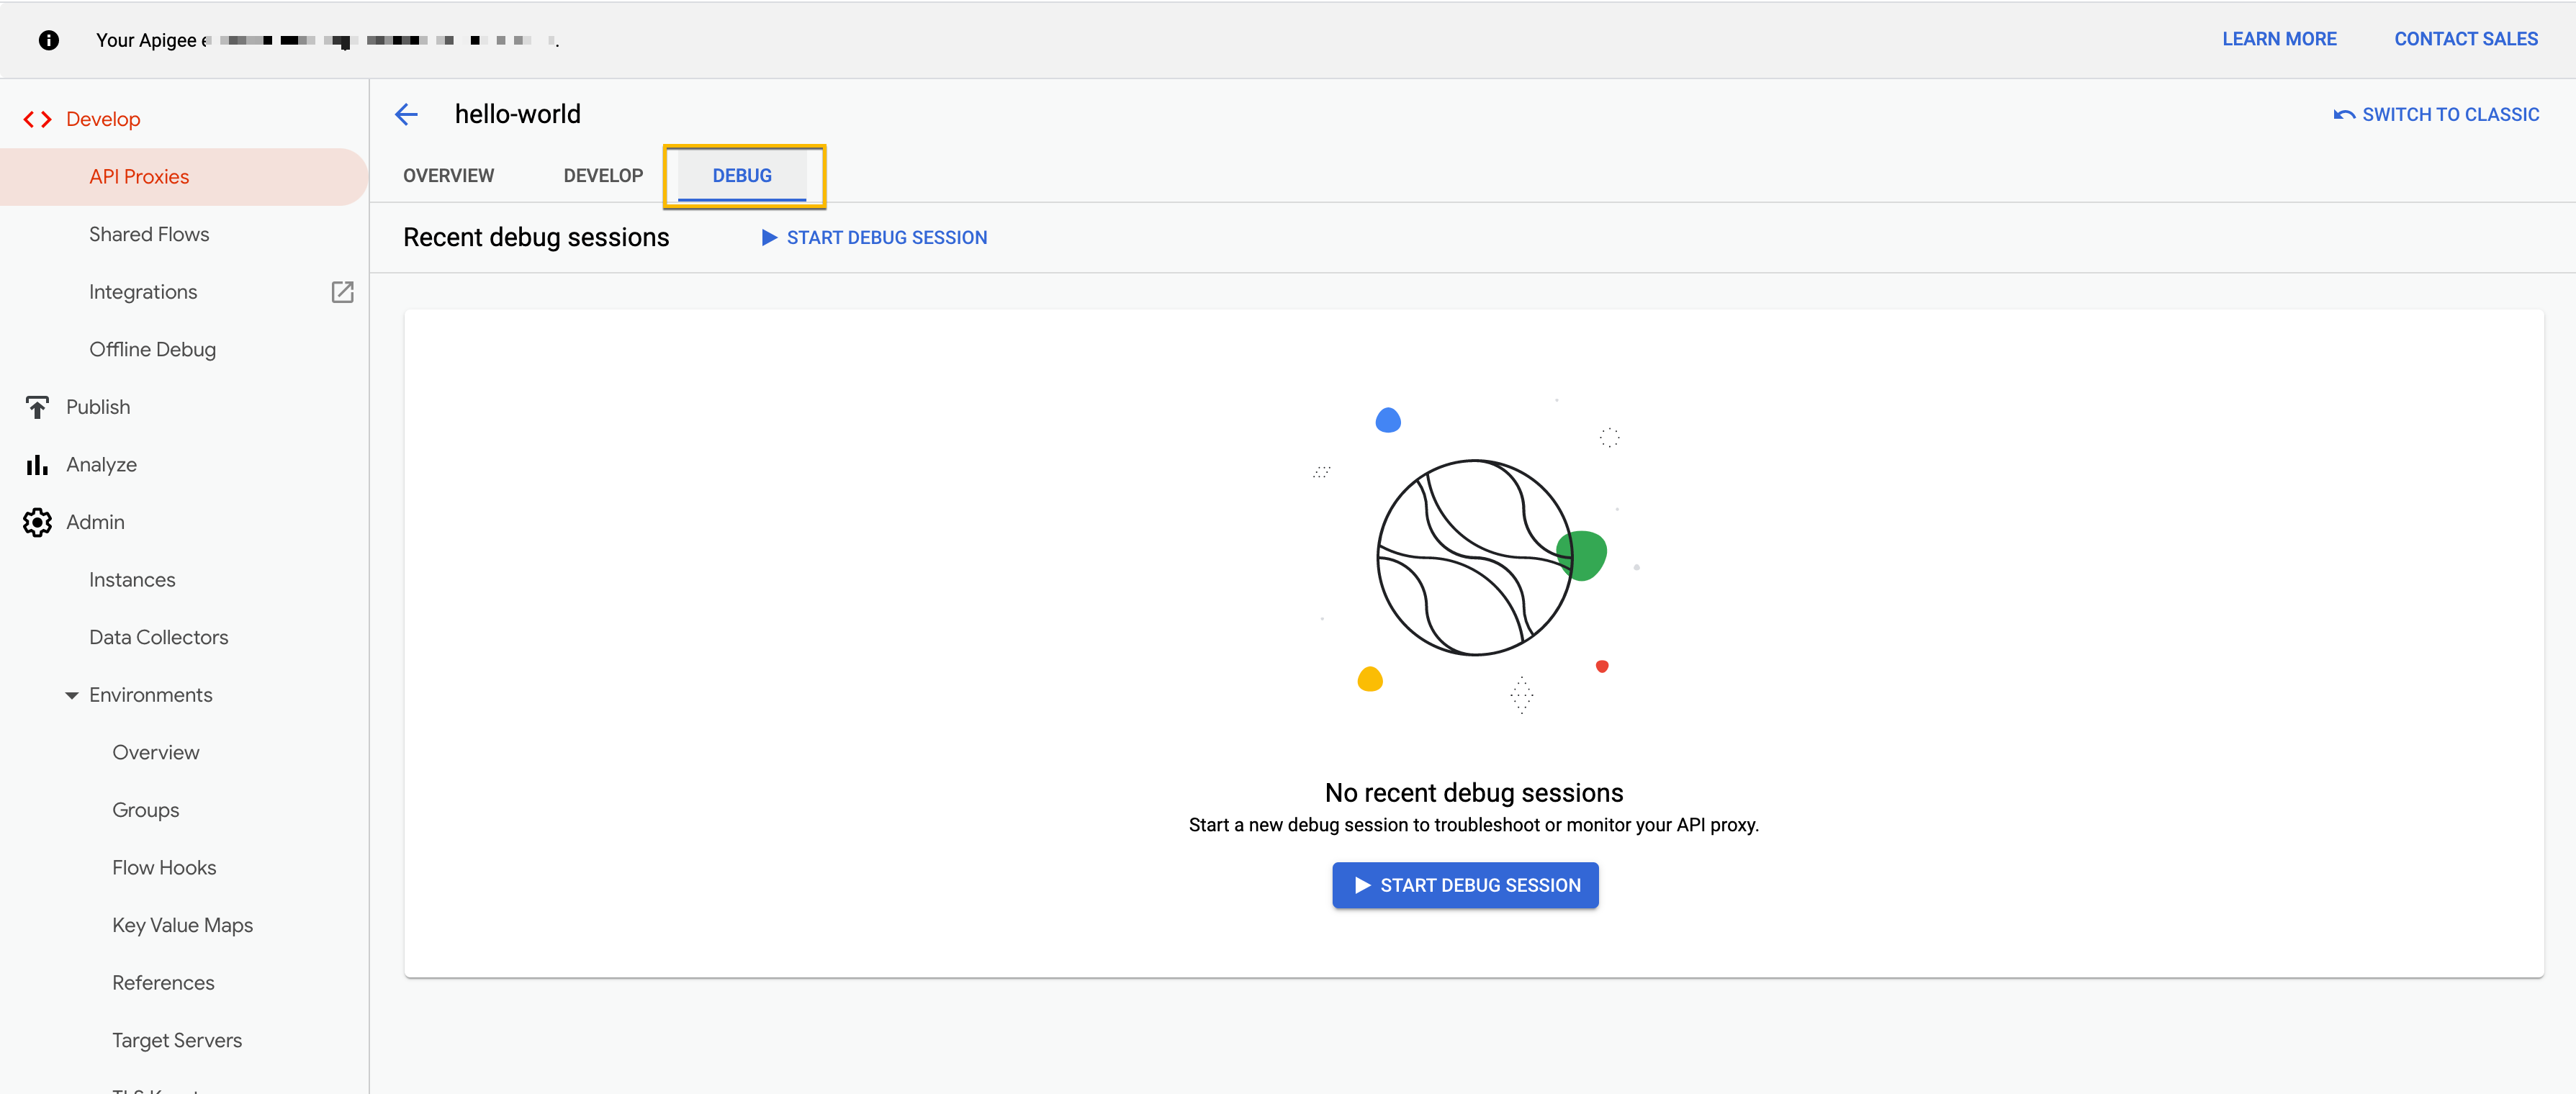
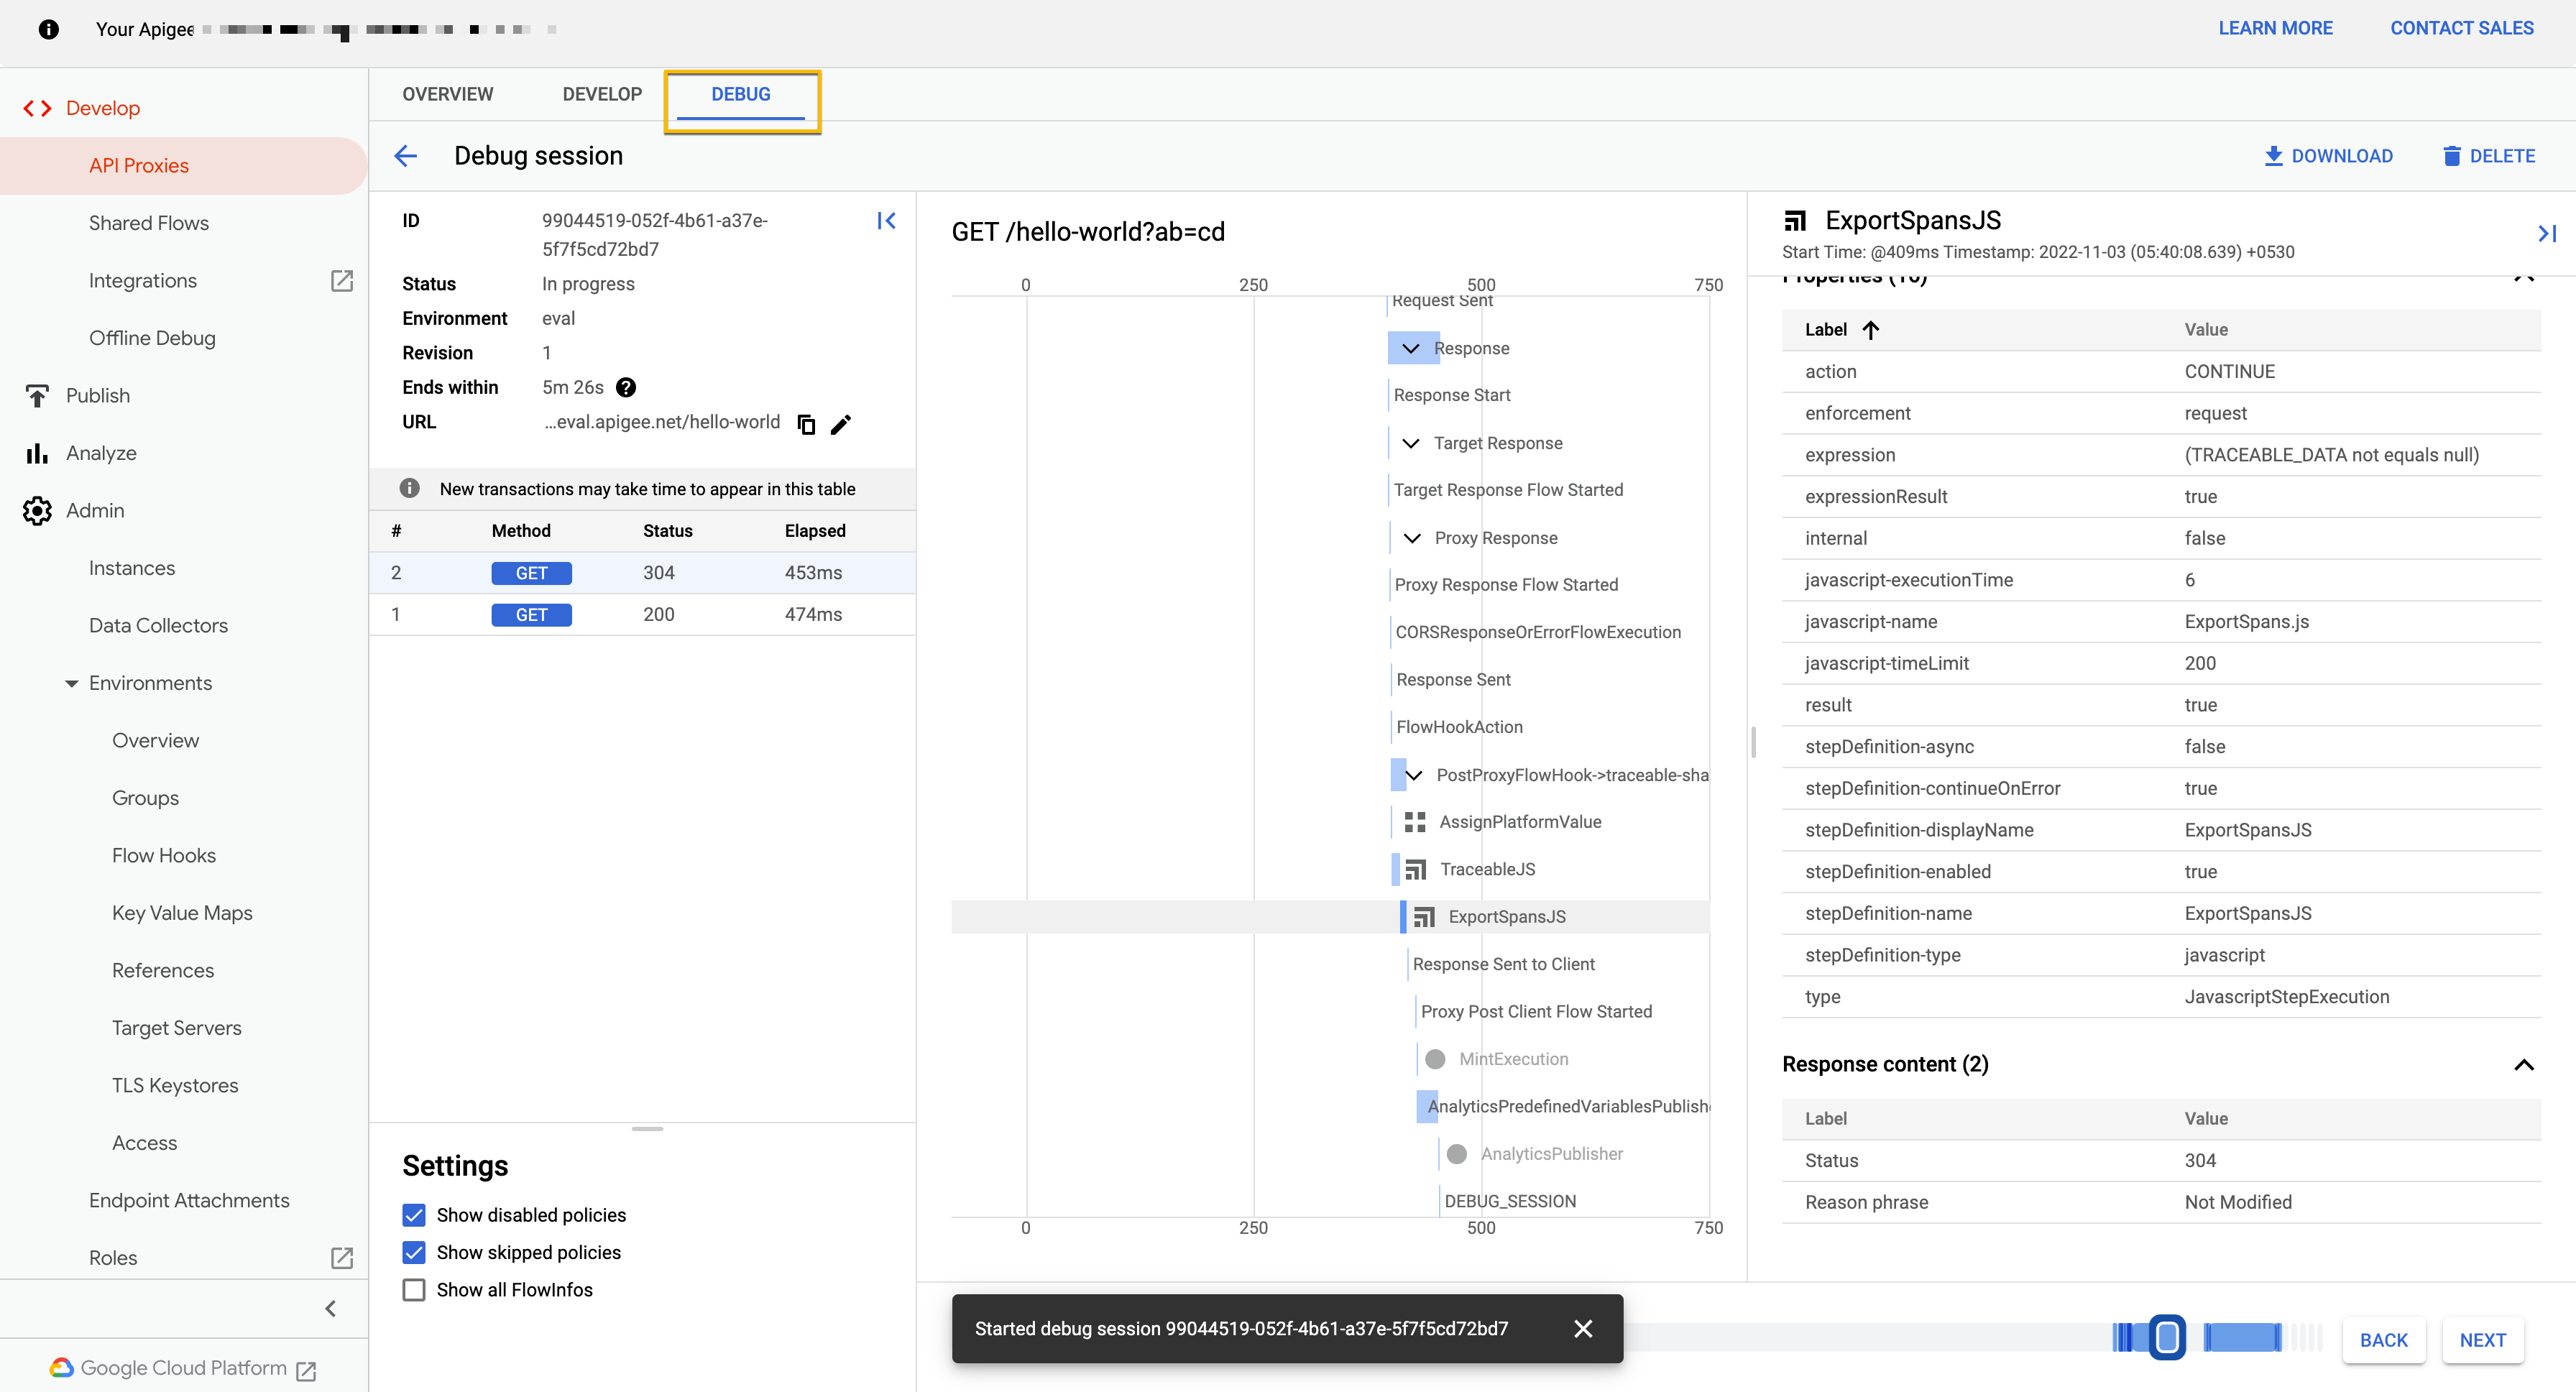
In Apigee UI, you can go to any API Proxy on which a Traceable agent is attached, and click on the Traces/Debug tab. Start the trace session, send a request, and check the flow of request and variables in TraceableJS policy on both the request and response side. Verify that ExportSpansJS policy was executed on the Response side (not skipped).
Make sure connection from Apigee to Traceable Platform is proper.

Was this article helpful?